User Manual
Page 11
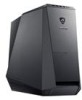
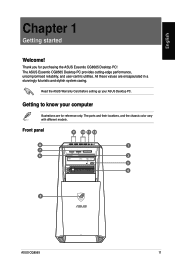
... 12 8 1 7 6 2 3 4 5 ASUS CG8565 11 Read the ASUS Warranty Card before setting up your computer Illustrations are encapsulated in a stunningly futuristic and stylish system casing. All these values are for purchasing the ASUS Essentio CG8565 Desktop PC! The ports and their locations, and ...the chassis color vary with different models. English Chapter 1 Getting started Welcome! The ASUS Essentio CG8565 Desktop PC provides cutting-edge performance, uncompromised ...
... 12 8 1 7 6 2 3 4 5 ASUS CG8565 11 Read the ASUS Warranty Card before setting up your computer Illustrations are encapsulated in a stunningly futuristic and stylish system casing. All these values are for purchasing the ASUS Essentio CG8565 Desktop PC! The ports and their locations, and ...the chassis color vary with different models. English Chapter 1 Getting started Welcome! The ASUS Essentio CG8565 Desktop PC provides cutting-edge performance, uncompromised ...

User Manual
Page 13
HDMI port. ASUS CG8565 13 This port is for a High-Definition Multimedia Interface (HDMI) connector, and is HDCP compliant allowing playback of HD DVD, Blu-ray, and other protected ...
HDMI port. ASUS CG8565 13 This port is for a High-Definition Multimedia Interface (HDMI) connector, and is HDCP compliant allowing playback of HD DVD, Blu-ray, and other protected ...

User Manual
Page 15
...;�o�d�e�l�s�o��n�ly�)�. The display output ports on this optional ASUS Graphics Card may vary with different models. 21. ��E��x�p�a�n�s�i�...;�p�o�r�t�s�(�r�e�m��o�v�a�b��le�)�. ASUS CG8565 15 Remove the expansion slot bracket when installing an expansion card. English 18. ��L�A�N�&#...
...;�o�d�e�l�s�o��n�ly�)�. The display output ports on this optional ASUS Graphics Card may vary with different models. 21. ��E��x�p�a�n�s�i�...;�p�o�r�t�s�(�r�e�m��o�v�a�b��le�)�. ASUS CG8565 15 Remove the expansion slot bracket when installing an expansion card. English 18. ��L�A�N�&#...
User Manual
Page 17
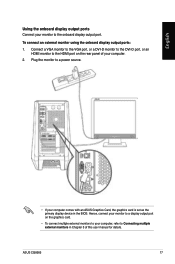
... rear panel of this user manual for details. Plug the monitor to a power source. • If your computer, refer to your computer comes with an ASUS Graphics Card, the graphics card is set as the primary display device in Chapter 3 of your monitor to the onboard display output port. To connect... an HDMI monitor to the HDMI port on the graphics card. • To connect multiple external monitors to Connecting multiple external monitors in the BIOS. ASUS CG8565 17 English Using the onboard display output ports Connect your computer. 2.
... rear panel of this user manual for details. Plug the monitor to a power source. • If your computer, refer to your computer comes with an ASUS Graphics Card, the graphics card is set as the primary display device in Chapter 3 of your monitor to the onboard display output port. To connect... an HDMI monitor to the HDMI port on the graphics card. • To connect multiple external monitors to Connecting multiple external monitors in the BIOS. ASUS CG8565 17 English Using the onboard display output ports Connect your computer. 2.
User Manual
Page 19
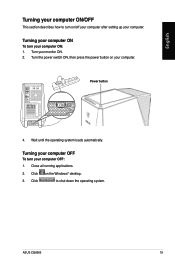
Turning your computer ON To turn your computer OFF: 1. Turn the power switch ON, then press the power button on the Windows® desktop. 3. Click on your computer. Turning your computer OFF To turn your computer ON: 1. Close all running applications. 2. English Turning your computer ON/OFF This section describes how to shut down the operating system. Click to turn on/off your computer after setting up your monitor ON. 2. Wait until the operating system loads automatically. Turn your computer. Power button E-SATA 4. ASUS CG8565 19
Turning your computer ON To turn your computer OFF: 1. Turn the power switch ON, then press the power button on the Windows® desktop. 3. Click on your computer. Turning your computer OFF To turn your computer ON: 1. Close all running applications. 2. English Turning your computer ON/OFF This section describes how to shut down the operating system. Click to turn on/off your computer after setting up your monitor ON. 2. Wait until the operating system loads automatically. Turn your computer. Power button E-SATA 4. ASUS CG8565 19
User Manual
Page 21
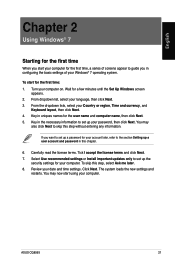
Carefully read the license terms. Tick I accept the license terms and click Next. 7. ASUS CG8565 21 Turn your Country or region, Time and currency, and Keyboard layout, then click Next. 4. From the dropdown lists, select your computer on. Key in ...
Carefully read the license terms. Tick I accept the license terms and click Next. 7. ASUS CG8565 21 Turn your Country or region, Time and currency, and Keyboard layout, then click Next. 4. From the dropdown lists, select your computer on. Key in ...

User Manual
Page 23
... the Start menu or taskbar. 3. From the jumplist, right-click the item that you want to this list. From the taskbar, right-click an icon. 2. ASUS CG8565 23 Select Pin to Taskbar or Pin to the jumplist: 1. From the Start menu, right-click the program that you want to pin, then select...
... the Start menu or taskbar. 3. From the jumplist, right-click the item that you want to this list. From the taskbar, right-click an icon. 2. ASUS CG8565 23 Select Pin to Taskbar or Pin to the jumplist: 1. From the Start menu, right-click the program that you want to pin, then select...

User Manual
Page 25
... folders: 1. From the navigation pane, select the location of your preferred sorting type. From the menu that appears, select Sort by , then select your data. 3. ASUS CG8565 25 From the breadcrumb bar, click the arrow to view the file/folder. From the toolbar, click the View icon . 4. Customizing the file/folder view...
... folders: 1. From the navigation pane, select the location of your preferred sorting type. From the menu that appears, select Sort by , then select your data. 3. ASUS CG8565 25 From the breadcrumb bar, click the arrow to view the file/folder. From the toolbar, click the View icon . 4. Customizing the file/folder view...
User Manual
Page 27
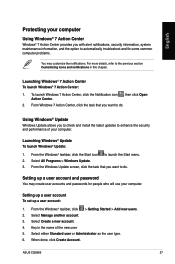
.... 4. Launching Windows® 7 Action Center To launch Windows® 7 Action Center: 1. From the Windows® taskbar, click the Start icon to launch the Start menu. 2. ASUS CG8565 27 Select All Programs > Windows Update. 3. To launch Windows 7 Action Center, click the Notification icon , then click Open Action Center. 2. From the Windows® taskbar...
.... 4. Launching Windows® 7 Action Center To launch Windows® 7 Action Center: 1. From the Windows® taskbar, click the Start icon to launch the Start menu. 2. ASUS CG8565 27 Select All Programs > Windows Update. 3. To launch Windows 7 Action Center, click the Notification icon , then click Open Action Center. 2. From the Windows® taskbar...
User Manual
Page 29
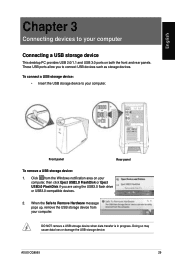
ASUS CG8565 29 Front panel Rear panel To remove a USB storage device: 1. When the Safe to Remove Hardware message pops up, remove the USB storage device from ...
ASUS CG8565 29 Front panel Rear panel To remove a USB storage device: 1. When the Safe to Remove Hardware message pops up, remove the USB storage device from ...

User Manual
Page 31
English Connecting 4-channel Speakers Connecting 6-channel Speakers ASUS CG8565 31
English Connecting 4-channel Speakers Connecting 6-channel Speakers ASUS CG8565 31
User Manual
Page 33
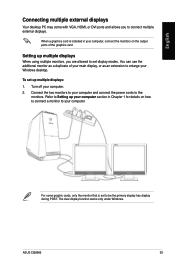
... displays Your desktop PC may come with VGA, HDMI, or DVI ports and allows you are allowed to the monitors. Turn off your Windows desktop. ASUS CG8565 33
... displays Your desktop PC may come with VGA, HDMI, or DVI ports and allows you are allowed to the monitors. Turn off your Windows desktop. ASUS CG8565 33
User Manual
Page 35
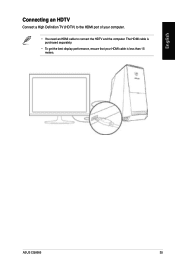
The HDMI cable is purchased separately. • To get the best display performance, ensure that your computer. • You need an HDMI cable to connect the HDTV and the computer. English Connecting an HDTV Connect a High Definition TV (HDTV) to the HDMI port of your HDMI cable is less than 15 meters. ASUS CG8565 35
The HDMI cable is purchased separately. • To get the best display performance, ensure that your computer. • You need an HDMI cable to connect the HDTV and the computer. English Connecting an HDTV Connect a High Definition TV (HDTV) to the HDMI port of your HDMI cable is less than 15 meters. ASUS CG8565 35
User Manual
Page 37
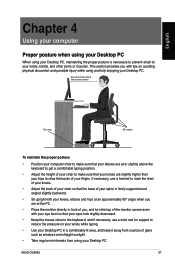
If necessary, use a wrist rest for support to your wrists, hands, and other joints or muscles. ASUS CG8565 37 This section provides you , and turn the top of the monitor screen even with your eye level so that your eyes look slightly downward. &#...
If necessary, use a wrist rest for support to your wrists, hands, and other joints or muscles. ASUS CG8565 37 This section provides you , and turn the top of the monitor screen even with your eye level so that your eyes look slightly downward. &#...

User Manual
Page 39
... the taskbar, click Computer, and then double-click the CD/DVD drive icon to open the tray. 3. If AutoPlay is on , press the PUSH button. 2. ASUS CG8565 39 Remove the disc from the AutoPlay window to eject the tray: • Press the eject button below the drive bay cover to access the...
... the taskbar, click Computer, and then double-click the CD/DVD drive icon to open the tray. 3. If AutoPlay is on , press the PUSH button. 2. ASUS CG8565 39 Remove the disc from the AutoPlay window to eject the tray: • Press the eject button below the drive bay cover to access the...
User Manual
Page 41
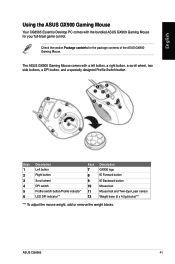
...blocks)*** *** To adjust the mouse weight, add or remove the weight blocks. ASUS CG8565 41 The ASUS GX900 Gaming Mouse comes with the bundled ASUS GX900 Gaming Mouse for the package contents of the ASUS GX900 Gaming Mouse. Check the section Package contents for your full-blast game control.... English Using the ASUS GX900 Gaming Mouse Your CG8565 Essentio Desktop PC comes with a left button, ...
...blocks)*** *** To adjust the mouse weight, add or remove the weight blocks. ASUS CG8565 41 The ASUS GX900 Gaming Mouse comes with the bundled ASUS GX900 Gaming Mouse for the package contents of the ASUS GX900 Gaming Mouse. Check the section Package contents for your full-blast game control.... English Using the ASUS GX900 Gaming Mouse Your CG8565 Essentio Desktop PC comes with a left button, ...
User Manual
Page 43
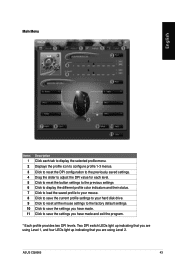
... button settings to the previous settings Click to configure profile 1-3 menus. Click to load the saved profile to save the settings you are using Level 2. ASUS CG8565 43 Click to your mouse. Displays the profile icon to display the different profile color indicators and their status. Two DPI switch LEDs light up...
... button settings to the previous settings Click to configure profile 1-3 menus. Click to load the saved profile to save the settings you are using Level 2. ASUS CG8565 43 Click to your mouse. Displays the profile icon to display the different profile color indicators and their status. Two DPI switch LEDs light up...
User Manual
Page 45
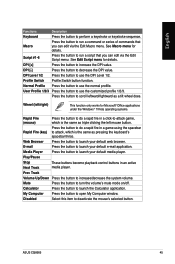
... do a rapid fire in an active media player. Media Player Press the button to attack, which is the same as pressing the keyboard's spacebar thrice. ASUS CG8565 45 DPI Level 1/2 Press the button to increase/decrease the system volume. Prev Track Volume Up/Down Press the button to use the normal profille...
... do a rapid fire in an active media player. Media Player Press the button to attack, which is the same as pressing the keyboard's spacebar thrice. ASUS CG8565 45 DPI Level 1/2 Press the button to increase/decrease the system volume. Prev Track Volume Up/Down Press the button to use the normal profille...

User Manual
Page 47
.... Stop Click to your hard disk drive. Fire Sets the script to move up /down Click to run at a click and stop when clicked again. ASUS CG8565 47 Edit Script menu English Items Description Edit Script Click to start recording the keystrokes and/or mouse actions. Otherwise, any new instruction will be...
.... Stop Click to your hard disk drive. Fire Sets the script to move up /down Click to run at a click and stop when clicked again. ASUS CG8565 47 Edit Script menu English Items Description Edit Script Click to start recording the keystrokes and/or mouse actions. Otherwise, any new instruction will be...

User Manual
Page 49
... cable to connect your DSL/cable modem. 2. Set up your computer. 4. Turn on the rear panel of an RJ-45 cable to a DSL/cable modem. 3. ASUS CG8565 49 Contact your Internet Service Provider (ISP) for details or assistance in setting up your computer and the other end to the LAN (RJ-45...
... cable to connect your DSL/cable modem. 2. Set up your computer. 4. Turn on the rear panel of an RJ-45 cable to a DSL/cable modem. 3. ASUS CG8565 49 Contact your Internet Service Provider (ISP) for details or assistance in setting up your computer and the other end to the LAN (RJ-45...


