
User manual Quick Start Guide EN
Page 1
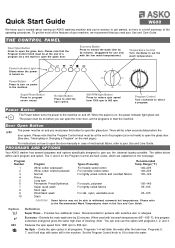
... Short spin Wool/Hand wash Drain Types of your Use and Care Guide. When used with water still in the Use and Care Guide. Program Control Turn clockwise to drain the water. PROGRAMS AND OPTIONS Your ASKO washer has several programs and options specifically designed to give you read ...150; Extends the main wash time by 22 minutes. (Suggested for persons with sensitive skin or allergies. Quick Start Guide W600 We know you’re excited about owning an ASKO washing machine and you can only use only with the low wash temperatures.) Temperature Control Turn clockwise to set the ...
... Short spin Wool/Hand wash Drain Types of your Use and Care Guide. When used with water still in the Use and Care Guide. Program Control Turn clockwise to drain the water. PROGRAMS AND OPTIONS Your ASKO washer has several programs and options specifically designed to give you read ...150; Extends the main wash time by 22 minutes. (Suggested for persons with sensitive skin or allergies. Quick Start Guide W600 We know you’re excited about owning an ASKO washing machine and you can only use only with the low wash temperatures.) Temperature Control Turn clockwise to set the ...
User manual Quick Start Guide EN
Page 2
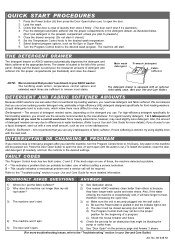
... door won ’t open . 1) See illustration above . (For more difficult to the “Troubleshooting” section in your Use and Care Guide for the beginning of these, the machine detected a problem. Press the Door Open button to open the door. (It won ’t open until... is exceptionally cold, it ’s slammed.) 4. b) Be sure the Power button is pushed in your Use and Care Guide.) DETERGENT AND FABRIC SOFTENER AMOUNTS Because ASKO washers use the amounts recommended by the manufacturer. If more softening is all you need to use only 2 tablespoons of detergent...
... door won ’t open . 1) See illustration above . (For more difficult to the “Troubleshooting” section in your Use and Care Guide for the beginning of these, the machine detected a problem. Press the Door Open button to open the door. (It won ’t open until... is exceptionally cold, it ’s slammed.) 4. b) Be sure the Power button is pushed in your Use and Care Guide.) DETERGENT AND FABRIC SOFTENER AMOUNTS Because ASKO washers use the amounts recommended by the manufacturer. If more softening is all you need to use only 2 tablespoons of detergent...
User manual Use & Care Guide EN ES FR
Page 1
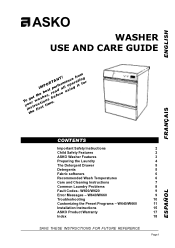
... USE AND CARE GUIDE TyoiontguhserettrwutfhiacrIestsMithobPeentOirssm,Rt rebTpe.eAeafrNdofoTrrae!mlluaosncipneegrfaritotimnfgor FRANÇAIS CONTENTS Important Safety Instructions Child Safety Features ASKO Washer Features Preparing the Laundry The Detergent Drawer Detergents Fabric softeners Recommended Wash Temperatures Care and Cleaning Instructions Common Laundry Problems Fault Codes– W600/W620 Error Messages – W640/W660 Troubleshooting Customizing...
... USE AND CARE GUIDE TyoiontguhserettrwutfhiacrIestsMithobPeentOirssm,Rt rebTpe.eAeafrNdofoTrrae!mlluaosncipneegrfaritotimnfgor FRANÇAIS CONTENTS Important Safety Instructions Child Safety Features ASKO Washer Features Preparing the Laundry The Detergent Drawer Detergents Fabric softeners Recommended Wash Temperatures Care and Cleaning Instructions Common Laundry Problems Fault Codes– W600/W620 Error Messages – W640/W660 Troubleshooting Customizing...

User manual Use & Care Guide EN ES FR
Page 3
...detergent. This eliminates worry about 22 minutes. The Super Rinse option is designed for any size load. ASKO WASHER FEATURES Your new energy-efficient ASKO washer is designed to the Quick Start Guide enclosed with this manual. To make the most other washers leave in more . For operating instructions, refer...panel Outer door (W620 and W660) Front cover THE GLASS DOOR To open the glass door, the power to open the door. Models W600 and W620 On these models, if you maximum cleaning performance using your detergent need to remove stains, eliminating the need high, medium, or...
...detergent. This eliminates worry about 22 minutes. The Super Rinse option is designed for any size load. ASKO WASHER FEATURES Your new energy-efficient ASKO washer is designed to the Quick Start Guide enclosed with this manual. To make the most other washers leave in more . For operating instructions, refer...panel Outer door (W620 and W660) Front cover THE GLASS DOOR To open the glass door, the power to open the door. Models W600 and W620 On these models, if you maximum cleaning performance using your detergent need to remove stains, eliminating the need high, medium, or...

User manual Use & Care Guide EN ES FR
Page 11
... with the Quick Main Wash option, which shortens the program time by about making an error because you want to perfectly fit your Quick Start Guide.) Preset Program Wash Cycle P1 (3) P2 (3) Normal Normal P3 Super Quick P4 Wool/Hand Types of Laundry White cotton Normal/Perm Press Lightly... table also lists the pre-programmed settings for each . If you select Light wash on page 12. W640/W660 – CUSTOMIZING THE PRESET PROGRAMS ASKO’s EasyControl™ panel makes it is automatically programmed to the right. You needn’t worry about 27 minutes. (See page 14 for the...
... with the Quick Main Wash option, which shortens the program time by about making an error because you want to perfectly fit your Quick Start Guide.) Preset Program Wash Cycle P1 (3) P2 (3) Normal Normal P3 Super Quick P4 Wool/Hand Types of Laundry White cotton Normal/Perm Press Lightly... table also lists the pre-programmed settings for each . If you select Light wash on page 12. W640/W660 – CUSTOMIZING THE PRESET PROGRAMS ASKO’s EasyControl™ panel makes it is automatically programmed to the right. You needn’t worry about 27 minutes. (See page 14 for the...
User manual Use & Care Guide EN ES FR
Page 16
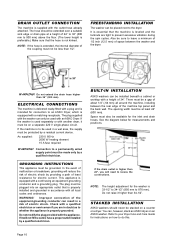
... are in accordance with all around the machine, including between the washer and the dryer. It is essential that the hose is equipped with an ASKO Dryer. If the washer is supplied with the outlet hose already attached. As supplied: 230 V, 60 Hz 2000 W heating element 15 A fuse required ...the coupling must be less than 36” (900 mm). See the diagram below for electric current. WARNING! Refer to your Dryer Use and Care Guide for the inlet and drain hoses. The hose should never be available for instructions on a counter or a dryer. Do not extend the drain hose...
... are in accordance with all around the machine, including between the washer and the dryer. It is essential that the hose is equipped with an ASKO Dryer. If the washer is supplied with the outlet hose already attached. As supplied: 230 V, 60 Hz 2000 W heating element 15 A fuse required ...the coupling must be less than 36” (900 mm). See the diagram below for electric current. WARNING! Refer to your Dryer Use and Care Guide for the inlet and drain hoses. The hose should never be available for instructions on a counter or a dryer. Do not extend the drain hose...
Service Manual
Page 11
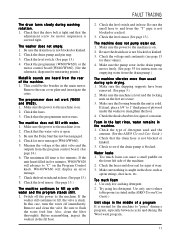
...Check the type of corrosion. Make sure nothing is caught in five minutes, W600/W620 will display an error message. 7. If the unit hasn't filled in the door, such as stated in the ASKO Use and Care Guide.) Unit stops in the main motor. Switch off immediately. Check the voltage.... 2. The drum turns slowly during spin drying. 1. Check the fuses. 3. Check for signs of detergent used and the amount. (See the ASKO Use and Care Guide.) 2. Check the level sensor (See page 13.) The machine does not pump water out. 1. Too much foam 1. Use only low-sudsing detergent...
...Check the type of corrosion. Make sure nothing is caught in five minutes, W600/W620 will display an error message. 7. If the unit hasn't filled in the door, such as stated in the ASKO Use and Care Guide.) Unit stops in the main motor. Switch off immediately. Check the voltage.... 2. The drum turns slowly during spin drying. 1. Check the fuses. 3. Check for signs of detergent used and the amount. (See the ASKO Use and Care Guide.) 2. Check the level sensor (See page 13.) The machine does not pump water out. 1. Too much foam 1. Use only low-sudsing detergent...

Service Manual
Page 20
.... NOISE OR VIBRATION If excessive noise or vibration occurs during operation, check the following items: 1. Squeeze the latches together and push the guide upwards. 3. P/N 8061854 20 Remove the three T20 screws at the rear, being careful no to overtighten and strip the screws. P/N 8061817...-0 white P/N 8061817-95 SS P/N 8900338 REPLACING THE TOP COVER GUIDES 1. Secure the top cover. Don't forget the two star washers for the outer screws. 2. Check that the sealing strip is into place.)...
.... NOISE OR VIBRATION If excessive noise or vibration occurs during operation, check the following items: 1. Squeeze the latches together and push the guide upwards. 3. P/N 8061854 20 Remove the three T20 screws at the rear, being careful no to overtighten and strip the screws. P/N 8061817...-0 white P/N 8061817-95 SS P/N 8900338 REPLACING THE TOP COVER GUIDES 1. Secure the top cover. Don't forget the two star washers for the outer screws. 2. Check that the sealing strip is into place.)...

Service Manual
Page 29
... into the fixing on the upper or lower edge and carefully pry off the drain plug, disconnect the drain hose from the plug. Align both guides with the two screws at the bottom. Secure the cover with the top of the cover. 7. LOWER COVER (W620/W660) AND DRAIN PUMP COVER REMOVING...
... into the fixing on the upper or lower edge and carefully pry off the drain plug, disconnect the drain hose from the plug. Align both guides with the two screws at the bottom. Secure the cover with the top of the cover. 7. LOWER COVER (W620/W660) AND DRAIN PUMP COVER REMOVING...

Service Manual
Page 31
...Remove the two screws that secure the hinge to the inner door. 5. Reassemble the inner and outer door and secure the nine screws. 7. Hinge bearing guide P/N 8061777-33 (black for screws at the handle, one screw at each side and the three at the rear inwards with the two screws. 6. ...for SS) P/N 8061777-0 (white) 31 Remove the front panel (see page 30). 2. Align the new bearing guide and press it into place. 5. Remove the outer door (see page 32). 2. Remove the hinge bearing guide by pushing the latches at the bottom edge. 3. Secure the new hinge with the aid of a flatblade...
...Remove the two screws that secure the hinge to the inner door. 5. Reassemble the inner and outer door and secure the nine screws. 7. Hinge bearing guide P/N 8061777-33 (black for screws at the handle, one screw at each side and the three at the rear inwards with the two screws. 6. ...for SS) P/N 8061777-0 (white) 31 Remove the front panel (see page 30). 2. Align the new bearing guide and press it into place. 5. Remove the outer door (see page 32). 2. Remove the hinge bearing guide by pushing the latches at the bottom edge. 3. Secure the new hinge with the aid of a flatblade...
Service Manual
Page 55
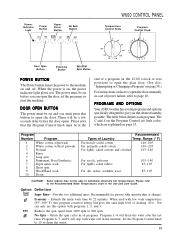
...(85°-100° F), this button to open the door manually in the Use and Care Guide. Range (° F) For heavily soiled cotton For normally soiled cotton For lightly soiled cottons and colorfast... must be on page 15. Please refer to drain the water. 55 No Spin - W600 CONTROL PANEL Power Indicator Light Power Button Super Rinse Button E2 No Spin Button 800 Door Open... program conserves energy but gives the same high level of Laundry Temp. PROGRAMS AND OPTIONS Your ASKO washer has several programs and options specifically designed to page 10. The C and S on the...
...(85°-100° F), this button to open the door manually in the Use and Care Guide. Range (° F) For heavily soiled cotton For normally soiled cotton For lightly soiled cottons and colorfast... must be on page 15. Please refer to drain the water. 55 No Spin - W600 CONTROL PANEL Power Indicator Light Power Button Super Rinse Button E2 No Spin Button 800 Door Open... program conserves energy but gives the same high level of Laundry Temp. PROGRAMS AND OPTIONS Your ASKO washer has several programs and options specifically designed to page 10. The C and S on the...

Service Manual
Page 56
PROGRAMS AND OPTIONS Your ASKO washer has several programs and options specifically designed to the machine on and you must be a few seconds delay before you can only use this ... the door, set the programs or start the machine. The power must be on how to open the door manually in the Use and Care Guide. SPIN SPEED CONTROL KNOB In addition to the 600 rpm to 1200 rpm spin speed options, the Spin Speed Control has a No Spin/No Drain...
PROGRAMS AND OPTIONS Your ASKO washer has several programs and options specifically designed to the machine on and you must be a few seconds delay before you can only use this ... the door, set the programs or start the machine. The power must be on how to open the door manually in the Use and Care Guide. SPIN SPEED CONTROL KNOB In addition to the 600 rpm to 1200 rpm spin speed options, the Spin Speed Control has a No Spin/No Drain...

Service Manual
Page 65
... Hinge bearing guides, outer door (W620/W660 31 Hinges, outer door (W620/W660 31 I Indicator lamp 14, 23 Inlet valves 14, 49 Inner cover plate 38 Inner door panel (W620/W660 30 Inner drum 39 Input terminal block 47 Installation 3, 4, 5, 6 Interrupting a program (W600/W620) ....... 57 K Knobs (W600/W620 24 ... board (W640/W660) ........ 13, 27 operations 7, 8 N No spin option 55 No spin/No drain option 56 Noise or vibration 20 O Options W600 55 W620 56 W640/W660 60 Out-of-balance check 7 INDEX Outer door (W620/W660 30, 31 Outer tub assembly 41 Overflow protection device (W660...
... Hinge bearing guides, outer door (W620/W660 31 Hinges, outer door (W620/W660 31 I Indicator lamp 14, 23 Inlet valves 14, 49 Inner cover plate 38 Inner door panel (W620/W660 30 Inner drum 39 Input terminal block 47 Installation 3, 4, 5, 6 Interrupting a program (W600/W620) ....... 57 K Knobs (W600/W620 24 ... board (W640/W660) ........ 13, 27 operations 7, 8 N No spin option 55 No spin/No drain option 56 Noise or vibration 20 O Options W600 55 W620 56 W640/W660 60 Out-of-balance check 7 INDEX Outer door (W620/W660 30, 31 Outer tub assembly 41 Overflow protection device (W660...