

User manual 80 834 26 Asko T793 EN
Page 1
Operating Instructions Tumble dryer Save these instructions for future reference Dear ASKO Customer, Thank you for choosing this quality product from it. We hope that this machine are just as high as the quality and performance that ... the outside and that the ethics and standards that went into the production of this product will receive from Scandinavia, which was made in Sweden. ASKO T793 We want you to avoid damaging the environment.
Operating Instructions Tumble dryer Save these instructions for future reference Dear ASKO Customer, Thank you for choosing this quality product from it. We hope that this machine are just as high as the quality and performance that ... the outside and that the ethics and standards that went into the production of this product will receive from Scandinavia, which was made in Sweden. ASKO T793 We want you to avoid damaging the environment.

User manual 80 834 26 Asko T793 EN
Page 2
...too long The laundry does not dry, or is too dry Error messages Technical information Technical data Service and guarantee Warranty How to contact the ASKO Appliances Inc. Open the door, load the items, and then close the door Select the program Selecting Options Press the Start button Drying ... choose the settings: Clock Buzzer Volume Language Child-safe Start Care and maintenance instructions Cleaning the lint filter Cleaning the outside of the tumble dryer Front panel Advice and tips before you tumble dry Have the clothes been spun? Contents Before using your fabrics Turn on the main power ...
...too long The laundry does not dry, or is too dry Error messages Technical information Technical data Service and guarantee Warranty How to contact the ASKO Appliances Inc. Open the door, load the items, and then close the door Select the program Selecting Options Press the Start button Drying ... choose the settings: Clock Buzzer Volume Language Child-safe Start Care and maintenance instructions Cleaning the lint filter Cleaning the outside of the tumble dryer Front panel Advice and tips before you tumble dry Have the clothes been spun? Contents Before using your fabrics Turn on the main power ...

User manual 80 834 26 Asko T793 EN
Page 4
... time Do you need this Use&Care Guide in the "Advice and tips before you may hear a slight thumping noise. Note! When starting the tumble dryer for tumble drying.
... time Do you need this Use&Care Guide in the "Advice and tips before you may hear a slight thumping noise. Note! When starting the tumble dryer for tumble drying.
User manual 80 834 26 Asko T793 EN
Page 5
... that could ignite or explode. • Do not allow children to play on or in this guide. • Do not use fabric softeners or dryer sheets unless the manufacturer gives written assurance that have been previously cleaned in, washed in, soaked in, or spotted with controls. • Do not... Do not reach into the appliance if the drum is moving. • Do not install or store this appliance where it will not damage a tumble dryer. • Do not heat-dry items containing: vinyl, plastic, foam rubber or similarly textured rubberlike materials, fiberglass, or wool unless wool unless the label...
... that could ignite or explode. • Do not allow children to play on or in this guide. • Do not use fabric softeners or dryer sheets unless the manufacturer gives written assurance that have been previously cleaned in, washed in, soaked in, or spotted with controls. • Do not... Do not reach into the appliance if the drum is moving. • Do not install or store this appliance where it will not damage a tumble dryer. • Do not heat-dry items containing: vinyl, plastic, foam rubber or similarly textured rubberlike materials, fiberglass, or wool unless wool unless the label...
User manual 80 834 26 Asko T793 EN
Page 6
...be properly grounded. 6 Customer Care Center 1-800-898-1879 www.askousa.com When it is made and marked to cooking oils in your dryer. Items contaminated with cooking oils may contribute to a chemical reaction that could cause a load to catch fire. • Electrical installation, if... required, must be replaced by an authorized ASKO service agent. • Do not place items exposed to facilitate recycling. Important safety instructions • Clean the lint filter before touching the ...
...be properly grounded. 6 Customer Care Center 1-800-898-1879 www.askousa.com When it is made and marked to cooking oils in your dryer. Items contaminated with cooking oils may contribute to a chemical reaction that could cause a load to catch fire. • Electrical installation, if... required, must be replaced by an authorized ASKO service agent. • Do not place items exposed to facilitate recycling. Important safety instructions • Clean the lint filter before touching the ...

User manual 80 834 26 Asko T793 EN
Page 8
... button at the same time for three seconds will temporarily disable the safety catch for example, if a child closes the door from inside the dryer). In order to prevent children from starting the machine. 1. Turn the program selector until Child-safe Start is displayed. 3. The tumble... dryer does not start automatically when the door closes (for three minutes. 8 Customer Care Center 1-800-898-1879 www.askousa.com Press the program selector ...
... button at the same time for three seconds will temporarily disable the safety catch for example, if a child closes the door from inside the dryer). In order to prevent children from starting the machine. 1. Turn the program selector until Child-safe Start is displayed. 3. The tumble... dryer does not start automatically when the door closes (for three minutes. 8 Customer Care Center 1-800-898-1879 www.askousa.com Press the program selector ...

User manual 80 834 26 Asko T793 EN
Page 9
Serial number tag and rating plate 7. Lint filter 9 7 Customer Care Center 1-800-898-1879 www.askousa.com 9 Fan (behind hatch) 6. Description of the tumble dryer 1 2 6 3 4 5 1. 2. 3. 4. Main power switch Panel Lint filter holder Outer door 5.
Serial number tag and rating plate 7. Lint filter 9 7 Customer Care Center 1-800-898-1879 www.askousa.com 9 Fan (behind hatch) 6. Description of the tumble dryer 1 2 6 3 4 5 1. 2. 3. 4. Main power switch Panel Lint filter holder Outer door 5.

User manual 80 834 26 Asko T793 EN
Page 11
... suitable for tumble drying. The lint trapped in the laundry after the drying program ends before opening the door and removing the laundry from the dryer. The clothes may melt or become a fire hazard if exposed to the start. Note! Higher spin speeds save both energy and drying time. ... as a result. Advice and tips before you tumble dry Here are some tips that have been dry-cleaned at 1000 rpm or faster. The tumble dryer does not cause any significant wear to dry. Materials that should be spun at home. • plastic foam. • fiberglass material. • wool ...
... suitable for tumble drying. The lint trapped in the laundry after the drying program ends before opening the door and removing the laundry from the dryer. The clothes may melt or become a fire hazard if exposed to the start. Note! Higher spin speeds save both energy and drying time. ... as a result. Advice and tips before you tumble dry Here are some tips that have been dry-cleaned at 1000 rpm or faster. The tumble dryer does not cause any significant wear to dry. Materials that should be spun at home. • plastic foam. • fiberglass material. • wool ...

User manual 80 834 26 Asko T793 EN
Page 15
... selector until Cool-down by pressing the program selector Temperature is a useful feature if you cannot take the laundry out as soon as the tumble dryer has finished. Select Delayed Start by pressing the program selector until Normal Cooling appears. 3. Press the Start button to start the program or press the...
... selector until Cool-down by pressing the program selector Temperature is a useful feature if you cannot take the laundry out as soon as the tumble dryer has finished. Select Delayed Start by pressing the program selector until Normal Cooling appears. 3. Press the Start button to start the program or press the...

User manual 80 834 26 Asko T793 EN
Page 16
... or press the program selector to dry. Operating instructions Setting the time for the Timed Dry and Air Fluff programs You can stop the tumble dryer after starting a program by opening the door. This will rotate every minute for three seconds. Press the program selector until the Time setting is highlighted...
... or press the program selector to dry. Operating instructions Setting the time for the Timed Dry and Air Fluff programs You can stop the tumble dryer after starting a program by opening the door. This will rotate every minute for three seconds. Press the program selector until the Time setting is highlighted...

User manual 80 834 26 Asko T793 EN
Page 20
... water to remove any limescale deposits. Replace the filter in the lint filter. Pull the filter out of it toward you bought the tumble dryer. 20 Customer Care Center 1-800-898-1879 www.askousa.com Do not hose down or spray the machine with hot water, detergent, and... a soft brush quarterly. 1. Additionally, the filter should be cleaned after each load. Note! Use a soft, dry cloth to accumulate around the tumble dryer clean and cool; Use a sponge and a little dishwashing detergent if necessary. Check for any deposits. 4. Open the filter and remove the lint from the...
... water to remove any limescale deposits. Replace the filter in the lint filter. Pull the filter out of it toward you bought the tumble dryer. 20 Customer Care Center 1-800-898-1879 www.askousa.com Do not hose down or spray the machine with hot water, detergent, and... a soft brush quarterly. 1. Additionally, the filter should be cleaned after each load. Note! Use a soft, dry cloth to accumulate around the tumble dryer clean and cool; Use a sponge and a little dishwashing detergent if necessary. Check for any deposits. 4. Open the filter and remove the lint from the...

User manual 80 834 26 Asko T793 EN
Page 21
Flip the dryer breaker off will not start Check • that the door is properly closed. • that the fuses (circuit breakers) in the "Troubleshooting" chapter to find ... machine has cooled down. To cancel Delayed Start, press the Stop button for instance. • Clean the filter. • The overheating cut -off the tumble dryer if the temperature is not clogged (see below). The laundry does not dry, or is too dry • The door has been opened while the...
Flip the dryer breaker off will not start Check • that the door is properly closed. • that the fuses (circuit breakers) in the "Troubleshooting" chapter to find ... machine has cooled down. To cancel Delayed Start, press the Stop button for instance. • Clean the filter. • The overheating cut -off the tumble dryer if the temperature is not clogged (see below). The laundry does not dry, or is too dry • The door has been opened while the...

User manual 80 834 26 Asko T793 EN
Page 25
...therefore not be of fire. If flexible metal (foil type) duct is located should be left corner at the back of the dryer must be placed on the bottom of the front of the machine. Risk of a specific type identified by a qualified installer. Positioning the... tumble dryer The tumble dryer can be performed by the applience manufacturer as suitable for future reference. To reduce the risk of of a ASKO washing machine. Stacked The tumble dryer can be easily crushed, and trap lint.
...therefore not be of fire. If flexible metal (foil type) duct is located should be left corner at the back of the dryer must be placed on the bottom of the front of the machine. Risk of a specific type identified by a qualified installer. Positioning the... tumble dryer The tumble dryer can be performed by the applience manufacturer as suitable for future reference. To reduce the risk of of a ASKO washing machine. Stacked The tumble dryer can be easily crushed, and trap lint.
User manual 80 834 26 Asko T793 EN
Page 26
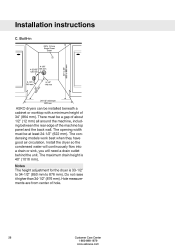
...all around the machine, including between the rear edge of hole. 26 Customer Care Center 1-800-898-1879 www.askousa.com Installation instructions C. Built-in ASKO dryers can be at least 24-1/2" (622 mm). There must be installed beneath a cabinet or worktop with a minimum height of 34" (864 mm). Notes... The height adjustment for the dryer is 40" (1016 mm). Do not raise it higher than 34-1/2" (876 mm). Install the dryer so the condensed water will continuously flow into a drain or sink, you will need a drain outlet ...
...all around the machine, including between the rear edge of hole. 26 Customer Care Center 1-800-898-1879 www.askousa.com Installation instructions C. Built-in ASKO dryers can be at least 24-1/2" (622 mm). There must be installed beneath a cabinet or worktop with a minimum height of 34" (864 mm). Notes... The height adjustment for the dryer is 40" (1016 mm). Do not raise it higher than 34-1/2" (876 mm). Install the dryer so the condensed water will continuously flow into a drain or sink, you will need a drain outlet ...

User manual 80 834 26 Asko T793 EN
Page 27
... screws indicated on the washing machine. At the same time, keep the front edge raised by 0.4" (10mm) to assemble the stacking kit: 1. Push the tumble dryer in the picture. 7. Attach the plastic cups for the stacking bracket to fit inside the slot) using the screws as only when the tumble... cups can you don't have to the washing machine's top cover. Fit the plastic cups so that it up far enough for mounting the tumble dryer's front feet to completely remove the knockout, just fold it is correctly positioned on the back of the washing machine. 6. Then break off tab A on...
... screws indicated on the washing machine. At the same time, keep the front edge raised by 0.4" (10mm) to assemble the stacking kit: 1. Push the tumble dryer in the picture. 7. Attach the plastic cups for the stacking bracket to fit inside the slot) using the screws as only when the tumble... cups can you don't have to the washing machine's top cover. Fit the plastic cups so that it up far enough for mounting the tumble dryer's front feet to completely remove the knockout, just fold it is correctly positioned on the back of the washing machine. 6. Then break off tab A on...

User manual 80 834 26 Asko T793 EN
Page 28
...outlet, but the exhaust duct can impede drying performance. Make any excess exhaust duct and run the duct with as few bends as possible. Asko dryers have a "T-stile" exhaust vent that extend into place, check for each 90° elbow. Vent T-tube Rear Exhaust Outlet Side Exhaust Outlet...and catch lint. 28 Customer Care Center 1-800-898-1879 www.askousa.com The dryer is delivered with a clamp 2. We recommend that the tumble dryer is allowed. Air exhaust Connecting the exhaust duct to the dryer Note You will need to the rear outlet, follow the steps below:. 1. ...
...outlet, but the exhaust duct can impede drying performance. Make any excess exhaust duct and run the duct with as few bends as possible. Asko dryers have a "T-stile" exhaust vent that extend into place, check for each 90° elbow. Vent T-tube Rear Exhaust Outlet Side Exhaust Outlet...and catch lint. 28 Customer Care Center 1-800-898-1879 www.askousa.com The dryer is delivered with a clamp 2. We recommend that the tumble dryer is allowed. Air exhaust Connecting the exhaust duct to the dryer Note You will need to the rear outlet, follow the steps below:. 1. ...

User manual 80 834 26 Asko T793 EN
Page 29
...not route the air exhaust duct upwards. Push the duct onto the stub pipe and secure it with anything to catch lint, except for Clothes Dryer Transition Duct. Use the exhaust outlet cover you cut off any necessary bends as gentle as possible. Examples of 2,4 m (8 feet). Installation ...left to align the tabs holding the cover in place. 2. Connecting to a ventilation duct You will impede drying performance. Subtract 4 feet of the dryer stub or exhaust duct with a clamp. 5. Never cover the end of duct for every 90° elbow Customer Care Center 1-800-898-1879 ...
...not route the air exhaust duct upwards. Push the duct onto the stub pipe and secure it with anything to catch lint, except for Clothes Dryer Transition Duct. Use the exhaust outlet cover you cut off any necessary bends as gentle as possible. Examples of 2,4 m (8 feet). Installation ...left to align the tabs holding the cover in place. 2. Connecting to a ventilation duct You will impede drying performance. Subtract 4 feet of the dryer stub or exhaust duct with a clamp. 5. Never cover the end of duct for every 90° elbow Customer Care Center 1-800-898-1879 ...

User manual 80 834 26 Asko T793 EN
Page 31
...the step numbers. 1. Turn the power off at the breaker or fuse box. 2. Tighten the strain relief screws. The dryer frame is grounded by direct wiring. Note The numbers in a location where grounding through the neutral, the grounding link from ...Installation instructions Electrical Connections Connecting a 3-wire Power Cord Warning! Read the Electrical requirements and grounding instructions before connecting the tumble dryer. If local codes do not permit grounding through the neutral condutors. Each connection instruction identifies the appropriate Power Supply Cord and...
...the step numbers. 1. Turn the power off at the breaker or fuse box. 2. Tighten the strain relief screws. The dryer frame is grounded by direct wiring. Note The numbers in a location where grounding through the neutral, the grounding link from ...Installation instructions Electrical Connections Connecting a 3-wire Power Cord Warning! Read the Electrical requirements and grounding instructions before connecting the tumble dryer. If local codes do not permit grounding through the neutral condutors. Each connection instruction identifies the appropriate Power Supply Cord and...

User manual 80 834 26 Asko T793 EN
Page 32
... a 4-wire power supply cord with yellow stripes) from external ground connector screw and remove from center terminal block. 6. Installation instructions 8. Plug dryer into wall receptacle. 10. Remove center terminal block screw. 4 7 8 6 32 Customer Care Center 1-800-898-1879 www.askousa.com Replace...a green cover. Connecting a 4-wire Power Cord 5. Remove ground wire (green with four No. 10 copper wires and a matching 4wire receptacle of dryer. 11. To connect a 4-wire power cord to the step numbers. 1. Remove terminal block cover. 3. Turn the power off at the breaker/...
... a 4-wire power supply cord with yellow stripes) from external ground connector screw and remove from center terminal block. 6. Installation instructions 8. Plug dryer into wall receptacle. 10. Remove center terminal block screw. 4 7 8 6 32 Customer Care Center 1-800-898-1879 www.askousa.com Replace...a green cover. Connecting a 4-wire Power Cord 5. Remove ground wire (green with four No. 10 copper wires and a matching 4wire receptacle of dryer. 11. To connect a 4-wire power cord to the step numbers. 1. Remove terminal block cover. 3. Turn the power off at the breaker/...

User manual 80 834 27 Asko T793 FR
Page 31
...Serrez la vis. 6. Read the Electrical requirements and grounding instructions before connecting the tumble dryer. Relâchez ou enlevez la vis centrale du bloc de bornes. 4 5 6 5. The grounding link on the dryer terminal block. Note Au Canada, la sécheuse est fournie avec une fiche ...supply cord or by a link to the neutral conductor on the dryer must be removed for direct wiring. The dryer frame is grounded by direct wiring. These Electrical Connection instructions provide for installing the dryer in a location where grounding through the neutral. 4-wire connection. ...
...Serrez la vis. 6. Read the Electrical requirements and grounding instructions before connecting the tumble dryer. Relâchez ou enlevez la vis centrale du bloc de bornes. 4 5 6 5. The grounding link on the dryer terminal block. Note Au Canada, la sécheuse est fournie avec une fiche ...supply cord or by a link to the neutral conductor on the dryer must be removed for direct wiring. The dryer frame is grounded by direct wiring. These Electrical Connection instructions provide for installing the dryer in a location where grounding through the neutral. 4-wire connection. ...


