

User manual 80 834 26 Asko T793 EN
Page 2
...-off Drying takes too long The laundry does not dry, or is too dry Error messages Technical information Technical data Service and guarantee Warranty How to choose the settings: Clock Buzzer Volume Language Child-safe Start Care and maintenance instructions Cleaning the lint filter Cleaning the outside of the tumble dryer Front panel Advice and tips before you tumble dry Have the clothes been spun? Contents Before using your fabrics Turn on the main power switch. Materials...
...-off Drying takes too long The laundry does not dry, or is too dry Error messages Technical information Technical data Service and guarantee Warranty How to choose the settings: Clock Buzzer Volume Language Child-safe Start Care and maintenance instructions Cleaning the lint filter Cleaning the outside of the tumble dryer Front panel Advice and tips before you tumble dry Have the clothes been spun? Contents Before using your fabrics Turn on the main power switch. Materials...

User manual 80 834 26 Asko T793 EN
Page 21
...). Drying takes too long • Check that the lint filter is connected. • that the overheating cut -off shuts off will not start Check • that the door is properly closed. • that the main power switch is on to close error messages. Read "Drying takes too long" in your house are intact. Customer Care Center 1-800-898-1879 www.askousa.com 21 Flip the dryer breaker off...
...). Drying takes too long • Check that the lint filter is connected. • that the overheating cut -off shuts off will not start Check • that the door is properly closed. • that the main power switch is on to close error messages. Read "Drying takes too long" in your house are intact. Customer Care Center 1-800-898-1879 www.askousa.com 21 Flip the dryer breaker off...

User manual 80 834 26 Asko T793 EN
Page 23
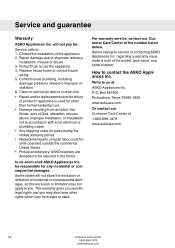
... installations One-year ASKO replacement parts and/or repair labor to Full Warranty correct defect in materials or workmanship. Cosmetic damage must be reported to your product warranty registration correct defect in materials or workmanship. Service must be provided by an authorized From date of purchase. ASKO service agent. online at www.askousa.com/customercare/reg- Third Year Full ASKO replacement parts and/or repair...
... installations One-year ASKO replacement parts and/or repair labor to Full Warranty correct defect in materials or workmanship. Cosmetic damage must be reported to your product warranty registration correct defect in materials or workmanship. Service must be provided by an authorized From date of purchase. ASKO service agent. online at www.askousa.com/customercare/reg- Third Year Full ASKO replacement parts and/or repair...
User manual 80 834 26 Asko T793 EN
Page 24
... to contact the ASKO Appliances Inc. Replace house fuses or correct house wiring. 5. For warranty service, contact our Customer Care Center at : ASKO Appliances Inc.P.O. Instruct how to you may also have other than home/residential use the appliance. 4. Correct house plumbing, including drainage problems related to shipment, delivery, installation, misuse or abuse. 3. Clean or service air device in drain line. • Repair and/or replacement parts for failure...
... to contact the ASKO Appliances Inc. Replace house fuses or correct house wiring. 5. For warranty service, contact our Customer Care Center at : ASKO Appliances Inc.P.O. Instruct how to you may also have other than home/residential use the appliance. 4. Correct house plumbing, including drainage problems related to shipment, delivery, installation, misuse or abuse. 3. Clean or service air device in drain line. • Repair and/or replacement parts for failure...
User manual 80 834 26 Asko T793 EN
Page 26
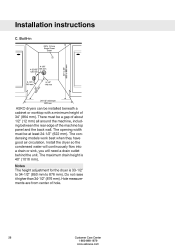
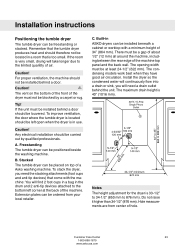
...mm). Notes The height adjustment for the dryer is 40" (1016 mm). Built-in ASKO dryers can be installed beneath a cabinet or worktop with a minimum height of hole. 26 Customer Care Center 1-800-898-1879 www.askousa.com The opening width must be at least 24-1/2" (... between the rear edge of the machine top panel and the back wall. Do not raise it higher than 34-1/2" (876 mm). Installation instructions C. Install the dryer so the condensed water will continuously flow into a drain or sink, you will need a drain outlet behind the unit. The condensing models work best when they...
...mm). Notes The height adjustment for the dryer is 40" (1016 mm). Built-in ASKO dryers can be installed beneath a cabinet or worktop with a minimum height of hole. 26 Customer Care Center 1-800-898-1879 www.askousa.com The opening width must be at least 24-1/2" (... between the rear edge of the machine top panel and the back wall. Do not raise it higher than 34-1/2" (876 mm). Installation instructions C. Install the dryer so the condensed water will continuously flow into a drain or sink, you will need a drain outlet behind the unit. The condensing models work best when they...

User manual 80 834 26 Asko T793 EN
Page 30
... A circuit required Vent spacer Remove cover to a discharge through the wall. 2. Make sure nothing is only one vent duct from the room, a vent spacer must be fitted. Refer to the point of cold air. Connection to the outlet stub on the rear of a building. Secure the duct joint to a permanently wired supply point must be made only by a residual current device. Electrical installation Warning! Installation instructions To connect the exhaust duct...
... A circuit required Vent spacer Remove cover to a discharge through the wall. 2. Make sure nothing is only one vent duct from the room, a vent spacer must be fitted. Refer to the point of cold air. Connection to the outlet stub on the rear of a building. Secure the duct joint to a permanently wired supply point must be made only by a residual current device. Electrical installation Warning! Installation instructions To connect the exhaust duct...

User manual 80 834 26 Asko T793 EN
Page 31
... breaker/fuse box. Turn the power off at the breaker or fuse box. 2. Read the Electrical requirements and grounding instructions before connecting the tumble dryer. Before starting this procedure, be removed for direct wiring. Connect ground (center) wire of NEMA Type 10-30R, as illustrated below: To connect a 3-wire power cord to the center, silver-colored terminal screw. Electric models of the above connections can be used when the applience is grounded by direct wiring. Tighten screw. 6. Connect the other wires...
... breaker/fuse box. Turn the power off at the breaker or fuse box. 2. Read the Electrical requirements and grounding instructions before connecting the tumble dryer. Before starting this procedure, be removed for direct wiring. Connect ground (center) wire of NEMA Type 10-30R, as illustrated below: To connect a 3-wire power cord to the center, silver-colored terminal screw. Electric models of the above connections can be used when the applience is grounded by direct wiring. Tighten screw. 6. Connect the other wires...

User manual 80 834 26 Asko T793 EN
Page 32
... NEMA Type 14-30R, as illustrated below . Remove center terminal block screw. 4 7 8 6 32 Customer Care Center 1-800-898-1879 www.askousa.com Installation instructions 8. Connect neutral (white) wire of cord under center screw of cord to the step numbers. 1. Turn power on back of dryer. 9. Connecting a 4-wire Power Cord 5. Replace terminal box cover on at the breaker/fuse box. 2. Before starting this procedure, be identified with yellow stripes) from external ground connector screw and remove from center terminal block...
... NEMA Type 14-30R, as illustrated below . Remove center terminal block screw. 4 7 8 6 32 Customer Care Center 1-800-898-1879 www.askousa.com Installation instructions 8. Connect neutral (white) wire of cord under center screw of cord to the step numbers. 1. Turn power on back of dryer. 9. Connecting a 4-wire Power Cord 5. Replace terminal box cover on at the breaker/fuse box. 2. Before starting this procedure, be identified with yellow stripes) from external ground connector screw and remove from center terminal block...

User manual 80 834 27 Asko T793 FR
Page 31
... on the dryer terminal block. Electric models of the above connections can be removed for new branch-circuit installations, mobile homes, recreational vehicles, and areas where local codes prohibit grounding through the neutral conductor i prohibited. Only a 4-conductor cord shall be used when the applience is installed in the following situations: 3-wire connection where local codes permit grounding through the neutral. 3-wire connection plus separate grounding connector where local codes do...
... on the dryer terminal block. Electric models of the above connections can be removed for new branch-circuit installations, mobile homes, recreational vehicles, and areas where local codes prohibit grounding through the neutral conductor i prohibited. Only a 4-conductor cord shall be used when the applience is installed in the following situations: 3-wire connection where local codes permit grounding through the neutral. 3-wire connection plus separate grounding connector where local codes do...
User manual 80 847 07 Asko T793 EN
Page 2
... electricity 10 Service and guarantee 22 Operating instructions 11 Warranty 23 Sort your fabrics 11 How to contact the ASKO Turn on the main power switch. 11 Appliances Inc. 23 Open the door, load the items, and Installation instructions 24 then close the door 11 Positioning the tumble dryer 24 Select the program 11 Adjusting the feet 27 Selecting Options 14 Air exhaust 27 Press the Start button 15 Electrical installation 29 Drying...
... electricity 10 Service and guarantee 22 Operating instructions 11 Warranty 23 Sort your fabrics 11 How to contact the ASKO Turn on the main power switch. 11 Appliances Inc. 23 Open the door, load the items, and Installation instructions 24 then close the door 11 Positioning the tumble dryer 24 Select the program 11 Adjusting the feet 27 Selecting Options 14 Air exhaust 27 Press the Start button 15 Electrical installation 29 Drying...

User manual 80 847 07 Asko T793 EN
Page 20
... cut -off shuts off will not start Check • that the door is properly closed. • that the main power switch is running, which disrupts the moisture monitoring function. Drying takes too long • Check that the fuses (circuit breakers) in the "Troubleshooting" chapter to find out what to do. • If "Clean lint filter" appears on the display, the maximum program time has been reached. Error messages •...
... cut -off shuts off will not start Check • that the door is properly closed. • that the main power switch is running, which disrupts the moisture monitoring function. Drying takes too long • Check that the fuses (circuit breakers) in the "Troubleshooting" chapter to find out what to do. • If "Clean lint filter" appears on the display, the maximum program time has been reached. Error messages •...
User manual 80 847 07 Asko T793 EN
Page 23
... parts during the limited warranty period. • Replacement parts or repair labor costs for service or contacting ASKO Appliances Inc. Instruct how to contact the ASKO Appliances Inc. Replace house fuses or correct house wiring. 5. How to use . • Damage resulting from state to improper installation. 6. ASKO washers are designed to be responsible for : Service calls to us at the number listed below. Write to : 1. Before calling for units operated...
... parts during the limited warranty period. • Replacement parts or repair labor costs for service or contacting ASKO Appliances Inc. Instruct how to contact the ASKO Appliances Inc. Replace house fuses or correct house wiring. 5. How to use . • Damage resulting from state to improper installation. 6. ASKO washers are designed to be responsible for : Service calls to us at the number listed below. Write to : 1. Before calling for units operated...

User manual 80 847 07 Asko T793 EN
Page 25
...). Install the dryer so the condensed water will continuously flow into a drain or sink, you will need a drain outlet behind the unit. The maximum drain height is 33-1/2" to 34-1/2" (850 mm to 876 mm). Installation instructions C. Hole measurements are from center of 34" (864 mm). Customer Care Center 25 1-800-898-1879 www.askousa.com Built-in ASKO dryers can...
...). Install the dryer so the condensed water will continuously flow into a drain or sink, you will need a drain outlet behind the unit. The maximum drain height is 33-1/2" to 34-1/2" (850 mm to 876 mm). Installation instructions C. Hole measurements are from center of 34" (864 mm). Customer Care Center 25 1-800-898-1879 www.askousa.com Built-in ASKO dryers can...

User manual 80 847 07 Asko T793 EN
Page 27
... possible. Side Exhaust Outlet Stub Clamp Duct (not supplied) The duct must not be attached to connect the Vent duct on the rear or on the washing machine. Customer Care Center 27 1-800-898-1879 www.askousa.com After you to either the right or left or right side. We recommend that allows you push the dryer into the duct and trap lint. Installation instructions Adjusting the...
... possible. Side Exhaust Outlet Stub Clamp Duct (not supplied) The duct must not be attached to connect the Vent duct on the rear or on the washing machine. Customer Care Center 27 1-800-898-1879 www.askousa.com After you to either the right or left or right side. We recommend that allows you push the dryer into the duct and trap lint. Installation instructions Adjusting the...

User manual 80 847 07 Asko T793 EN
Page 29
..., 3000W heater rating 30 A circuit required Remove cover to a ventilation outlet, follow the steps below: 1. Secure the duct joint to the "Important Safety Instructions" for exhausting. This appliance shall not be grounded. The power supply cord must be used in a wet area, the supply must use the ready-fitted plug supplied with as few bends as possible to the point of 15 A each. Vent spacer Electrical installation Warning...
..., 3000W heater rating 30 A circuit required Remove cover to a ventilation outlet, follow the steps below: 1. Secure the duct joint to the "Important Safety Instructions" for exhausting. This appliance shall not be grounded. The power supply cord must be used in a wet area, the supply must use the ready-fitted plug supplied with as few bends as possible to the point of 15 A each. Vent spacer Electrical installation Warning...

User manual 80 847 07 Asko T793 EN
Page 30
... a 3-wire Power Cord Warning! Ground Ground (center) Power Supply Cord You will need a 3-wire power supply cord with a four-prong plug intended for direct wiring. Turn the power off at the breaker or fuse box. 2. Remove terminal block cover. 3. These Electrical Connection instructions provide for a 3-wire connection system. Note The numbers in the illustration below . Loosen or remove center terminal block screw. 4 5 6 30 Customer Care Center 1-800-898-1879 www.askousa.com Read the Electrical requirements and grounding instructions before connecting the tumble dryer. Only...
... a 3-wire Power Cord Warning! Ground Ground (center) Power Supply Cord You will need a 3-wire power supply cord with a four-prong plug intended for direct wiring. Turn the power off at the breaker or fuse box. 2. Remove terminal block cover. 3. These Electrical Connection instructions provide for a 3-wire connection system. Note The numbers in the illustration below . Loosen or remove center terminal block screw. 4 5 6 30 Customer Care Center 1-800-898-1879 www.askousa.com Read the Electrical requirements and grounding instructions before connecting the tumble dryer. Only...

User manual 80 847 08 Asko T793 FR
Page 30
... laveuse ou un équivalent. Mise en garde! These Electrical Connection instructions provide for direct wiring. The dryer frame is installed in the following situations: 3-wire connection where local codes permit grounding through the neutral. 3-wire connection plus separate grounding connector where local codes do not permit grounding through the neutral condutors. Read the Electrical requirements and grounding instructions before connecting the tumble dryer. The grounding link on the dryer terminal block.
... laveuse ou un équivalent. Mise en garde! These Electrical Connection instructions provide for direct wiring. The dryer frame is installed in the following situations: 3-wire connection where local codes permit grounding through the neutral. 3-wire connection plus separate grounding connector where local codes do not permit grounding through the neutral condutors. Read the Electrical requirements and grounding instructions before connecting the tumble dryer. The grounding link on the dryer terminal block.
User manual Use & Care Guide Asko T793 EN
Page 22
... appliance. 2. Replace house fuses or correct house wiring. 5. ASKO washers are designed to be responsible for any incidental or consequential damages. Repair damage due to : 1. Clean or service air device in drain line. • Repair and/or replacement parts for failure of product if appliance is used for units operated outside the continental United States. • Pickup and delivery. This warranty gives you specific legal rights and you...
... appliance. 2. Replace house fuses or correct house wiring. 5. ASKO washers are designed to be responsible for any incidental or consequential damages. Repair damage due to : 1. Clean or service air device in drain line. • Repair and/or replacement parts for failure of product if appliance is used for units operated outside the continental United States. • Pickup and delivery. This warranty gives you specific legal rights and you...
User manual Use & Care Guide Asko T793 EN
Page 23
Any electrical installation should be left corner at least 24-1/2" (622 mm). Stacked The tumble dryer can be placed on the bottom of the front of the dryer must be a gap of about 1/2" (12 mm) all around the machine, including between the rear edge of a Asko washing machine. The condensing models work best when they have good air circulation. Customer Care Center...
Any electrical installation should be left corner at least 24-1/2" (622 mm). Stacked The tumble dryer can be placed on the bottom of the front of the dryer must be a gap of about 1/2" (12 mm) all around the machine, including between the rear edge of a Asko washing machine. The condensing models work best when they have good air circulation. Customer Care Center...

User manual Use & Care Guide Asko T793 EN
Page 25
Asko dryers have a "T-stile" exhaust vent that allows you push the dryer into place, check for each 90° elbow. With the duct attached, insert the stub pipe into place. 3. Make any excess exhaust duct and run the duct with a clamp 2. Customer Care Center 25 1-800-898-1879 www.askousa.com Vent T-tube Rear Exhaust Outlet Side Exhaust Outlet Stub Clamp Duct (not supplied) To connect the exhaust duct to the rear outlet To connect the...
Asko dryers have a "T-stile" exhaust vent that allows you push the dryer into place, check for each 90° elbow. With the duct attached, insert the stub pipe into place. 3. Make any excess exhaust duct and run the duct with a clamp 2. Customer Care Center 25 1-800-898-1879 www.askousa.com Vent T-tube Rear Exhaust Outlet Side Exhaust Outlet Stub Clamp Duct (not supplied) To connect the exhaust duct to the rear outlet To connect the...


