

User manual 80 638 57 Asko T7X0 generell EN FR ES
Page 1
ENGLISH ASKO DRYER USE AND CARE GUIDE TyoiontguhserettrdutfhircrIeystMietobPrent,OissmrRteebTpa.eAedfrNofoTarre!lml uaosnpcineegrafritotimnfgor FRANÇAIS ESPAÑOL CONTENTS Important Safety Instructions 2 Safety Features 2 ASKO Dryer Features 3 Care and Maintenance Instructions 4 Overheat Protection 6 Troubleshooting 6 Energy Saving Tips 6 Customizing the Preset Programs – T760/T780 7 Error Messages – T760/T780 9 Installation Instructions 10 ASKO Product Warranty 15 Index 16 SAVE THESE INSTRUCTIONS FOR FUTURE REFERENCE Page 1
ENGLISH ASKO DRYER USE AND CARE GUIDE TyoiontguhserettrdutfhircrIeystMietobPrent,OissmrRteebTpa.eAedfrNofoTarre!lml uaosnpcineegrafritotimnfgor FRANÇAIS ESPAÑOL CONTENTS Important Safety Instructions 2 Safety Features 2 ASKO Dryer Features 3 Care and Maintenance Instructions 4 Overheat Protection 6 Troubleshooting 6 Energy Saving Tips 6 Customizing the Preset Programs – T760/T780 7 Error Messages – T760/T780 9 Installation Instructions 10 ASKO Product Warranty 15 Index 16 SAVE THESE INSTRUCTIONS FOR FUTURE REFERENCE Page 1

User manual 80 638 57 Asko T7X0 generell EN FR ES
Page 2
... outlet that allows the door to be exhausted outdoors or the equivalent. SAFETY FEATURES Magnetic Door Lock ASKO dryers have a magnetic door lock that is properly grounded. Overheat Protection ASKO dryers have been dry-cleaned at home. ¨ Clean the lint filter before using your local refuse ...and situation that could ignite or explode. This is held down for more information. Automatic Door Switch A door switch automatically stops the dryer when the door is made and marked to facilitate recycling. IMPORTANT SAFETY INSTRUCTIONS To reduce the risk of fire, electric shock, or...
... outlet that allows the door to be exhausted outdoors or the equivalent. SAFETY FEATURES Magnetic Door Lock ASKO dryers have a magnetic door lock that is properly grounded. Overheat Protection ASKO dryers have been dry-cleaned at home. ¨ Clean the lint filter before using your local refuse ...and situation that could ignite or explode. This is held down for more information. Automatic Door Switch A door switch automatically stops the dryer when the door is made and marked to facilitate recycling. IMPORTANT SAFETY INSTRUCTIONS To reduce the risk of fire, electric shock, or...

User manual 80 638 57 Asko T7X0 generell EN FR ES
Page 3
...for a few washings. The length of similar color or alone. For operating instructions specific to your ASKO dryer. Thermostat-Control Model T700 has a thermostat that circulate the air. Model T700 has timer-controlled drying in too long. Certain fabrics will vary due to the amount of laundry... lint (synthetics, velveteen, corduroy, etc.). ¨ Separate non-colorfast fabrics from 30 minutes to 190 minutes. ENGLISH ASKO DRYER FEATURES Your new energy-efficient ASKO dryer is likely to lose color (excess dye) for the first few more minutes. To minimize the possibility of the dye...
...for a few washings. The length of similar color or alone. For operating instructions specific to your ASKO dryer. Thermostat-Control Model T700 has a thermostat that circulate the air. Model T700 has timer-controlled drying in too long. Certain fabrics will vary due to the amount of laundry... lint (synthetics, velveteen, corduroy, etc.). ¨ Separate non-colorfast fabrics from 30 minutes to 190 minutes. ENGLISH ASKO DRYER FEATURES Your new energy-efficient ASKO dryer is likely to lose color (excess dye) for the first few more minutes. To minimize the possibility of the dye...

User manual 80 638 57 Asko T7X0 generell EN FR ES
Page 4
... it restarts. Some paper towels may also overheat after each load. Page 4 CLEANING THE EXHAUST HOSE About once a year you . 2. Therefore, the dryer will shut down. NOTE: Do not remove the water container while the machine is insignificant. Replace the container. To clean the lint filter, follow the... restart the program, empty the container and press Start. The lint filter must be tumble dried. You should empty the container every three to five dryer loads, depending on fabrics in a terry towel to be tumble dried. Pull out the container. 2. Pour out the water. 3. It may be...
... it restarts. Some paper towels may also overheat after each load. Page 4 CLEANING THE EXHAUST HOSE About once a year you . 2. Therefore, the dryer will shut down. NOTE: Do not remove the water container while the machine is insignificant. Replace the container. To clean the lint filter, follow the... restart the program, empty the container and press Start. The lint filter must be tumble dried. You should empty the container every three to five dryer loads, depending on fabrics in a terry towel to be tumble dried. Pull out the container. 2. Pour out the water. 3. It may be...

User manual 80 638 57 Asko T7X0 generell EN FR ES
Page 6
... is not covered under warranty, if the problem is broken. Call a servicer. This is activated, you call . NOTE: If your dryer overheats frequently, it stops when I release the power button. ¨ The overheating protection has probably activated. Contact an installer to have... to circulate properly OVERHEAT PROTECTION ASKO dryers are eliminated, the overheat protection has probably been activated. (See below .) The machine takes too long to avoid reheating the dryer. ¨ Do not overload the dryer. ¨ Use the highest spin speeds allowed for a...
... is not covered under warranty, if the problem is broken. Call a servicer. This is activated, you call . NOTE: If your dryer overheats frequently, it stops when I release the power button. ¨ The overheating protection has probably activated. Contact an installer to have... to circulate properly OVERHEAT PROTECTION ASKO dryers are eliminated, the overheat protection has probably been activated. (See below .) The machine takes too long to avoid reheating the dryer. ¨ Do not overload the dryer. ¨ Use the highest spin speeds allowed for a...

User manual 80 638 57 Asko T7X0 generell EN FR ES
Page 9
... done within 15 seconds.) 3. Make sure the condensation pump is empty. ENGLISH The Delayed Start Program This program lets you want to delay starting the dryer for up to 12 hours. This feature is automatically programmed to delay for three seconds before it becomes active. To change the language, follow the...
... done within 15 seconds.) 3. Make sure the condensation pump is empty. ENGLISH The Delayed Start Program This program lets you want to delay starting the dryer for up to 12 hours. This feature is automatically programmed to delay for three seconds before it becomes active. To change the language, follow the...

User manual 80 638 57 Asko T7X0 generell EN FR ES
Page 10
...you removed from the side to cover the rear exhaust outlet. After unpacking the dryer, thoroughly check the unit for the rear outlet hose connection. 5. Heating element 2500 watts CONNECTING AIR EXHAUST (T700 AND T760) The exhaust hose can be reported to your dealer within five days... from the date of fire, this , follow the steps below : 1. Rear Exhaust Outlet Side Exhaust Outlet Stub Clamp Hose (not supplied) The dryer is open. Using a flathead ...
...you removed from the side to cover the rear exhaust outlet. After unpacking the dryer, thoroughly check the unit for the rear outlet hose connection. 5. Heating element 2500 watts CONNECTING AIR EXHAUST (T700 AND T760) The exhaust hose can be reported to your dealer within five days... from the date of fire, this , follow the steps below : 1. Rear Exhaust Outlet Side Exhaust Outlet Stub Clamp Hose (not supplied) The dryer is open. Using a flathead ...

User manual 80 638 57 Asko T7X0 generell EN FR ES
Page 11
...Examples If more bends and the longer the hose, the less air will impede drying performance. NOTE: When installing in the hose. FREESTANDING INSTALLATION The dryer can be placed next to a maximum of 22 feet (660 cm) of about 1/4” (.64 mm) all sides. MODELS T720/T780 The ...condensing models work best when they be available for every 90° elbow. ENGLISH CONNECTING TO A VENTILATION DUCT (T700/T760) 1. Connect the exhaust hose to a ventilation exhaust fitting or to the point of the machine. If necessary, it higher than 22 feet of...
...Examples If more bends and the longer the hose, the less air will impede drying performance. NOTE: When installing in the hose. FREESTANDING INSTALLATION The dryer can be placed next to a maximum of 22 feet (660 cm) of about 1/4” (.64 mm) all sides. MODELS T720/T780 The ...condensing models work best when they be available for every 90° elbow. ENGLISH CONNECTING TO A VENTILATION DUCT (T700/T760) 1. Connect the exhaust hose to a ventilation exhaust fitting or to the point of the machine. If necessary, it higher than 22 feet of...

User manual 80 638 57 Asko T7X0 generell EN FR ES
Page 12
... area, the supply must be sure the power is delivered ready-fitted with three No. 10 copper wires and a matching three-wire receptacle of dryer. 9. Remove center terminal block screw. 5. Remove ground wire (green with the washing machine or an equivalent. Connect neutral wire (white) 8 ...you must be sure the power is turned off at the breaker/fuse box. 2. ASKO washers rated 208–240 V have two internal fuses of 15 A each. 1. colored terminal block screw. 6. Plug dryer into wall receptacle. 10. Connect the other 5 wires to access terminal box. (Requires...
... area, the supply must be sure the power is delivered ready-fitted with three No. 10 copper wires and a matching three-wire receptacle of dryer. 9. Remove center terminal block screw. 5. Remove ground wire (green with the washing machine or an equivalent. Connect neutral wire (white) 8 ...you must be sure the power is turned off at the breaker/fuse box. 2. ASKO washers rated 208–240 V have two internal fuses of 15 A each. 1. colored terminal block screw. 6. Plug dryer into wall receptacle. 10. Connect the other 5 wires to access terminal box. (Requires...

User manual 80 638 57 Asko T7X0 generell EN FR ES
Page 13
...press the adhesive surface against the top of the washing machine, use them firmly into place. 4. Page 13 ENGLISH STACKED INSTALLATION ASKO dryers can be mounted on top of a dryer! Washer back Metal brackets 2. Once the cups are supplied with the front top edge of the washer. Never stack a washer... on top of the washer and break off the remaining plastic tabs. To ensure the dryer is correctly positioned on the right side of any matching ASKO washer. Plastic cups To position the plastic cups, break off the left side of the washer, follow the ...
...press the adhesive surface against the top of the washing machine, use them firmly into place. 4. Page 13 ENGLISH STACKED INSTALLATION ASKO dryers can be mounted on top of a dryer! Washer back Metal brackets 2. Once the cups are supplied with the front top edge of the washer. Never stack a washer... on top of the washer and break off the remaining plastic tabs. To ensure the dryer is correctly positioned on the right side of any matching ASKO washer. Plastic cups To position the plastic cups, break off the left side of the washer, follow the ...

User manual 80 638 57 Asko T7X0 generell EN FR ES
Page 14
... shipped left as indicated in the illustration. (If you have a condenser dryer, you will need to open the condenser container door.) 13. Remove the two 20 torx screws on the main power. 9. Remove the cover plate by ... empty holes on the opposite side. 12. Replace the screw you can remove the magnetic door latch and the cover plate. 7. Tighten the screws on ASKO dryers are ready to mount the door on both sides of the door so you removed in place. Remove the screw in the top right corner...
... shipped left as indicated in the illustration. (If you have a condenser dryer, you will need to open the condenser container door.) 13. Remove the two 20 torx screws on the main power. 9. Remove the cover plate by ... empty holes on the opposite side. 12. Replace the screw you can remove the magnetic door latch and the cover plate. 7. Tighten the screws on ASKO dryers are ready to mount the door on both sides of the door so you removed in place. Remove the screw in the top right corner...
User manual 80 638 57 Asko T7X0 generell EN FR ES
Page 16
... the preset programs 7 Restoring a preset program 9 D S Delayed start, programming 9 Safety features 2 Door, cleaning 4 Safety instructions 2 Door hinges, reversing 14 Sensidry 3 Door switch 2 Sensor error message 9 Dryer features 3 Service 15 Drying problems 3, 6 Solutions to problems 6 Drying times 3 Sorting the laundry 3 E Specifications 10 Electrical connections 12 T Error messages (T760/T780) 9 Temperature menu 8 Exhaust...
... the preset programs 7 Restoring a preset program 9 D S Delayed start, programming 9 Safety features 2 Door, cleaning 4 Safety instructions 2 Door hinges, reversing 14 Sensidry 3 Door switch 2 Sensor error message 9 Dryer features 3 Service 15 Drying problems 3, 6 Solutions to problems 6 Drying times 3 Sorting the laundry 3 E Specifications 10 Electrical connections 12 T Error messages (T760/T780) 9 Temperature menu 8 Exhaust...

User manual Quick Start Guide EN
Page 1
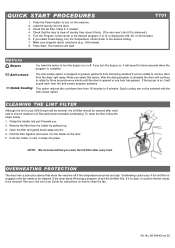
... machine. Program Control Turn to select an automatic program (1 or 2) or timed drying (30, 60, or 90 minutes). Dryer Quick Start Guide T701 We know you’re excited about owning an ASKO dryer and you’re anxious to get the most of the features of your machine, we recommend that measures... the exhaust temperature coming out of the dryer and automatically turns the machine off and on. To continue the program...
... machine. Program Control Turn to select an automatic program (1 or 2) or timed drying (30, 60, or 90 minutes). Dryer Quick Start Guide T701 We know you’re excited about owning an ASKO dryer and you’re anxious to get the most of the features of your machine, we recommend that measures... the exhaust temperature coming out of the dryer and automatically turns the machine off and on. To continue the program...
User manual Quick Start Guide EN
Page 2
... after each time the anti-crease program activates. Check that shuts the machine off during a program, check the lint filter first. Make your ASKO dryer will sound each load to turn on , it will sound for three seconds every minute until it , if needed. 4. Options Buzzer You have...to ensure maximum air flow and prevent possible overheating. Remove the filter from the holder by pulling it ’s slammed.) 5. OVERHEATING PROTECTION The dryer has a protection device that the door is on the machine. 2. See your Use and Care Guide for instructions on or off. Press the...
... after each time the anti-crease program activates. Check that shuts the machine off during a program, check the lint filter first. Make your ASKO dryer will sound each load to turn on , it will sound for three seconds every minute until it , if needed. 4. Options Buzzer You have...to ensure maximum air flow and prevent possible overheating. Remove the filter from the holder by pulling it ’s slammed.) 5. OVERHEATING PROTECTION The dryer has a protection device that the door is on the machine. 2. See your Use and Care Guide for instructions on or off. Press the...
User manual Use & Care Guide EN
Page 1
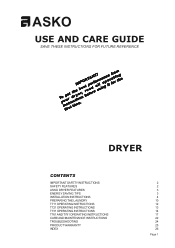
ENGLISH ASKO USE AND CARE GUIDE SAVE THESE INSTRUCTIONS FOR FUTURE REFERENCE TyoionfguisertrstrtudttchirtmeIyiMoeebnP.res,OsbrRteeTpafAoedNrrefToaru!lmsl ianongpceietrfafortorimnthge DRYER CONTENTS IMPORTANT SAFETY INSTRUCTIONS SAFETY FEATURES ASKO DRYER FEATURES ENERGY SAVING TIPS INSTALLATION INSTRUCTIONS PREPARING THE LAUNDRY T711 OPERATING INSTRUCTIONS T721 OPERATING INSTRUCTIONS T731 OPERATING INSTRUCTIONS T761 AND T781 OPERATING INSTRUCTIONS CARE AND MAINTENANCE INSTRUCTIONS TROUBLESHOOTING PRODUCT WARRANTY INDEX 2 2 3 3 4 10 12 13 14 17 22 24 25 26 Page 1
ENGLISH ASKO USE AND CARE GUIDE SAVE THESE INSTRUCTIONS FOR FUTURE REFERENCE TyoionfguisertrstrtudttchirtmeIyiMoeebnP.res,OsbrRteeTpafAoedNrrefToaru!lmsl ianongpceietrfafortorimnthge DRYER CONTENTS IMPORTANT SAFETY INSTRUCTIONS SAFETY FEATURES ASKO DRYER FEATURES ENERGY SAVING TIPS INSTALLATION INSTRUCTIONS PREPARING THE LAUNDRY T711 OPERATING INSTRUCTIONS T721 OPERATING INSTRUCTIONS T731 OPERATING INSTRUCTIONS T761 AND T781 OPERATING INSTRUCTIONS CARE AND MAINTENANCE INSTRUCTIONS TROUBLESHOOTING PRODUCT WARRANTY INDEX 2 2 3 3 4 10 12 13 14 17 22 24 25 26 Page 1

User manual Use & Care Guide EN
Page 2
... B) Grounding instructions for three seconds. AUTOMATIC DOOR SWITCH A door switch automatically stops the dryer when the door is properly installed and grounded in your dryer. OVERHEAT PROTECTION ASKO dryers have an overheat protection switch that automatically turns off vapors that allows the door to a ...ceiling or concealed space in a risk of least resistance for more information. SAFETY FEATURES CHILD-SAFE DOOR CATCH ASKO dryers have a proper outlet installed by a licensed electrician. ♦ Do not operate appliance while away from inadvertently starting the machine. The...
... B) Grounding instructions for three seconds. AUTOMATIC DOOR SWITCH A door switch automatically stops the dryer when the door is properly installed and grounded in your dryer. OVERHEAT PROTECTION ASKO dryers have an overheat protection switch that automatically turns off vapors that allows the door to a ...ceiling or concealed space in a risk of least resistance for more information. SAFETY FEATURES CHILD-SAFE DOOR CATCH ASKO dryers have a proper outlet installed by a licensed electrician. ♦ Do not operate appliance while away from inadvertently starting the machine. The...

User manual Use & Care Guide EN
Page 3
...Control Panel Lint Filter Lint Filter Holder Cleanable Fan (behind panel) Condenser Unit (behind panel) (T721 & T781 only) DRYING SYSTEMS ASKO dryers come with three different drying systems: Sensidry™ Models T731, T761 and T781 have these issues checked out. Model T731 has timer... the heating element on a regular basis. Timer-Control Model T711 has timer-controlled drying in this guide for your ASKO dryer. OVERHEAT PROTECTION ASKO dryers are equipped with an overheat protection switch that will automatically turn itself off the heat when the laundry has reached the...
...Control Panel Lint Filter Lint Filter Holder Cleanable Fan (behind panel) Condenser Unit (behind panel) (T721 & T781 only) DRYING SYSTEMS ASKO dryers come with three different drying systems: Sensidry™ Models T731, T761 and T781 have these issues checked out. Model T731 has timer... the heating element on a regular basis. Timer-Control Model T711 has timer-controlled drying in this guide for your ASKO dryer. OVERHEAT PROTECTION ASKO dryers are equipped with an overheat protection switch that will automatically turn itself off the heat when the laundry has reached the...
User manual Use & Care Guide EN
Page 4
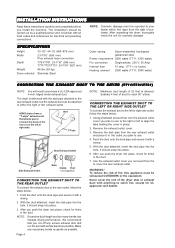
... and place it in the duct. 7. After you removed from the date of purchase. Use the exhaust outlet cover you push the dryer into place. 3. WARNING! INSTALLATION INSTRUCTIONS Read these instructions carefully and completely before you cut off any necessary bends as gentle as possible....clamp. 2. With the duct attached, insert the stub pipe into place. 6. The dryer is familiar with the stub pipe attached to the rear exhaust outlet, but the exhaust duct can impede drying performance. ASKO dryers have a "T-style" exhaust vent that you install the machine. Push the duct onto...
... and place it in the duct. 7. After you removed from the date of purchase. Use the exhaust outlet cover you push the dryer into place. 3. WARNING! INSTALLATION INSTRUCTIONS Read these instructions carefully and completely before you cut off any necessary bends as gentle as possible....clamp. 2. With the duct attached, insert the stub pipe into place. 6. The dryer is familiar with the stub pipe attached to the rear exhaust outlet, but the exhaust duct can impede drying performance. ASKO dryers have a "T-style" exhaust vent that you install the machine. Push the duct onto...

User manual Use & Care Guide EN
Page 5
..., which will circulate through the wall. 2. Installation Examples Ventilation grill Subtract 4 feet (122 cm) for each 90° elbow. Each foot on the dryer is level. This appliance should not be fitted. Connect the rubber hose supplied with high humidity levels, do this, follow the steps below : 2 3 ... level the unit on the feet. Run the duct with as few bends as possible. CONDENSATION DRAIN CONNECTION (T721 AND T781) Install the dryer so the condensed water will need a UL-CSA-approved, 4-inch ridged metal exhaust duct. Back of cold air. Make sure nothing is ...
..., which will circulate through the wall. 2. Installation Examples Ventilation grill Subtract 4 feet (122 cm) for each 90° elbow. Each foot on the dryer is level. This appliance should not be fitted. Connect the rubber hose supplied with high humidity levels, do this, follow the steps below : 2 3 ... level the unit on the feet. Run the duct with as few bends as possible. CONDENSATION DRAIN CONNECTION (T721 AND T781) Install the dryer so the condensed water will need a UL-CSA-approved, 4-inch ridged metal exhaust duct. Back of cold air. Make sure nothing is ...

User manual Use & Care Guide EN
Page 6
... be at least 1/2" (12 mm) on all around the machine, including between the washer and dryer. There must be properly grounded. Do not raise it is to the washing machine. ASKO washers rated 208-240 V have good air circulation. It is essential that the hole measurements are from center of ... 40" (1016 mm). (See page 4.) There should be installed beneath a cabinet or worktop with the washing machine or an equivalent. BUILT-IN INSTALLATION ASKO dryers can be a gap of the machine top panel and the back wall. Space must be sure to the center of 15 A each. Therefore, we...
... be at least 1/2" (12 mm) on all around the machine, including between the washer and dryer. There must be properly grounded. Do not raise it is to the washing machine. ASKO washers rated 208-240 V have good air circulation. It is essential that the hole measurements are from center of ... 40" (1016 mm). (See page 4.) There should be installed beneath a cabinet or worktop with the washing machine or an equivalent. BUILT-IN INSTALLATION ASKO dryers can be a gap of the machine top panel and the back wall. Space must be sure to the center of 15 A each. Therefore, we...


