

User manual 80 638 57 Asko T7X0 generell EN FR ES
Page 2
...; Clean the lint filter before or after each load. ¨ Keep the area around the exhaust opening and adjacent areas free from service or discarded, remove the door to start again until you are in a building. Refer to page 9 for instructions on how to program this appliance must be done by an authorized ASKO service agent. ¨ Do not attempt to repair or replace any part of...
...; Clean the lint filter before or after each load. ¨ Keep the area around the exhaust opening and adjacent areas free from service or discarded, remove the door to start again until you are in a building. Refer to page 9 for instructions on how to program this appliance must be done by an authorized ASKO service agent. ¨ Do not attempt to repair or replace any part of...

User manual 80 638 57 Asko T7X0 generell EN FR ES
Page 3
... drying temperature (Normal or Low) within +/- 5° F. Model T700 has timer-controlled drying in too long. SORTING THE LAUNDRY For best drying results, clothes should be careful not to sort your dryer for the recommended installation.) Page 3 Below are equipped with this manual carefully before using less energy. FABRIC SOFTENER SHEETS We recommend that item in the dryer. For operating instructions specific to your model, refer to a Ventilation Duct (T700/T760)” on these sheets can set...
... drying temperature (Normal or Low) within +/- 5° F. Model T700 has timer-controlled drying in too long. SORTING THE LAUNDRY For best drying results, clothes should be careful not to sort your dryer for the recommended installation.) Page 3 Below are equipped with this manual carefully before using less energy. FABRIC SOFTENER SHEETS We recommend that item in the dryer. For operating instructions specific to your model, refer to a Ventilation Duct (T700/T760)” on these sheets can set...

User manual 80 638 57 Asko T7X0 generell EN FR ES
Page 4
... washer than clothes spun at 800 rpm will pass through the drum. You should remove the exhaust hose and clean it can be cleaned after a while, which will shut down. These items should not be sure the air flow is strong and nothing is running. 1. The machine may also scratch the finish. NOTE: Do not remove the water container while the machine is blocking the vent...
... washer than clothes spun at 800 rpm will pass through the drum. You should remove the exhaust hose and clean it can be cleaned after a while, which will shut down. These items should not be sure the air flow is strong and nothing is running. 1. The machine may also scratch the finish. NOTE: Do not remove the water container while the machine is blocking the vent...

User manual 80 638 57 Asko T7X0 generell EN FR ES
Page 6
... fabrics together, light fabrics together). ¨ Clean the lint filter after each load. ¨ Do not overdry clothes when using a faster or longer spin cycle. ¨ Make sure the outside vent exhaust is activated, you have sufficient air circulation. This is turned on the back of the dryer. ¨ If all of a service call. The machine won’t start the machine. Press the reset button to avoid reheating...
... fabrics together, light fabrics together). ¨ Clean the lint filter after each load. ¨ Do not overdry clothes when using a faster or longer spin cycle. ¨ Make sure the outside vent exhaust is activated, you have sufficient air circulation. This is turned on the back of the dryer. ¨ If all of a service call. The machine won’t start the machine. Press the reset button to avoid reheating...

User manual 80 638 57 Asko T7X0 generell EN FR ES
Page 9
... select Delayed Start on again. 2. CHILD-SAFE START As a safety measure, you can appear if there are dry clothes in the lower right corner. Press ENTER five times, then press P3 five times. (This must select a delay time (1 to 12 hours. Make sure exhaust hose is not blocked. The drain should not be higher than 40 inches from accidentally changing the program settings. Turn the...
... select Delayed Start on again. 2. CHILD-SAFE START As a safety measure, you can appear if there are dry clothes in the lower right corner. Press ENTER five times, then press P3 five times. (This must select a delay time (1 to 12 hours. Make sure exhaust hose is not blocked. The drain should not be higher than 40 inches from accidentally changing the program settings. Turn the...

User manual 80 638 57 Asko T7X0 generell EN FR ES
Page 11
... of about 1/4” (.64 mm) all sides. ENGLISH CONNECTING TO A VENTILATION DUCT (T700/T760) 1. Installation Examples If more bends and the longer the hose, the less air will circulate through the wall. 2. Fit the ventilation grill to the outlet stub on the left, right or rear of the holes. FREESTANDING INSTALLATION The dryer can be a gap of 34” (864 mm...
... of about 1/4” (.64 mm) all sides. ENGLISH CONNECTING TO A VENTILATION DUCT (T700/T760) 1. Installation Examples If more bends and the longer the hose, the less air will circulate through the wall. 2. Fit the ventilation grill to the outlet stub on the left, right or rear of the holes. FREESTANDING INSTALLATION The dryer can be a gap of 34” (864 mm...

User manual 80 638 57 Asko T7X0 generell EN FR ES
Page 12
... (white) Connecting a Four-wire Power Cord WARNING! As supplied: Single-phase, 230 V, 60 Hz, 2500 Watt heater rating 30 A fuse required CAUTION: The receptacle on the rear of dryer. 9. Use the strain relief attached below . Replace terminal box 7 cover on back of NEMA Type 10-30R, as illustrated below the terminal block opening . 4. ELECTRICAL CONNECTIONS The power supply cord must be protected by a residual current device. Power Supply Cord You will need a three-wire power supply cord with...
... (white) Connecting a Four-wire Power Cord WARNING! As supplied: Single-phase, 230 V, 60 Hz, 2500 Watt heater rating 30 A fuse required CAUTION: The receptacle on the rear of dryer. 9. Use the strain relief attached below . Replace terminal box 7 cover on back of NEMA Type 10-30R, as illustrated below the terminal block opening . 4. ELECTRICAL CONNECTIONS The power supply cord must be protected by a residual current device. Power Supply Cord You will need a three-wire power supply cord with...

User manual 80 638 57 Asko T7X0 generell EN FR ES
Page 15
... appliance and mail it rusts or fails to hold water. Correct the installation of purchase. Instruct how to use . Clean or service air device in materials or workmanship. ASKO washers are designed to be resolved locally, write: ASKO USA Inc. This warranty gives you specific legal rights and you may not apply to you. For warranty service, contact the dealer from date of God, alteration...
... appliance and mail it rusts or fails to hold water. Correct the installation of purchase. Instruct how to use . Clean or service air device in materials or workmanship. ASKO washers are designed to be resolved locally, write: ASKO USA Inc. This warranty gives you specific legal rights and you may not apply to you. For warranty service, contact the dealer from date of God, alteration...
User manual 80 638 57 Asko T7X0 generell EN FR ES
Page 16
INDEX A Load sizes, recommended 4 Advisory Center phone number 15 M Air exhaust, connecting 10 Maintenance instructions 4 Air fluff, programming 8 Magnetic door lock 2 Automatic door switch 2 Menus, programming 8 B O Built-in installation 11 Options menu 8 C Overflow error message 9 Care and cleaning 4 Overheat protection 2, 6 Care label instructions 3 P Changing the LED readouts 9 Power cord connection 12 Child-safe start (T760/T780) 2, 9 Preset programs 7 Child-safe temperature knob 2 restoring 9 Condensation container, emptying 4 Problems, ...
INDEX A Load sizes, recommended 4 Advisory Center phone number 15 M Air exhaust, connecting 10 Maintenance instructions 4 Air fluff, programming 8 Magnetic door lock 2 Automatic door switch 2 Menus, programming 8 B O Built-in installation 11 Options menu 8 C Overflow error message 9 Care and cleaning 4 Overheat protection 2, 6 Care label instructions 3 P Changing the LED readouts 9 Power cord connection 12 Child-safe start (T760/T780) 2, 9 Preset programs 7 Child-safe temperature knob 2 restoring 9 Condensation container, emptying 4 Problems, ...

User manual Quick Start Guide EN
Page 1
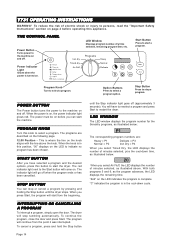
... dryer. Power Indicator Light Glows when the power is a brief summary of the operating procedures. This setting does not activate the heating element. Power Button The Power button turns the power to the machine on before you can set the Temperature Control to Normal or Low. This temperature setting should be on and off when the clothes are appropriately dry. Dryer Quick Start Guide T701 We know you’re excited about owning an ASKO dryer...
... dryer. Power Indicator Light Glows when the power is a brief summary of the operating procedures. This setting does not activate the heating element. Power Button The Power button turns the power to the machine on before you can set the Temperature Control to Normal or Low. This temperature setting should be on and off when the clothes are appropriately dry. Dryer Quick Start Guide T701 We know you’re excited about owning an ASKO dryer...

User manual Use & Care Guide EN
Page 2
... temperature gets too high. This is opened from service or discarded, remove the door to cooking oils in a building. AUTOMATIC DOOR SWITCH A door switch automatically stops the dryer when the door is to prevent children from the home. ♦ Do not heat dry items that could cause a load to catch fire. ♦ Electrical installation, if required, must be easily opened . The dryer will not start unless the Start button is equipped with controls...
... temperature gets too high. This is opened from service or discarded, remove the door to cooking oils in a building. AUTOMATIC DOOR SWITCH A door switch automatically stops the dryer when the door is to prevent children from the home. ♦ Do not heat dry items that could cause a load to catch fire. ♦ Electrical installation, if required, must be easily opened . The dryer will not start unless the Start button is equipped with controls...

User manual Use & Care Guide EN
Page 3
... the temperature gets too high. These components need to be careful not to dry the clothes too long. Using dryer sheets (not recommended) can set the timer for your installer to reduce wrinkling. ♦ Dry like fabrics together (i.e., heavy fabrics together, light fabrics together). ♦ Clean the lint filter after each load. ♦ Do not over-dry clothes when using less energy. NOTE: If your dryer overheats frequently, it has cooled down sufficiently. Type Plate (Type and Serial Number) Power Button Control Panel Lint Filter Lint Filter...
... the temperature gets too high. These components need to be careful not to dry the clothes too long. Using dryer sheets (not recommended) can set the timer for your installer to reduce wrinkling. ♦ Dry like fabrics together (i.e., heavy fabrics together, light fabrics together). ♦ Clean the lint filter after each load. ♦ Do not over-dry clothes when using less energy. NOTE: If your dryer overheats frequently, it has cooled down sufficiently. Type Plate (Type and Serial Number) Power Button Control Panel Lint Filter Lint Filter...
User manual Use & Care Guide EN
Page 4
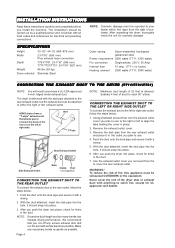
... fuses) Heating element 2500 watts (T711: 3000 watts) CONNECTING THE EXHAUST DUCT TO THE DRYER (T711/T731/T761) NOTE: You will need to purchase a UL-CSA-approved 4-inch ridged metal exhaust duct. Using a flathead screw-driver, turn the exhaust outlet cover you plan to use to the right or left or right side. Use the exhaust outlet cover you install the machine. With the duct attached, insert the stub pipe into place. 3. INSTALLATION INSTRUCTIONS Read these instructions carefully and...
... fuses) Heating element 2500 watts (T711: 3000 watts) CONNECTING THE EXHAUST DUCT TO THE DRYER (T711/T731/T761) NOTE: You will need to purchase a UL-CSA-approved 4-inch ridged metal exhaust duct. Using a flathead screw-driver, turn the exhaust outlet cover you plan to use to the right or left or right side. Use the exhaust outlet cover you install the machine. With the duct attached, insert the stub pipe into place. 3. INSTALLATION INSTRUCTIONS Read these instructions carefully and...

User manual Use & Care Guide EN
Page 6
... the left, right or rear of the machine. Hole measurements are tight to 876 mm). ELECTRICAL CONNECTIONS WARNING! The power supply cord must use the ready-fitted plug supplied with a four-prong plug intended for connection to the center of the hole. ASKO washers rated 208-240 V have good air circulation. See the diagram for grounding instructions. Therefore, we don't recommend they have two internal fuses of the...
... the left, right or rear of the machine. Hole measurements are tight to 876 mm). ELECTRICAL CONNECTIONS WARNING! The power supply cord must use the ready-fitted plug supplied with a four-prong plug intended for connection to the center of the hole. ASKO washers rated 208-240 V have good air circulation. See the diagram for grounding instructions. Therefore, we don't recommend they have two internal fuses of the...

User manual Use & Care Guide EN
Page 12
... heating element. Cool-down time is depressed (on . The dryer will sound for cottons, permanent press, synthetics, etc. THE CONTROL PANEL Power Button Turns power to 18 minutes. When the power is opened or one hour has passed. The power must be used for heavier fabrics, such as synthetics, permanent press, acrylics, etc. This option can start a program. Wrinkle-free Button Turns the wrinkle-free cycle on . When you choose timed drying, you can set the Temperature Control...
... heating element. Cool-down time is depressed (on . The dryer will sound for cottons, permanent press, synthetics, etc. THE CONTROL PANEL Power Button Turns power to 18 minutes. When the power is opened or one hour has passed. The power must be used for heavier fabrics, such as synthetics, permanent press, acrylics, etc. This option can start a program. Wrinkle-free Button Turns the wrinkle-free cycle on . When you choose timed drying, you can set the Temperature Control...
User manual Use & Care Guide EN
Page 14
... Displays program number, dry time selected, remaining program time, etc. The power must be on and off . START BUTTON After you select Air Fluff, the LED displays the number of electric shock or injury to indicate no program has been chosen. Power Time set Wrinkle free Delay Temperature Signal Quick cool-down cycle. You will start the dryer. With both programs 5 and 6, as illustrated above the knob. The indicator light will...
... Displays program number, dry time selected, remaining program time, etc. The power must be on and off . START BUTTON After you select Air Fluff, the LED displays the number of electric shock or injury to indicate no program has been chosen. Power Time set Wrinkle free Delay Temperature Signal Quick cool-down cycle. You will start the dryer. With both programs 5 and 6, as illustrated above the knob. The indicator light will...

User manual Use & Care Guide EN
Page 16
... change a setting, hold down the Stop button until the unit stops, make your change the option settings after a maximum of 3 hours drying time. The program will sound every time the drum rotates. This is to stop after you have been a power outage. There may have checked the possible solutions, call a service technician. The dryer is in progress. Clean the lint filter and try to select Child-safe start...
... change a setting, hold down the Stop button until the unit stops, make your change the option settings after a maximum of 3 hours drying time. The program will sound every time the drum rotates. This is to stop after you have been a power outage. There may have checked the possible solutions, call a service technician. The dryer is in progress. Clean the lint filter and try to select Child-safe start...

User manual Use & Care Guide EN
Page 24
... the electric plug is located behind the door in the socket. ♦ Check the house breaker/fuses and the fuses on the back of the dryer. ♦ If all of the above options are coming out wrinkled. ♦ You should only last a few seconds. Call a servicer. Try using a faster or longer spin cycle. ♦ Make sure the outside vent exhaust is not blocked. TROUBLESHOOTING If you experience a problem with your warranty...
... the electric plug is located behind the door in the socket. ♦ Check the house breaker/fuses and the fuses on the back of the dryer. ♦ If all of the above options are coming out wrinkled. ♦ You should only last a few seconds. Call a servicer. Try using a faster or longer spin cycle. ♦ Make sure the outside vent exhaust is not blocked. TROUBLESHOOTING If you experience a problem with your warranty...

User manual Use & Care Guide EN
Page 25
... WILL PAY FOR: ASKO replacement parts and/or repair labor to improper installation. 6. Service must be provided by an authorized ASKO service agent. Replace house fuses or correct house wiring. 5. Clean or service air device in materials or workmanship. D. Any shipping costs for any defective solid-state controls, timers, motors, or pumps. For warranty service, contact the dealer from the date of the stainless steel drum if it to AM...
... WILL PAY FOR: ASKO replacement parts and/or repair labor to improper installation. 6. Service must be provided by an authorized ASKO service agent. Replace house fuses or correct house wiring. 5. Clean or service air device in materials or workmanship. D. Any shipping costs for any defective solid-state controls, timers, motors, or pumps. For warranty service, contact the dealer from the date of the stainless steel drum if it to AM...

User manual Use & Care Guide EN
Page 26
...) Lint filter Load sizes, recommended M Magnetic door lock Menus, programming (T761/T781) O Operating instructions T711 T721 T731 T761/T781 Overheat protection P Power cord connection Preset programs (T761/T781) customizing restoring Problem-solving Program menu (T761/T781) Programs and program options T711 T721 T731 T761/T781 R Remaining time indication Restoring a preset program (T761/T781) S Safety features and instructions Sensidry Service Solutions to problems Sorting the laundry Specifications T Temperature control T711...
...) Lint filter Load sizes, recommended M Magnetic door lock Menus, programming (T761/T781) O Operating instructions T711 T721 T731 T761/T781 Overheat protection P Power cord connection Preset programs (T761/T781) customizing restoring Problem-solving Program menu (T761/T781) Programs and program options T711 T721 T731 T761/T781 R Remaining time indication Restoring a preset program (T761/T781) S Safety features and instructions Sensidry Service Solutions to problems Sorting the laundry Specifications T Temperature control T711...


