
Use and Care Guide EN
Page 16
... in which it is installed in an inaccessible location or is not installed in accordance with ASKO's published installation instructions. 10 Replacement parts or repair labor on ASKO Products with original model/serial numbers that have been removed, altered or cannot be repaired in your home. 7 ...Repairs to parts or systems resulting from date of the ASKO Product if it was purchased. Residential ASKO Products Used Exclusively for Household/...
... in which it is installed in an inaccessible location or is not installed in accordance with ASKO's published installation instructions. 10 Replacement parts or repair labor on ASKO Products with original model/serial numbers that have been removed, altered or cannot be repaired in your home. 7 ...Repairs to parts or systems resulting from date of the ASKO Product if it was purchased. Residential ASKO Products Used Exclusively for Household/...
Installation instructions EN
Page 2
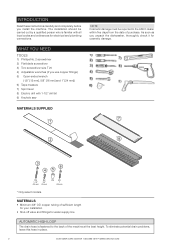
...the back of purchase. MATERIALS SUPPLIED *1 *7 *2 *8 3 6 45 6x 1-1/2" (38 mm) 2x 3/8" (10 mm) 2x 2x 1" (25 mm) * Only select models. WHAT YOU NEED TOOLS 1) Phillips No. 2 screwdriver 2) Flat blade screwdriver 3) Torx screwdriver size T 20 4) Adjustable wrenches (if you use copper fittings) 5) Open-ended wrench...800-898-1879 • WWW.ASKONA.COM The installation should be carried out by a qualified person who is fastened to the ASKO dealer within five days from the date of the machine at the best height. INTRODUCTION Read these instructions carefully and completely before ...
...the back of purchase. MATERIALS SUPPLIED *1 *7 *2 *8 3 6 45 6x 1-1/2" (38 mm) 2x 3/8" (10 mm) 2x 2x 1" (25 mm) * Only select models. WHAT YOU NEED TOOLS 1) Phillips No. 2 screwdriver 2) Flat blade screwdriver 3) Torx screwdriver size T 20 4) Adjustable wrenches (if you use copper fittings) 5) Open-ended wrench...800-898-1879 • WWW.ASKONA.COM The installation should be carried out by a qualified person who is fastened to the ASKO dealer within five days from the date of the machine at the best height. INTRODUCTION Read these instructions carefully and completely before ...
Installation instructions EN
Page 3
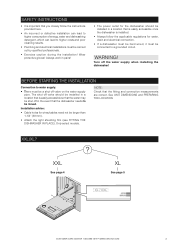
... to higher costs and poor cleaning results. • Plumbing and electrical installations must be a shut off the water supply when installing the dishwasher! Only select models. Turn off valve on the water supply pipe. NOTE: Check that you closely follow the applicable regulations for wires/cables need not be connected to...
... to higher costs and poor cleaning results. • Plumbing and electrical installations must be a shut off the water supply when installing the dishwasher! Only select models. Turn off valve on the water supply pipe. NOTE: Check that you closely follow the applicable regulations for wires/cables need not be connected to...
Installation instructions EN
Page 7
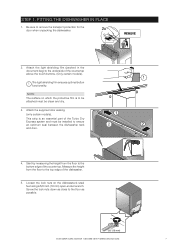
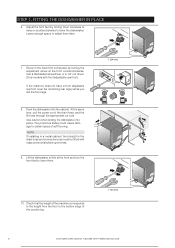
... sure to the floor as possible. 5/8" (16 mm) CUSTOMER CARE CENTER 1-800-898-1879 • WWW.ASKONA.COM 7 Attach the supplied door sealing (only certain models). 1 This strip is to the underside of the dishwasher. 5. Loosen the lock nuts on which the protective film is an essential part of the counter... bottom edge of the Turbo Dry Express system and must be installed to the top edge of the countertop above the touch buttons. (Only certain models). 1 ! Start by measuring the height from the floor to ensure an optimum seal between the dishwasher tank 2 2 and door. 4.
... sure to the floor as possible. 5/8" (16 mm) CUSTOMER CARE CENTER 1-800-898-1879 • WWW.ASKONA.COM 7 Attach the supplied door sealing (only certain models). 1 This strip is to the underside of the dishwasher. 5. Loosen the lock nuts on which the protective film is an essential part of the counter... bottom edge of the Turbo Dry Express system and must be installed to the top edge of the countertop above the touch buttons. (Only certain models). 1 ! Start by measuring the height from the floor to ensure an optimum seal between the dishwasher tank 2 2 and door. 4.
Installation instructions EN
Page 8
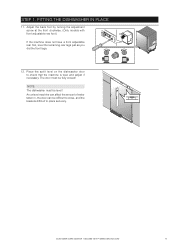
... lower the dishwasher. Push the dishwasher into place. Lift the dishwasher a little at the front counterclockwise. Use a flat-bladed screwdriver or a 1/4˝ nut driver. (Only models with edge protectors/rubber grommets. 9. If the machine does not have a front adjustable rear foot, level the remaining rear legs just as you did the...
... lower the dishwasher. Push the dishwasher into place. Lift the dishwasher a little at the front counterclockwise. Use a flat-bladed screwdriver or a 1/4˝ nut driver. (Only models with edge protectors/rubber grommets. 9. If the machine does not have a front adjustable rear foot, level the remaining rear legs just as you did the...
Installation instructions EN
Page 9
... • WWW.ASKONA.COM 9 NOTE: The dishwasher must be fully closed! Adjust the back foot by turning the adjustment screw at the front clockwise. (Only models with front adjustable rear foot.) If the machine does not have a front adjustable rear foot, level the remaining rear legs just as you did the...
... • WWW.ASKONA.COM 9 NOTE: The dishwasher must be fully closed! Adjust the back foot by turning the adjustment screw at the front clockwise. (Only models with front adjustable rear foot.) If the machine does not have a front adjustable rear foot, level the remaining rear legs just as you did the...
Installation instructions EN
Page 20
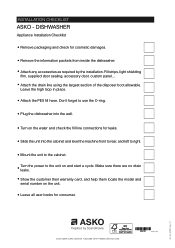
... the PEX fill hose. Make sure there are no drain • Show the customer their warranty card, and help them locate the model and serial number on and start a cycle. power to the cabinet. • Turn the leaks. No 492181 Rev. 01 en ... damages. • Remove the information packets from inside the dishwasher. • Attach any accessories as required by the installation. INSTALLATION CHECKLIST ASKO - DISHWASHER Appliance Installation Checklist • Remove packaging and check for consumer. Fill strips, light shielding film, supplied door sealing, accessory door...
... the PEX fill hose. Make sure there are no drain • Show the customer their warranty card, and help them locate the model and serial number on and start a cycle. power to the cabinet. • Turn the leaks. No 492181 Rev. 01 en ... damages. • Remove the information packets from inside the dishwasher. • Attach any accessories as required by the installation. INSTALLATION CHECKLIST ASKO - DISHWASHER Appliance Installation Checklist • Remove packaging and check for consumer. Fill strips, light shielding film, supplied door sealing, accessory door...


