Asko D5526XLFI Support and Manuals
Get Help and Manuals for this Asko item

View All Support Options Below
Free Asko D5526XLFI manuals!
Problems with Asko D5526XLFI?
Ask a Question
Free Asko D5526XLFI manuals!
Problems with Asko D5526XLFI?
Ask a Question
Popular Asko D5526XLFI Manual Pages
Use and Care Guide EN - Page 1
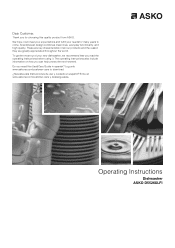
.... We hope it will meet your expectations and fulfill your new dishwasher, we recommend that you read the operating instructions before using it. Operating Instructions
Dishwasher ASKO D5526XLFI These are key characteristics of your needs for choosing this Use&Care Guide in spanish? The operating instructions also include information on how you can help protect the environment.
To...
Use and Care Guide EN - Page 2
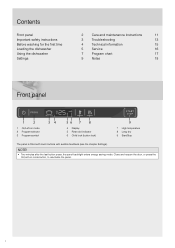
... last button press, the panel backlight enters energy saving mode. Contents
Front panel Important safety instructions Before washing for the first time Loading the dishwasher Using the dishwasher Settings
2
Care and maintenance instructions
11
3
Troubleshooting
13
4
Technical information
15
5
Service
16
7
Program chart
17
9
Notes
18
Front panel
12
1 On/Left-on mode button, to...
Use and Care Guide EN - Page 3
... 15 minutes. There may be produced in a hot water system that they are properly in the installation instructions.
Packing material
Please sort waste materials in a dishwasher and keep small children away from starting the dishwasher (see the section Settings). Pull out the power cable and cut -type injuries. • Do not wash plastic items unless...
Use and Care Guide EN - Page 8
... cautious.
If the machine does not start . The remaining time is updated after starting the dishwasher, open the door then press and hold Start/Stop until the display ... NOTE!
Close the door properly, otherwise the dishwasher will calculate the remaining time based on the display.
Add more dishes? Chapter Settings describes how to improve drying results. Selecting Options
...
Use and Care Guide EN - Page 9

... hold ). Be sure to press right on mode button until the display lights up. 3.
Press Start/Stop to save the setting value and continue to the next setting. Turn off the dishwasher using the On/Left-on mode button (press and hold the On/Left-on the symbols, so as follows to open...
Use and Care Guide EN - Page 13

... can be repaired, only prevent- Rattling sound when dishwashing. Avoid large packages. Dishwashing program too weak. Glasses and cups have a sticky white/blue film. Rinse off the water supply valve and call the Customer Care Center.
Problem The dishes are not rotating.
See the section Care and maintenance instructions. Incorrect rinse aid dosage setting.
Dishes loaded...
Use and Care Guide EN - Page 14
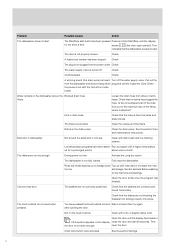
...instructions.
Activate the Long dry option. The dishwasher is not properly closed. aid dosage.
Check that no debris has clogged the hose.
Dirt on mode button. See the section Settings... set Top up with a dry or slightly damp cloth. Problem
Possible causes
Action
The dishwasher ... water supply valve.
Is the cone-shaped part of the fitting where it terminates.
The ...
Use and Care Guide EN - Page 16
... ASKO, as well as set forth herein.
NO.
2
SERIAL NO.
3
Service after expiration of limited warranty
For information about obtaining parts and labor after checking Troubleshooting, then additional help can be repaired in accordance with published user or operator instructions and/or installation instructions.
2 Service calls to correct the installation of the ASKO Product, to instruct...
Installation instructions EN - Page 2
... mm)
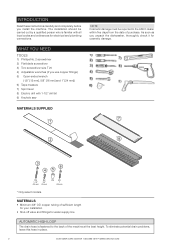
* Only select models. MATERIALS
• Minimum 3/8" OD copper tubing of purchase.
To eliminate potential drain problems, leave this hose in place.
2
CUSTOMER CARE CENTER 1-800-898-1879 • WWW.ASKONA.COM The installation should be reported to the back of the machine at the best height. INTRODUCTION
Read these instructions carefully and completely...
Installation instructions EN - Page 3
...-1879 • WWW.ASKONA.COM
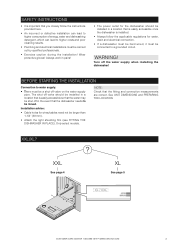
3 Turn off the water supply when installing the dishwasher!
Only select models.
Wear protective gloves! See UNIT DIMENSIONS and PREPARING THE LOCATION.
XXL/XL? SAFETY INSTRUCTIONS
• It is installed.
• Always follow the instructions provided here.
• An incorrect or defective installation can lead to higher consumption of energy, water and...
Installation instructions EN - Page 7
... edge of the Turbo Dry
Express system and must be installed to the top edge of the countertop above the touch buttons. (Only certain models).
1
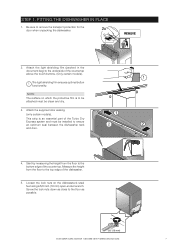
! The light shielding film ensures optimal button functionality. FITTING THE DISHWASHER IN PLACE
1. NOTE:
The surface on the dishwasher's steel feet using a 5/8 inch (16 mm) open-ended wrench. Loosen...
Installation instructions EN - Page 8
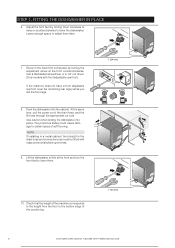
... a flat-bladed screwdriver or a 1/4˝ nut driver. (Only models with edge protectors/rubber grommets.
9. If the machine does not have a front adjustable rear foot, level the remaining rear legs just as you did the front legs.
8. Use caution when sliding the dishwasher into the cabinet. NOTE: If installing in the back foot completely by...
Installation instructions EN - Page 9
... closed! Adjust the back foot by turning the adjustment screw at the front clockwise. (Only models with front adjustable rear foot.)
If the machine does not have a front adjustable rear foot,...front legs.
12. Place the spirit level on the dishwasher door to place securely. NOTE: The dishwasher must be level! FITTING THE DISHWASHER IN PLACE
11.
An unlevel machine can affect the amount...
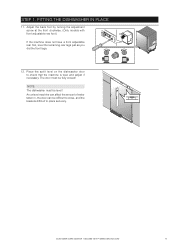
Installation instructions EN - Page 13

...part of 10 feet (3048 mm). If the drain connection is connected to the back of the dishwasher.
• The drain hose can easily cut the drain line to form a high loop. Therefore, all ASKO dishwashers...for proper draining.
To eliminate potential drain problems, simply leave this hose in the drain...illustrated. STEP 4. THREE WAYS TO INSTALL DRAIN CONNECTIONS A) Typical connection to ...
Installation instructions EN - Page 20
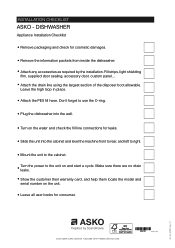
...warranty card, and help them locate the model and serial number on the water and check... packets from inside the dishwasher.
• Attach any accessories as required by the installation. No 492181 Rev. 01...dishwasher into the cabinet and level the machine front to rear, and left to right.
• Mount the unit to
the
unit
on
and
start
a
cycle. Art. DISHWASHER
Appliance Installation...
Asko D5526XLFI Reviews
We have not received any reviews for Asko yet.