

Getting Started
Page 4
...Memory Chapter 5 61 Troubleshooting 61 Problems That Prevent You From Using Your Computer 63 Other Problems 65 Restoring Your Computer's Software 66 Locating Your Product Serial Number Appendix A 67 Specifications Appendix B 69 Care, Use, and Safety Information 69 Cleaning Your iBook G4 69 Carrying Your iBook G4 69 Storing Your iBook G4... 70 Safety Instructions for Setting Up and Using Your Computer 71 General Safety Instructions 72 Battery 72 Connectors and Ports 72 Avoid Hearing Damage 72 Apple and the Environment...
...Memory Chapter 5 61 Troubleshooting 61 Problems That Prevent You From Using Your Computer 63 Other Problems 65 Restoring Your Computer's Software 66 Locating Your Product Serial Number Appendix A 67 Specifications Appendix B 69 Care, Use, and Safety Information 69 Cleaning Your iBook G4 69 Carrying Your iBook G4 69 Storing Your iBook G4... 70 Safety Instructions for Setting Up and Using Your Computer 71 General Safety Instructions 72 Battery 72 Connectors and Ports 72 Avoid Hearing Damage 72 Apple and the Environment...
Getting Started
Page 36
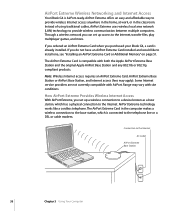
...Memory" on page 51. If you ordered an AirPort Extreme Card when you set up a wireless connection to a device known as a base station, which is AirPort-ready. The AirPort Extreme Card is already installed. How AirPort Extreme Provides Wireless Internet Access With AirPort Extreme, you purchased your iBook G4..., a card is compatible with both the Apple AirPort Extreme Base Station and the original Apple AirPort Base Station and any 802.11b or 802.11g compliant products. Range may...
...Memory" on page 51. If you ordered an AirPort Extreme Card when you set up a wireless connection to a device known as a base station, which is AirPort-ready. The AirPort Extreme Card is already installed. How AirPort Extreme Provides Wireless Internet Access With AirPort Extreme, you purchased your iBook G4..., a card is compatible with both the Apple AirPort Extreme Base Station and the original Apple AirPort Base Station and any 802.11b or 802.11g compliant products. Range may...

Getting Started
Page 51
...) format • 1.25 inch or smaller • 128, 256, 512 MB, or 1 gigabyte (GB) • 200-pin • PC2100 DDR 266 Type RAM 51 Warning: Apple recommends that you can install an AirPort Extreme Card in your Apple Authorized Reseller or from your iBook G4 yourself or have an Apple-certified technician install memory.
...) format • 1.25 inch or smaller • 128, 256, 512 MB, or 1 gigabyte (GB) • 200-pin • PC2100 DDR 266 Type RAM 51 Warning: Apple recommends that you can install an AirPort Extreme Card in your Apple Authorized Reseller or from your iBook G4 yourself or have an Apple-certified technician install memory.

Getting Started
Page 52
... adapter, phone cord, and any other cables connected to the computer to "Installing an AirPort Extreme Card" on page 54 or "Installing Additional Memory" on page 55. Turn the computer over and remove the battery by giving the latch a quarter turn. Removing the Battery and Keyboard 1 ... Warning: The internal components of memory you can install in the memory slot. To install an AirPort Extreme Card or additional memory, you have been using one 1 GB DIMM in your iBook G4 is 1.256 GB, using your iBook G4, wait 30 minutes after shutting down your iBook G4 may be hot. The recommended ...
... adapter, phone cord, and any other cables connected to the computer to "Installing an AirPort Extreme Card" on page 54 or "Installing Additional Memory" on page 55. Turn the computer over and remove the battery by giving the latch a quarter turn. Removing the Battery and Keyboard 1 ... Warning: The internal components of memory you can install in the memory slot. To install an AirPort Extreme Card or additional memory, you have been using one 1 GB DIMM in your iBook G4 is 1.256 GB, using your iBook G4, wait 30 minutes after shutting down your iBook G4 may be hot. The recommended ...

Getting Started
Page 53
... plastic tabs away from your body. • If you are installing an AirPort Extreme Card, continue to the next section. • If you are installing memory, skip to "Installing Additional Memory" on the palm rest. Then lift the keyboard, flip it over, and lay it may be locked.
... plastic tabs away from your body. • If you are installing an AirPort Extreme Card, continue to the next section. • If you are installing memory, skip to "Installing Additional Memory" on the palm rest. Then lift the keyboard, flip it over, and lay it may be locked.
Getting Started
Page 55
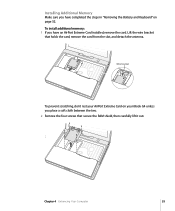
Wire bracket To prevent scratching, don't rest your iBook G4 unless you have an AirPort Extreme Card installed, remove the card. To install additional memory: 1 If you have completed the steps in "Removing the Battery and Keyboard" on your AirPort Extreme Card on page 52. Installing Additional Memory Make sure you place a soft cloth between the two. 2 Remove the four screws that holds the card, remove the card from the slot, and detach the antenna. Lift the wire bracket that secure the RAM shield, then carefully lift it out. Chapter 4 Enhancing Your Computer 55
Wire bracket To prevent scratching, don't rest your iBook G4 unless you have an AirPort Extreme Card installed, remove the card. To install additional memory: 1 If you have completed the steps in "Removing the Battery and Keyboard" on your AirPort Extreme Card on page 52. Installing Additional Memory Make sure you place a soft cloth between the two. 2 Remove the four screws that holds the card, remove the card from the slot, and detach the antenna. Lift the wire bracket that secure the RAM shield, then carefully lift it out. Chapter 4 Enhancing Your Computer 55

Getting Started
Page 56
If the memory card does not latch, do not force the card down on the memory card to make sure it . Spread the tabs in the slot away from the notches in the slot, remove it is fully seated. 56 Chapter 4 Enhancing Your Computer Try reinserting the card to lock it fully into the slot at a 30-degree angle. 3 If you already have a memory card installed in the memory card. Push the card to seat it in place. The card should pop up slightly. 4 Insert the new memory card into the slot. 30O 5 Press down .
If the memory card does not latch, do not force the card down on the memory card to make sure it . Spread the tabs in the slot away from the notches in the slot, remove it is fully seated. 56 Chapter 4 Enhancing Your Computer Try reinserting the card to lock it fully into the slot at a 30-degree angle. 3 If you already have a memory card installed in the memory card. Push the card to seat it in place. The card should pop up slightly. 4 Insert the new memory card into the slot. 30O 5 Press down .

Getting Started
Page 57
Now that you have one. Chapter 4 Enhancing Your Computer 57 6 Replace the RAM shield and AirPort Extreme Card, if you 've completed installing the memory card, proceed to the next section and "Making Sure Your Computer Recognizes the New Memory" on page 59. Replacing the Keyboard and Battery 1 Replace the keyboard by inserting it at an angle and gently lowering it into place.
Now that you have one. Chapter 4 Enhancing Your Computer 57 6 Replace the RAM shield and AirPort Extreme Card, if you 've completed installing the memory card, proceed to the next section and "Making Sure Your Computer Recognizes the New Memory" on page 59. Replacing the Keyboard and Battery 1 Replace the keyboard by inserting it at an angle and gently lowering it into place.

Getting Started
Page 58
Gently press the right side of the battery into place. 4 Reconnect the power adapter and any other cables that were attached. 58 Chapter 4 Enhancing Your Computer 2 To prevent unauthorized access to your AirPort Extreme Card or memory module, you can lock the keyboard by turning the keyboard screw one half turn. ® 3 Replace the battery. Place the left side of the battery down until the battery latch locks into the battery compartment.
Gently press the right side of the battery into place. 4 Reconnect the power adapter and any other cables that were attached. 58 Chapter 4 Enhancing Your Computer 2 To prevent unauthorized access to your AirPort Extreme Card or memory module, you can lock the keyboard by turning the keyboard screw one half turn. ® 3 Replace the battery. Place the left side of the battery down until the battery latch locks into the battery compartment.

Getting Started
Page 59
... computer does not start up your iBook G4 and check the instructions again to make sure that the memory you still have problems, remove the memory and consult the support information that came with this iBook G4 and that shows the total amount of memory installed in your computer, click the...Info button or open System Profiler, located in the Utilities folder in your iBook G4, check whether the computer recognizes the new memory. 1 Start up correctly, shut down your computer. 2 When you see the Mac OS desktop, choose Apple (K) > About This Mac from the menu bar. For a more detailed...
... computer does not start up your iBook G4 and check the instructions again to make sure that the memory you still have problems, remove the memory and consult the support information that came with this iBook G4 and that shows the total amount of memory installed in your computer, click the...Info button or open System Profiler, located in the Utilities folder in your iBook G4, check whether the computer recognizes the new memory. 1 Start up correctly, shut down your computer. 2 When you see the Mac OS desktop, choose Apple (K) > About This Mac from the menu bar. For a more detailed...
Getting Started
Page 61
... that occur only with a specific application may not be sure the problem is not compatible with your iBook G4, check here first for a few seconds to shut down the computer. 61 Troubleshooting 5 5 If ... information in Mac OS Help, on your work in the AppleCare Knowledge Base at kbase.info.apple.com. Things to quit. If a dialog appears, select the application you would like to ...be compatible with the Classic environment.) • Any new hardware, such as additional memory or a peripheral, that led up . • If you are working with the version of things...
... that occur only with a specific application may not be sure the problem is not compatible with your iBook G4, check here first for a few seconds to shut down the computer. 61 Troubleshooting 5 5 If ... information in Mac OS Help, on your work in the AppleCare Knowledge Base at kbase.info.apple.com. Things to quit. If a dialog appears, select the application you would like to ...be compatible with the Classic environment.) • Any new hardware, such as additional memory or a peripheral, that led up . • If you are working with the version of things...

Getting Started
Page 63
• If you recently installed additional memory, make sure that it is correctly installed and that it is compatible with your iBook G4 for information on contacting Apple for service. Other Problems If you forgot your password You can configure your work. For more information, choose Help > Mac Help ...and hold down the C key as it allows the computer to start up . • If you have two iBook G4 Software Install and Restore DVDs, insert the first disc into your iBook G4 except the power adapter. 2 Hold down the Command (x) and Control keys and press the Power button (®) to...
• If you recently installed additional memory, make sure that it is correctly installed and that it is compatible with your iBook G4 for information on contacting Apple for service. Other Problems If you forgot your password You can configure your work. For more information, choose Help > Mac Help ...and hold down the C key as it allows the computer to start up . • If you have two iBook G4 Software Install and Restore DVDs, insert the first disc into your iBook G4 except the power adapter. 2 Hold down the Command (x) and Control keys and press the Power button (®) to...
Getting Started
Page 64
...wireless communication and reduce this range. Then restart your computer and hold down the Option key as the memory or processor. Repositioning or rotating the computer may be using Apple Hardware Test: • If you have trouble ejecting a disc m Quit any applications that doesn't work...within antenna range of your computer's components, such as it into your iBook G4 came with one of the other computer or the network's access point. If your iBook G4 came with two Software Install and Restore DVDs, Apple Hardware Test is running and has a wireless access point. • ...
...wireless communication and reduce this range. Then restart your computer and hold down the Option key as the memory or processor. Repositioning or rotating the computer may be using Apple Hardware Test: • If you have trouble ejecting a disc m Quit any applications that doesn't work...within antenna range of your computer's components, such as it into your iBook G4 came with one of the other computer or the network's access point. If your iBook G4 came with two Software Install and Restore DVDs, Apple Hardware Test is running and has a wireless access point. • ...
Getting Started
Page 67
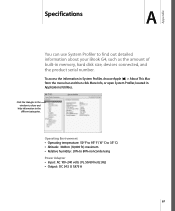
... C) • Altitude: 3048 m (10,000 ft.) maximum • Relative humidity: 20% to find out detailed information about your iBook G4, such as the amount of built-in memory, hard disk size, devices connected, and the product serial number. Click the triangles in the window to show and hide information in... Applications/Utilities. To access the information in System Profiler, choose Apple (K) > About This Mac from the menu ...
... C) • Altitude: 3048 m (10,000 ft.) maximum • Relative humidity: 20% to find out detailed information about your iBook G4, such as the amount of built-in memory, hard disk size, devices connected, and the product serial number. Click the triangles in the window to show and hide information in... Applications/Utilities. To access the information in System Profiler, choose Apple (K) > About This Mac from the menu ...

Getting Started
Page 70
... which may create excessive heat and drain your battery. Do not use , place your iBook G4 on your computer unless all of the case. The bottom of the iBook G4 case functions as installing memory or removing the hard disk. The bottom of the case is raised slightly to the modem... when storing your computer (especially important when storing your computer for other electronic devices (including other iBook G4 models and other soft material when it is on, as installing memory or removing the hard disk. Never turn on a flat, stable surface. Always disconnect the power adapter and remove ...
... which may create excessive heat and drain your battery. Do not use , place your iBook G4 on your computer unless all of the case. The bottom of the iBook G4 case functions as installing memory or removing the hard disk. The bottom of the case is raised slightly to the modem... when storing your computer (especially important when storing your computer for other electronic devices (including other iBook G4 models and other soft material when it is on, as installing memory or removing the hard disk. Never turn on a flat, stable surface. Always disconnect the power adapter and remove ...

Getting Started
Page 103
...87 setting up a connection 77 amber light 21 analog phone line 11, 39 Apple 56K internal modem 39 Apple VGA Display Adapter 39 Apple Video Adapter 40 application freeze 29 B base station 36 battery 16, 45,...DVDs 44 C cable modem 81 setting up 77 calibrating your battery 16 carrying your iBook G4 69 CDs 41 changing image size 20 password 63 System Preferences 24 the desktop 24 the resolution 20 the screen 20 charging the battery 47 checking memory... drives 34 headphones 26 to an Ethernet network 12 two computers 34, 35 USB printers 32 videocameras 34 wirelessly 36 conserving battery power 94 103
...87 setting up a connection 77 amber light 21 analog phone line 11, 39 Apple 56K internal modem 39 Apple VGA Display Adapter 39 Apple Video Adapter 40 application freeze 29 B base station 36 battery 16, 45,...DVDs 44 C cable modem 81 setting up 77 calibrating your battery 16 carrying your iBook G4 69 CDs 41 changing image size 20 password 63 System Preferences 24 the desktop 24 the resolution 20 the screen 20 charging the battery 47 checking memory... drives 34 headphones 26 to an Ethernet network 12 two computers 34, 35 USB printers 32 videocameras 34 wirelessly 36 conserving battery power 94 103
Getting Started
Page 104
...cleaning 69 goes black 63 mirroring 40 release button 7 disposing of batteries 47, 98 downloading software 26 DSL 78, 81 modem 77 DVD burning 44 DVD discs 43 Dynamic Host Configuration Protocol (DHCP) 81 E ejecting a disc 42 ergonomics 73 Ethernet networking capability 38 port 9, 38 ...71 green light 21 H hand positions 73 headphone port 9 I image size 20 inserting a disc 42 installation instructions 5 installing AirPort Extreme Card 51 memory 55 internal modem 39 port 9 Internet configuration 80 connection 65, 93 using Setup Assistant 87 Internet service provider 75 inventory of items 5 ISP 75 ...
...cleaning 69 goes black 63 mirroring 40 release button 7 disposing of batteries 47, 98 downloading software 26 DSL 78, 81 modem 77 DVD burning 44 DVD discs 43 Dynamic Host Configuration Protocol (DHCP) 81 E ejecting a disc 42 ergonomics 73 Ethernet networking capability 38 port 9, 38 ...71 green light 21 H hand positions 73 headphone port 9 I image size 20 inserting a disc 42 installation instructions 5 installing AirPort Extreme Card 51 memory 55 internal modem 39 port 9 Internet configuration 80 connection 65, 93 using Setup Assistant 87 Internet service provider 75 inventory of items 5 ISP 75 ...
