
Installation Instruction
Page 2
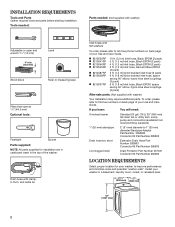
... minimize noise and possible "washer walk". Tools needed: Parts needed: (Not supplied with washer) Adjustable or open end wrench 9/16" (14 mm) 4" min (102 mm) Level Wood block Ruler or measuring tape Pliers that open to 1" (25 mm) diameter Standpipe Adapter Part Number 3363920 Connector Kit Part Number 285835 Drain hose too short Extension Drain Hose Part Number 285863 Connector Kit Part Number 285835 Lint clogged drain Drain Protector Part Number 367031 Connector Kit Part Number 285835 LOCATION REQUIREMENTS Select proper location for installation...
... minimize noise and possible "washer walk". Tools needed: Parts needed: (Not supplied with washer) Adjustable or open end wrench 9/16" (14 mm) 4" min (102 mm) Level Wood block Ruler or measuring tape Pliers that open to 1" (25 mm) diameter Standpipe Adapter Part Number 3363920 Connector Kit Part Number 285835 Drain hose too short Extension Drain Hose Part Number 285863 Connector Kit Part Number 285835 Lint clogged drain Drain Protector Part Number 367031 Connector Kit Part Number 285835 LOCATION REQUIREMENTS Select proper location for installation...
Installation Instruction
Page 3
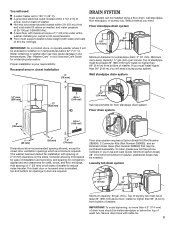
... for a standpipe drain: 2" (51 mm). n Hot and cold water faucets located within 4 ft (1.2 m) of power cord on all sides of wash tub. Water remaining in washer after use may cause damage in your Use and Care Guide. install no higher than 4.5" (114 mm) of washer. Consider allowing more than 96" (2.44 m) from bottom of drain hose should be at least 39" (990 mm) high; You will need . n A grounded electrical outlet located within 3 ft...
... for a standpipe drain: 2" (51 mm). n Hot and cold water faucets located within 4 ft (1.2 m) of power cord on all sides of wash tub. Water remaining in washer after use may cause damage in your Use and Care Guide. install no higher than 4.5" (114 mm) of washer. Consider allowing more than 96" (2.44 m) from bottom of drain hose should be at least 39" (990 mm) high; You will need . n A grounded electrical outlet located within 3 ft...
Installation Instruction
Page 4
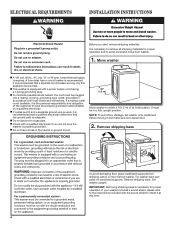
.... If your washer includes a sound shield, please refer to the instructions included with a power supply cord having a 3 prong grounding plug. n Check with local codes and ordinances. Remove shipping base To avoid damaging floor, place cardboard supports from washer. 1. ELECTRICAL REQUIREMENTS INSTALLATION INSTRUCTIONS Before you are not sure the washer is necessary for proper operation and to avoid excessive noise from shipping carton on cardboard supports. or 20-amp, fused electrical supply is...
.... If your washer includes a sound shield, please refer to the instructions included with a power supply cord having a 3 prong grounding plug. n Check with local codes and ordinances. Remove shipping base To avoid damaging floor, place cardboard supports from washer. 1. ELECTRICAL REQUIREMENTS INSTALLATION INSTRUCTIONS Before you are not sure the washer is necessary for proper operation and to avoid excessive noise from shipping carton on cardboard supports. or 20-amp, fused electrical supply is...
Installation Instruction
Page 6
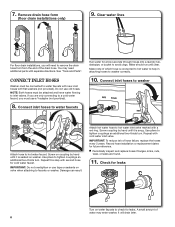
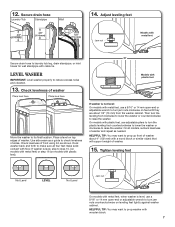
... water faucets Run water for leaks. Attach hot water hose to check for a few seconds through hoses into a laundry tub, drainpipe, or bucket to washer correctly. 10. Use pliers to hot water faucet. Repeat this step with flat washers (not provided). A small amount of hose failure, replace the hoses every 5 years. CONNECT INLET HOSES Washer must use a Y-adapter (not provided). 8. Damage can result. Record hose installation or replacement dates for cold water faucet. 7. You may enter washer. See "Tools and Parts". Remove drain hose...
... water faucets Run water for leaks. Attach hot water hose to check for a few seconds through hoses into a laundry tub, drainpipe, or bucket to washer correctly. 10. Use pliers to hot water faucet. Repeat this step with flat washers (not provided). A small amount of hose failure, replace the hoses every 5 years. CONNECT INLET HOSES Washer must use a Y-adapter (not provided). 8. Damage can result. Record hose installation or replacement dates for cold water faucet. 7. You may enter washer. See "Tools and Parts". Remove drain hose...
Installation Instruction
Page 7
... laundry tub leg, drain standpipe, or inlet hoses for wall standpipe with metal feet Secure drain hose to check levelness of washer. 15. Tighten leveling feet Not Level LEVEL Not Level Jam nut On models with floor. HELPFUL TIP: You may want to turn jam nuts clockwise on leveling feet tightly against washer cabinet. 12. If washer is level, use adjustable pliers to turn the leveling foot clockwise to lower the washer or counterclockwise to reduce excess noise...
... laundry tub leg, drain standpipe, or inlet hoses for wall standpipe with metal feet Secure drain hose to check levelness of washer. 15. Tighten leveling feet Not Level LEVEL Not Level Jam nut On models with floor. HELPFUL TIP: You may want to turn jam nuts clockwise on leveling feet tightly against washer cabinet. 12. If washer is level, use adjustable pliers to turn the leveling foot clockwise to lower the washer or counterclockwise to reduce excess noise...
Installation Instruction
Page 8
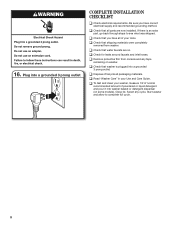
... "Washer Care" in your washer, measure 1/2 of normal recommended amount of powdered or liquid detergent and pour it into a grounded 3 prong outlet COMPLETE INSTALLATION CHECKLIST q Check electrical requirements. q Check that all packaging materials. q Dispose of your tools. Close lid. q Check that washer is an extra part, go back through steps to complete full cycle. 8 q Check for leaks around faucets and inlet hoses. q To test and clean your Use and Care Guide. q Check that shipping materials were completely removed...
... "Washer Care" in your washer, measure 1/2 of normal recommended amount of powdered or liquid detergent and pour it into a grounded 3 prong outlet COMPLETE INSTALLATION CHECKLIST q Check electrical requirements. q Check that all packaging materials. q Dispose of your tools. Close lid. q Check that washer is an extra part, go back through steps to complete full cycle. 8 q Check for leaks around faucets and inlet hoses. q To test and clean your Use and Care Guide. q Check that shipping materials were completely removed...
Use and Care Manual
Page 3
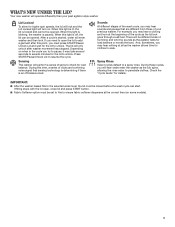
... stops with the lid open the lid to ensure fabric softener dispenses at all as the lid lock goes through a self-test. Your new washer will perform a series of the cycle as the washer allows time for clothes to soak. When this time, a series of clicks and a whirring noise signal that are different from those of humming and whirring sounds as the tub spins, allowing the rinse water to check for higher spin speeds, the lid will lock...
... stops with the lid open the lid to ensure fabric softener dispenses at all as the lid lock goes through a self-test. Your new washer will perform a series of the cycle as the washer allows time for clothes to soak. When this time, a series of clicks and a whirring noise signal that are different from those of humming and whirring sounds as the tub spins, allowing the rinse water to check for higher spin speeds, the lid will lock...
Use and Care Manual
Page 4
... the START/Pause/Unlock Lid button is pressed, the washer will begin until the lid has been closed when the machine is added at the correct time in a cold and cool water wash, some warm water may be added to the washer to maintain a minimum temperature. 3 FABRIC SOFTENER (on some models and cycles, warm and hot water may be set to the selected water level. If the lid is open when the water stops entering the machine, the cycle...
... the START/Pause/Unlock Lid button is pressed, the washer will begin until the lid has been closed when the machine is added at the correct time in a cold and cool water wash, some warm water may be added to the washer to maintain a minimum temperature. 3 FABRIC SOFTENER (on some models and cycles, warm and hot water may be set to the selected water level. If the lid is open when the water stops entering the machine, the cycle...
Use and Care Manual
Page 5
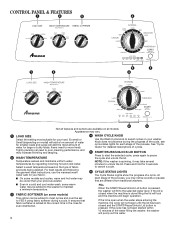
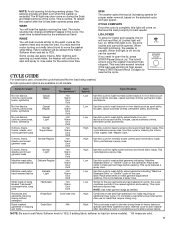
... is normal. SPIN The washer spins the load at high speed. Remove the load promptly for proper water removal, based on briefly (short hum) to wash soiled garments indicating "Machine Washable Silks" or "Gentle" cycle on the care label. Press START/Pause/Unlock Lid again to open the lid, press START/Pause/Unlock Lid. Machine-wash silks, hand-washed fabrics Delicate Light Hot Warm Cool Cold Low Use this cycle to move the basket while filling. To restart the washer after a power failure. CYCLE GUIDE...
... is normal. SPIN The washer spins the load at high speed. Remove the load promptly for proper water removal, based on briefly (short hum) to wash soiled garments indicating "Machine Washable Silks" or "Gentle" cycle on the care label. Press START/Pause/Unlock Lid again to open the lid, press START/Pause/Unlock Lid. Machine-wash silks, hand-washed fabrics Delicate Light Hot Warm Cool Cold Low Use this cycle to move the basket while filling. To restart the washer after a power failure. CYCLE GUIDE...
Use and Care Manual
Page 6
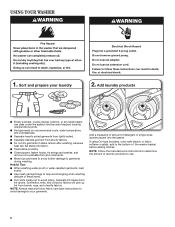
... chenille fabrics. USING YOUR WASHER WARNING 1. Do not use an adapter. If using Oxi-type boosters, color-safe bleach, or fabric softener crystals, add to use. 6 Synthetics, knits, and corduroy fabrics will pick up lint from lint-givers. Sort and prepare your garments. Add laundry products ■■ Empty pockets. Do not remove ground prong. Failure to follow fabric care label instructions to avoid damage to your laundry Electrical Shock Hazard Plug...
... chenille fabrics. USING YOUR WASHER WARNING 1. Do not use an adapter. If using Oxi-type boosters, color-safe bleach, or fabric softener crystals, add to use. 6 Synthetics, knits, and corduroy fabrics will pick up lint from lint-givers. Sort and prepare your garments. Add laundry products ■■ Empty pockets. Do not remove ground prong. Failure to follow fabric care label instructions to avoid damage to your laundry Electrical Shock Hazard Plug...
Use and Care Manual
Page 7
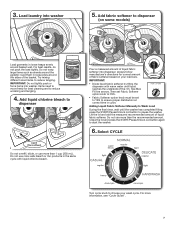
... washer has completed filling, press the START/Pause/Unlock Lid button to start the washer. 6. Pour a measured amount of the basket. Items need to move freely for correct amount of liquid fabric softener. Add liquid chlorine bleach to dispenser (on your wash cycle. Do not use color-safe bleach or Oxi products in loose piles around the sides of liquid fabric softener into dispenser; Try mixing different sized items to ensure proper distribution at correct time...
... washer has completed filling, press the START/Pause/Unlock Lid button to start the washer. 6. Pour a measured amount of the basket. Items need to move freely for correct amount of liquid fabric softener. Add liquid chlorine bleach to dispenser (on your wash cycle. Do not use color-safe bleach or Oxi products in loose piles around the sides of liquid fabric softener into dispenser; Try mixing different sized items to ensure proper distribution at correct time...
Use and Care Manual
Page 8
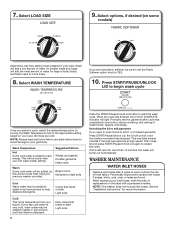
.... WASHER MAINTENANCE WATER INLET HOSES Replace inlet hoses after cycle has completed to move freely. 8. See the "Installation Instructions" for your load. When the cycle has finished, the CYCLE COMPLETE indicator will unlock once the washer movement has stopped. Periodically inspect and replace inlet hoses if bulges, kinks, cuts, wear, or leaks are cold. Promptly remove garments after 5 years of use to the appropriate setting based on your load. This will pump out automatically. Select WASH TEMPERATURE If you are using fabric softener...
.... WASHER MAINTENANCE WATER INLET HOSES Replace inlet hoses after cycle has completed to move freely. 8. See the "Installation Instructions" for your load. When the cycle has finished, the CYCLE COMPLETE indicator will unlock once the washer movement has stopped. Periodically inspect and replace inlet hoses if bulges, kinks, cuts, wear, or leaks are cold. Promptly remove garments after 5 years of use to the appropriate setting based on your load. This will pump out automatically. Select WASH TEMPERATURE If you are using fabric softener...
Use and Care Manual
Page 9
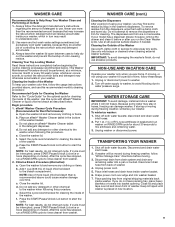
... needed. NON-USE AND VACATION CARE Operate your washer, you are not removable. If moving, or not using your washer only when you may find some water may increase the rate at which detergent and soil residue accumulate inside of liquid chlorine bleach to the bleach compartment. Because some residue buildup in new location. 9 To winterize washer: 1. Disconnect and drain water inlet hoses. 2. Place inlet hoses and drain hose inside washer. If you run a RINSE/SPIN cycle to rinse cleaner...
... needed. NON-USE AND VACATION CARE Operate your washer, you are not removable. If moving, or not using your washer only when you may find some water may increase the rate at which detergent and soil residue accumulate inside of liquid chlorine bleach to the bleach compartment. Because some residue buildup in new location. 9 To winterize washer: 1. Disconnect and drain water inlet hoses. 2. Place inlet hoses and drain hose inside washer. If you run a RINSE/SPIN cycle to rinse cleaner...
Use and Care Manual
Page 10
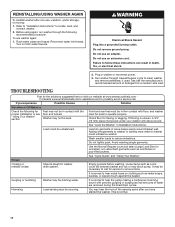
... manufacturer's recommended amount of water are removed during the Drain/Spin cycles. Check floor for a medium-size load. Load dry garments in washer or reconnect power. 3. Humming Load sensing may be unbalanced. Turn on clothing such as coins could unbalance washer. Load could be occuring. Do not tightly pack. Avoid washing single garments. Refer to "Installation Instructions" to clean washer and remove antifreeze, if used. Do not use an extension cord. Run washer through the following for...
... manufacturer's recommended amount of water are removed during the Drain/Spin cycles. Check floor for a medium-size load. Load dry garments in washer or reconnect power. 3. Humming Load sensing may be unbalanced. Turn on clothing such as coins could unbalance washer. Load could be occuring. Do not tightly pack. Avoid washing single garments. Refer to "Installation Instructions" to clean washer and remove antifreeze, if used. Do not use an extension cord. Run washer through the following for...
Use and Care Manual
Page 11
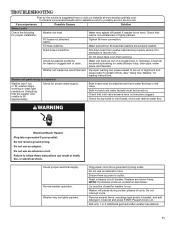
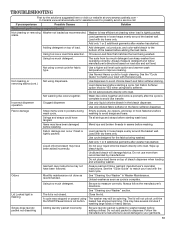
... to fill appropriately) Check for washer to run or fill, washer stops working or wash light remains on . Drain hose connection. See "Using Your Washer" for proper installation: Washer not level. Reset a tripped circuit breaker. NOTE: If problems continue, contact an electrician. Close lid and press START/Pause/Unlock Lid. Check proper electrical supply. Check that inlet valve screens have water flowing to drainpipe or laundry tub. Do not use an extension cord. Remove several items, rearrange load evenly in inlet hoses, which can cause...
... to fill appropriately) Check for washer to run or fill, washer stops working or wash light remains on . Drain hose connection. See "Using Your Washer" for proper installation: Washer not level. Reset a tripped circuit breaker. NOTE: If problems continue, contact an electrician. Close lid and press START/Pause/Unlock Lid. Check proper electrical supply. Check that inlet valve screens have water flowing to drainpipe or laundry tub. Do not use an extension cord. Remove several items, rearrange load evenly in inlet hoses, which can cause...
Use and Care Manual
Page 12
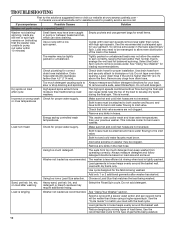
... load being washed. Remove any clogs from too much detergent. This washer uses cooler wash and rinse water temperatures than 4.5" (114 mm). Load not rinsed Check for proper installation. Both hoses must be attached and have both hot and cold water flowing to develop dry spots during the final spin can keep washer from operating correctly. Inlet valve screens on load after washer has started. The suds from drain hose. Washer not loaded as recommended. Use cycle designed for your previous washer. Using too low a Load Size...
... load being washed. Remove any clogs from too much detergent. This washer uses cooler wash and rinse water temperatures than 4.5" (114 mm). Load not rinsed Check for proper installation. Both hoses must be attached and have both hot and cold water flowing to develop dry spots during the final spin can keep washer from operating correctly. Inlet valve screens on load after washer has started. The suds from drain hose. Washer not loaded as recommended. Use cycle designed for your previous washer. Using too low a Load Size...
Use and Care Manual
Page 13
...the lid. Add only 1 or 2 additional garments after washer has started . Fabric damage can keep washer from operating correctly. Load with dry items only. Undiluted bleach will not unlock until the the START/Pause/Unlock Lid button. Always measure detergent and follow manufacturer's directions based on load size and soil level. Use Normal Heavy cycle for the fabrics being washed. Wash like colors together. Use only diluted fabric softener in Washer Maintenance. Use dispensers to improve cleaning. Do not pour liquid chlorine bleach directly onto load. Odors...
...the lid. Add only 1 or 2 additional garments after washer has started . Fabric damage can keep washer from operating correctly. Load with dry items only. Undiluted bleach will not unlock until the the START/Pause/Unlock Lid button. Always measure detergent and follow manufacturer's directions based on load size and soil level. Use Normal Heavy cycle for the fabrics being washed. Wash like colors together. Use only diluted fabric softener in Washer Maintenance. Use dispensers to improve cleaning. Do not pour liquid chlorine bleach directly onto load. Odors...
Use and Care Manual
Page 14
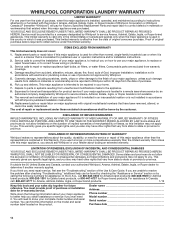
... designated by Whirlpool. 5. This warranty gives you specific legal rights, and you ever need repair service, first see the "Troubleshooting" section of the Use & Care Guide. If outside the 50 United States and Canada, contact your authorized Whirlpool, Amana, Admiral, Estate, Inglis, or Roper dealer to repair or replace appliance light bulbs, air filters, or water filters. Service calls to determine if another warranty applies. YOUR SOLE AND...
... designated by Whirlpool. 5. This warranty gives you specific legal rights, and you ever need repair service, first see the "Troubleshooting" section of the Use & Care Guide. If outside the 50 United States and Canada, contact your authorized Whirlpool, Amana, Admiral, Estate, Inglis, or Roper dealer to repair or replace appliance light bulbs, air filters, or water filters. Service calls to determine if another warranty applies. YOUR SOLE AND...
Dimensions
Page 1
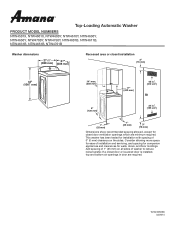
...-Loading Automatic Washer PRODUCT MODEL NUMBERS NTW4501X, NTW4601X, NTW4600Y, NTW4610Y, NTW4630Y, NTW4650Y, NTW4700Y, NTW4750Y, NTW4601B, NTW4611B, NTW4631B, NTW4651B, NTW4701B Washer dimensions 271/2" 27" (699 mm) (686 mm) Recessed area or closet installation 3" (76 mm) 42" (1067 mm) 14" max. (356 mm) 17" (432 mm) 48 in.2 (310 cm2) 5" (126 mm) 24 in door are minimum required. Add spacing of washer to reduce noise...
...-Loading Automatic Washer PRODUCT MODEL NUMBERS NTW4501X, NTW4601X, NTW4600Y, NTW4610Y, NTW4630Y, NTW4650Y, NTW4700Y, NTW4750Y, NTW4601B, NTW4611B, NTW4631B, NTW4651B, NTW4701B Washer dimensions 271/2" 27" (699 mm) (686 mm) Recessed area or closet installation 3" (76 mm) 42" (1067 mm) 14" max. (356 mm) 17" (432 mm) 48 in.2 (310 cm2) 5" (126 mm) 24 in door are minimum required. Add spacing of washer to reduce noise...

Dimensions
Page 2
... need . IMPORTANT: To avoid siphoning, no more than 96" (2.44 m) from bottom of drain hose should be installed using a floor drain, wall standpipe, floor standpipe, or laundry tub. or 20-amp, fused electrical supply is recommended. Dimensions are for a standpipe drain: 2" (51 mm). install no higher than 4.5" (114 mm) of washer. (Additional hoses may be purchased separately. Specifications subject to change without notice. Floor standpipe drain system Floor drain...
... need . IMPORTANT: To avoid siphoning, no more than 96" (2.44 m) from bottom of drain hose should be installed using a floor drain, wall standpipe, floor standpipe, or laundry tub. or 20-amp, fused electrical supply is recommended. Dimensions are for a standpipe drain: 2" (51 mm). install no higher than 4.5" (114 mm) of washer. (Additional hoses may be purchased separately. Specifications subject to change without notice. Floor standpipe drain system Floor drain...


