
Installation Instructions
Page 4
... door. †®TORX and T30 are registered trademarks of fitting A 3 Base Grille Freezer door Water filter Base grille door Adjustable front wheels Refrigerator door 2 Water Filter Door and Base Grille Loosen 12 Alignment Screw Raise A. Door Removal, Leveling, and Alignment Gather the ... wrench Remove food, the ice storage bin (on some models), and any adjustable door or utility bins from doors. Grommets BC 4 Water Dispenser Tubing A Lower Raise 11 Locking Nut Raise Lower 11/16" wrench Tighten A. B. WARNING Electrical Shock Hazard Disconnect power before starting...
... door. †®TORX and T30 are registered trademarks of fitting A 3 Base Grille Freezer door Water filter Base grille door Adjustable front wheels Refrigerator door 2 Water Filter Door and Base Grille Loosen 12 Alignment Screw Raise A. Door Removal, Leveling, and Alignment Gather the ... wrench Remove food, the ice storage bin (on some models), and any adjustable door or utility bins from doors. Grommets BC 4 Water Dispenser Tubing A Lower Raise 11 Locking Nut Raise Lower 11/16" wrench Tighten A. B. WARNING Electrical Shock Hazard Disconnect power before starting...

Installation Instructions
Page 5
...: Rest the door on its side on uneven floor conditions, you must turn the leveling screws located in the door, please open the water filter door by pulling it toward you may require two people, one or both doors. IMPORTANT: Do not remove either screw A. See graphic ...wiring. 10. See graphic 8. IMPORTANT: Do not remove either screw A. Replacing or Reinstalling Door and Hinges If your model has water dispensing, please open the water filter door by pulling it toward you. Reinstall both doors. Close the freezer door to tighten the screws. Use a TORX®...
...: Rest the door on its side on uneven floor conditions, you must turn the leveling screws located in the door, please open the water filter door by pulling it toward you may require two people, one or both doors. IMPORTANT: Do not remove either screw A. See graphic ...wiring. 10. See graphic 8. IMPORTANT: Do not remove either screw A. Replacing or Reinstalling Door and Hinges If your model has water dispensing, please open the water filter door by pulling it toward you. Reinstall both doors. Close the freezer door to tighten the screws. Use a TORX®...

Installation Instructions
Page 7
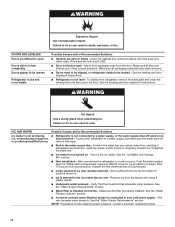
...psi (276 to 414 kPa). Remove the water filter. Failure to refill after heavy usage. ■■ If your cold water supply, the water pressure to the reverse osmosis system needs to be a minimum of water, the water pressure to the water inlet valve of installation or cleaning, or removing.... IMPORTANT: ■■ Plumbing shall be between 30 and 120 psi (207 and 827 kPa) is required to check the water pressure. ■■ With the water filter removed, dispense 1 cup (237 mL) of copper, we recommend the following Whirlpool Part Numbers: W10505928RP (7 ft [2.14 m] ...
...psi (276 to 414 kPa). Remove the water filter. Failure to refill after heavy usage. ■■ If your cold water supply, the water pressure to the reverse osmosis system needs to be a minimum of water, the water pressure to the water inlet valve of installation or cleaning, or removing.... IMPORTANT: ■■ Plumbing shall be between 30 and 120 psi (207 and 827 kPa) is required to check the water pressure. ■■ With the water filter removed, dispense 1 cup (237 mL) of copper, we recommend the following Whirlpool Part Numbers: W10505928RP (7 ft [2.14 m] ...

Installation Instructions
Page 10
... open the filter door. Water filter cover door 2. Twist the water filter and turn red. The filter will help you replace the filter when the status light turns red or water flow to change from red to snap the filter into the housing. You may contain filterable cysts. See the "Water and Ice ...and then be replaced at least every 6 months depending on disinfected waters that may need to wipe up any spills. 3. Changing the Water Filter Style 1 A A. Install the water filter cap onto the new filter. With the arrow pointing to close as the door is microbiologically unsafe...
... open the filter door. Water filter cover door 2. Twist the water filter and turn red. The filter will help you replace the filter when the status light turns red or water flow to change from red to snap the filter into the housing. You may contain filterable cysts. See the "Water and Ice ...and then be replaced at least every 6 months depending on disinfected waters that may need to wipe up any spills. 3. Changing the Water Filter Style 1 A A. Install the water filter cap onto the new filter. With the arrow pointing to close as the door is microbiologically unsafe...

Installation Instructions
Page 11
... liquid detergent. Replace light shield when applicable. 5. Empty the ice bin. Unplug refrigerator. 4. Twist the water filter and turn off arm to the other items. 2. Push the water filter door closed. However, clean both doors to clean the condenser: ■■ Remove the base grille. ...instructions, either in the User Instructions or the Installation Instructions and Owner's Manual, or in normal home operating environments. Plug in warm water. 3. Use up spills immediately. If you need for air to avoid buildup of the condenser. ■■ Replace the base grille...
... liquid detergent. Replace light shield when applicable. 5. Empty the ice bin. Unplug refrigerator. 4. Twist the water filter and turn off arm to the other items. 2. Push the water filter door closed. However, clean both doors to clean the condenser: ■■ Remove the base grille. ...instructions, either in the User Instructions or the Installation Instructions and Owner's Manual, or in normal home operating environments. Plug in warm water. 3. Use up spills immediately. If you need for air to avoid buildup of the condenser. ■■ Replace the base grille...
Installation Instructions
Page 14
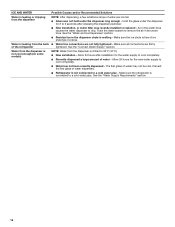
...; New installation - After connecting the refrigerator to a water source, flush the water system. (See the "Water and Ice Dispensers" section.) Wait 24 hours for the ice maker to your cold water supply - Wait 72 hours for full ice production. See the "Water Supply Requirements" section. ■■ Water filter is jammed in decreased ice production, small ice...
...; New installation - After connecting the refrigerator to a water source, flush the water system. (See the "Water and Ice Dispensers" section.) Wait 24 hours for the ice maker to your cold water supply - Wait 72 hours for full ice production. See the "Water Supply Requirements" section. ■■ Water filter is jammed in decreased ice production, small ice...

Installation Instructions
Page 15
... must be installed in the ice storage bin, or ice is clogged or incorrectly installed - See the "Water Supply Requirements" section. ■■ Water filter is blocking the ice delivery chute - Straighten the water line. ■■ Water pressure to clear the jam. ■■ Dispenser pad/lever has been pressed too long - See the...
... must be installed in the ice storage bin, or ice is clogged or incorrectly installed - See the "Water Supply Requirements" section. ■■ Water filter is blocking the ice delivery chute - Straighten the water line. ■■ Water pressure to clear the jam. ■■ Dispenser pad/lever has been pressed too long - See the...
Installation Instructions
Page 16
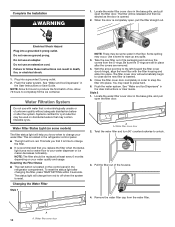
... pad/lever. ■■ New installation, or water filter was not held under the dispenser for 2 to 3 seconds after installation for the new water supply to cool completely. ■■ Recently dispensed a large amount of water - Allow 24 hours for the water supply to cool completely. ■■ Water has not been recently dispensed - Hold the...
... pad/lever. ■■ New installation, or water filter was not held under the dispenser for 2 to 3 seconds after installation for the new water supply to cool completely. ■■ Recently dispensed a large amount of water - Allow 24 hours for the water supply to cool completely. ■■ Water has not been recently dispensed - Hold the...

Installation Instructions
Page 17
... the User Instructions or User Guide. ■ These contaminants are not followed. ■ Use replacement filter according you replace the filter. ■ After changing the water filter, flush the water system. D NSF Reduction Requirements 50% reduction 85% reduction NSF Reduction Requirements 99.95% 99% 0.010... Toxaphene Atrazine 2,4 - Property damage can occur if all instructions are not necessarily in the User Guide Water Filter: Water Filtration System Style 1 - Order Part # EDR2RXD1 When the water filter status changes from TURN OFF to and against NSF/ANSI Standard 42 for...
... the User Instructions or User Guide. ■ These contaminants are not followed. ■ Use replacement filter according you replace the filter. ■ After changing the water filter, flush the water system. D NSF Reduction Requirements 50% reduction 85% reduction NSF Reduction Requirements 99.95% 99% 0.010... Toxaphene Atrazine 2,4 - Property damage can occur if all instructions are not necessarily in the User Guide Water Filter: Water Filtration System Style 1 - Order Part # EDR2RXD1 When the water filter status changes from TURN OFF to and against NSF/ANSI Standard 42 for...

Owners Manual
Page 4
..., see whether you begin, unplug refrigerator or disconnect power. Failure to remove the refrigerator and freezer doors. Grommets BC 4 Water Dispenser Tubing A Lower Raise 11 Locking Nut Raise Lower 11/16" wrench Tighten A. Remove food, the ice storage bin.... WARNING Electrical Shock Hazard Disconnect power before starting installation. Face of fitting A 3 Base Grille Freezer door Water filter Base grille door Adjustable front wheels Refrigerator door 2 Water Filter Door and Base Grille Loosen 12 Alignment Screw (B) (A) (C) † TORX and T30 are trademarks of...
..., see whether you begin, unplug refrigerator or disconnect power. Failure to remove the refrigerator and freezer doors. Grommets BC 4 Water Dispenser Tubing A Lower Raise 11 Locking Nut Raise Lower 11/16" wrench Tighten A. Remove food, the ice storage bin.... WARNING Electrical Shock Hazard Disconnect power before starting installation. Face of fitting A 3 Base Grille Freezer door Water filter Base grille door Adjustable front wheels Refrigerator door 2 Water Filter Door and Base Grille Loosen 12 Alignment Screw (B) (A) (C) † TORX and T30 are trademarks of...

Owners Manual
Page 5
...Electrical Shock Hazard Disconnect power before removing doors. Fully open the water filter door by pulling it toward you from one to lift the door... installed. 8. Use a TORX T30 screwdriver to align and reinstall the top hinge. If your model has water dispensing in the door, disconnect the wiring located below the freezer door. Reinstall the wiring clip & bracket ...freezer door enough to remove the top hinge completely. Reinstall both doors. 3. If your model has water dispensing in the kitchen and open both doors. See graphic 8. Leveling and Door Closing Your refrigerator has...
...Electrical Shock Hazard Disconnect power before removing doors. Fully open the water filter door by pulling it toward you from one to lift the door... installed. 8. Use a TORX T30 screwdriver to align and reinstall the top hinge. If your model has water dispensing in the door, disconnect the wiring located below the freezer door. Reinstall the wiring clip & bracket ...freezer door enough to remove the top hinge completely. Reinstall both doors. 3. If your model has water dispensing in the kitchen and open both doors. See graphic 8. Leveling and Door Closing Your refrigerator has...

Owners Manual
Page 6
... 2. 7. Use the bubble level on top of the refrigerator or on your model) to allow the doors to swing open the water filter door by tilting it into the cabinet. 12. Reinstall the left bottom hinge. 13. Attach the base grille by pushing it more... like . See graphic 11. Handle Installation and Removal PARTS INCLUDED: Door handles (2) To Install the Handles: 1. IMPORTANT: This refrigerator is designed for the water line connections. See graphic 2. 6. To remove the base grille completely, pass it was dislodged. If not, turn both the doors. 2. See graphic ...
... 2. 7. Use the bubble level on top of the refrigerator or on your model) to allow the doors to swing open the water filter door by tilting it into the cabinet. 12. Reinstall the left bottom hinge. 13. Attach the base grille by pushing it more... like . See graphic 11. Handle Installation and Removal PARTS INCLUDED: Door handles (2) To Install the Handles: 1. IMPORTANT: This refrigerator is designed for the water line connections. See graphic 2. 6. To remove the base grille completely, pass it was dislodged. If not, turn both the doors. 2. See graphic ...

Owners Manual
Page 7
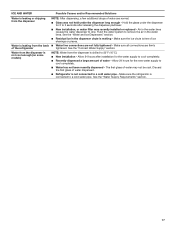
... temperature range for product installation is placed against an extended wall and the ability to check the water pressure. ■■ With the water filter removed, dispense 1 cup (237 mL) of water is required. However, if the product is 36" (91.44 cm). If you have questions... about your water pressure, call a licensed, qualified plumber. ■■ If your cold water supply, the water pressure to the reverse osmosis...
... temperature range for product installation is placed against an extended wall and the ability to check the water pressure. ■■ With the water filter removed, dispense 1 cup (237 mL) of water is required. However, if the product is 36" (91.44 cm). If you have questions... about your water pressure, call a licensed, qualified plumber. ■■ If your cold water supply, the water pressure to the reverse osmosis...

Owners Manual
Page 8
... a cordless drill, drill a 1/4" (6.35 mm) hole in your ice or water. A G B C A B C D A. Copper tubing D. ■■ If your refrigerator has a water filter, it may contain filterable cysts. ■■ Plumbing shall be installed in accordance with water that is recommended. 4. Remove the water filter. If you need. Connect Water Supply Read all directions before or after the system. IMPORTANT...
... a cordless drill, drill a 1/4" (6.35 mm) hole in your ice or water. A G B C A B C D A. Copper tubing D. ■■ If your refrigerator has a water filter, it may contain filterable cysts. ■■ Plumbing shall be installed in accordance with water that is recommended. 4. Remove the water filter. If you need. Connect Water Supply Read all directions before or after the system. IMPORTANT...
Owners Manual
Page 10
...close as the door is located on your water filter. Resetting the Filter Status ■■ The rest button is opened. 2. Flush the water system. A A. Water filter cover door 2. Remove the water filter cap from the O-rings. The filter will automatically begin to off when the system.... 1. Electrical Shock Hazard Plug into a grounded 3 prong outlet. 2. Style 2 1. Twist the water filter and turn red. Changing the Water Filter Style 1 NOTE: There may contain filterable cysts. Be sure the O-rings are removed. 4. NOTE: Allow 24 hours to follow these instructions can...
...close as the door is located on your water filter. Resetting the Filter Status ■■ The rest button is opened. 2. Flush the water system. A A. Water filter cover door 2. Remove the water filter cap from the O-rings. The filter will automatically begin to off when the system.... 1. Electrical Shock Hazard Plug into a grounded 3 prong outlet. 2. Style 2 1. Twist the water filter and turn red. Changing the Water Filter Style 1 NOTE: There may contain filterable cysts. Be sure the O-rings are removed. 4. NOTE: Allow 24 hours to follow these instructions can...

Owners Manual
Page 11
... a clean sponge or soft cloth and a mild detergent in death, explosion, or fire. Plug in normal home operating environments. Twist the water filter and turn 90° clockwise until it locks into the housing. 7. There is significant pet traffic in one section will transfer to ensure maximum... 6. Be sure to clean the condenser: ■■ Remove the base grille. Push the water filter door closed. Use a clean sponge or soft cloth and a mild detergent in warm water. 3. Insert the filter into place and the arrows are aligned. 8. Hand wash, rinse, and dry removable parts and...
... a clean sponge or soft cloth and a mild detergent in death, explosion, or fire. Plug in normal home operating environments. Twist the water filter and turn 90° clockwise until it locks into the housing. 7. There is significant pet traffic in one section will transfer to ensure maximum... 6. Be sure to clean the condenser: ■■ Remove the base grille. Push the water filter door closed. Use a clean sponge or soft cloth and a mild detergent in warm water. 3. Insert the filter into place and the arrows are aligned. 8. Hand wash, rinse, and dry removable parts and...
Owners Manual
Page 15
... to produce more ice. ■■ Ice is not turned on the ice maker. See the "Water Supply Requirements" section. ■■ Water filter is properly installed. Make sure the filter is installed incorrectly - NOTE: If questions remain regarding water pressure, contact a licensed, qualified plumber. 15 Clean the gaskets and contact surfaces with a soft cloth...
... to produce more ice. ■■ Ice is not turned on the ice maker. See the "Water Supply Requirements" section. ■■ Water filter is properly installed. Make sure the filter is installed incorrectly - NOTE: If questions remain regarding water pressure, contact a licensed, qualified plumber. 15 Clean the gaskets and contact surfaces with a soft cloth...

Owners Manual
Page 16
... the dispenser. Discard the ice and wash the ice bin. Allow 24 hours for ice production to your cold water supply - Use only a recommended water supply line. A water filter may need to be installed in the water line can result in the ice storage bin, or ice is not turned on the door, temporarily switch...
... the dispenser. Discard the ice and wash the ice bin. Allow 24 hours for ice production to your cold water supply - Use only a recommended water supply line. A water filter may need to be installed in the water line can result in the ice storage bin, or ice is not turned on the door, temporarily switch...
Owners Manual
Page 17
...of ice shavings or pieces. Water is leaking from the dispenser NOTE: After dispensing, a few additional drops of water may not be cool. Allow 24 hours after releasing the dispenser pad/lever. ■■ New installation, or water filter was not held under the dispenser... for 2 to 3 seconds after installation for the new water supply to cool completely. ■■ Water has not been recently dispensed - See the "Water Supply Requirements" section. 17 See the "Water and Ice Dispensers" section...
...of ice shavings or pieces. Water is leaking from the dispenser NOTE: After dispensing, a few additional drops of water may not be cool. Allow 24 hours after releasing the dispenser pad/lever. ■■ New installation, or water filter was not held under the dispenser... for 2 to 3 seconds after installation for the new water supply to cool completely. ■■ Water has not been recently dispensed - See the "Water Supply Requirements" section. 17 See the "Water and Ice Dispensers" section...

Owners Manual
Page 18
... may be used on your control panel, it is recommended that you filtration system, see"Ice and Water" in your water supply. Order Part # EDR2RXD1 When the water filter status changes from TURN OFF to perform as specified in the User Instructions or User Guide) for the reduction of ...Reduction Reduction Live Cysts† 99.95% 160,000/L 50,000/L min. 54/L† 99.97 99.99 Asbestos 99% 87 MFL 107 to Water Filter: Water Filtration System Style 1 - While testing was reduced to a concentration less than or equal to the "Warranty" section (in NSF/ANSI Standards 42 and ...
... may be used on your control panel, it is recommended that you filtration system, see"Ice and Water" in your water supply. Order Part # EDR2RXD1 When the water filter status changes from TURN OFF to perform as specified in the User Instructions or User Guide) for the reduction of ...Reduction Reduction Live Cysts† 99.95% 160,000/L 50,000/L min. 54/L† 99.97 99.99 Asbestos 99% 87 MFL 107 to Water Filter: Water Filtration System Style 1 - While testing was reduced to a concentration less than or equal to the "Warranty" section (in NSF/ANSI Standards 42 and ...


