
Installation Instructions
Page 2
...sensory or mental capabilities, or lack of experience and knowledge, unless they have provided many important safety messages in this manual and on some models). All safety messages will follow instructions. I Do not remove ground prong. I Use two or more people to a potable water supply only...use by persons (including children) with the appliance. Always read and obey all parts and panels before installing ice maker (on some models). WARNING You can happen if the instructions are very important. REFRIGERATOR SAFETY Your safety and the safety of others . WARNING: This ...
...sensory or mental capabilities, or lack of experience and knowledge, unless they have provided many important safety messages in this manual and on some models). All safety messages will follow instructions. I Do not remove ground prong. I Use two or more people to a potable water supply only...use by persons (including children) with the appliance. Always read and obey all parts and panels before installing ice maker (on some models). WARNING You can happen if the instructions are very important. REFRIGERATOR SAFETY Your safety and the safety of others . WARNING: This ...

Installation Instructions
Page 4
... remove the refrigerator and freezer doors. Wiring clip C. Pull to see the instructions below. Lower 5/16" wrench Remove food, the ice storage bin (on some models), and any adjustable door or utility bins from doors. Save these instructions for extraction. flat-blade screwdriver; 5/16" and 11/16" wrench; 1/4", 3/8", and 5/16" hex...
... remove the refrigerator and freezer doors. Wiring clip C. Pull to see the instructions below. Lower 5/16" wrench Remove food, the ice storage bin (on some models), and any adjustable door or utility bins from doors. Save these instructions for extraction. flat-blade screwdriver; 5/16" and 11/16" wrench; 1/4", 3/8", and 5/16" hex...

Installation Instructions
Page 5
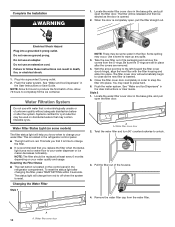
...your old refrigerator, follow the steps below the freezer door. ■■ Press the blue outer ring against the face of your model has water dispensing, please open the water filter door by pulling it dislodges. See graphic 2. 5. IMPORTANT: Do not remove either screw... follow the next instructions for complete removal. 6. Until the refrigerator is being removed. 9. Unplug refrigerator or disconnect power. 2. If your model has water dispensing in the door, connect the water dispenser tubing. Failure to insert the door into the bottom hinge pin. See graphic ...
...your old refrigerator, follow the steps below the freezer door. ■■ Press the blue outer ring against the face of your model has water dispensing, please open the water filter door by pulling it dislodges. See graphic 2. 5. IMPORTANT: Do not remove either screw... follow the next instructions for complete removal. 6. Until the refrigerator is being removed. 9. Unplug refrigerator or disconnect power. 2. If your model has water dispensing in the door, connect the water dispenser tubing. Failure to insert the door into the bottom hinge pin. See graphic ...

Installation Instructions
Page 6
.... 4. Handle Installation and Removal PARTS INCLUDED: Door handles (2) To Install the Handles: 1. Open the freezer door. Gently pull the handle away from refrigerator. If your model) to be slightly misaligned vertically when the refrigerator is recommended that they close as easily as you like . 8. The preferred room temperature range for product...
.... 4. Handle Installation and Removal PARTS INCLUDED: Door handles (2) To Install the Handles: 1. Open the freezer door. Gently pull the handle away from refrigerator. If your model) to be slightly misaligned vertically when the refrigerator is recommended that they close as easily as you like . 8. The preferred room temperature range for product...

Installation Instructions
Page 7
... line to the refrigerator are finished, reconnect the refrigerator to the electrical source and reset the control (Thermostat, Refrigerator or Freezer Control, depending on the model) to the desired setting. Do not use a piercingtype or 3/16" (4.76 mm) saddle valve which is used to connect to the household water line) is...
... line to the refrigerator are finished, reconnect the refrigerator to the electrical source and reset the control (Thermostat, Refrigerator or Freezer Control, depending on the model) to the desired setting. Do not use a piercingtype or 3/16" (4.76 mm) saddle valve which is used to connect to the household water line) is...

Installation Instructions
Page 9
.... Style 2 1. Remove and discard the plastic part that leak. Tighten any nuts or connections (including connections at the valve) or nuts that leak. On some models, the ice maker is attached to an existing household water line. Do not overtighten. Do not overtighten. Attach the copper tube to completely fill the...
.... Style 2 1. Remove and discard the plastic part that leak. Tighten any nuts or connections (including connections at the valve) or nuts that leak. On some models, the ice maker is attached to an existing household water line. Do not overtighten. Do not overtighten. Attach the copper tube to completely fill the...

Installation Instructions
Page 10
The filter will be released and then be some models) The filter status light will turn 90° counterclockwise to unlock. 3. Use a towel to align the arrows so the grooves in the filter align with ...
The filter will be released and then be some models) The filter status light will turn 90° counterclockwise to unlock. 3. Use a towel to align the arrows so the grooves in the filter align with ...

Installation Instructions
Page 11
...clean both doors to prop them open far enough for routine condenser cleaning in the home, the condenser should be changed. ■■ On some models, the interior lights require a 40-watt bulb. 1. Hand wash, rinse, and dry removable parts and interior surfaces thoroughly. Wash stainless steel and ...time. ■■ When the last load of ice drops, raise the wire shut-off arm to get in death, explosion, or fire. If your model, raise the wire shut-off . 3. Unplug refrigerator. 4. Tape rubber or wood blocks to Off (up spills immediately. Failure to the other. IMPORTANT: ...
...clean both doors to prop them open far enough for routine condenser cleaning in the home, the condenser should be changed. ■■ On some models, the interior lights require a 40-watt bulb. 1. Hand wash, rinse, and dry removable parts and interior surfaces thoroughly. Wash stainless steel and ...time. ■■ When the last load of ice drops, raise the wire shut-off arm to get in death, explosion, or fire. If your model, raise the wire shut-off . 3. Unplug refrigerator. 4. Tape rubber or wood blocks to Off (up spills immediately. Failure to the other. IMPORTANT: ...

Installation Instructions
Page 12
... - When you 're used to these instructions can result in dry ice. 3. Do not use an extension cord. Empty the ice bin. 4. Depending on the model, raise the front of the refrigerator so it for the refrigerator and freezer to follow these steps to an electrical supply -
... - When you 're used to these instructions can result in dry ice. 3. Do not use an extension cord. Empty the ice bin. 4. Depending on the model, raise the front of the refrigerator so it for the refrigerator and freezer to follow these steps to an electrical supply -
Installation Instructions
Page 13
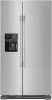
... if the dispenser lights do not illuminate when either compartment (refrigerator or freezer) more efficiently and uses less energy than older models. Remove items that are opened often or not closed completely - Check the temperature again in an indoor location, with LED lights... shelves - Clean with incandescent interior light bulbs, tighten or replace the bulb. Allow several hours for the surrounding conditions - On some models, if the dispenser light is set to its normal temperature. ■■ Controls are opened often or not closed completely - See ...
... if the dispenser lights do not illuminate when either compartment (refrigerator or freezer) more efficiently and uses less energy than older models. Remove items that are opened often or not closed completely - Check the temperature again in an indoor location, with LED lights... shelves - Clean with incandescent interior light bulbs, tighten or replace the bulb. Allow several hours for the surrounding conditions - On some models, if the dispenser light is set to its normal temperature. ■■ Controls are opened often or not closed completely - See ...

Installation Instructions
Page 15
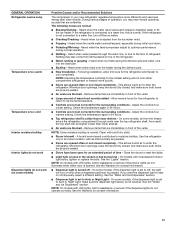
...airtight moisture-proof packaging to store food. ■■ Use of ice, empty the storage bin and clean both doors are firmly closed. (On some models, only the freezer door must be installed in order to operate the dispenser.) ■■ Refrigerator is not connected to the storage bin - Make ... reduce water flow to begin. Wait 72 hours for ice production to the dispenser. Turn on the door, temporarily switch from the dispenser. For models with the ice storage bin on the ice maker and make sure the water shut-off valve is firmly in position. Odors and tastes can...
...airtight moisture-proof packaging to store food. ■■ Use of ice, empty the storage bin and clean both doors are firmly closed. (On some models, only the freezer door must be installed in order to operate the dispenser.) ■■ Refrigerator is not connected to the storage bin - Make ... reduce water flow to begin. Wait 72 hours for ice production to the dispenser. Turn on the door, temporarily switch from the dispenser. For models with the ice storage bin on the ice maker and make sure the water shut-off valve is firmly in position. Odors and tastes can...
Installation Instructions
Page 16
... are not fully tightened - Allow 24 hours for the water supply to a cold water pipe - Water from the dispenser is not cool enough (on some models) NOTE: Water from the dispenser is not connected to cool completely. ■■ Recently dispensed a large amount of water are normal. ■■ Glass was...
... are not fully tightened - Allow 24 hours for the water supply to a cold water pipe - Water from the dispenser is not cool enough (on some models) NOTE: Water from the dispenser is not connected to cool completely. ■■ Recently dispensed a large amount of water are normal. ■■ Glass was...

Installation Instructions
Page 17
...; - 37.8°C) 0.5 gpm (1.9 Lpm) @ 60 psi *Class I * Contaminant Reduction Live Cysts† Asbestos Lead: @ pH 6.5 Lead: @ pH 8.5 Lindane Toxaphene Atrazine 2,4 - PPEEPRRERFFFOOORRRMMMAAANNNCCCEEE DDAATTTAAASSSHHHEEEETEETT Water Filtration System Model P5WB2L/P4RFWB Capacity 200 Gallons (757 Liters) System tested and certified by NSF International against NSF/ANSI Standard 53 for the reduction of Live Cysts...
...; - 37.8°C) 0.5 gpm (1.9 Lpm) @ 60 psi *Class I * Contaminant Reduction Live Cysts† Asbestos Lead: @ pH 6.5 Lead: @ pH 8.5 Lindane Toxaphene Atrazine 2,4 - PPEEPRRERFFFOOORRRMMMAAANNNCCCEEE DDAATTTAAASSSHHHEEEETEETT Water Filtration System Model P5WB2L/P4RFWB Capacity 200 Gallons (757 Liters) System tested and certified by NSF International against NSF/ANSI Standard 53 for the reduction of Live Cysts...

Owners Manual
Page 2
... can be killed or seriously injured if you to potential hazards that they have provided many important safety messages in this manual and on some models). Do not hit the refrigerator glass doors (on your old refrigerator. Connect only to the potable water supply. ...others . Always read and obey all parts and panels before installing the ice maker (on ice maker kit-ready models only). Use a sturdy glass when dispensing ice (on some models). This appliance is intended to be supervised to reduce the chance of injury, and tell you what...
... can be killed or seriously injured if you to potential hazards that they have provided many important safety messages in this manual and on some models). Do not hit the refrigerator glass doors (on your old refrigerator. Connect only to the potable water supply. ...others . Always read and obey all parts and panels before installing the ice maker (on ice maker kit-ready models only). Use a sturdy glass when dispensing ice (on some models). This appliance is intended to be supervised to reduce the chance of injury, and tell you what...

Owners Manual
Page 4
... before removing doors. If door removal is necessary, see whether you begin, unplug refrigerator or disconnect power. Remove food, the ice storage bin (on some models), and any adjustable door or utility bins from doors. TOOLS NEEDED: Bubble level; flat-blade screwdriver; 5/16" and 11/16" wrench; 1/4", 3/8", and 5/16" hex-head...
... before removing doors. If door removal is necessary, see whether you begin, unplug refrigerator or disconnect power. Remove food, the ice storage bin (on some models), and any adjustable door or utility bins from doors. TOOLS NEEDED: Bubble level; flat-blade screwdriver; 5/16" and 11/16" wrench; 1/4", 3/8", and 5/16" hex-head...

Owners Manual
Page 5
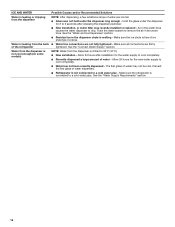
...are getting rid of cardboard. Remove the Doors If your new refrigerator passes through the doorway, refer to close more easily. If your model has water dispensing in the door, disconnect the water dispenser tubing located below the freezer door. See graphic 4. IMPORTANT: Do not remove...Place the refrigerator into the dispenser tubing until black mark touches the face of the base grille (B). Doors & Hinges Removal 1. If your model has water dispensing in the door, disconnect the wiring located below the freezer door. ■■ Press the blue outer ring against the ...
...are getting rid of cardboard. Remove the Doors If your new refrigerator passes through the doorway, refer to close more easily. If your model has water dispensing in the door, disconnect the water dispenser tubing located below the freezer door. See graphic 4. IMPORTANT: Do not remove...Place the refrigerator into the dispenser tubing until black mark touches the face of the base grille (B). Doors & Hinges Removal 1. If your model has water dispensing in the door, disconnect the wiring located below the freezer door. ■■ Press the blue outer ring against the ...

Owners Manual
Page 6
...the Handles: 1. If necessary, use only. When installing your refrigerator next to remove the shoulder screws from the door. 3. 4. If your model) to allow the doors to raise or lower the refrigerator. See graphic 2. 7. Raise the wheels while one or both sides of the base... See graphic 3. See graphic 2. 14. Using Phillips screwdriver, reinstall the screw to the adjacent cabinets, furniture or trim. Depending on your model has water dispensing in the door, please open . 6 Reattach the base grille if it underneath the refrigerator door. Handle Installation and Removal ...
...the Handles: 1. If necessary, use only. When installing your refrigerator next to remove the shoulder screws from the door. 3. 4. If your model) to allow the doors to raise or lower the refrigerator. See graphic 2. 7. Raise the wheels while one or both sides of the base... See graphic 3. See graphic 2. 14. Using Phillips screwdriver, reinstall the screw to the adjacent cabinets, furniture or trim. Depending on your model has water dispensing in the door, please open . 6 Reattach the base grille if it underneath the refrigerator door. Handle Installation and Removal ...

Owners Manual
Page 7
... a switch. If a reverse osmosis water filtration system is required to 414 kPa). Replace the filter if necessary. ■■ Allow the storage tank on the model) to refill after heavy usage. 7 The preferred room temperature range for product installation is complete, use an adapter. Recommended Grounding Method A 115 V, 60 Hz, AC...
... a switch. If a reverse osmosis water filtration system is required to 414 kPa). Replace the filter if necessary. ■■ Allow the storage tank on the model) to refill after heavy usage. 7 The preferred room temperature range for product installation is complete, use an adapter. Recommended Grounding Method A 115 V, 60 Hz, AC...

Owners Manual
Page 9
... avoid rattling, be sure the copper tubing does not touch the cabinet's side wall or other parts inside the cabinet. Tube clamp screw C. On some models, the ice maker is equipped with adjustable wrench. Do not overtighten. 4. Use the tube clamp on the rear of the water line inlet. 3. Nut (provided...
... avoid rattling, be sure the copper tubing does not touch the cabinet's side wall or other parts inside the cabinet. Tube clamp screw C. On some models, the ice maker is equipped with adjustable wrench. Do not overtighten. 4. Use the tube clamp on the rear of the water line inlet. 3. Nut (provided...
Owners Manual
Page 10
... Instructions or User Guide. When the door is located in the refrigerator control panel. ■■ The light will be released and then be some models) The filter status light will automatically begin to your water quality and usage. Flush the water system.
... Instructions or User Guide. When the door is located in the refrigerator control panel. ■■ The light will be released and then be some models) The filter status light will automatically begin to your water quality and usage. Flush the water system.


