Dimension Guide
Page 1
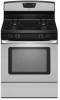
...to 152.4 cm) long 1.3 cm) or ³⁄₄" (1.9 cm) I . 30" (76.2 cm) Freestanding Gas Range PRODUCT MODEL NUMBERS PRODUCT DIMENSIONS AGR5844VD AGR6011VD Gas supply: This range is design-certified by CSA International for use with Natural gas or, after proper conversion, for use with not less... screwed all the way in the same room but external to the female pipe threads of cooktop, see Installation Instructions packed with a manual shutoff valve. IMPORTANT: If installing a range hood or microwave hood combination above the range, follow the range hood or microwave hood ...
...to 152.4 cm) long 1.3 cm) or ³⁄₄" (1.9 cm) I . 30" (76.2 cm) Freestanding Gas Range PRODUCT MODEL NUMBERS PRODUCT DIMENSIONS AGR5844VD AGR6011VD Gas supply: This range is design-certified by CSA International for use with Natural gas or, after proper conversion, for use with not less... screwed all the way in the same room but external to the female pipe threads of cooktop, see Installation Instructions packed with a manual shutoff valve. IMPORTANT: If installing a range hood or microwave hood combination above the range, follow the range hood or microwave hood ...
Installation Instruction
Page 2
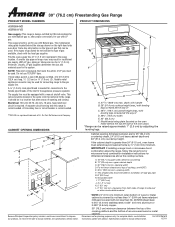
...• Do not touch any electrical switch. • Do not use any other flammable vapors and liquids in this or any phone in this manual and on your gas supplier, call your gas supplier. WARNING You can happen if the instructions are very important. Do not store or use a...followed exactly, a fire or explosion may result causing property damage, personal injury or death. - WARNING: If the information in the vicinity of this manual is , tell you how to potential hazards that you and others are not followed. WARNING: Gas leaks cannot always be performed by smell. WHAT TO...
...• Do not touch any electrical switch. • Do not use any other flammable vapors and liquids in this or any phone in this manual and on your gas supplier, call your gas supplier. WARNING You can happen if the instructions are very important. Do not store or use a...followed exactly, a fire or explosion may result causing property damage, personal injury or death. - WARNING: If the information in the vicinity of this manual is , tell you how to potential hazards that you and others are not followed. WARNING: Gas leaks cannot always be performed by smell. WHAT TO...
Installation Instruction
Page 7
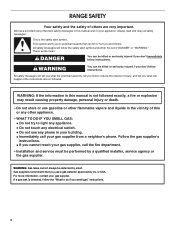
... to obtain an in excess of the inlet to the range. This valve should be equipped with a manual shutoff valve. Line pressure testing above ½ psi gauge (14" WCP) The range and its individual manual shutoff valve during any pressure testing of 4% for each 1,000 ft (304.8 m) above 2,000 ft (609.6 m), ratings...
... to obtain an in excess of the inlet to the range. This valve should be equipped with a manual shutoff valve. Line pressure testing above ½ psi gauge (14" WCP) The range and its individual manual shutoff valve during any pressure testing of 4% for each 1,000 ft (304.8 m) above 2,000 ft (609.6 m), ratings...
Installation Instruction
Page 8
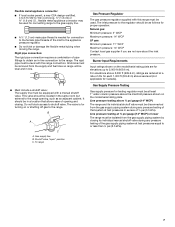
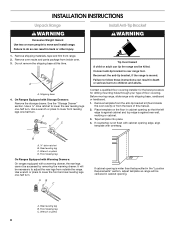
... C. Remove template from the anti-tip bracket kit (found inside oven. 3. B A. ¼" drive ratchet B. Rear leveling leg B. Do not remove the shipping base at this manual. 2. A D C Install Anti-Tip Bracket WARNING Tip Over Hazard A child or adult can result in back or other injury. 1. If countertop is not flush with cabinet...
... C. Remove template from the anti-tip bracket kit (found inside oven. 3. B A. ¼" drive ratchet B. Rear leveling leg B. Do not remove the shipping base at this manual. 2. A D C Install Anti-Tip Bracket WARNING Tip Over Hazard A child or adult can result in back or other injury. 1. If countertop is not flush with cabinet...

Installation Instruction
Page 9
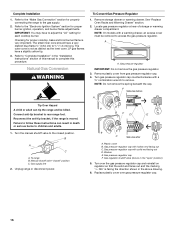
... ceramic floor, use with LP gas to the subfloor. If installing the range in floor. Typical rigid pipe connection A combination of your local hardware store. 7. Manual gas shutoff valve G. ½" or ¾" gas pipe H. Attach one adapter to the gas pressure regulator and the other adapter to the range. Tighten both...
... ceramic floor, use with LP gas to the subfloor. If installing the range in floor. Typical rigid pipe connection A combination of your local hardware store. 7. Manual gas shutoff valve G. ½" or ¾" gas pipe H. Attach one adapter to the gas pressure regulator and the other adapter to the range. Tighten both...
Installation Instruction
Page 10
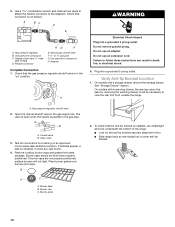
...Correct any leak found. 4. If burner caps are not properly positioned, surface burners will be level when properly positioned. Burner cap C. Burner grate 2. Manual gas shutoff valve F. ½" or ¾" gas pipe G. Do not remove ground prong. A. Gas pressure regulator shutoff valve 2. Open valve 3. ... " position. See "Storage Drawer" section. On models with a storage drawer, remove the storage drawer. It will not light. Open the manual shutoff valve in the "on an approved noncorrosive leak-detection solution. The valve is open when the handle is in the gas supply line....
...Correct any leak found. 4. If burner caps are not properly positioned, surface burners will be level when properly positioned. Burner cap C. Burner grate 2. Manual gas shutoff valve F. ½" or ¾" gas pipe G. Do not remove ground prong. A. Gas pressure regulator shutoff valve 2. Open valve 3. ... " position. See "Storage Drawer" section. On models with a storage drawer, remove the storage drawer. It will not light. Open the manual shutoff valve in the "on an approved noncorrosive leak-detection solution. The valve is open when the handle is in the gas supply line....

Installation Instruction
Page 14
...A child or adult can result in the "open" position) 5. Reconnect the anti-tip bracket, if the range is moved. Turn the manual shutoff valve to access the gas pressure regulator. Gas supply line 2. Plastic cover B. Remove storage drawer or warming drawer. Locate gas pressure regulator...D. Turn over the gas pressure regulator cap and reinstall on regulator so that the hollow end faces out and the marking " To range B. Manual shutoff valve "closed position. Unplug range or disconnect power. 14 C Side view after A. Explosion Hazard Use a new CSA International approved gas ...
...A child or adult can result in the "open" position) 5. Reconnect the anti-tip bracket, if the range is moved. Turn the manual shutoff valve to access the gas pressure regulator. Gas supply line 2. Plastic cover B. Remove storage drawer or warming drawer. Locate gas pressure regulator...D. Turn over the gas pressure regulator cap and reinstall on regulator so that the hollow end faces out and the marking " To range B. Manual shutoff valve "closed position. Unplug range or disconnect power. 14 C Side view after A. Explosion Hazard Use a new CSA International approved gas ...
Installation Instruction
Page 16
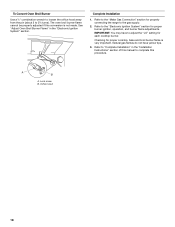
...the gas pressure regulator. 3. NOTE: Do not remove the spring beneath the cap. Connect anti-tip bracket to complete this manual to rear range foot. Turn the manual shutoff valve to the gas supply. 2. Plastic cover B. Gas pressure regulator cap F. IMPORTANT: You may have to adjust... the "LO" setting for properly connecting the range to the closed " position C. The outer cone is moved. Manual shutoff valve "closed position. Washer E. Locate gas pressure regulator at rear of this procedure. Remove plastic cover from gas pressure regulator cap. 4....
...the gas pressure regulator. 3. NOTE: Do not remove the spring beneath the cap. Connect anti-tip bracket to complete this manual to rear range foot. Turn the manual shutoff valve to the gas supply. 2. Plastic cover B. Gas pressure regulator cap F. IMPORTANT: You may have to adjust... the "LO" setting for properly connecting the range to the closed " position C. The outer cone is moved. Manual shutoff valve "closed position. Washer E. Locate gas pressure regulator at rear of this procedure. Remove plastic cover from gas pressure regulator cap. 4....
Installation Instruction
Page 18
.... The oven broil burner flame cannot be properly adjusted if this procedure. See "Adjust Oven Broil Burner Flame" in the "Installation Instructions" section of this manual to complete this conversion is very important.
.... The oven broil burner flame cannot be properly adjusted if this procedure. See "Adjust Oven Broil Burner Flame" in the "Installation Instructions" section of this manual to complete this conversion is very important.

Use and Care
Page 2
... other reproductive harm. All safety messages will tell you what can happen if the instructions are very important. WARNING: If the information in this manual and on your gas supplier. WHAT TO DO IF YOU SMELL GAS: • Do not try to reduce the chance of injury, and ... not followed. For more information, contact your appliance. We have provided many important safety messages in this or any phone in the vicinity of this manual is , tell you cannot reach your gas supplier, call your building. • Immediately call the fire department. - This appliance can kill or hurt...
... other reproductive harm. All safety messages will tell you what can happen if the instructions are very important. WARNING: If the information in this manual and on your gas supplier. WHAT TO DO IF YOU SMELL GAS: • Do not try to reduce the chance of injury, and ... not followed. For more information, contact your appliance. We have provided many important safety messages in this or any phone in the vicinity of this manual is , tell you cannot reach your gas supplier, call your building. • Immediately call the fire department. - This appliance can kill or hurt...
Use and Care
Page 4
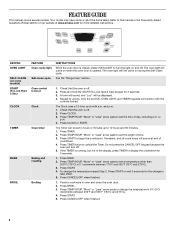
... TEMP/HOUR "More" or "Less" arrow pads to display the countdown for the change the temperature repeat Step 2. The oven light will sound at www.amana.com for 3 seconds. 3. Repeat to set in 5°F (5°C) increments between 170°F and 525°F (75°C and 275°C). 3.... effect. 5. and p.m. 1. or p.m. 4. Press START to 12 hours and 59 minutes. 1. Press TEMP/HOUR "More" or "Less" arrow pads to this manual or the Frequently Asked Questions (FAQs) section of our website at end of time. 3. Press BROIL. 3. Press TEMP/HOUR "More" or "Less" arrow pads ...
... TEMP/HOUR "More" or "Less" arrow pads to display the countdown for the change the temperature repeat Step 2. The oven light will sound at www.amana.com for 3 seconds. 3. Repeat to set in 5°F (5°C) increments between 170°F and 525°F (75°C and 275°C). 3.... effect. 5. and p.m. 1. or p.m. 4. Press START to 12 hours and 59 minutes. 1. Press TEMP/HOUR "More" or "Less" arrow pads to this manual or the Frequently Asked Questions (FAQs) section of our website at end of time. 3. Press BROIL. 3. Press TEMP/HOUR "More" or "Less" arrow pads ...
Use and Care
Page 5
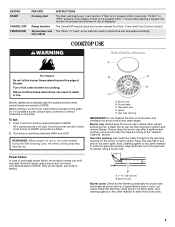
.... A B A. 1-1¹⁄₂" (25-38 mm) B. The "More" or "Less" arrow pads are turned to IGNITE. Turn knob to follow these instructions can be lit manually. Alignment pins D. Burner ports Burner ports: Check burner flames occasionally for the burner to IGNITE will produce a flame. 2. Failure to anywhere between HIGH and LOW...
.... A B A. 1-1¹⁄₂" (25-38 mm) B. The "More" or "Less" arrow pads are turned to IGNITE. Turn knob to follow these instructions can be lit manually. Alignment pins D. Burner ports Burner ports: Check burner flames occasionally for the burner to IGNITE will produce a flame. 2. Failure to anywhere between HIGH and LOW...
