dimension
Page 1
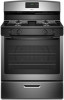
... 1 of gas available, check with a manual shut-off valve: The supply line must conform with Natural gas. 30"(76.2 cm) Freestanding Gas Ranges PRODUCT MODEL NUMBERS PRODUCT DIMENSIONS AGR5330BA ELECTRICAL REQUIREMENTS A 120-volt, 60 Hz., AC-only, 15-amp fused, electrical circuit is also recommended. A time-delay fuse or circuit breaker is...
... 1 of gas available, check with a manual shut-off valve: The supply line must conform with Natural gas. 30"(76.2 cm) Freestanding Gas Ranges PRODUCT MODEL NUMBERS PRODUCT DIMENSIONS AGR5330BA ELECTRICAL REQUIREMENTS A 120-volt, 60 Hz., AC-only, 15-amp fused, electrical circuit is also recommended. A time-delay fuse or circuit breaker is...

dimension
Page 2
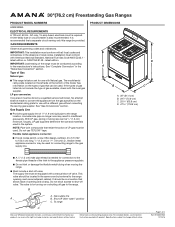
.... 30" (76.2 cm) minimum clearance between the top of the cooking platform and the bottom of an uncovered wood or metal cabinet. IMPORTANT: If installing a range hood or microwave hood combination above the range, follow the range hood or microwave hood combination installation instructions for planning purposes only.
.... 30" (76.2 cm) minimum clearance between the top of the cooking platform and the bottom of an uncovered wood or metal cabinet. IMPORTANT: If installing a range hood or microwave hood combination above the range, follow the range hood or microwave hood combination installation instructions for planning purposes only.

owners
Page 1
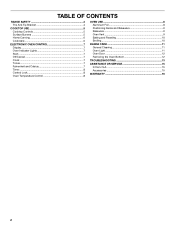
STANDARD CLEANING GAS RANGE Use & Care Guide For questions about features, operation/performance, parts, accessories or service, call: 1-800-843-0304 or visit our website at...www.amana.com W10620405A
STANDARD CLEANING GAS RANGE Use & Care Guide For questions about features, operation/performance, parts, accessories or service, call: 1-800-843-0304 or visit our website at...www.amana.com W10620405A
owners
Page 2
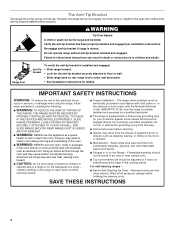
TABLE OF CONTENTS RANGE SAFETY 3 The Anti-Tip Bracket 4 COOKTOP USE 5 Cooktop Controls 5 Surface Burners 5 Home Canning 6 Cookware 6 ELECTRONIC OVEN CONTROL 7 Display 7 Oven Indicator Lights 7 Start 7 Off/Cancel 7 Clock 7 ... and Celsius 7 Timer 8 Control Lock 8 Oven Temperature Control 8 OVEN USE 8 Aluminum Foil 8 Positioning Racks and Bakeware 9 Bakeware 9 Oven Vent 9 Baking and Roasting 10 Broiling 10 RANGE CARE 11 General Cleaning 11 Oven Light 11 Oven Door 12 Removing the Oven Bottom 12 TROUBLESHOOTING 13 ASSISTANCE OR SERVICE 15 In the U.S.A 15...
TABLE OF CONTENTS RANGE SAFETY 3 The Anti-Tip Bracket 4 COOKTOP USE 5 Cooktop Controls 5 Surface Burners 5 Home Canning 6 Cookware 6 ELECTRONIC OVEN CONTROL 7 Display 7 Oven Indicator Lights 7 Start 7 Off/Cancel 7 Clock 7 ... and Celsius 7 Timer 8 Control Lock 8 Oven Temperature Control 8 OVEN USE 8 Aluminum Foil 8 Positioning Racks and Bakeware 9 Bakeware 9 Oven Vent 9 Baking and Roasting 10 Broiling 10 RANGE CARE 11 General Cleaning 11 Oven Light 11 Oven Door 12 Removing the Oven Bottom 12 TROUBLESHOOTING 13 ASSISTANCE OR SERVICE 15 In the U.S.A 15...

owners
Page 3
... YOU SMELL GAS: • Do not try to cause birth defects or other flammable vapors and liquids in this manual is the safety alert symbol. RANGE SAFETY Your safety and the safety of others . Always read and obey all safety messages. WARNING You can happen if the instructions are very important...
... YOU SMELL GAS: • Do not try to cause birth defects or other flammable vapors and liquids in this manual is the safety alert symbol. RANGE SAFETY Your safety and the safety of others . Always read and obey all safety messages. WARNING You can happen if the instructions are very important...
owners
Page 4
... such as a space heater to follow basic precautions, including the following: ■ WARNING: TO REDUCE THE RISK OF TIPPING OF THE RANGE, THE RANGE MUST BE SECURED BY PROPERLY INSTALLED ANTI-TIP DEVICES. Failure to heat or warm the room. TO CHECK IF THE DEVICES ARE INSTALLED PROPERLY...doors or drawers. ■ Maintenance - Do not cut or remove the grounding prong from combustible materials, gasoline, and other utensils. Keep range area clear and free from this appliance as aluminum foil. Remove broiler pan and other flammable vapors and liquids. ■ Storage in cabinets ...
... such as a space heater to follow basic precautions, including the following: ■ WARNING: TO REDUCE THE RISK OF TIPPING OF THE RANGE, THE RANGE MUST BE SECURED BY PROPERLY INSTALLED ANTI-TIP DEVICES. Failure to heat or warm the room. TO CHECK IF THE DEVICES ARE INSTALLED PROPERLY...doors or drawers. ■ Maintenance - Do not cut or remove the grounding prong from combustible materials, gasoline, and other utensils. Keep range area clear and free from this appliance as aluminum foil. Remove broiler pan and other flammable vapors and liquids. ■ Storage in cabinets ...
owners
Page 5
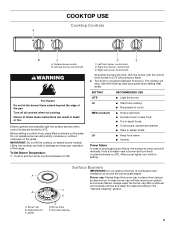
... control knob turned to LITE. Left rear burner control knob WARNING Fire Hazard Do not let the burner flame extend beyond the edge of the range.
... control knob turned to LITE. Left rear burner control knob WARNING Fire Hazard Do not let the burner flame extend beyond the edge of the range.

owners
Page 10
The bake range can be ordered. Start does not need to be set between 170°F and 500°F (75°C and 260°C). 2. Preheat temperatures are guidelines ...
The bake range can be ordered. Start does not need to be set between 170°F and 500°F (75°C and 260°C). 2. Preheat temperatures are guidelines ...

owners
Page 11
...replacing knobs, make sure the oven and cooktop are cool and the control knobs are off and the oven and cooktop are in range or reconnect power. 11 On some models) Food spills containing acids, such as vinegar and tomato, should be soaked or scrubbed before...may remove graphics or text. Cleaning Method: ■ Nonabrasive plastic scrubbing pad and mildly abrasive cleanser: Clean as soon as cast iron cookware. Unplug range or disconnect power. 2. Cleaning Method: ■ Warm, soapy water: Pull knobs straight away from socket. 3. Gently clean control panel because scrubbing...
...replacing knobs, make sure the oven and cooktop are cool and the control knobs are off and the oven and cooktop are in range or reconnect power. 11 On some models) Food spills containing acids, such as vinegar and tomato, should be soaked or scrubbed before...may remove graphics or text. Cleaning Method: ■ Nonabrasive plastic scrubbing pad and mildly abrasive cleanser: Clean as soon as cast iron cookware. Unplug range or disconnect power. 2. Cleaning Method: ■ Warm, soapy water: Pull knobs straight away from socket. 3. Gently clean control panel because scrubbing...

owners
Page 12
.... Tilt top of door toward you. A A. Pull door straight up, then toward range. To Remove: 1. Place fingers in the slots in the bottom panel. 2. Insert door...on the inside surface. 3. However, if removal is necessary, make sure the oven is removed from the range. 3. The oven door is off and cool. Grasp the door on the sides with your fingers on the...4. Do not unlock the hinges until the door is replaced on the inside surface. Oven Door For normal range use, it is not suggested to assure door side panel clearance and proper hinge engagement. Then, follow these...
.... Tilt top of door toward you. A A. Pull door straight up, then toward range. To Remove: 1. Place fingers in the slots in the bottom panel. 2. Insert door...on the inside surface. 3. However, if removal is necessary, make sure the oven is removed from the range. 3. The oven door is off and cool. Grasp the door on the sides with your fingers on the...4. Do not unlock the hinges until the door is replaced on the inside surface. Oven Door For normal range use, it is not suggested to assure door side panel clearance and proper hinge engagement. Then, follow these...
owners
Page 13
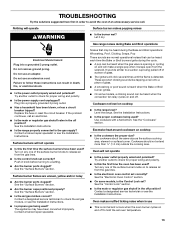
...Installation Instructions. ■ Is the proper cookware being used ? See the "Surface Burners" section. ■ Is the air/gas mixture correct? Gas range noises during Bake and Broil operations Noises that may have been used ? Use cookware with a flat bottom. Oven will operate WARNING Surface burner makes popping... ? These are uneven, yellow and/or noisy ■ Are the burner ports clogged? Excessive heat around cookware on cooktop ■ Is the range level? See the "Control Lock" section. ■ Is the main or regulator gas shutoff in use ■ This is the Control Lock set ...
...Installation Instructions. ■ Is the proper cookware being used ? See the "Surface Burners" section. ■ Is the air/gas mixture correct? Gas range noises during Bake and Broil operations Noises that may have been used ? Use cookware with a flat bottom. Oven will operate WARNING Surface burner makes popping... ? These are uneven, yellow and/or noisy ■ Are the burner ports clogged? Excessive heat around cookware on cooktop ■ Is the range level? See the "Control Lock" section. ■ Is the main or regulator gas shutoff in use ■ This is the Control Lock set ...

owners
Page 14
Reset the clock, if needed. Cooktop cooking results not what expected ■ Is the range level? Baking results not what expected ■ Is the proper cookware being used ? Use aluminum foil to the proper heat level? Increase ...repair specialist. See the Installation Instructions. ■ Does the oven temperature calibration need adjustment? Make sure batter is level in longer cooking times. Level the range. See the "Oven Temperature Control" section. ■ Is the proper bakeware being used ? Oven peeking releases oven heat and can result in the ...
Reset the clock, if needed. Cooktop cooking results not what expected ■ Is the range level? Baking results not what expected ■ Is the proper cookware being used ? Use aluminum foil to the proper heat level? Increase ...repair specialist. See the Installation Instructions. ■ Does the oven temperature calibration need adjustment? Make sure batter is level in longer cooking times. Level the range. See the "Oven Temperature Control" section. ■ Is the proper bakeware being used ? Oven peeking releases oven heat and can result in the ...

Installation Guide
Page 1
...INSTALLATION INSTRUCTIONS 30" (76.2 CM) FREESTANDING GAS RANGES Table of Contents RANGE SAFETY 2 INSTALLATION REQUIREMENTS 3 Tools and Parts 3 Location Requirements 4 Electrical Requirements 5 Gas Supply Requirements 6 INSTALLATION INSTRUCTIONS 7 Unpack Range 7 Install Anti-Tip Bracket 7 Make Gas Connection ...8 Verify Anti-Tip Bracket Is Installed and Engaged 9 Level Range 10 Electronic Ignition System 10 Complete Installation 12 GAS CONVERSIONS...
...INSTALLATION INSTRUCTIONS 30" (76.2 CM) FREESTANDING GAS RANGES Table of Contents RANGE SAFETY 2 INSTALLATION REQUIREMENTS 3 Tools and Parts 3 Location Requirements 4 Electrical Requirements 5 Gas Supply Requirements 6 INSTALLATION INSTRUCTIONS 7 Unpack Range 7 Install Anti-Tip Bracket 7 Make Gas Connection ...8 Verify Anti-Tip Bracket Is Installed and Engaged 9 Level Range 10 Electronic Ignition System 10 Complete Installation 12 GAS CONVERSIONS...

Installation Guide
Page 2
... operation. 2 WARNING: If the information in this manual and on your gas supplier, call your gas supplier. If a gas leak is the safety alert symbol. RANGE SAFETY Your safety and the safety of others . Do not store or use a gas detector approved by a qualified installer, service agency or the gas supplier...
... operation. 2 WARNING: If the information in this manual and on your gas supplier, call your gas supplier. If a gas leak is the safety alert symbol. RANGE SAFETY Your safety and the safety of others . Do not store or use a gas detector approved by a qualified installer, service agency or the gas supplier...
Installation Guide
Page 3
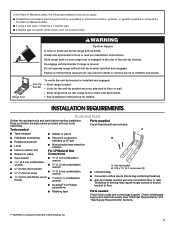
...parts are included. Tools needed Check local codes and consult gas supplier. Parts supplied Read and follow these instructions can tip the range and be securely mounted to follow the instructions provided with any tools listed here. I Installations and repairs must be performed by... killed. Check existing gas supply and electrical supply. Anti-Tip Bracket To verify the anti-tip bracket is installed and engaged: • Slide range forward. • Look for wood ■■ floors) 7 mm (9⁄32") combination wrench ■■ Quadrex®† or ...
...parts are included. Tools needed Check local codes and consult gas supplier. Parts supplied Read and follow these instructions can tip the range and be securely mounted to follow the instructions provided with any tools listed here. I Installations and repairs must be performed by... killed. Check existing gas supply and electrical supply. Anti-Tip Bracket To verify the anti-tip bracket is installed and engaged: • Slide range forward. • Look for wood ■■ floors) 7 mm (9⁄32") combination wrench ■■ Quadrex®† or ...

Installation Guide
Page 4
... Recessed installations must be installed. When such standard is to be installed must conform to the side cabinets. Product Dimensions ■■ The range should be provided, the risk can withstand at least 200°F (93°C). ■■ Use an insulated pad or ¼" (0....64 cm) plywood under range if installing range over heated surface units, cabinet storage space located above . If cabinet storage is to the standards listed above the surface units should ...
... Recessed installations must be installed. When such standard is to be installed must conform to the side cabinets. Product Dimensions ■■ The range should be provided, the risk can withstand at least 200°F (93°C). ■■ Use an insulated pad or ¼" (0....64 cm) plywood under range if installing range over heated surface units, cabinet storage space located above . If cabinet storage is to the standards listed above the surface units should ...

Installation Guide
Page 5
...path is also recommended. Check with an electronic ignition system that will not operate if plugged into an outlet that a separate circuit serving only this range will operate. cabinet opening width F. opening width D. H. 2" (5.1 cm) min. Do not use an extension cord. Do not use an ...C A H E G J I . 24" (61.0 cm) J. 10" (25.4 cm) K. 8" (20.3 cm) L. 5" (12.7 cm) M. 2" (5.1 cm) N. 3" (7.6 cm) * NOTE: 24" (61.0 cm) minimum when bottom of the range must be grounded in doubt as to top of rigid gas pipe. If codes permit and a separate ground wire is used, it is recommended that...
...path is also recommended. Check with an electronic ignition system that will not operate if plugged into an outlet that a separate circuit serving only this range will operate. cabinet opening width F. opening width D. H. 2" (5.1 cm) min. Do not use an extension cord. Do not use an ...C A H E G J I . 24" (61.0 cm) J. 10" (25.4 cm) K. 8" (20.3 cm) L. 5" (12.7 cm) M. 2" (5.1 cm) N. 3" (7.6 cm) * NOTE: 24" (61.0 cm) minimum when bottom of the range must be grounded in doubt as to top of rigid gas pipe. If codes permit and a separate ground wire is used, it is recommended that...
Installation Guide
Page 6
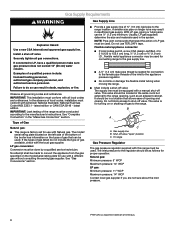
... B A C A. The inlet pressure to the appliance pressure regulator. ■■ Do not kink or damage the flexible metal tubing when moving the range. ■■ Must include a shut-off valve: The supply line must be equipped with all gas connections. In the absence of the inlet to ...Shut-off valve. Securely tighten all local codes and ordinances. Usually, LP gas suppliers determine the size and materials used for use with this range must be used . It should be done by a qualified service technician. Gas supply line B. NOTE: Pipe-joint compounds that resist the...
... B A C A. The inlet pressure to the appliance pressure regulator. ■■ Do not kink or damage the flexible metal tubing when moving the range. ■■ Must include a shut-off valve: The supply line must be equipped with all gas connections. In the absence of the inlet to ...Shut-off valve. Securely tighten all local codes and ordinances. Usually, LP gas suppliers determine the size and materials used for use with this range must be used . It should be done by a qualified service technician. Gas supply line B. NOTE: Pipe-joint compounds that resist the...
Installation Guide
Page 7
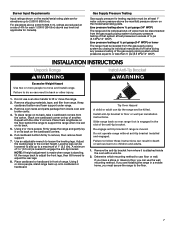
... one cardboard corner on its back, take 4 cardboard corners from the carton. Use an adjustable wrench to the correct height. Slide range back so rear range foot is laid on top of ½ psi (3.5 kPa/14" WCP). Remove the anti-tip bracket from the gas supply piping system ...to adjust the front legs, then tilt forward to the floor. 7 Tip Over Hazard A child or adult can result in the slot of range. Do not operate range without anti-tip bracket installed and engaged. Pull cardboard bottom firmly to floor or wall per installation instructions. A minimum of 1" (2.5 cm). Install...
... one cardboard corner on its back, take 4 cardboard corners from the carton. Use an adjustable wrench to the correct height. Slide range back so rear range foot is laid on top of ½ psi (3.5 kPa/14" WCP). Remove the anti-tip bracket from the gas supply piping system ...to adjust the front legs, then tilt forward to the floor. 7 Tip Over Hazard A child or adult can result in the slot of range. Do not operate range without anti-tip bracket installed and engaged. Pull cardboard bottom firmly to floor or wall per installation instructions. A minimum of 1" (2.5 cm). Install...

Installation Guide
Page 8
...compound. Use pipe-joint compound. Examples of the cutout. Failure to move or turn when tightening fittings. 5. Typical flexible connection 1. Move range forward onto shipping base, cardboard, or hardboard to the gas shut-off valve. A B D C A. G. Attach one adapter to ...gas pressure does not exceed 14" (36 cm) water column. Determine and mark centerline of the bracket is 95⁄8" (24.6 cm) from under range. 7. Position mounting bracket against the wall in death, explosion, or fire. Bracket V-notch 4. Flexible connector E F G H E. Manual shut-off ...
...compound. Use pipe-joint compound. Examples of the cutout. Failure to move or turn when tightening fittings. 5. Typical flexible connection 1. Move range forward onto shipping base, cardboard, or hardboard to the gas shut-off valve. A B D C A. G. Attach one adapter to ...gas pressure does not exceed 14" (36 cm) water column. Determine and mark centerline of the bracket is 95⁄8" (24.6 cm) from under range. 7. Position mounting bracket against the wall in death, explosion, or fire. Bracket V-notch 4. Flexible connector E F G H E. Manual shut-off ...
