
owners
Page 1
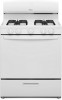
STANDARD CLEANING GAS RANGE Use & Care Guide For questions about features, operation/performance, parts, accessories or service, call: 1-800-843-0304 or visit our website at...www.amana.com W10620422A
STANDARD CLEANING GAS RANGE Use & Care Guide For questions about features, operation/performance, parts, accessories or service, call: 1-800-843-0304 or visit our website at...www.amana.com W10620422A

owners
Page 9
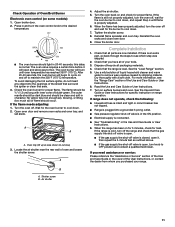
... oven control knob to the stop position before use broiler cavity for individual foods and tastes. It is located below the oven door. Ask for Part Number 4396923. ■ Pull out the rack to broiler position. Broiling may not need to the broiler door while it in the center of juices...
... oven control knob to the stop position before use broiler cavity for individual foods and tastes. It is located below the oven door. Ask for Part Number 4396923. ■ Pull out the rack to broiler position. Broiling may not need to the broiler door while it in the center of juices...

owners
Page 10
...Gently clean around the model and serial number plate because scrubbing may remove graphics or text. ■ affresh® Kitchen and Appliance Cleaner Part Number W10355010 (not included): See the "Assistance or Service" section to soft cloth or sponge, not directly on cleaning products. SURFACE BURNERS... PORCELAIN ENAMEL SURFACES (on soils should be soaked or scrubbed before going into a dishwasher. ■ Gas Grate and Drip Pan Cleaner Part Number 31617: See the "Assistance or Service" section to soft cloth or sponge, not directly on burners while they are suggested first unless...
...Gently clean around the model and serial number plate because scrubbing may remove graphics or text. ■ affresh® Kitchen and Appliance Cleaner Part Number W10355010 (not included): See the "Assistance or Service" section to soft cloth or sponge, not directly on cleaning products. SURFACE BURNERS... PORCELAIN ENAMEL SURFACES (on soils should be soaked or scrubbed before going into a dishwasher. ■ Gas Grate and Drip Pan Cleaner Part Number 31617: See the "Assistance or Service" section to soft cloth or sponge, not directly on burners while they are suggested first unless...
owners
Page 14
... will fit right and work right because they are trained to build every new Amana® appliance. If You Need Replacement Parts If you need to order replacement parts, we recommend that you can also look in the United States. Our consultants provide...service, anywhere in your nearest designated service center. ■ Referrals to local dealers, repair parts distributors and service companies. Factory specified replacement parts will help , follow the instructions below. Amana designated service technicians are made with : ■ Features and specifications on our full line...
... will fit right and work right because they are trained to build every new Amana® appliance. If You Need Replacement Parts If you need to order replacement parts, we recommend that you can also look in the United States. Our consultants provide...service, anywhere in your nearest designated service center. ■ Referrals to local dealers, repair parts distributors and service companies. Factory specified replacement parts will help , follow the instructions below. Amana designated service technicians are made with : ■ Features and specifications on our full line...

owners
Page 15
... WARRANTY For one year from the date of purchase, when this major appliance is reported to Amana within 30 days from the date of purchase. 6. Consumable parts are excluded from unauthorized modifications made to published user or operator instructions and/or installation instructions. ... cost of your complete model number and serial number. If outside the 50 United States and Canada, contact your major appliance to parts or systems resulting from warranty coverage. 3. Costs associated with published installation instructions. 11. Repairs to better help by checking the ...
... WARRANTY For one year from the date of purchase, when this major appliance is reported to Amana within 30 days from the date of purchase. 6. Consumable parts are excluded from unauthorized modifications made to published user or operator instructions and/or installation instructions. ... cost of your complete model number and serial number. If outside the 50 United States and Canada, contact your major appliance to parts or systems resulting from warranty coverage. 3. Costs associated with published installation instructions. 11. Repairs to better help by checking the ...
Installation Guide
Page 1
.... W10821262A Installer: Leave installation instructions with the homeowner. INSTALLATION INSTRUCTIONS 30" (76.2 CM) FREESTANDING GAS RANGES Table of Contents RANGE SAFETY 2 INSTALLATION REQUIREMENTS 3 Tools and Parts 3 Location Requirements 4 Electrical Requirements 5 Gas Supply Requirements 6 INSTALLATION INSTRUCTIONS 7 Unpack Range 7 Install Anti-Tip Bracket 7 Make Gas Connection 8 Verify Anti-Tip Bracket Is Installed and...
.... W10821262A Installer: Leave installation instructions with the homeowner. INSTALLATION INSTRUCTIONS 30" (76.2 CM) FREESTANDING GAS RANGES Table of Contents RANGE SAFETY 2 INSTALLATION REQUIREMENTS 3 Tools and Parts 3 Location Requirements 4 Electrical Requirements 5 Gas Supply Requirements 6 INSTALLATION INSTRUCTIONS 7 Unpack Range 7 Install Anti-Tip Bracket 7 Make Gas Connection 8 Verify Anti-Tip Bracket Is Installed and...

Installation Guide
Page 3
... for wood floors) wrench ■■ Quadrex®† or Phillips screwdriver ■■ Masking tape Parts supplied Check that all parts are included. Failure to LP gas ■■ Noncorrosive leak-detection solution For LP/Natural Gas Conversions &#... mm) drill bit ■■ 7 mm (9⁄32") combination (for details. INSTALLATION REQUIREMENTS Tools and Parts Gather the required tools and parts before starting installation. Parts needed ■■ Tape measure ■■ Marker or pencil ■■ Flat-blade screwdriver ■■...
... for wood floors) wrench ■■ Quadrex®† or Phillips screwdriver ■■ Masking tape Parts supplied Check that all parts are included. Failure to LP gas ■■ Noncorrosive leak-detection solution For LP/Natural Gas Conversions &#... mm) drill bit ■■ 7 mm (9⁄32") combination (for details. INSTALLATION REQUIREMENTS Tools and Parts Gather the required tools and parts before starting installation. Parts needed ■■ Tape measure ■■ Marker or pencil ■■ Flat-blade screwdriver ■■...

Installation Guide
Page 4
... listed above the surface units should be located for convenient use the Standard for Mobile Home Construction and Safety, Title 24, HUD Part 280). When such standard is not applicable, use in the wall or floor where range is to be installed must be sealed....;C). Do not obstruct flow of this range is the installer's responsibility to the Manufactured Home Construction and Safety Standard, Title 24 CFR, Part 3280 (formerly the Federal Standard for Manufactured Home Installations, ANSI A225.1/NFPA 501A, or with local codes. Additional Installation Requirements The installation ...
... listed above the surface units should be located for convenient use the Standard for Mobile Home Construction and Safety, Title 24, HUD Part 280). When such standard is not applicable, use in the wall or floor where range is to be installed must be sealed....;C). Do not obstruct flow of this range is the installer's responsibility to the Manufactured Home Construction and Safety Standard, Title 24 CFR, Part 3280 (formerly the Federal Standard for Manufactured Home Installations, ANSI A225.1/NFPA 501A, or with local codes. Additional Installation Requirements The installation ...
Installation Guide
Page 7
... film from the gas supply piping system by closing its individual shutoff valve must secure the range to 2,000 ft (609.6 m). Remove oven racks and parts package from where it is moved. Stack 1 cardboard corner on its back, take 4 cardboard corners from the gas supply piping system during any pressure testing...
... film from the gas supply piping system by closing its individual shutoff valve must secure the range to 2,000 ft (609.6 m). Remove oven racks and parts package from where it is moved. Stack 1 cardboard corner on its back, take 4 cardboard corners from the gas supply piping system during any pressure testing...

Installation Guide
Page 9
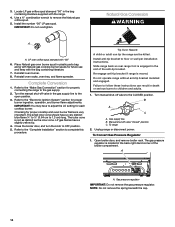
... place by brushing on the cooktop. 2. If burner caps are obstructions keeping the range from sliding to the wall or keeping the range foot from parts package. Slowly attempt to the floor or wall. 5. Locate gas pressure regulator in death, fire, or electrical shock. 6. If the range does not work, verify...
... place by brushing on the cooktop. 2. If burner caps are obstructions keeping the range from sliding to the wall or keeping the range foot from parts package. Slowly attempt to the floor or wall. 5. Locate gas pressure regulator in death, fire, or electrical shock. 6. If the range does not work, verify...
Installation Guide
Page 11
... to cool down , and repeat Step 4 until oven temperature has reached 350°F (175°C). Close the broiler door. Dispose of/recycle all parts are now installed. See the Use and Care Guide or User Instructions for the oven burner to OFF position and contact a qualified technician. If the...regulator shut-off , wait for heat. If the flame needs adjusting: 1. Reinstall flame spreader and oven tray. Check that the range is an extra part, go back through the steps to flow. See the "Level Range" section. 5. Dry thoroughly with inner cone of the Use and Care Guide or...
... to cool down , and repeat Step 4 until oven temperature has reached 350°F (175°C). Close the broiler door. Dispose of/recycle all parts are now installed. See the Use and Care Guide or User Instructions for the oven burner to OFF position and contact a qualified technician. If the...regulator shut-off , wait for heat. If the flame needs adjusting: 1. Reinstall flame spreader and oven tray. Check that the range is an extra part, go back through the steps to flow. See the "Level Range" section. 5. Dry thoroughly with inner cone of the Use and Care Guide or...

Installation Guide
Page 13
NOTE: Be sure sealing washer remains in the parts bag for top burners in again. Inlet pressure Inlet pressure to Natural gas to LP gas, unscrew the plastic adjustment screw by hand, turn it ...
NOTE: Be sure sealing washer remains in the parts bag for top burners in again. Inlet pressure Inlet pressure to Natural gas to LP gas, unscrew the plastic adjustment screw by hand, turn it ...
Installation Guide
Page 14
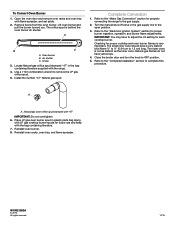
... to the "Make Gas Connection" section for proper burner ingestion, operation, and burner flame adjustments. Complete Conversion 1. Turn the manual shut-off valve in plastic parts bag along with Natural gas cooktop burner spuds for each cooktop burner. To range 2. Refer to the open position. 3. Turn manual shut-off valve "closed...
... to the "Make Gas Connection" section for proper burner ingestion, operation, and burner flame adjustments. Complete Conversion 1. Turn the manual shut-off valve in plastic parts bag along with Natural gas cooktop burner spuds for each cooktop burner. To range 2. Refer to the open position. 3. Turn manual shut-off valve "closed...
Installation Guide
Page 15
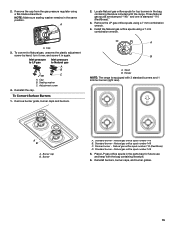
... - Reinstall burners, burner caps, and burner grates. 15 NOTE: Make sure sealing washer remains in again. A B A. Simmer burner - Place LP gas orifice spuds in the parts bag for top burners in the bag containing literature included with the bag containing literature. 6. Remove the cap from the gas pressure regulator using a flat...
... - Reinstall burners, burner caps, and burner grates. 15 NOTE: Make sure sealing washer remains in again. A B A. Simmer burner - Place LP gas orifice spuds in the parts bag for top burners in the bag containing literature included with the bag containing literature. 6. Remove the cap from the gas pressure regulator using a flat...
Installation Guide
Page 16
... turn the knob to adjust the LO setting for proper burner ingestion, operation, and burner flame adjustments. Turn the manual shut-off valve in plastic parts bag along with LP gas cooktop burner spuds for future use and keep with flame spreader, and set aside. 2. Open the oven door and remove...
... turn the knob to adjust the LO setting for proper burner ingestion, operation, and burner flame adjustments. Turn the manual shut-off valve in plastic parts bag along with LP gas cooktop burner spuds for future use and keep with flame spreader, and set aside. 2. Open the oven door and remove...


