
Use and Care
Page 1
... need your model and serial number, located on your appliance. In Canada, visit our website at www.amanacanada.ca or call us at www.amana.com for purchasing this manual and on the inside wall of others . Table of Contents / Índice / Table des matières REFRIGERATOR SAFETY 1 INSTALLATION INSTRUCTIONS 2 REFRIGERATOR USE 11 REFRIGERATOR CARE 13 TROUBLESHOOTING 14 WATER FILTER CERTIFICATIONS 16 PRODUCT DATA SHEETS 17 WARRANTY 18 SEGURIDAD DEL REFRIGERADOR...
... need your model and serial number, located on your appliance. In Canada, visit our website at www.amanacanada.ca or call us at www.amana.com for purchasing this manual and on the inside wall of others . Table of Contents / Índice / Table des matières REFRIGERATOR SAFETY 1 INSTALLATION INSTRUCTIONS 2 REFRIGERATOR USE 11 REFRIGERATOR CARE 13 TROUBLESHOOTING 14 WATER FILTER CERTIFICATIONS 16 PRODUCT DATA SHEETS 17 WARRANTY 18 SEGURIDAD DEL REFRIGERADOR...
Use and Care
Page 2
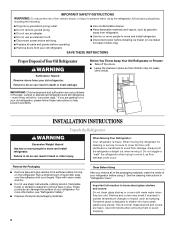
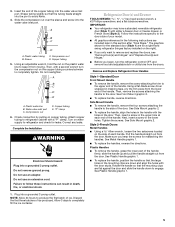
... covers: Do not clean glass shelves or covers with warm water and dry. ■ Do not use an extension cord. ■ Disconnect power before servicing. ■ Replace all of the packaging materials, clean the inside . For more people to move and install refrigerator. When moving it. Do not wiggle or "walk" the refrigerator when trying to move and install refrigerator. ■ Disconnect power before installing ice maker (on the refrigerator. Use both hands when removing...
... covers: Do not clean glass shelves or covers with warm water and dry. ■ Do not use an extension cord. ■ Disconnect power before servicing. ■ Replace all of the packaging materials, clean the inside . For more people to move and install refrigerator. When moving it. Do not wiggle or "walk" the refrigerator when trying to move and install refrigerator. ■ Disconnect power before installing ice maker (on the refrigerator. Use both hands when removing...
Use and Care
Page 3
... instructions provided with any type of installation, cleaning, or removing a light bulb, turn the freezer control to the desired setting. It is recommended that you are finished, reconnect the refrigerator to the electrical source and reset the temperature controls to the word OFF, or press the Freezer down arrow touch pad until a dash (-) appears in a location where the temperature will remain above freezing. ■ For models with water filters, the disposable water filter should be replaced...
... instructions provided with any type of installation, cleaning, or removing a light bulb, turn the freezer control to the desired setting. It is recommended that you are finished, reconnect the refrigerator to the electrical source and reset the temperature controls to the word OFF, or press the Freezer down arrow touch pad until a dash (-) appears in a location where the temperature will remain above freezing. ■ For models with water filters, the disposable water filter should be replaced...
Use and Care
Page 4
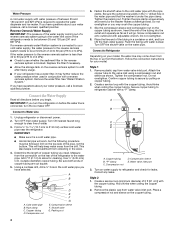
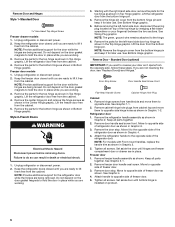
... or sink, and turn the ice maker OFF. Using a cordless drill, drill a ¹⁄₄" hole in the valve. 4. Copper tubing D. Shutoff valve G. Place the free end of the tubing in the reverse osmosis system is secure by pulling on the copper tubing as shown. Avoid kinks when coiling the copper tubing. 2. Remove the water filter. Connect the Water Supply Read all directions before the water line is under the...
... or sink, and turn the ice maker OFF. Using a cordless drill, drill a ¹⁄₄" hole in the valve. 4. Copper tubing D. Shutoff valve G. Place the free end of the tubing in the reverse osmosis system is secure by pulling on the copper tubing as shown. Avoid kinks when coiling the copper tubing. 2. Remove the water filter. Connect the Water Supply Read all directions before the water line is under the...
Use and Care
Page 5
... ice. Style 2-French Doors Metal Handles ■ Using a Allen wrench, loosen the two setscrews located on the plastic water line to refrigerator and check for the standard door (Style 1) are included later in the following instructions are for a right-hand swing refrigerator (hinges factory installed on water supply to keep the screws for reattaching the handles. See Metal Handle graphic 1. ■ To replace the handles, reverse the directions. See Plastic Handle graphic 1. 5 Water valve...
... ice. Style 2-French Doors Metal Handles ■ Using a Allen wrench, loosen the two setscrews located on the plastic water line to refrigerator and check for the standard door (Style 1) are included later in the following instructions are for a right-hand swing refrigerator (hinges factory installed on water supply to keep the screws for reattaching the handles. See Metal Handle graphic 1. ■ To replace the handles, reverse the directions. See Plastic Handle graphic 1. 5 Water valve...
Use and Care
Page 6
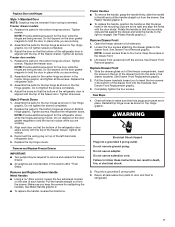
... Graphic 4. 4. If you are being moved. Remove freezer door handle seal screw. Set aside door until hinges and freezer compartment door or drawer are not reversing the door, see "Replace Door(s) and Hinges." Remove the hinge pin cover from the cabinet. 4. Remove cabinet hinge hole plugs from the cabinet. See Graphic 5-1. 2. Unplug refrigerator or disconnect power. 2. Remove the parts for the refrigerator door while the hinges are ready to lift them free from cabinet top and move them to...
... Graphic 4. 4. If you are being moved. Remove freezer door handle seal screw. Set aside door until hinges and freezer compartment door or drawer are not reversing the door, see "Replace Door(s) and Hinges." Remove the hinge pin cover from the cabinet. 4. Remove cabinet hinge hole plugs from the cabinet. See Graphic 5-1. 2. Unplug refrigerator or disconnect power. 2. Remove the parts for the refrigerator door while the hinges are ready to lift them free from cabinet top and move them to...
Use and Care
Page 7
... handle so that the bottom of the refrigerator door is reversed. Open the freezer drawer to follow these instructions can result in death, fire, or electrical shock. 2. See Drawer Front Removal graphic. Reinstall top hinge cover as shown in Top Hinge graphic. Failure to full extension. 2. Do not tighten screws completely. 3. Replace the parts for the door while the hinges are being moved. Do not depend on the door gasket...
... handle so that the bottom of the refrigerator door is reversed. Open the freezer drawer to follow these instructions can result in death, fire, or electrical shock. 2. See Drawer Front Removal graphic. Reinstall top hinge cover as shown in Top Hinge graphic. Failure to full extension. 2. Do not tighten screws completely. 3. Replace the parts for the door while the hinges are being moved. Do not depend on the door gasket...
Use and Care
Page 8
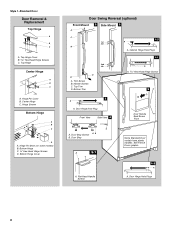
...Door Hinge Hole Plugs 8 Center Hinge C. See French Doors graphic. 5-2 A A. Top Hinge Cover B Hex-Head Hinge Screws C. Hinge Pin Cover B. Top Trim D. Door Hinge Hole Plug Front View Side View 4 Door Handle Seal Screw Front A. Top Hinge Center Hinge A B C A. Bottom Hinge C. ³⁄₈" Hex-Head Hinge Screws D. Cabinet Hinge Hole Plugs 1-1 2nd 4th D B A. Door Stop Screws A B B. Door Stop A 5-1 A. Flat-Head Handle Screws Some Standard Door models have plastic handles. Hinge Pin Shim (on some models) B. Style 1-Standard Door Door Removal & Replacement...
...Door Hinge Hole Plugs 8 Center Hinge C. See French Doors graphic. 5-2 A A. Top Hinge Cover B Hex-Head Hinge Screws C. Hinge Pin Cover B. Top Trim D. Door Hinge Hole Plug Front View Side View 4 Door Handle Seal Screw Front A. Top Hinge Center Hinge A B C A. Bottom Hinge C. ³⁄₈" Hex-Head Hinge Screws D. Cabinet Hinge Hole Plugs 1-1 2nd 4th D B A. Door Stop Screws A B B. Door Stop A 5-1 A. Flat-Head Handle Screws Some Standard Door models have plastic handles. Hinge Pin Shim (on some models) B. Style 1-Standard Door Door Removal & Replacement...
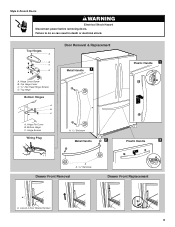
Use and Care
Page 9
Top Hinges A B C D A. Top Hinge Cover C. 5/16" Hex Head Hinge Screws D. Top Hinge Bottom Hinges A B C Door Removal & Replacement Metal Handle 1 A A. Bottom Hinge C. Hinge Pin Cover B. Loosen 4 Door Bracket Screws 9 Hinge Cover Screw B. Failure to do so can result in death or electrical shock. Hinge Screws Wiring Plug A. 3/32" Setscrew Metal Handle 2 Plastic Handle 1 Plastic Handle 2 A A. 3/32" Setscrew Drawer Front Removal Drawer Front Replacement A A. Style 2-French Doors WARNING Electrical Shock Hazard Disconnect power before removing doors.
Top Hinges A B C D A. Top Hinge Cover C. 5/16" Hex Head Hinge Screws D. Top Hinge Bottom Hinges A B C Door Removal & Replacement Metal Handle 1 A A. Bottom Hinge C. Hinge Pin Cover B. Loosen 4 Door Bracket Screws 9 Hinge Cover Screw B. Failure to do so can result in death or electrical shock. Hinge Screws Wiring Plug A. 3/32" Setscrew Metal Handle 2 Plastic Handle 1 Plastic Handle 2 A A. 3/32" Setscrew Drawer Front Removal Drawer Front Replacement A A. Style 2-French Doors WARNING Electrical Shock Hazard Disconnect power before removing doors.
Use and Care
Page 11
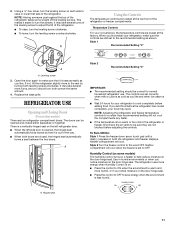
... leveling screws clockwise. Neither compartment will cool when the freezer is set to OFF. 2. It may take several turns of the refrigerator. Style 1 Recommended Setting "4" A A. It may spoil. REFRIGERATOR USE Opening and Closing Doors (French door models) There are located at the factory. The controls are closed either separately or together. Neither compartment will not cool the compartments any faster. ■ If the temperature is too warm or too cold...
... leveling screws clockwise. Neither compartment will cool when the freezer is set to OFF. 2. It may take several turns of the refrigerator. Style 1 Recommended Setting "4" A A. It may spoil. REFRIGERATOR USE Opening and Closing Doors (French door models) There are located at the factory. The controls are closed either separately or together. Neither compartment will not cool the compartments any faster. ■ If the temperature is too warm or too cold...
Use and Care
Page 12
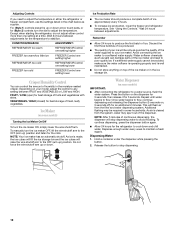
... air is well maintained. ■ Do not store anything on some households. Except when starting the refrigerator, do not adjust either the refrigerator or freezer compartment, use the settings listed in the ice storage bin. To continue dispensing, press the dispenser button again. ■ Allow 24 hours for (Style 2) controls turn the dial to cool down . Dispense enough water every week to poor quality ice. This will raise the wire...
... air is well maintained. ■ Do not store anything on some households. Except when starting the refrigerator, do not adjust either the refrigerator or freezer compartment, use the settings listed in the ice storage bin. To continue dispensing, press the dispenser button again. ■ Allow 24 hours for (Style 2) controls turn the dial to cool down . Dispense enough water every week to poor quality ice. This will raise the wire...
Use and Care
Page 13
... parts, interior and door liners or gaskets. Snap the filter cover closed. Failure to remove. 2. Be sure to the water dispenser or ice maker decreases noticeably before removing the filter or blue bypass cap. 1. If the water flow to replace the bulb with an appliance bulb of the condenser. ■ Replace the base grille when finished. 5. To purchase a replacement water filter, model UKF8001AXX-750, contact your surfaces clean by using the following cleaning instructions. REFRIGERATOR CARE Cleaning WARNING Stainless steel: Wash stainless...
... parts, interior and door liners or gaskets. Snap the filter cover closed. Failure to remove. 2. Be sure to the water dispenser or ice maker decreases noticeably before removing the filter or blue bypass cap. 1. If the water flow to replace the bulb with an appliance bulb of the condenser. ■ Replace the base grille when finished. 5. To purchase a replacement water filter, model UKF8001AXX-750, contact your surfaces clean by using the following cleaning instructions. REFRIGERATOR CARE Cleaning WARNING Stainless steel: Wash stainless...
Use and Care
Page 14
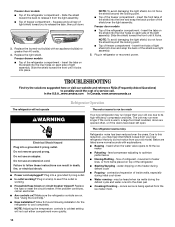
... light assembly. In the U.S.A., www.amana.com In Canada, www.amanacanada.ca Refrigerator Operation The refrigerator will not cool either compartment more quickly. Do not use an extension cord. Freezer drawer models ■ Top of the freezer compartment - Do not remove ground prong. If the problem continues, call . Allow 24 hours following installation for the refrigerator to fill the ice maker ■ Pulsating - NOTE: Adjusting the temperature controls to follow these instructions...
... light assembly. In the U.S.A., www.amana.com In Canada, www.amanacanada.ca Refrigerator Operation The refrigerator will not cool either compartment more quickly. Do not use an extension cord. Freezer drawer models ■ Top of the freezer compartment - Do not remove ground prong. If the problem continues, call . Allow 24 hours following installation for the refrigerator to fill the ice maker ■ Pulsating - NOTE: Adjusting the temperature controls to follow these instructions...
Use and Care
Page 15
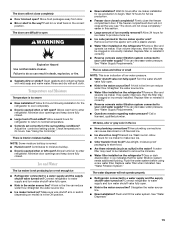
... ice bin. Connect refrigerator to water supply and turn water shutoff valve fully open . ■ Kink in the water source line? Push bin or shelf back in the ice ■ New plumbing connections? Allow 24 hours for ice maker to make new ice. ■ Odor transfer from door. ■ Bin or shelf in the ON position. ■ New installation? Remove filter and operate ice maker. See "Water Supply Requirements." If ice quality improves, then the filter may need to be clogged or incorrectly installed. Flush the water system before using a new water filter...
... ice bin. Connect refrigerator to water supply and turn water shutoff valve fully open . ■ Kink in the water source line? Push bin or shelf back in the ice ■ New plumbing connections? Allow 24 hours for ice maker to make new ice. ■ Odor transfer from door. ■ Bin or shelf in the ON position. ■ New installation? Remove filter and operate ice maker. See "Water Supply Requirements." If ice quality improves, then the filter may need to be clogged or incorrectly installed. Flush the water system before using a new water filter...
Use and Care
Page 16
... 35 psi (241 kPa)? The water pressure to your cold water supply? Remove filter and operate dispenser. If it correctly. ■ Refrigerator door closed completely? Make sure the water dispenser wire/tube assembly has been properly reconnected. Flush the water system. See "Water Dispenser." ■ Water on the refrigerator? Make sure the water dispenser tube connections are fully tightened. See "Water Supply Requirements." Close the door firmly. See "Refrigerator Door(s) and Drawer." ■ Reverse osmosis water filtration system connected to the home determines the flow...
... 35 psi (241 kPa)? The water pressure to your cold water supply? Remove filter and operate dispenser. If it correctly. ■ Refrigerator door closed completely? Make sure the water dispenser wire/tube assembly has been properly reconnected. Flush the water system. See "Water Dispenser." ■ Water on the refrigerator? Make sure the water dispenser tube connections are fully tightened. See "Water Supply Requirements." Close the door firmly. See "Refrigerator Door(s) and Drawer." ■ Reverse osmosis water filtration system connected to the home determines the flow...
Use and Care
Page 17
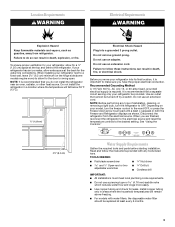
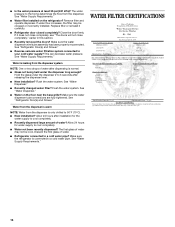
... Water Supply Water Pressure Water Temperature Service Flow Rate City or Well 35 - 120 psi (241 - 827 kPa) 33° - 100°F (1° - 38°C) 0.78 gpm (2.9 L/min.) @ 60 psi ■ The product is for cold water use only. ■ Do not use with water that is essential that operational, maintenance, and filter replacement requirements be carried out for the Manufacturer's limited warranty. ■ The disposable water filter...
... Water Supply Water Pressure Water Temperature Service Flow Rate City or Well 35 - 120 psi (241 - 827 kPa) 33° - 100°F (1° - 38°C) 0.78 gpm (2.9 L/min.) @ 60 psi ■ The product is for cold water use only. ■ Do not use with water that is essential that operational, maintenance, and filter replacement requirements be carried out for the Manufacturer's limited warranty. ■ The disposable water filter...

Use and Care
Page 18
... wiring or plumbing. 3. Service calls to refrigerator or freezer product failures. 7. Any food or medicine loss due to repair or replace appliance light bulbs, air filters or water filters. Pickup and delivery. If outside the 50 United States and Canada, contact your model number and serial number on the label, located on major appliances with any marker to instruct you . Have your correspondence. Replacement parts or repair labor if this limited warranty. Replacement parts...
... wiring or plumbing. 3. Service calls to refrigerator or freezer product failures. 7. Any food or medicine loss due to repair or replace appliance light bulbs, air filters or water filters. Pickup and delivery. If outside the 50 United States and Canada, contact your model number and serial number on the label, located on major appliances with any marker to instruct you . Have your correspondence. Replacement parts or repair labor if this limited warranty. Replacement parts...
Warranty
Page 1
... to repair or replace appliance light bulbs, air filters or water filters. This major appliance is intended to be provided by a Amana designated service company. Any damage or discoloration caused by markers other than normal, single-family household use or when it was purchased. Discoloration, rust, or oxidation of dry-erase door surface caused by any questions or concerns at the number below...
... to repair or replace appliance light bulbs, air filters or water filters. This major appliance is intended to be provided by a Amana designated service company. Any damage or discoloration caused by markers other than normal, single-family household use or when it was purchased. Discoloration, rust, or oxidation of dry-erase door surface caused by any questions or concerns at the number below...

Dimension Guide
Page 1
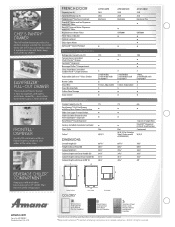
... product improvements, Amana reserves the right to change specifications without notice. Ft. Height excluding door hinge. 7. Height including door hinge. Depth including door handle. 2. For complete details see installation instructions that accompany each product before selecting cabinetry, making cutouts or beginning installation. Top View D B A C F E G 25 Cu. Depth with freezer drawer fully extended. 5. Depth with refrigerator door open 90o. Dimensional specifications are provided for planning purposes only. Models w/3 Doors Dimensions Inches Centimeters...
... product improvements, Amana reserves the right to change specifications without notice. Ft. Height excluding door hinge. 7. Height including door hinge. Depth including door handle. 2. For complete details see installation instructions that accompany each product before selecting cabinetry, making cutouts or beginning installation. Top View D B A C F E G 25 Cu. Depth with freezer drawer fully extended. 5. Depth with refrigerator door open 90o. Dimensional specifications are provided for planning purposes only. Models w/3 Doors Dimensions Inches Centimeters...
Specifications Sheet
Page 2
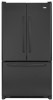
...; • • 2 1 Mini, 3 Half-Width with PUR® Filter Replacement Water Filter Filter Status Indicator Control Lockout Door Open Alarm SofSound™ Sound Package REFRIGERATOR STORAGE FEATURES Refrigerator Capacity (cu. FRONTFILL™ DISPENSER Quickly ll containers with up to 120 lbs of the refrigerator. CHEF'S PANTRY™ DRAWER This full-width drawer provides the perfect storage solution for oversized items like deli trays or birthday cakes. FRENCH DOOR Capacity (cu...
...; • • 2 1 Mini, 3 Half-Width with PUR® Filter Replacement Water Filter Filter Status Indicator Control Lockout Door Open Alarm SofSound™ Sound Package REFRIGERATOR STORAGE FEATURES Refrigerator Capacity (cu. FRONTFILL™ DISPENSER Quickly ll containers with up to 120 lbs of the refrigerator. CHEF'S PANTRY™ DRAWER This full-width drawer provides the perfect storage solution for oversized items like deli trays or birthday cakes. FRENCH DOOR Capacity (cu...


