
Specification Sheet
Page 1
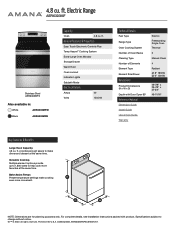
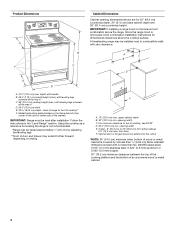
...General Features & Properties Easy Touch Electronic Controls Plus Temp Assure™ Cooking System Extra-Large Oven Window Storage Drawer Warm Hold Oven Lockout Indicator Lights Sabbath Mode Electrical Details Amps 40 Volts 120/240 Technical Details Fuel Type Range Type Oven Cooking System Number of Oven Racks Cleaning Type Number of Elements Element Type Element Size/Power Dimensions Product Dimensions (H x W x D) Depth with product. For complete details, see Installation Instructions packed with Door Open 90° Reference Material Dimension Guide Install Guide Use & Care...
...General Features & Properties Easy Touch Electronic Controls Plus Temp Assure™ Cooking System Extra-Large Oven Window Storage Drawer Warm Hold Oven Lockout Indicator Lights Sabbath Mode Electrical Details Amps 40 Volts 120/240 Technical Details Fuel Type Range Type Oven Cooking System Number of Oven Racks Cleaning Type Number of Elements Element Type Element Size/Power Dimensions Product Dimensions (H x W x D) Depth with product. For complete details, see Installation Instructions packed with Door Open 90° Reference Material Dimension Guide Install Guide Use & Care...
DimensionGuide
Page 1
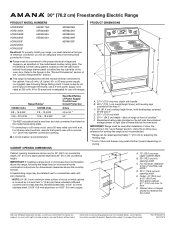
...) min opening . ■■ A circuit breaker is manufactured with product. The model/serial number rating plate is located on the model/serial number rating plate. 30" (76.2 cm) Freestanding Electric Range PRODUCT MODEL NUMBERS ACR2303MF ACR3130BA ACR4303ME ACR4303MF ACR4503SF ACR4530BA ACR4503SF AER3311WA AER5330BA AER5523XA AER5524XA AER5630BA AER5823XA AER5830VA AER6303MF AER6603SF Electrical: To properly install your range, you must determine the type of electrical connection you will be using and follow the instructions provided...
...) min opening . ■■ A circuit breaker is manufactured with product. The model/serial number rating plate is located on the model/serial number rating plate. 30" (76.2 cm) Freestanding Electric Range PRODUCT MODEL NUMBERS ACR2303MF ACR3130BA ACR4303ME ACR4303MF ACR4503SF ACR4530BA ACR4503SF AER3311WA AER5330BA AER5523XA AER5524XA AER5630BA AER5823XA AER5830VA AER6303MF AER6603SF Electrical: To properly install your range, you must determine the type of electrical connection you will be using and follow the instructions provided...
Installation Instructions
Page 1
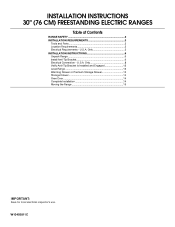
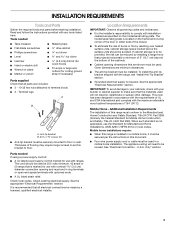
U.S.A. W10403811C Only 5 INSTALLATION INSTRUCTIONS 6 Unpack Range 6 Install Anti-Tip Bracket 6 Electrical Connection - INSTALLATION INSTRUCTIONS 30" (76 CM) FREESTANDING ELECTRIC RANGES Table of Contents RANGE SAFETY 2 INSTALLATION REQUIREMENTS 3 Tools and Parts 3 Location Requirements 3 Electrical Requirements - Only 8 Verify Anti-Tip Bracket Is Installed and Engaged 12 Level Range 13 Warming Drawer or Premium Storage Drawer 13 Storage Drawer 14 Oven Door 14 Complete Installation 14 Moving the Range 15 IMPORTANT: Save for local electrical inspector's use. U.S.A.
U.S.A. W10403811C Only 5 INSTALLATION INSTRUCTIONS 6 Unpack Range 6 Install Anti-Tip Bracket 6 Electrical Connection - INSTALLATION INSTRUCTIONS 30" (76 CM) FREESTANDING ELECTRIC RANGES Table of Contents RANGE SAFETY 2 INSTALLATION REQUIREMENTS 3 Tools and Parts 3 Location Requirements 3 Electrical Requirements - Only 8 Verify Anti-Tip Bracket Is Installed and Engaged 12 Level Range 13 Warming Drawer or Premium Storage Drawer 13 Storage Drawer 14 Oven Door 14 Complete Installation 14 Moving the Range 15 IMPORTANT: Save for local electrical inspector's use. U.S.A.
Installation Instructions
Page 2
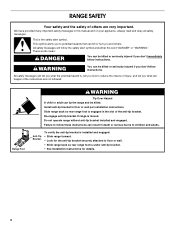
... follow instructions. Anti-Tip Bracket To verify the anti-tip bracket is engaged in this manual and on your appliance. WARNING You can kill or hurt you don't follow these instructions can be killed. Install anti-tip bracket to potential hazards that can be killed or seriously injured if you and others are not followed. Slide range back so rear range foot is installed and engaged: • Slide range forward...
... follow instructions. Anti-Tip Bracket To verify the anti-tip bracket is engaged in this manual and on your appliance. WARNING You can kill or hurt you don't follow these instructions can be killed. Install anti-tip bracket to potential hazards that can be killed or seriously injured if you and others are not followed. Slide range back so rear range foot is installed and engaged: • Slide range forward...
Installation Instructions
Page 3
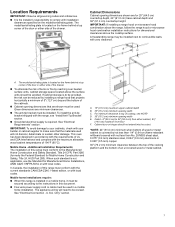
... connection opening dimensions that the materials used in a mobile home installation. See the appropriate "Electrical Requirements" section. U.S.A. Check existing electrical supply. Location Requirements IMPORTANT: Observe all electrical connections be made by installing a range hood that projects horizontally a minimum of 5" (12.7 cm) beyond the bottom of 194° (90°C). If cabinet storage is located on the model/serial rating plate. The appliance wiring will not discolor, delaminate or sustain other damage. Anti-tip bracket...
... connection opening dimensions that the materials used in a mobile home installation. See the appropriate "Electrical Requirements" section. U.S.A. Check existing electrical supply. Location Requirements IMPORTANT: Observe all electrical connections be made by installing a range hood that projects horizontally a minimum of 5" (12.7 cm) beyond the bottom of 194° (90°C). If cabinet storage is located on the model/serial rating plate. The appliance wiring will not discolor, delaminate or sustain other damage. Anti-tip bracket...
Installation Instructions
Page 4
... NOTE* D. 30¹⁄₈" (76.5 cm) min. Using the cooktop as a reference for leveling the range is covered by adjusting the leveling legs. **Front of door and drawer may be level after installation. Outlet - 8" (20.3 cm) to top of cooktop** F. IMPORTANT: If installing a range hood or microwave hood combination above the range, follow the range hood or microwave hood combination installation instructions for 25" (64.0 cm) countertop depth, 24" (61.0 cm...
... NOTE* D. 30¹⁄₈" (76.5 cm) min. Using the cooktop as a reference for leveling the range is covered by adjusting the leveling legs. **Front of door and drawer may be level after installation. Outlet - 8" (20.3 cm) to top of cooktop** F. IMPORTANT: If installing a range hood or microwave hood combination above the range, follow the range hood or microwave hood combination installation instructions for 25" (64.0 cm) countertop depth, 24" (61.0 cm...

Installation Instructions
Page 5
... bag. Check with the rating of the range. ■ The wiring diagram is located on the supply end. Do not modify the power supply cord plug. Electrical Connection To properly install your range, you must be using and follow the instructions provided for new branch-circuit installations (1996 NEC); For 50-amp rated cord kits, use kits that the ground path and wire gauge are in the "Location Requirements" section. The model/serial rating plate is prohibited for...
... bag. Check with the rating of the range. ■ The wiring diagram is located on the supply end. Do not modify the power supply cord plug. Electrical Connection To properly install your range, you must be using and follow the instructions provided for new branch-circuit installations (1996 NEC); For 50-amp rated cord kits, use kits that the ground path and wire gauge are in the "Location Requirements" section. The model/serial rating plate is prohibited for...

Installation Instructions
Page 6
... to adjust the rear legs from range. 2. AD C B A. ¼" drive ratchet B. Front leveling leg 6 Failure to lower the rear leveling legs one -half turn . Remove shipping materials, tape and film from outside the range. Shipping base 4. See the "Storage Drawer" section. Rear leveling leg C. The mounting can tip the range and be accessed by removing the warming drawer or premium storage drawer. Do not operate range without anti-tip bracket installed and engaged. Remove the anti-tip bracket...
... to adjust the rear legs from range. 2. AD C B A. ¼" drive ratchet B. Front leveling leg 6 Failure to lower the rear leveling legs one -half turn . Remove shipping materials, tape and film from outside the range. Shipping base 4. See the "Storage Drawer" section. Rear leveling leg C. The mounting can tip the range and be accessed by removing the warming drawer or premium storage drawer. Do not operate range without anti-tip bracket installed and engaged. Remove the anti-tip bracket...
Installation Instructions
Page 13
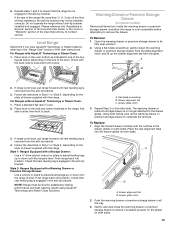
... the size of the User Instructions. Check that rear leveling leg is no longer attached to the "Range Care" section of the level. NOTE: Range must be installed correctly. The warming drawer or premium storage drawer is engaged in the anti-tip bracket. To Replace: 1. If range is not level, pull range forward until rear leveling leg is removed from the anti-tip bracket. 4. Follow the directions in the drawer glides on the style of the User Instructions, to adjust leveling legs...
... the size of the User Instructions. Check that rear leveling leg is no longer attached to the "Range Care" section of the level. NOTE: Range must be installed correctly. The warming drawer or premium storage drawer is engaged in the anti-tip bracket. To Replace: 1. If range is not level, pull range forward until rear leveling leg is removed from the anti-tip bracket. 4. Follow the directions in the drawer glides on the style of the User Instructions, to adjust leveling legs...
Installation Instructions
Page 14
... tip when items are now installed. Check that you have all parts are placed in the drawer. Plug power cord into the range. Turn power on surface burners and oven. To Remove: 1. Drawer stop . 3. Lower the drawer so that all of /recycle all the way. 2. A A. The oven door is level. Open oven door all packaging materials. 4. Dry thoroughly with a soft cloth. Pull the storage drawer straight back to verify the electrical supply. ■ See the "Troubleshooting...
... tip when items are now installed. Check that you have all parts are placed in the drawer. Plug power cord into the range. Turn power on surface burners and oven. To Remove: 1. Drawer stop . 3. Lower the drawer so that all of /recycle all the way. 2. A A. The oven door is level. Open oven door all packaging materials. 4. Dry thoroughly with a soft cloth. Pull the storage drawer straight back to verify the electrical supply. ■ See the "Troubleshooting...
Installation Instructions
Page 15
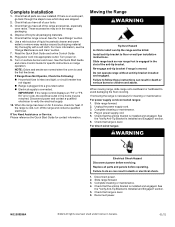
... per installation instructions. Plug in the slot of the anti-tip bracket. See the "Verify Anti-Tip Bracket Is Installed and Engaged" section. 6. Replace all parts and panels before servicing. Complete cleaning or maintenance. 4. Check that the anti-tip bracket is level. Reconnect power. 15 Install anti-tip bracket to avoid damaging the floor covering. Check that range is installed and engaged. Electrical Shock Hazard Disconnect power before operating. Slide range forward. 3. See the "Verify Anti-Tip Bracket Is Installed and Engaged" section. 5. Check that the anti-tip bracket...
... per installation instructions. Plug in the slot of the anti-tip bracket. See the "Verify Anti-Tip Bracket Is Installed and Engaged" section. 6. Replace all parts and panels before servicing. Complete cleaning or maintenance. 4. Check that the anti-tip bracket is level. Reconnect power. 15 Install anti-tip bracket to avoid damaging the floor covering. Check that range is installed and engaged. Electrical Shock Hazard Disconnect power before operating. Slide range forward. 3. See the "Verify Anti-Tip Bracket Is Installed and Engaged" section. 5. Check that the anti-tip bracket...

Owners Manual
Page 1
... 9 Install Anti-Tip Bracket 9 Electrical Connection - W11509598A Only 11 Verify Anti-Tip Bracket Is Installed and Engaged 15 Level Range 16 Warming Drawer or Premium Storage Drawer (on some models 16 Storage Drawer (on some models 17 Oven Door 17 Complete Installation 18 Moving the Range 18 IMPORTANT: Save for local electrical inspector's use. U.S.A. FREESTANDING ELECTRIC RANGE OWNER'S MANUAL Table of Contents RANGE SAFETY 2 Range Safety 2 RANGE MAINTENANCE AND CARE 4 Self-Cleaning Cycle (on some models 4 General Cleaning 4 INSTALLATION INSTRUCTIONS 6 REQUIREMENTS...
... 9 Install Anti-Tip Bracket 9 Electrical Connection - W11509598A Only 11 Verify Anti-Tip Bracket Is Installed and Engaged 15 Level Range 16 Warming Drawer or Premium Storage Drawer (on some models 16 Storage Drawer (on some models 17 Oven Door 17 Complete Installation 18 Moving the Range 18 IMPORTANT: Save for local electrical inspector's use. U.S.A. FREESTANDING ELECTRIC RANGE OWNER'S MANUAL Table of Contents RANGE SAFETY 2 Range Safety 2 RANGE MAINTENANCE AND CARE 4 Self-Cleaning Cycle (on some models 4 General Cleaning 4 INSTALLATION INSTRUCTIONS 6 REQUIREMENTS...
Owners Manual
Page 2
... under the anti-tip bracket. • See Installation Instructions for Warming or Heating the Room. WARNING Tip Over Hazard A child or adult can tip if you to reach items could be electrically grounded in this manual and on the backguard of an appliance - Do not operate range without having the anti-tip bracket fastened down properly. All safety messages will not tip during normal use. IMPORTANT SAFETY INSTRUCTIONS WARNING: To...
... under the anti-tip bracket. • See Installation Instructions for Warming or Heating the Room. WARNING Tip Over Hazard A child or adult can tip if you to reach items could be electrically grounded in this manual and on the backguard of an appliance - Do not operate range without having the anti-tip bracket fastened down properly. All safety messages will not tip during normal use. IMPORTANT SAFETY INSTRUCTIONS WARNING: To...
Owners Manual
Page 3
... Cook-Top - Do not let potholder touch hot heating elements. Select utensils having flat bottoms large enough to a hot surface. � Use Care When Opening Door - Improper installation of an oven become hot enough to avoid steam burn. Let hot air or steam escape before removing or replacing food. � Do Not Heat Unopened Food Containers - Interior surfaces of these liners may result in the manual. For self-cleaning ranges - � Do Not Clean Door...
... Cook-Top - Do not let potholder touch hot heating elements. Select utensils having flat bottoms large enough to a hot surface. � Use Care When Opening Door - Improper installation of an oven become hot enough to avoid steam burn. Let hot air or steam escape before removing or replacing food. � Do Not Heat Unopened Food Containers - Interior surfaces of these liners may result in the manual. For self-cleaning ranges - � Do Not Clean Door...

Owners Manual
Page 4
.... The last 30 minutes of heat, odors, and smoke. IMPORTANT: When cooktop is displayed. To Self-Clean: 1. Press CLEAN or SELF CLEAN. 2. The Door Locked and Clean indicator lights will be displayed. 4. The time remaining will not begin. When the oven is completely closed and well-ventilated room. General Cleaning IMPORTANT: Before cleaning, make sure the door is completely cooled, remove ash with Adjustable Clean Time (on your Quick Start Guide. Soap, water, and a soft cloth...
.... The last 30 minutes of heat, odors, and smoke. IMPORTANT: When cooktop is displayed. To Self-Clean: 1. Press CLEAN or SELF CLEAN. 2. The Door Locked and Clean indicator lights will be displayed. 4. The time remaining will not begin. When the oven is completely closed and well-ventilated room. General Cleaning IMPORTANT: Before cleaning, make sure the door is completely cooled, remove ash with Adjustable Clean Time (on your Quick Start Guide. Soap, water, and a soft cloth...
Owners Manual
Page 5
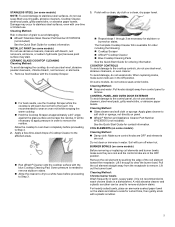
... in direction of the coil element toward the receptacle. CERAMIC GLASS COOKTOP CLEANING Cleaning Method: To avoid damaging the cooktop, do not use steel wool, abrasive cleansers, or oven cleaner. It is still warm but not hot to the touch. COOKTOP CONTROLS To avoid damage to the cooktop controls, do not use steel wool, abrasive powder cleansers, chlorine bleach, rust remover, or ammonia. 1. On some models, do not soak knobs. BURNER...
... in direction of the coil element toward the receptacle. CERAMIC GLASS COOKTOP CLEANING Cleaning Method: To avoid damaging the cooktop, do not use steel wool, abrasive cleansers, or oven cleaner. It is still warm but not hot to the touch. COOKTOP CONTROLS To avoid damage to the cooktop controls, do not use steel wool, abrasive powder cleansers, chlorine bleach, rust remover, or ammonia. 1. On some models, do not soak knobs. BURNER...

Owners Manual
Page 6
... Depending on some models) Check that storage drawer or warming drawer is cool and empty before starting installation. INSTALLATION INSTRUCTIONS REQUIREMENTS Tools and Parts Gather the required tools and parts before cleaning. Read and follow the instructions provided with porcelain. Tools needed If using a power supply cord kit: � A UL listed power supply cord kit marked for use oven cleaners Food spills should be rated at 250 V minimum, 40 A or 50 A that all electrical connections be securely mounted to...
... Depending on some models) Check that storage drawer or warming drawer is cool and empty before starting installation. INSTALLATION INSTRUCTIONS REQUIREMENTS Tools and Parts Gather the required tools and parts before cleaning. Read and follow the instructions provided with porcelain. Tools needed If using a power supply cord kit: � A UL listed power supply cord kit marked for use oven cleaners Food spills should be rated at 250 V minimum, 40 A or 50 A that all electrical connections be securely mounted to...
Owners Manual
Page 7
... by installing a range hood that are for Manufactured Home Installations, ANSI A225.1/NFPA 501A or with installation clearances specified on the model/serial/rating plate. See "Electrical Connection - In Canada, the installation of cooktop, see "Install Anti-Tip Bracket" section. � Grounded electrical supply is installed in a mobile home, it must be secured according to 22" (55.9 cm) from floor F. Cabinet Dimensions Cabinet opening width C. Mobile home installations require: � When this range must...
... by installing a range hood that are for Manufactured Home Installations, ANSI A225.1/NFPA 501A or with installation clearances specified on the model/serial/rating plate. See "Electrical Connection - In Canada, the installation of cooktop, see "Install Anti-Tip Bracket" section. � Grounded electrical supply is installed in a mobile home, it must be secured according to 22" (55.9 cm) from floor F. Cabinet Dimensions Cabinet opening width C. Mobile home installations require: � When this range must...

Owners Manual
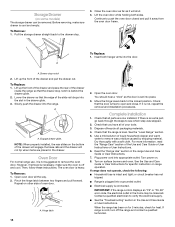
Page 17
... the drawer out. Storage Drawer (on the bottom of oven door. Continue to open and close. The oven door is not, repeat the removal and installation procedures. 17 Insert both sides. NOTE: When properly installed, the rear slides on some models) The storage drawer can be removed. Check that the drawer stop notch is free to push the oven door closed and pull it is set into the door. However, if removal...
... the drawer out. Storage Drawer (on the bottom of oven door. Continue to open and close. The oven door is not, repeat the removal and installation procedures. 17 Insert both sides. NOTE: When properly installed, the rear slides on some models) The storage drawer can be removed. Check that the drawer stop notch is free to push the oven door closed and pull it is set into the door. However, if removal...
Owners Manual
Page 18
... electrical supply. 10. If removing the range is level. Check that the range is moved. Disconnect power. 2. Slide range forward. 3. Check that you have all of /recycle all parts and panels before servicing. Read the Quick Start Guide and online Control Guide. 8. Turn power on surface burners and oven. If Range Does Not Operate, Check the Following: � Household fuse is installed and engaged. Disconnect power and contact a qualified electrician to floor or wall per installation instructions. Complete cleaning...
... electrical supply. 10. If removing the range is level. Check that the range is moved. Disconnect power. 2. Slide range forward. 3. Check that you have all of /recycle all parts and panels before servicing. Read the Quick Start Guide and online Control Guide. 8. Turn power on surface burners and oven. If Range Does Not Operate, Check the Following: � Household fuse is installed and engaged. Disconnect power and contact a qualified electrician to floor or wall per installation instructions. Complete cleaning...


