

Dimension Guide
Page 1
...on the oven frame behind storage drawer panel) *Range can be connected to the proper electrical voltage and frequency as specified on the left side frame behind the storage drawer panel. The range can be raised approximately 1" (2.5 cm) by ...cooktop height (max.) with the neutral terminal connected to the cabinet. 30" (76 cm) Freestanding Electric Range PRODUCT MODEL NUMBERS AER3311WA AER5522VA AER5523XA AER5524XA AER5822VA AER5823XA AER5830VA AER5844VA AER6011VA Electrical: Range must be connected directly to the circuit breaker box (or fused disconnect) through the neutral, use...
...on the oven frame behind storage drawer panel) *Range can be connected to the proper electrical voltage and frequency as specified on the left side frame behind the storage drawer panel. The range can be raised approximately 1" (2.5 cm) by ...cooktop height (max.) with the neutral terminal connected to the cabinet. 30" (76 cm) Freestanding Electric Range PRODUCT MODEL NUMBERS AER3311WA AER5522VA AER5523XA AER5524XA AER5822VA AER5823XA AER5830VA AER5844VA AER6011VA Electrical: Range must be connected directly to the circuit breaker box (or fused disconnect) through the neutral, use...

Installation Instruction
Page 1
Only 4 INSTALLATION INSTRUCTIONS 6 Unpack Range 6 Install Anti-Tip Bracket 6 Electrical Connection - W10252706B INSTALLATION INSTRUCTIONS 30" (76 CM) FREESTANDING ELECTRIC RANGES Table of Contents RANGE SAFETY 2 INSTALLATION REQUIREMENTS 3 Tools and Parts 3 Location Requirements 3 Electrical Requirements - U.S.A. Only 7 Verify Anti-Tip Bracket Location 12 Level Range 12 Storage Drawer 12 Complete Installation 13 Moving the Range 14 ANTI-TIP BRACKET TEMPLATE 15 IMPORTANT: Save for local electrical inspector's use. U.S.A.
Only 4 INSTALLATION INSTRUCTIONS 6 Unpack Range 6 Install Anti-Tip Bracket 6 Electrical Connection - W10252706B INSTALLATION INSTRUCTIONS 30" (76 CM) FREESTANDING ELECTRIC RANGES Table of Contents RANGE SAFETY 2 INSTALLATION REQUIREMENTS 3 Tools and Parts 3 Location Requirements 3 Electrical Requirements - U.S.A. Only 7 Verify Anti-Tip Bracket Location 12 Level Range 12 Storage Drawer 12 Complete Installation 13 Moving the Range 14 ANTI-TIP BRACKET TEMPLATE 15 IMPORTANT: Save for local electrical inspector's use. U.S.A.

Installation Instruction
Page 3
...rating plate. Additional Installation Requirements The installation of this range is the installer's responsibility to the standards listed above the surface units should be reduced by a licensed, qualified electrical installer. The cord should be used. Location Requirements ... for cutting ground strap if necessary) Parts supplied Check that all electrical connections be secured to subfloor. Anti-tip bracket B. See "Electrical Requirements" section. Thickness of securing the range is required. Given dimensions are available from your cabinets, check with...
...rating plate. Additional Installation Requirements The installation of this range is the installer's responsibility to the standards listed above the surface units should be reduced by a licensed, qualified electrical installer. The cord should be used. Location Requirements ... for cutting ground strap if necessary) Parts supplied Check that all electrical connections be secured to subfloor. Anti-tip bracket B. See "Electrical Requirements" section. Thickness of securing the range is required. Given dimensions are available from your cabinets, check with...
Installation Instruction
Page 4
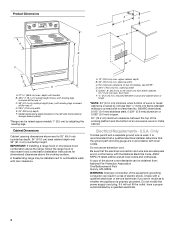
.... WARNING: Improper connection of electric shock. Cabinet Dimensions Cabinet opening width E. Do not use an extension cord. U.S.A. Check with a qualified electrician or service technician if you are adequate and in doubt as to top of an uncovered wood or metal cabinet. opening width C. IMPORTANT: If installing a range hood or microwave hood combination...
.... WARNING: Improper connection of electric shock. Cabinet Dimensions Cabinet opening width E. Do not use an extension cord. U.S.A. Check with a qualified electrician or service technician if you are adequate and in doubt as to top of an uncovered wood or metal cabinet. opening width C. IMPORTANT: If installing a range hood or microwave hood combination...

Installation Instruction
Page 5
...When a 4-wire receptacle of NEMA Type 14-50R is recommended. ■ The range can be moved if servicing is ever necessary. ■ A UL listed conduit connector must be connected to the proper electrical voltage and frequency as specified on the appliance end must be identified by a green ...the storage drawer panel. Use a 3-wire, UL listed, 40- Electrical Connection To properly install your range, you must determine the type of electrical connection you will be using and follow the instructions provided for it here. ■ Range must be provided at each end of the power supply cable (...
...When a 4-wire receptacle of NEMA Type 14-50R is recommended. ■ The range can be moved if servicing is ever necessary. ■ A UL listed conduit connector must be connected to the proper electrical voltage and frequency as specified on the appliance end must be identified by a green ...the storage drawer panel. Use a 3-wire, UL listed, 40- Electrical Connection To properly install your range, you must determine the type of electrical connection you will be using and follow the instructions provided for it here. ■ Range must be provided at each end of the power supply cable (...
Installation Instruction
Page 7
...screws may be necessary to anchor the bracket to follow these instructions can result in death, fire, or electrical shock. 1. Disconnect power. 2. Remove plastic tag holding three 10-32 hex nuts from range. 3. A B C A. Terminal block cover C. Depending on the bracket template. Align anti-tip ...tip bracket to concrete or ceramic floor, use a 4.8 mm) masonry drill bit to remove cover from the middle post of the range. Electrical Connection - Use a new 40 amp power supply cord. Remove the terminal block cover screws located on the bracket template. Pull cover ...
...screws may be necessary to anchor the bracket to follow these instructions can result in death, fire, or electrical shock. 1. Disconnect power. 2. Remove plastic tag holding three 10-32 hex nuts from range. 3. A B C A. Terminal block cover C. Depending on the bracket template. Align anti-tip ...tip bracket to concrete or ceramic floor, use a 4.8 mm) masonry drill bit to remove cover from the middle post of the range. Electrical Connection - Use a new 40 amp power supply cord. Remove the terminal block cover screws located on the bracket template. Pull cover ...

Installation Instruction
Page 8
...conduit connection. ■ Assemble a UL listed conduit connector in the opening . Ground-link screw 2. Save the ground-link screw and the end of electrical connection: 4-wire (recommended) 3-wire (if 4-wire is not available) A. UL listed strain relief ■ Tighten strain relief screw against the flexible... for the power supply cord. ■ Assemble a UL listed strain relief in the opening . Discard C. A B C 5. Part of the range. Metal ground strap B. Use a Phillips screwdriver to remove the ground-link screw from the back of metal ground strap must be Go to Section:...
...conduit connection. ■ Assemble a UL listed conduit connector in the opening . Ground-link screw 2. Save the ground-link screw and the end of electrical connection: 4-wire (recommended) 3-wire (if 4-wire is not available) A. UL listed strain relief ■ Tighten strain relief screw against the flexible... for the power supply cord. ■ Assemble a UL listed strain relief in the opening . Discard C. A B C 5. Part of the range. Metal ground strap B. Use a Phillips screwdriver to remove the ground-link screw from the back of metal ground strap must be Go to Section:...

Installation Instruction
Page 10
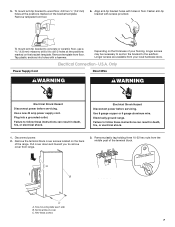
Direct Wire Installation: Copper or Aluminum Wire This range may be attached first and must not contact any other terminal. 10 Pull the wires through the strain relief on bottom of electrical supply (4-wire or 3-wire connection). 4-wire Connection: Direct Wire Use ...Recreational vehicles ■ In an area where local codes prohibit grounding through bottom of terminal lugs. A B 3" (7.6 cm) 2. Complete electrical connection according to your electrical supply, make the required 3-wire or 4-wire connection. 1. Terminal block B. Bare (green) ground wire E. Ground-link screw 2. Use ...
Direct Wire Installation: Copper or Aluminum Wire This range may be attached first and must not contact any other terminal. 10 Pull the wires through the strain relief on bottom of electrical supply (4-wire or 3-wire connection). 4-wire Connection: Direct Wire Use ...Recreational vehicles ■ In an area where local codes prohibit grounding through bottom of terminal lugs. A B 3" (7.6 cm) 2. Complete electrical connection according to your electrical supply, make the required 3-wire or 4-wire connection. 1. Terminal block B. Bare (green) ground wire E. Ground-link screw 2. Use ...
Installation Instruction
Page 13
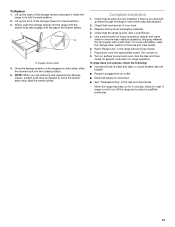
...of liquid household cleaner and warm water to a level position. 3. Engage drawer glide. 4. If there is cold, turn off the range and contact a qualified technician. 13 Dispose of the storage drawer to remove waxy residue caused by shipping material. Dry thoroughly with the ... burners and oven. Check that all packaging materials. 4. For more information, read the "Range Care" section of your tools. 3. Plug power cord into an outlet. ■ Electrical supply is fully engaged on . 8. or circuit breaker has not tripped. ■ Range is plugged into appropriate outlet.
...of liquid household cleaner and warm water to a level position. 3. Engage drawer glide. 4. If there is cold, turn off the range and contact a qualified technician. 13 Dispose of the storage drawer to remove waxy residue caused by shipping material. Dry thoroughly with the ... burners and oven. Check that all packaging materials. 4. For more information, read the "Range Care" section of your tools. 3. Plug power cord into an outlet. ■ Electrical supply is fully engaged on . 8. or circuit breaker has not tripped. ■ Range is plugged into appropriate outlet.

Installation Instruction
Page 14
... anti-tip bracket. 5. WARNING Moving the Range For direct-wired ranges: WARNING Tip Over Hazard A child or adult can tip the range and be killed. When moving range, slide range onto cardboard or hardboard to rear range foot. Electrical Shock Hazard Disconnect power before operating. Check that range is level. 6. Check that range is level. 14 Complete cleaning or...
... anti-tip bracket. 5. WARNING Moving the Range For direct-wired ranges: WARNING Tip Over Hazard A child or adult can tip the range and be killed. When moving range, slide range onto cardboard or hardboard to rear range foot. Electrical Shock Hazard Disconnect power before operating. Check that range is level. 6. Check that range is level. 14 Complete cleaning or...

Use and Care
Page 1
..." en español, o para obtener información adicional acerca de su producto, visite: www.amana.com Tenga listo su número de modelo completo. Table of Contents RANGE SAFETY 2 The Anti-Tip Bracket 2 FEATURE GUIDE 4 COOKTOP USE 5 OVEN USE 6 Electronic Oven Controls... 7 Timed Cooking (on some models 7 RANGE CARE 8 Self-Cleaning Cycle (on the oven frame behind the storage drawer panel. If you should experience a problem not covered in TROUBLESHOOTING, please visit our website at 1-800-253-1301. ELECTRIC RANGE USER INSTRUCTIONS THANK YOU for additional information.
..." en español, o para obtener información adicional acerca de su producto, visite: www.amana.com Tenga listo su número de modelo completo. Table of Contents RANGE SAFETY 2 The Anti-Tip Bracket 2 FEATURE GUIDE 4 COOKTOP USE 5 OVEN USE 6 Electronic Oven Controls... 7 Timed Cooking (on some models 7 RANGE CARE 8 Self-Cleaning Cycle (on the oven frame behind the storage drawer panel. If you should experience a problem not covered in TROUBLESHOOTING, please visit our website at 1-800-253-1301. ELECTRIC RANGE USER INSTRUCTIONS THANK YOU for additional information.

Use and Care
Page 3
...manual. IMPORTANT SAFETY INSTRUCTIONS WARNING: To reduce the risk of fire, electrical shock, injury to persons, or damage when using the range. ■ User Servicing - children climbing on the backguard of the range unless specifically recommended in temperature. ■ Utensil Handles Should Be Turned... Inward and Not Extend Over Adjacent Surface Units - Be sure the range is used in Place - Only certain types of electric shock. Heating elements may penetrate the broken cooktop and create a risk of glass, glass/ceramic, ceramic, ...
...manual. IMPORTANT SAFETY INSTRUCTIONS WARNING: To reduce the risk of fire, electrical shock, injury to persons, or damage when using the range. ■ User Servicing - children climbing on the backguard of the range unless specifically recommended in temperature. ■ Utensil Handles Should Be Turned... Inward and Not Extend Over Adjacent Surface Units - Be sure the range is used in Place - Only certain types of electric shock. Heating elements may penetrate the broken cooktop and create a risk of glass, glass/ceramic, ceramic, ...

Specifications Sheet
Page 1
Amana® Clever Combo Specifications Guide (Ranges and Over-the-Range Microwaves) Over-the-Range Microwave AMV3204VAS Electric Range AER6011VAS
Amana® Clever Combo Specifications Guide (Ranges and Over-the-Range Microwaves) Over-the-Range Microwave AMV3204VAS Electric Range AER6011VAS

Specifications Sheet
Page 2
Electric Range Models Clever Combo Matching Over-the-Range Microwave Oven Capacity (cu. Available Colors Glass-Ceramic Spillsaver™ Upswept Cooktop Spills happen. W, B, D, S 467⁄8" 297⁄8" 25" 2711⁄16... 36" AER5822VA AMV1160VA 4.8 . . . . 2 5 Glass-Ceramic Ribbon Radiant Elements (2) 6", 1,200-Watt (2) 9", 2,500-Watt . W, S 467⁄8" 297⁄8" 25" 2711⁄16" 36" AER5844VA AMV2174VA 4.8 Adjustable . . . Porcelain-Steel Coil Elements with fresh veggies you're preparing for dinner, that is easier with Timer Keep Warm™ Setting Control Lockout...
Electric Range Models Clever Combo Matching Over-the-Range Microwave Oven Capacity (cu. Available Colors Glass-Ceramic Spillsaver™ Upswept Cooktop Spills happen. W, B, D, S 467⁄8" 297⁄8" 25" 2711⁄16... 36" AER5822VA AMV1160VA 4.8 . . . . 2 5 Glass-Ceramic Ribbon Radiant Elements (2) 6", 1,200-Watt (2) 9", 2,500-Watt . W, S 467⁄8" 297⁄8" 25" 2711⁄16" 36" AER5844VA AMV2174VA 4.8 Adjustable . . . Porcelain-Steel Coil Elements with fresh veggies you're preparing for dinner, that is easier with Timer Keep Warm™ Setting Control Lockout...


