

Installation Instruction
Page 1
W10252706B Only 7 Verify Anti-Tip Bracket Location 12 Level Range 12 Storage Drawer 12 Complete Installation 13 Moving the Range 14 ANTI-TIP BRACKET TEMPLATE 15 IMPORTANT: Save for local electrical inspector's use. U.S.A. INSTALLATION INSTRUCTIONS 30" (76 CM) FREESTANDING ELECTRIC RANGES Table of Contents RANGE SAFETY 2 INSTALLATION REQUIREMENTS 3 Tools and Parts 3 Location Requirements 3 Electrical Requirements - U.S.A. Only 4 INSTALLATION INSTRUCTIONS 6 Unpack Range 6 Install Anti-Tip Bracket 6 Electrical Connection -
W10252706B Only 7 Verify Anti-Tip Bracket Location 12 Level Range 12 Storage Drawer 12 Complete Installation 13 Moving the Range 14 ANTI-TIP BRACKET TEMPLATE 15 IMPORTANT: Save for local electrical inspector's use. U.S.A. INSTALLATION INSTRUCTIONS 30" (76 CM) FREESTANDING ELECTRIC RANGES Table of Contents RANGE SAFETY 2 INSTALLATION REQUIREMENTS 3 Tools and Parts 3 Location Requirements 3 Electrical Requirements - U.S.A. Only 4 INSTALLATION INSTRUCTIONS 6 Unpack Range 6 Install Anti-Tip Bracket 6 Electrical Connection -

Installation Instruction
Page 3
... The cord should be used in ring terminals or open-end spade terminals with ranges. It is required. See "Electrical Connection" section. 3 Parts needed ■ Tape measure ■ ¼" drive ratchet ■ Flat-blade screwdriver ■ Level ■ Hammer ■ Hand or... a mobile home, it conforms to the standards listed above the surface units should be located for cutting ground strap if necessary) Parts supplied Check that are shown must conform to subfloor. Check local codes. If cabinet storage is the installer's responsibility to terminal block...
... The cord should be used in ring terminals or open-end spade terminals with ranges. It is required. See "Electrical Connection" section. 3 Parts needed ■ Tape measure ■ ¼" drive ratchet ■ Flat-blade screwdriver ■ Level ■ Hammer ■ Hand or... a mobile home, it conforms to the standards listed above the surface units should be located for cutting ground strap if necessary) Parts supplied Check that are shown must conform to subfloor. Check local codes. If cabinet storage is the installer's responsibility to terminal block...

Installation Instruction
Page 6
... for the best procedure for drilling mounting holes through your type of this time. If countertop is moved. Front leveling leg C. Remove oven racks and parts package from range. 2. AB C If cabinet opening . Rear leveling leg C. Remove shipping materials, tape and film from inside the oven cavity) or from outside the...
... for the best procedure for drilling mounting holes through your type of this time. If countertop is moved. Front leveling leg C. Remove oven racks and parts package from range. 2. AB C If cabinet opening . Rear leveling leg C. Remove shipping materials, tape and film from inside the oven cavity) or from outside the...

Installation Instruction
Page 8
... removed. Style 1: Power supply cord strain relief ■ Remove the knockout for the flexible conduit connection. ■ Assemble a UL listed conduit connector in the opening . Part of metal ground strap must be Go to Section: connecting to remove the ground-link screw from the back of the range. Concuit ■ Tighten...
... removed. Style 1: Power supply cord strain relief ■ Remove the knockout for the flexible conduit connection. ■ Assemble a UL listed conduit connector in the opening . Part of metal ground strap must be Go to Section: connecting to remove the ground-link screw from the back of the range. Concuit ■ Tighten...

Installation Instruction
Page 10
... your electrical supply, make the required 3-wire or 4-wire connection. 1. Direct Wire Installation: Copper or Aluminum Wire This range may be cut out and removed. Part of the range. Cord/conduit plate D. Neutral (white) wire G. Ground-link screw 2. The ground wire must be attached first and must be connected directly to...
... your electrical supply, make the required 3-wire or 4-wire connection. 1. Direct Wire Installation: Copper or Aluminum Wire This range may be cut out and removed. Part of the range. Cord/conduit plate D. Neutral (white) wire G. Ground-link screw 2. The ground wire must be attached first and must be connected directly to...
Installation Instruction
Page 13
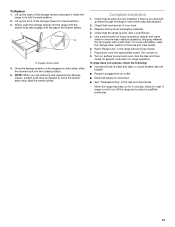
NOTE: When you have all packaging materials. 4. Check that all parts are removing and replacing the storage drawer, a slight push may be needed to see which step was skipped. 2. Check that the range is connected. ■ ... operate, check the following: ■ Household fuse is cold, turn off the range and contact a qualified technician. 13 Once the storage drawer is an extra part, go back through the steps to move the drawer stop notch past the drawer glides. Lift up the back of your tools. 3. If there is...
NOTE: When you have all packaging materials. 4. Check that all parts are removing and replacing the storage drawer, a slight push may be needed to see which step was skipped. 2. Check that the range is connected. ■ ... operate, check the following: ■ Household fuse is cold, turn off the range and contact a qualified technician. 13 Once the storage drawer is an extra part, go back through the steps to move the drawer stop notch past the drawer glides. Lift up the back of your tools. 3. If there is...

Installation Instruction
Page 14
... power supply cord. 5. Disconnect power. 2. Unplug the power supply cord. 3. Slide range forward. 3. Reconnect the anti-tip bracket, if the range is level. 6. Replace all parts and panels before servicing. Failure to follow these instructions can tip the range and be killed. Electrical Shock Hazard Disconnect power before operating. Check that...
... power supply cord. 5. Disconnect power. 2. Unplug the power supply cord. 3. Slide range forward. 3. Reconnect the anti-tip bracket, if the range is level. 6. Replace all parts and panels before servicing. Failure to follow these instructions can tip the range and be killed. Electrical Shock Hazard Disconnect power before operating. Check that...

Use and Care
Page 3
... be moved while oven is hot, do not let potholder contact hot heating element in desired location while oven is used in or around any part of the range. ■ Wear Proper Apparel - They should be used to wipe spills on the range to cool. All other glazed utensils...units or areas near surface units. ■ Do Not Use Water on Grease Fires - No commercial oven cleaner or oven liner protective coating of any part of the range unless specifically recommended in ignition of clothing. Do not use . During and after use aluminum foil to a qualified technician. ■ ...
... be moved while oven is hot, do not let potholder contact hot heating element in desired location while oven is used in or around any part of the range. ■ Wear Proper Apparel - They should be used to wipe spills on the range to cool. All other glazed utensils...units or areas near surface units. ■ Do Not Use Water on Grease Fires - No commercial oven cleaner or oven liner protective coating of any part of the range unless specifically recommended in ignition of clothing. Do not use . During and after use aluminum foil to a qualified technician. ■ ...
Use and Care
Page 7
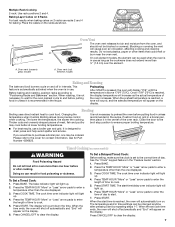
... than the one displayed. 3. The lower the temperature, the slower the cooking. Press the TEMP/HOUR "More" or "Less" arrow pads to the cover for Part Number 4396923. Please refer to enter a temperature other than ½" (1.3 cm) over the element. The cook time oven indicator light will light up . 4. Press START...
... than the one displayed. 3. The lower the temperature, the slower the cooking. Press the TEMP/HOUR "More" or "Less" arrow pads to the cover for Part Number 4396923. Please refer to enter a temperature other than ½" (1.3 cm) over the element. The cook time oven indicator light will light up . 4. Press START...

Use and Care
Page 9
...cooktop. Lift out the burner bowl. For heavily soiled bowls, place an ammonia soaked paper towel on panel. ■ All-Purpose Appliance Cleaner Part Number 31682 (not included): See cover for contact information. To avoid damage to soak for contact information. For additional information, you can be ...coil elements and burner bowls, make sure they are cool and the control knobs are in direction of our website at www.amana.com. Cooktop Scraper Part Number WA906B is cool. Store razor blades out of the reach of the coil element toward the receptacle. Light to stainless steel...
...cooktop. Lift out the burner bowl. For heavily soiled bowls, place an ammonia soaked paper towel on panel. ■ All-Purpose Appliance Cleaner Part Number 31682 (not included): See cover for contact information. To avoid damage to soak for contact information. For additional information, you can be ...coil elements and burner bowls, make sure they are cool and the control knobs are in direction of our website at www.amana.com. Cooktop Scraper Part Number WA906B is cool. Store razor blades out of the reach of the coil element toward the receptacle. Light to stainless steel...

Use and Care
Page 11
... is not available. 10. Service must be easily determined. Repairs when your major appliance is used for factory specified parts and repair labor to Amana within 30 days from the date of repair or replacement under this warranty. 8. Damage resulting from defects in materials ... not apply. Service calls to correct the installation of purchase. 6. Costs associated with Removable Insert Order Part Number 4396927 Broiler Pan Order Part Number 4396923 AMANA® MAJOR APPLIANCE WARRANTY LIMITED WARRANTY For one year from the date of your major appliance for product...
... is not available. 10. Service must be easily determined. Repairs when your major appliance is used for factory specified parts and repair labor to Amana within 30 days from the date of repair or replacement under this warranty. 8. Damage resulting from defects in materials ... not apply. Service calls to correct the installation of purchase. 6. Costs associated with Removable Insert Order Part Number 4396927 Broiler Pan Order Part Number 4396923 AMANA® MAJOR APPLIANCE WARRANTY LIMITED WARRANTY For one year from the date of your major appliance for product...

Warranty
Page 1
...States or Canada and applies only when the major appliance is not installed in accordance with Removable Insert Order Part Number 4396927 Broiler Pan Order Part Number 4396923 AMANA® MAJOR APPLIANCE WARRANTY LIMITED WARRANTY For one year from the date of purchase, when this limited warranty..... 7. Expenses for travel and transportation for factory specified parts and repair labor to correct defects in -home service is reported to Amana within 30 days from defects in a remote area where service by an authorized Amana servicer is contrary to correct the installation of the crust...
...States or Canada and applies only when the major appliance is not installed in accordance with Removable Insert Order Part Number 4396927 Broiler Pan Order Part Number 4396923 AMANA® MAJOR APPLIANCE WARRANTY LIMITED WARRANTY For one year from the date of purchase, when this limited warranty..... 7. Expenses for travel and transportation for factory specified parts and repair labor to correct defects in -home service is reported to Amana within 30 days from defects in a remote area where service by an authorized Amana servicer is contrary to correct the installation of the crust...


