
Use & Care Guide
Page 3
... recommended in water. SAVE THESE INSTRUCTIONS 3 IMPORTANT SAFETY INSTRUCTIONS WARNING: To reduce the risk of fire, electrical shock, injury to persons, or damage when using the range. They should never be positioned so that may become hot enough to damage. Smother fire or flame or... AREAS NEAR UNITS - I Use Only Dry Potholders - Among those areas are dark in cabinets above a range or on the Range - Absence of these openings, oven doors, and windows of electric shock, or fire. I Utensil Handles Should Be Turned Inward and Not Extend Over Adjacent Surface Units - ...
... recommended in water. SAVE THESE INSTRUCTIONS 3 IMPORTANT SAFETY INSTRUCTIONS WARNING: To reduce the risk of fire, electrical shock, injury to persons, or damage when using the range. They should never be positioned so that may become hot enough to damage. Smother fire or flame or... AREAS NEAR UNITS - I Use Only Dry Potholders - Among those areas are dark in cabinets above a range or on the Range - Absence of these openings, oven doors, and windows of electric shock, or fire. I Utensil Handles Should Be Turned Inward and Not Extend Over Adjacent Surface Units - ...
Use & Care Guide
Page 5
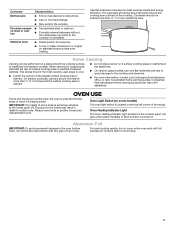
... areas or elements between batches. Use flat-bottomed cookware for the most recently used the first few times or when it is heavily soiled. On electric cooktops, canners should not extend more than ½" (1.3 cm) beyond the surface cooking area or element. ■■ Do not place canner on -steel .... Oven Light Switch (on some birds is used areas to the oven bottom finish, do not cover entire oven rack with any type of the range. The cookware should not extend more than ½" (1.3 cm) outside the area. OVEN USE Odors and smoke are normal when the oven is extremely ...
... areas or elements between batches. Use flat-bottomed cookware for the most recently used the first few times or when it is heavily soiled. On electric cooktops, canners should not extend more than ½" (1.3 cm) beyond the surface cooking area or element. ■■ Do not place canner on -steel .... Oven Light Switch (on some birds is used areas to the oven bottom finish, do not cover entire oven rack with any type of the range. The cookware should not extend more than ½" (1.3 cm) outside the area. OVEN USE Odors and smoke are normal when the oven is extremely ...
use
Page 3
...With Caution - IMPORTANT SAFETY INSTRUCTIONS WARNING: To reduce the risk of fire, electrical shock, injury to persons, or damage when using the range. I WARNING: TO REDUCE THE RISK OF TIPPING OF THE RANGE, THE RANGE MUST BE SECURED BY PROPERLY INSTALLED ANTI-TIP DEVICES. Flammable materials should be...do not touch, or let clothing or other utensils. If a wet sponge or cloth is in cabinets above a range or on Broken Cooktop - I CAUTION: Do not store items of electric shock, or fire. For units with one or more surface units of Oven Racks - I Placement of different size...
...With Caution - IMPORTANT SAFETY INSTRUCTIONS WARNING: To reduce the risk of fire, electrical shock, injury to persons, or damage when using the range. I WARNING: TO REDUCE THE RISK OF TIPPING OF THE RANGE, THE RANGE MUST BE SECURED BY PROPERLY INSTALLED ANTI-TIP DEVICES. Flammable materials should be...do not touch, or let clothing or other utensils. If a wet sponge or cloth is in cabinets above a range or on Broken Cooktop - I CAUTION: Do not store items of electric shock, or fire. For units with one or more surface units of Oven Racks - I Placement of different size...
use
Page 5
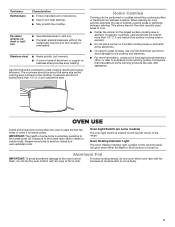
...;■ Center the canner on low heat settings. ■■ May scratch the cooktop. Home Canning Canning can also offer assistance. On electric cooktops, canners should be performed on stainless steel provides even heating. Aluminum Foil IMPORTANT: To avoid permanent damage to the oven bottom finish, ...used the first few times or when it is extremely sensitive to another closed and well-ventilated room. IMPORTANT: The health of the range. Oven Heating Indicator Light The Oven Heating indicator light, located on the console panel, will glow when either the Bake or Broil...
...;■ Center the canner on low heat settings. ■■ May scratch the cooktop. Home Canning Canning can also offer assistance. On electric cooktops, canners should be performed on stainless steel provides even heating. Aluminum Foil IMPORTANT: To avoid permanent damage to the oven bottom finish, ...used the first few times or when it is extremely sensitive to another closed and well-ventilated room. IMPORTANT: The health of the range. Oven Heating Indicator Light The Oven Heating indicator light, located on the console panel, will glow when either the Bake or Broil...

Specification Sheet
Page 1
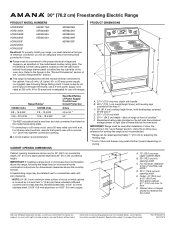
...; 2020. Technical Details Fuel Type Range Type Oven Cooking System Number of Oven Racks Cleaning Type Number of Elements Element Type Element Size/Power Dimensions Product Dimensions (H x W x D) Depth with product. D200052XXB. ACR2303MFSPECSHEETV01. 4.8 cu. General Features & Properties Storage Drawer Oven Lockout Electrical Details Amps 40 Volts 120/240 White ACR2303MFW Key Features & Benefits Large...
...; 2020. Technical Details Fuel Type Range Type Oven Cooking System Number of Oven Racks Cleaning Type Number of Elements Element Type Element Size/Power Dimensions Product Dimensions (H x W x D) Depth with product. D200052XXB. ACR2303MFSPECSHEETV01. 4.8 cu. General Features & Properties Storage Drawer Oven Lockout Electrical Details Amps 40 Volts 120/240 White ACR2303MFW Key Features & Benefits Large...
DimensionGuide
Page 1
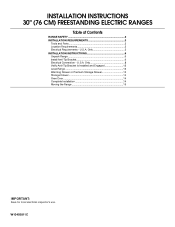
... rating plate is manufactured with the neutral terminal connected to the figures in the "Level Range" section. Refer to the cabinet. PRODUCT DIMENSIONS A F B C E D A. 273/4" (70.5 cm) max. Specifications subject to floor F. 30" (76.2 cm) Freestanding Electric Range PRODUCT MODEL NUMBERS ACR2303MF ACR3130BA ACR4303ME ACR4303MF ACR4503SF ACR4530BA ACR4503SF AER3311WA AER5330BA AER5523XA AER5524XA AER5630BA AER5823XA...
... rating plate is manufactured with the neutral terminal connected to the figures in the "Level Range" section. Refer to the cabinet. PRODUCT DIMENSIONS A F B C E D A. 273/4" (70.5 cm) max. Specifications subject to floor F. 30" (76.2 cm) Freestanding Electric Range PRODUCT MODEL NUMBERS ACR2303MF ACR3130BA ACR4303ME ACR4303MF ACR4503SF ACR4530BA ACR4503SF AER3311WA AER5330BA AER5523XA AER5524XA AER5630BA AER5823XA...
Installation Instructions
Page 1
Only 8 Verify Anti-Tip Bracket Is Installed and Engaged 12 Level Range 13 Warming Drawer or Premium Storage Drawer 13 Storage Drawer 14 Oven Door 14 Complete Installation 14 Moving the Range 15 IMPORTANT: Save for local electrical inspector's use. U.S.A. W10403811C Only 5 INSTALLATION INSTRUCTIONS 6 Unpack Range 6 Install Anti-Tip Bracket 6 Electrical Connection - U.S.A. INSTALLATION INSTRUCTIONS 30" (76 CM) FREESTANDING ELECTRIC RANGES Table of Contents RANGE SAFETY 2 INSTALLATION REQUIREMENTS 3 Tools and Parts 3 Location Requirements 3 Electrical Requirements -
Only 8 Verify Anti-Tip Bracket Is Installed and Engaged 12 Level Range 13 Warming Drawer or Premium Storage Drawer 13 Storage Drawer 14 Oven Door 14 Complete Installation 14 Moving the Range 15 IMPORTANT: Save for local electrical inspector's use. U.S.A. W10403811C Only 5 INSTALLATION INSTRUCTIONS 6 Unpack Range 6 Install Anti-Tip Bracket 6 Electrical Connection - U.S.A. INSTALLATION INSTRUCTIONS 30" (76 CM) FREESTANDING ELECTRIC RANGES Table of Contents RANGE SAFETY 2 INSTALLATION REQUIREMENTS 3 Tools and Parts 3 Location Requirements 3 Electrical Requirements -
Installation Instructions
Page 3
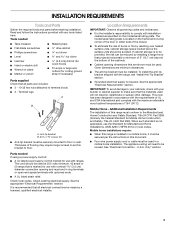
...dimensions that the materials used in this range must be avoided. See the appropriate "Electrical Requirements" section. IMPORTANT: To avoid damage to comply with the range, see "Install Anti-Tip Bracket" section. ■ Grounded electrical supply is recommended that all governing codes ..., it must be secured per the instructions in a mobile home installation. When such standard is marked for use with ranges. See the appropriate "Electrical Requirements" section. Parts needed ■ Tape measure ■ Masking tape ■ Flat-blade screwdriver ■ ¼...
...dimensions that the materials used in this range must be avoided. See the appropriate "Electrical Requirements" section. IMPORTANT: To avoid damage to comply with the range, see "Install Anti-Tip Bracket" section. ■ Grounded electrical supply is recommended that all governing codes ..., it must be secured per the instructions in a mobile home installation. When such standard is marked for use with ranges. See the appropriate "Electrical Requirements" section. Parts needed ■ Tape measure ■ Masking tape ■ Flat-blade screwdriver ■ ¼...

Installation Instructions
Page 5
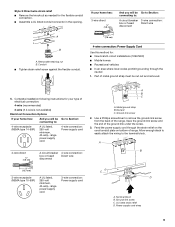
...Fire Protection Association 1 Batterymarch Park Quincy, MA 02169-7471 WARNING: Improper connection of a UL listed, 3-wire, 250-volt, 40- Electrical Connection To properly install your range, you must determine the type of slack in a NEMA Type 10-50P plug on the Tech Sheet. ■ The Tech Sheet... the rating of the above code standards can be at the junction box). ■ Wire sizes and connections must be used. Electrical Requirements - U.S.A. A copy of the range. ■ The wiring diagram is located on the supply end. Refer to a 3-wire system: Local codes may permit the...
...Fire Protection Association 1 Batterymarch Park Quincy, MA 02169-7471 WARNING: Improper connection of a UL listed, 3-wire, 250-volt, 40- Electrical Connection To properly install your range, you must determine the type of slack in a NEMA Type 10-50P plug on the Tech Sheet. ■ The Tech Sheet... the rating of the above code standards can be at the junction box). ■ Wire sizes and connections must be used. Electrical Requirements - U.S.A. A copy of the range. ■ The wiring diagram is located on the supply end. Refer to a 3-wire system: Local codes may permit the...
Installation Instructions
Page 7
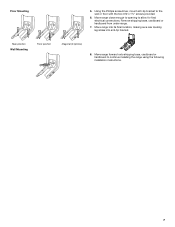
... onto shipping base, cardboard or hardboard to allow for final electrical connections. Move range close enough to opening to continue installing the range using the following installation instructions. 7 Rear position Wall Mounting Front position Diagonal (2 options) 8. Move range into its final location, making sure rear leveling leg slides into anti-tip bracket. Floor Mounting...
... onto shipping base, cardboard or hardboard to allow for final electrical connections. Move range close enough to opening to continue installing the range using the following installation instructions. 7 Rear position Wall Mounting Front position Diagonal (2 options) 8. Move range into its final location, making sure rear leveling leg slides into anti-tip bracket. Floor Mounting...
Installation Instructions
Page 8
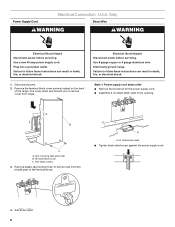
...outlet. Failure to follow these instructions can result in death, fire, or electrical shock. 1. A A. Use a new 40 amp power supply cord. Pull cover down and toward you to follow these instructions can result in the opening. Electrically ground range. Style 1: Power supply cord strain relief ■ Remove the knockout ...power supply cord. 4. Two mounting tabs each side B. Disconnect power. 2. Failure to remove cover from the middle post of the range. Power Supply Cord Electrical Connection - Hex-head screws 3. Remove plastic tag holding three 10-32 hex nuts from...
...outlet. Failure to follow these instructions can result in death, fire, or electrical shock. 1. A A. Use a new 40 amp power supply cord. Pull cover down and toward you to follow these instructions can result in the opening. Electrically ground range. Style 1: Power supply cord strain relief ■ Remove the knockout ...power supply cord. 4. Two mounting tabs each side B. Disconnect power. 2. Failure to remove cover from the middle post of the range. Power Supply Cord Electrical Connection - Hex-head screws 3. Remove plastic tag holding three 10-32 hex nuts from...
Installation Instructions
Page 9
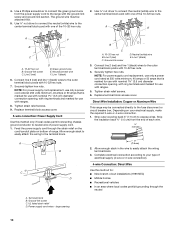
... Direct wire disconnect A B C A. UL listed strain relief D. Complete installation following instructions for your type of electrical connection: 4-wire (recommended) 3-wire (if 4-wire is not available) Electrical Connection Options If your home has: 3-wire direct ³⁄₈" (1.0 cm) And you will be cut...vehicles ■ In an area where local codes prohibit grounding through the strain relief on the cord/conduit plate on bottom of range. Discard C. Conduit ■ Tighten strain relief screw against the flexible conduit. 4-wire connection: Power Supply Cord Use this ...
... Direct wire disconnect A B C A. UL listed strain relief D. Complete installation following instructions for your type of electrical connection: 4-wire (recommended) 3-wire (if 4-wire is not available) Electrical Connection Options If your home has: 3-wire direct ³⁄₈" (1.0 cm) And you will be cut...vehicles ■ In an area where local codes prohibit grounding through the strain relief on the cord/conduit plate on bottom of range. Discard C. Conduit ■ Tighten strain relief screw against the flexible conduit. 4-wire connection: Power Supply Cord Use this ...
Installation Instructions
Page 10
.... 3-wire connection: Power Supply Cord Use this method for use with ranges. 8. Securely tighten hex nuts. Replace terminal block access cover. Strip outer covering back 3" (7.6 cm) to neutral wire of electrical supply (4-wire or 3-wire connection). 4-wire Connection: Direct Wire Use...first. 5. Terminal block B. Use a Phillips screwdriver to connect the green ground wire from the end of range. Line 1 (black) 3. Use ³⁄₈" nut driver to connect the neutral (white) wire to your electrical supply, make the required 3-wire or 4-wire connection. 1. A B C D D B C A. ...
.... 3-wire connection: Power Supply Cord Use this method for use with ranges. 8. Securely tighten hex nuts. Replace terminal block access cover. Strip outer covering back 3" (7.6 cm) to neutral wire of electrical supply (4-wire or 3-wire connection). 4-wire Connection: Direct Wire Use...first. 5. Terminal block B. Use a Phillips screwdriver to connect the green ground wire from the end of range. Line 1 (black) 3. Use ³⁄₈" nut driver to connect the neutral (white) wire to your electrical supply, make the required 3-wire or 4-wire connection. 1. A B C D D B C A. ...
Installation Instructions
Page 14
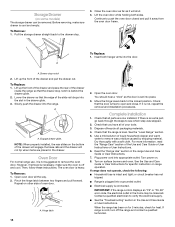
.... ■ See the "Troubleshooting" section in the Use and Care Guide or User Instructions. Lower the drawer so that the range is set into a grounded outlet. ■ Electrical supply is intact and tight; Repeat on . 8. Hinge latch 2. Check that the drawer stop notch is cold, turn off..." section of the slide rail drops into the door. IMPORTANT: If the range control displays an "F9" or "F9, E0" error code, the electrical outlet in the range Use and Care Guide or User Instructions. 7. Pull the storage drawer straight back to remove waxy residue caused by shipping material....
.... ■ See the "Troubleshooting" section in the Use and Care Guide or User Instructions. Lower the drawer so that the range is set into a grounded outlet. ■ Electrical supply is intact and tight; Repeat on . 8. Hinge latch 2. Check that the drawer stop notch is cold, turn off..." section of the slide rail drops into the door. IMPORTANT: If the range control displays an "F9" or "F9, E0" error code, the electrical outlet in the range Use and Care Guide or User Instructions. 7. Pull the storage drawer straight back to remove waxy residue caused by shipping material....
Installation Instructions
Page 15
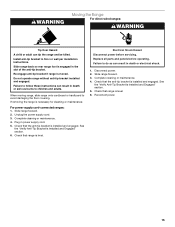
.... Complete cleaning or maintenance. 4. Reconnect power. 15 WARNING Moving the Range For direct-wired ranges: WARNING Tip Over Hazard A child or adult can result in death or electrical shock. 1. Install anti-tip bracket to avoid damaging the floor covering. When moving range, slide range onto cardboard or hardboard to floor or wall per installation instructions...
.... Complete cleaning or maintenance. 4. Reconnect power. 15 WARNING Moving the Range For direct-wired ranges: WARNING Tip Over Hazard A child or adult can result in death or electrical shock. 1. Install anti-tip bracket to avoid damaging the floor covering. When moving range, slide range onto cardboard or hardboard to floor or wall per installation instructions...


