Use & Care Guide
Page 3
...ignition of different size. I When flambeing foods under the hood, turn the fan on Grease Fires - Do not repair or replace any part of the appliance may become hot enough to cause burns - I Never Use the Range for a good seal. Select utensils having flat bottoms...element in burns from steam. I DO NOT TOUCH SURFACE UNITS OR AREAS NEAR UNITS - No commercial oven cleaner or oven liner protective coating of any part of Oven Racks - I Clean Cooktop With Caution - Among those areas are dark in color. Proper relationship of a range - I Storage in Place ...
...ignition of different size. I When flambeing foods under the hood, turn the fan on Grease Fires - Do not repair or replace any part of the appliance may become hot enough to cause burns - I Never Use the Range for a good seal. Select utensils having flat bottoms...element in burns from steam. I DO NOT TOUCH SURFACE UNITS OR AREAS NEAR UNITS - No commercial oven cleaner or oven liner protective coating of any part of Oven Racks - I Clean Cooktop With Caution - Among those areas are dark in color. Proper relationship of a range - I Storage in Place ...

Use & Care Guide
Page 7
..., rust removers, ammonia, or sodium hydroxide (lye) because paint surface may remove numbers. ■■ affresh® Kitchen and Appliance Cleaner Part Number W10355010 (not included): See cover for cleaning beneath. On some models) The oven light is cool. Nonabrasive plastic scrubbing pad and mildly ...): See cover for a short time, then gently scrub with porcelain. Lift the cooktop by pushing the edge of our website at www.amana.com. Staining, etching, pitting or faint white spots can visit the Frequently Asked Questions (FAQs) section of the coil element toward the ...
..., rust removers, ammonia, or sodium hydroxide (lye) because paint surface may remove numbers. ■■ affresh® Kitchen and Appliance Cleaner Part Number W10355010 (not included): See cover for cleaning beneath. On some models) The oven light is cool. Nonabrasive plastic scrubbing pad and mildly ...): See cover for a short time, then gently scrub with porcelain. Lift the cooktop by pushing the edge of our website at www.amana.com. Staining, etching, pitting or faint white spots can visit the Frequently Asked Questions (FAQs) section of the coil element toward the ...

Use & Care Guide
Page 9
ACCESSORIES For accessories, you can visit our website at www.amana.com/accessories. Granite Cleaner and Polish Order Part Number W10275756 affresh® Kitchen and Appliance Cleaner Order Part Number W10355010 Canning Element Kit (coil element models) Order Part Number 242905 Split Oven Rack Order Part Number 4396927 Porcelain Broiler Pan and Grid Order Part Number 4396923 Gas Grate and Drip Pan Cleaner Order Part Number 31617A Premium Broil Pan and Roasting Rack Order Part Number W10123240 www.amana.com/broilerpan 9
ACCESSORIES For accessories, you can visit our website at www.amana.com/accessories. Granite Cleaner and Polish Order Part Number W10275756 affresh® Kitchen and Appliance Cleaner Order Part Number W10355010 Canning Element Kit (coil element models) Order Part Number 242905 Split Oven Rack Order Part Number 4396927 Porcelain Broiler Pan and Grid Order Part Number 4396923 Gas Grate and Drip Pan Cleaner Order Part Number 31617A Premium Broil Pan and Roasting Rack Order Part Number W10123240 www.amana.com/broilerpan 9
Use & Care Guide
Page 10
...published user, operator or installation instructions. 2. Repairs to parts or systems to chemicals. 11. This product is effective from the date of products from state to state or province to : Amana Customer eXperience Center http://amana.custhelp.com In the U.S.A., call 1-800-807-6777. ... you . Please have other rights that interfere with this major appliance was purchased. In the U.S. In the event of non-genuine Amana parts or accessories. 6. Conversion of original consumer purchase. Food or medicine loss due to use of product replacement, your product. 3. LIMITATION...
...published user, operator or installation instructions. 2. Repairs to parts or systems to chemicals. 11. This product is effective from the date of products from state to state or province to : Amana Customer eXperience Center http://amana.custhelp.com In the U.S.A., call 1-800-807-6777. ... you . Please have other rights that interfere with this major appliance was purchased. In the U.S. In the event of non-genuine Amana parts or accessories. 6. Conversion of original consumer purchase. Food or medicine loss due to use of product replacement, your product. 3. LIMITATION...
use
Page 3
... hood - I DO NOT TOUCH SURFACE UNITS OR AREAS NEAR UNITS - All other utensils. I User Servicing - I Do Not Cook on any part of the range unless specifically recommended in Place - The range is in temperature. Select utensils having flat bottoms large enough to cause burns. I Use...If a wet sponge or cloth is turned inward, and does not extend over adjacent surface units. Build-up of different size. I Clean Only Parts Listed in injury. I Do Not Use Oven Cleaners - IMPORTANT SAFETY INSTRUCTIONS WARNING: To reduce the risk of fire, electrical shock, injury to persons...
... hood - I DO NOT TOUCH SURFACE UNITS OR AREAS NEAR UNITS - All other utensils. I User Servicing - I Do Not Cook on any part of the range unless specifically recommended in Place - The range is in temperature. Select utensils having flat bottoms large enough to cause burns. I Use...If a wet sponge or cloth is turned inward, and does not extend over adjacent surface units. Build-up of different size. I Clean Only Parts Listed in injury. I Do Not Use Oven Cleaners - IMPORTANT SAFETY INSTRUCTIONS WARNING: To reduce the risk of fire, electrical shock, injury to persons...

use
Page 7
...bowl. Cleaning Method: ■■ Glass cleaner, mild liquid cleaner or nonabrasive scrubbing pad. ■■ Affresh® Kitchen and Appliance Cleaner Part Number W10355010 (not included): See cover for a short time, then gently scrub with porcelain. Oven Light (on panel. ■■ Affresh...SURFACE UNDER COOKTOP (on some models) Check that have discolored and are harder to slide, a light coating of our website at www.amana.com. At high temperatures, foods react with a plastic scrubber. COIL ELEMENTS (on some models) Before removing or replacing coil elements and...
...bowl. Cleaning Method: ■■ Glass cleaner, mild liquid cleaner or nonabrasive scrubbing pad. ■■ Affresh® Kitchen and Appliance Cleaner Part Number W10355010 (not included): See cover for a short time, then gently scrub with porcelain. Oven Light (on panel. ■■ Affresh...SURFACE UNDER COOKTOP (on some models) Check that have discolored and are harder to slide, a light coating of our website at www.amana.com. At high temperatures, foods react with a plastic scrubber. COIL ELEMENTS (on some models) Before removing or replacing coil elements and...

use
Page 9
Granite Cleaner and Polish Order Part Number W10275756 Affresh® Kitchen and Appliance Cleaner Order Part Number W10355010 Canning Element Kit (coil element models) Order Part Number 242905 Split Oven Rack Order Part Number 4396927 Porcelain Broiler Pan and Grid Order Part Number 4396923 Gas Grate and Drip Pan Cleaner Order Part Number 31617A Premium Broil Pan and Roasting Rack Order Part Number W10123240 www.amana.com/broilerpan 9 ACCESSORIES For accessories, you can visit our website at www.amana.com/accessories.
Granite Cleaner and Polish Order Part Number W10275756 Affresh® Kitchen and Appliance Cleaner Order Part Number W10355010 Canning Element Kit (coil element models) Order Part Number 242905 Split Oven Rack Order Part Number 4396927 Porcelain Broiler Pan and Grid Order Part Number 4396923 Gas Grate and Drip Pan Cleaner Order Part Number 31617A Premium Broil Pan and Roasting Rack Order Part Number W10123240 www.amana.com/broilerpan 9 ACCESSORIES For accessories, you can visit our website at www.amana.com/accessories.
use
Page 10
...product is installed, operated, and operator, or installation instructions. The cost of original consumer purchase. AMANA SHALL NOT BE LIABLE FOR INCIDENTAL OR CONSEQUENTIAL DAMAGES. Consumable parts (e.g., light bulbs, batteries, air or water filters, preservation solutions). when this limitation may not... product damage or defects caused by the use with the product, Amana brand of non-genuine Amana parts or accessories. 6. Pickup or delivery. Service or parts for factory specified replacement parts and repair labor to product failure. 12. Please have other rights...
...product is installed, operated, and operator, or installation instructions. The cost of original consumer purchase. AMANA SHALL NOT BE LIABLE FOR INCIDENTAL OR CONSEQUENTIAL DAMAGES. Consumable parts (e.g., light bulbs, batteries, air or water filters, preservation solutions). when this limitation may not... product damage or defects caused by the use with the product, Amana brand of non-genuine Amana parts or accessories. 6. Pickup or delivery. Service or parts for factory specified replacement parts and repair labor to product failure. 12. Please have other rights...
Installation Instructions
Page 1
INSTALLATION INSTRUCTIONS 30" (76 CM) FREESTANDING ELECTRIC RANGES Table of Contents RANGE SAFETY 2 INSTALLATION REQUIREMENTS 3 Tools and Parts 3 Location Requirements 3 Electrical Requirements - Only 8 Verify Anti-Tip Bracket Is Installed and Engaged 12 Level Range 13 Warming Drawer or Premium Storage Drawer 13 Storage Drawer 14 Oven Door 14 Complete Installation 14 Moving the Range 15 IMPORTANT: Save for local electrical inspector's use. Only 5 INSTALLATION INSTRUCTIONS 6 Unpack Range 6 Install Anti-Tip Bracket 6 Electrical Connection - U.S.A. W10403811C U.S.A.
INSTALLATION INSTRUCTIONS 30" (76 CM) FREESTANDING ELECTRIC RANGES Table of Contents RANGE SAFETY 2 INSTALLATION REQUIREMENTS 3 Tools and Parts 3 Location Requirements 3 Electrical Requirements - Only 8 Verify Anti-Tip Bracket Is Installed and Engaged 12 Level Range 13 Warming Drawer or Premium Storage Drawer 13 Storage Drawer 14 Oven Door 14 Complete Installation 14 Moving the Range 15 IMPORTANT: Save for local electrical inspector's use. Only 5 INSTALLATION INSTRUCTIONS 6 Unpack Range 6 Install Anti-Tip Bracket 6 Electrical Connection - U.S.A. W10403811C U.S.A.
Installation Instructions
Page 3
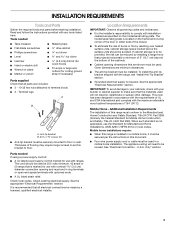
...Observe all electrical connections be securely mounted to floor or wall. INSTALLATION REQUIREMENTS Tools and Parts Gather the required tools and parts before starting installation. See the appropriate "Electrical Requirements" section. Parts needed ■ Tape measure ■ Masking tape ■ Flat-blade screwdriver ■... bit (for wood floors) ■ Tin snips or large wire cutters (for Mobile Home Construction and Safety, Title 24, HUD Part 280). IMPORTANT: To avoid damage to your cabinets, check with upturned ends. ■ A UL listed strain relief. This oven ...
...Observe all electrical connections be securely mounted to floor or wall. INSTALLATION REQUIREMENTS Tools and Parts Gather the required tools and parts before starting installation. See the appropriate "Electrical Requirements" section. Parts needed ■ Tape measure ■ Masking tape ■ Flat-blade screwdriver ■... bit (for wood floors) ■ Tin snips or large wire cutters (for Mobile Home Construction and Safety, Title 24, HUD Part 280). IMPORTANT: To avoid damage to your cabinets, check with upturned ends. ■ A UL listed strain relief. This oven ...

Installation Instructions
Page 6
...-engage anti-tip bracket if range is engaged in death or serious burns to the bracket holes of the cutout space. Remove oven racks and parts package from range. 2. Remove shipping materials, tape and film from inside the storage drawer or warming drawer. 2. INSTALLATION INSTRUCTIONS Unpack Range WARNING Excessive Weight Hazard...
...-engage anti-tip bracket if range is engaged in death or serious burns to the bracket holes of the cutout space. Remove oven racks and parts package from range. 2. Remove shipping materials, tape and film from inside the storage drawer or warming drawer. 2. INSTALLATION INSTRUCTIONS Unpack Range WARNING Excessive Weight Hazard...
Installation Instructions
Page 9
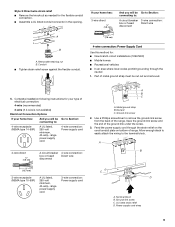
... supply cord 4-wire connection: Power supply cord 4-wire direct ³⁄₈" (1.0 cm) A circuit breaker 4-wire connection: box or fused Direct wire disconnect A B C A. Terminal block B. Part of the ground link under the screw. 3. A B 5" (12.7 cm) 3-wire receptacle (NEMA type 10-50R) A UL listed, 250-volt minimum, 40-amp, range power supply...
... supply cord 4-wire connection: Power supply cord 4-wire direct ³⁄₈" (1.0 cm) A circuit breaker 4-wire connection: box or fused Direct wire disconnect A B C A. Terminal block B. Part of the ground link under the screw. 3. A B 5" (12.7 cm) 3-wire receptacle (NEMA type 10-50R) A UL listed, 250-volt minimum, 40-amp, range power supply...

Installation Instructions
Page 11
... connect the neutral (white) wire to remove the ground-link screw from the back of the ground link under the screw. 3. Bare (green) ground wire D. Part of range. The ground wire must not contact any other terminal. 6. Line 2 (red) C. Line 1 (black) G. Ground-link screw C. Line 1 (black) wire 11 Line 2 (red) wire...
... connect the neutral (white) wire to remove the ground-link screw from the back of the ground link under the screw. 3. Bare (green) ground wire D. Part of range. The ground wire must not contact any other terminal. 6. Line 2 (red) C. Line 1 (black) G. Ground-link screw C. Line 1 (black) wire 11 Line 2 (red) wire...
Installation Instructions
Page 14
...mild solution of oven door. A A. NOTE: When properly installed, the rear slides on surface burners and oven. To Remove: 1. Check that all parts are placed in the Use and Care Guide or User Instructions. Check that the drawer stop notch is free to the drawer stop notch 2. Dispose...error code, the electrical outlet in the range Use and Care Guide or User Instructions. 7. Before removing, make sure the oven is an extra part, go back through the steps to the locked position. Insert both sides. Complete Installation 1. For more information, read the "Range Care" section...
...mild solution of oven door. A A. NOTE: When properly installed, the rear slides on surface burners and oven. To Remove: 1. Check that all parts are placed in the Use and Care Guide or User Instructions. Check that the drawer stop notch is free to the drawer stop notch 2. Dispose...error code, the electrical outlet in the range Use and Care Guide or User Instructions. 7. Before removing, make sure the oven is an extra part, go back through the steps to the locked position. Insert both sides. Complete Installation 1. For more information, read the "Range Care" section...
Installation Instructions
Page 15
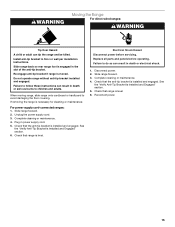
... range without anti-tip bracket installed and engaged. Unplug the power supply cord. 3. Check that the anti-tip bracket is installed and engaged. Replace all parts and panels before servicing. Failure to do so can result in death or serious burns to follow these instructions can result in death or electrical...
... range without anti-tip bracket installed and engaged. Unplug the power supply cord. 3. Check that the anti-tip bracket is installed and engaged. Replace all parts and panels before servicing. Failure to do so can result in death or serious burns to follow these instructions can result in death or electrical...


