Installation Manual
Page 1
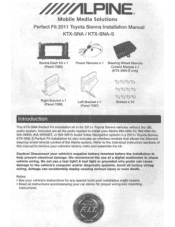
... wiring. Refer to the individual instruction sections of the Alpine system. Disconnect your vehicle's factory radio and assemble the kit. Mobile Media Solutions Perfect Fit 2011 Toyota Sienna Installation Manual KTX-SNA I KTX-SNA-S Sienna Dash Kit x 1 (Panel 7095) Power Harness x 1 Steering Wheel Remote Control Module x 1 (KTX-SNA-S only) Right Bracket x 1 (Panel 7096) Left Bracket x 1 (Panel 7097) ~~~~ ~~~~ ~~~~ Screws x 12 Introduction · This KTX-SNA Perfect Fit installation kit is for proper wiring and mounting instructions KTX-SNA-S Perfect Fit installation...
... wiring. Refer to the individual instruction sections of the Alpine system. Disconnect your vehicle's factory radio and assemble the kit. Mobile Media Solutions Perfect Fit 2011 Toyota Sienna Installation Manual KTX-SNA I KTX-SNA-S Sienna Dash Kit x 1 (Panel 7095) Power Harness x 1 Steering Wheel Remote Control Module x 1 (KTX-SNA-S only) Right Bracket x 1 (Panel 7096) Left Bracket x 1 (Panel 7097) ~~~~ ~~~~ ~~~~ Screws x 12 Introduction · This KTX-SNA Perfect Fit installation kit is for proper wiring and mounting instructions KTX-SNA-S Perfect Fit installation...

Installation Manual
Page 2
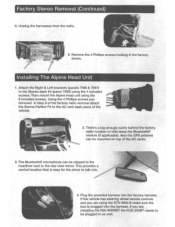
Unplug the harness from the back of the panel. 5. Using a proper panel removal tool unclip the AC controls panel and unclip the plugs behind the panel. Using a proper panel removal tool unclip the panel around the stereo. Remove the (4) 1Omm screws below the AC controls. 3. Using a proper panel removal tool unclip the panel with the vents around the shifter. Factory Stereo Removal 1. Unclip the plug from that panel. 4. sn~----r.~ 6. Using a proper panel removal tool unclip the panel below the radio. 7. Unscrew factory shift knob and remove. 2.
Unplug the harness from the back of the panel. 5. Using a proper panel removal tool unclip the AC controls panel and unclip the plugs behind the panel. Using a proper panel removal tool unclip the panel around the stereo. Remove the (4) 1Omm screws below the AC controls. 3. Using a proper panel removal tool unclip the panel with the vents around the shifter. Factory Stereo Removal 1. Unclip the plug from that panel. 4. sn~----r.~ 6. Using a proper panel removal tool unclip the panel below the radio. 7. Unscrew factory shift knob and remove. 2.
Installation Manual
Page 3
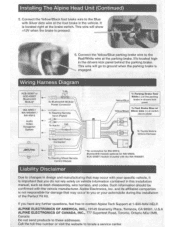
... antenna can be mounted on top of the vehicle. 2. Factory Stereo Removal (Continued) 8. The Bluetooth® microphone can be clipped to the headliner next to talk into the factory harness. If you are using the KTX-SNA-S make sure the box is easy for the driver to the rear view mirror. If the vehicle has steering wheel remote controls and you removed in the factory stereo. Unplug the harnesses from the radio...
... antenna can be mounted on top of the vehicle. 2. Factory Stereo Removal (Continued) 8. The Bluetooth® microphone can be clipped to the headliner next to talk into the factory harness. If you are using the KTX-SNA-S make sure the box is easy for the driver to the rear view mirror. If the vehicle has steering wheel remote controls and you removed in the factory stereo. Unplug the harnesses from the radio...
Installation Manual
Page 4
... products to locate a service center. Such information should be confirmed with the INA-W900BT. Connect the Yellow/Black foot brake wire to contact Alpine Tech Support at the parking brake. This wire will show +12V when the brake is located right at the brake switch. Wiring Harness Diagram Yellow/Blue To Parking Brake Red/ White (-) at the parking brake in drivers kick panel To Foot...
... products to locate a service center. Such information should be confirmed with the INA-W900BT. Connect the Yellow/Black foot brake wire to contact Alpine Tech Support at the parking brake. This wire will show +12V when the brake is located right at the brake switch. Wiring Harness Diagram Yellow/Blue To Parking Brake Red/ White (-) at the parking brake in drivers kick panel To Foot...

