Owners Manual
Page 1
I IMPRINT SOUND MANAGER I KTX-100EQ • /I\UDYSSEY] MULTEQ XT • OWNER'S MANUAL Please read before using this equipment. • ISTRUZIONI PER ~USO Si prega di leggere prima di utilizzare il attrezzatura. • BEDIENUNGSANLEITUNG Lesen Sie diese Bedienungsanleitung bitte vor Gebrauch des Gerates. • MODE D'EMPLOI Veuillez lire avant d'utiliser cet appareil. • MANUAL DE OPERACION Lealo antes de utilizar este equipo. • ANVANDARHANDLEDNING Innan du anvander utrustningen bar du lasa igenom denna anvandarhandledning. • I&t&~SF.l~ < c~mO)MI;:J:
I IMPRINT SOUND MANAGER I KTX-100EQ • /I\UDYSSEY] MULTEQ XT • OWNER'S MANUAL Please read before using this equipment. • ISTRUZIONI PER ~USO Si prega di leggere prima di utilizzare il attrezzatura. • BEDIENUNGSANLEITUNG Lesen Sie diese Bedienungsanleitung bitte vor Gebrauch des Gerates. • MODE D'EMPLOI Veuillez lire avant d'utiliser cet appareil. • MANUAL DE OPERACION Lealo antes de utilizar este equipo. • ANVANDARHANDLEDNING Innan du anvander utrustningen bar du lasa igenom denna anvandarhandledning. • I&t&~SF.l~ < c~mO)MI;:J:
Owners Manual
Page 2
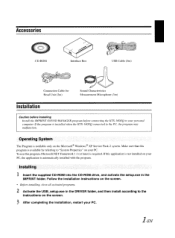
...(or later) is available only on the screen. • Before installing, close all activated programs. 2 Activate the USB_setup.exe in the IMPRINT folder. Installing. 1 Insert the supplied CD-ROM into the CD-ROM drive, and activate the setup.exe in the DRIVER folder, and... is installed when the KTX-IOOEQ connected to your Pc. Accessories CD-ROM Interface Box I USB Cable (5m) Connection Cable for Head Unit (2m) Sound Characteristics Measurement Microphone (3m) Installation Caution before Installing Install the IMPRINT SOUND MANAGER program before connecting the KTX-IOOEQ to the PC,...
...(or later) is available only on the screen. • Before installing, close all activated programs. 2 Activate the USB_setup.exe in the IMPRINT folder. Installing. 1 Insert the supplied CD-ROM into the CD-ROM drive, and activate the setup.exe in the DRIVER folder, and... is installed when the KTX-IOOEQ connected to your Pc. Accessories CD-ROM Interface Box I USB Cable (5m) Connection Cable for Head Unit (2m) Sound Characteristics Measurement Microphone (3m) Installation Caution before Installing Install the IMPRINT SOUND MANAGER program before connecting the KTX-IOOEQ to the PC,...

Owners Manual
Page 5
... microphone in tlte last pages. Afier disconnecting tlte Itead unit cable and bringing the front panel back to the indication of the IMPRINT SOUND MANAGER. and start measurement according to tlte "Message List" table described in a vertical position, at ear level (a camera tripod... is useful for data lost due to the incorrect operatioll of the IMPRINT SOUND MANAGER screen. 3 Activate IMPRINT SOUND MANAGER installed on the IMPRINT SOUND MANAGER screen. We recommend you to back-up your important dma regularly. 4 Set the Measurement Microphone in...
... microphone in tlte last pages. Afier disconnecting tlte Itead unit cable and bringing the front panel back to the indication of the IMPRINT SOUND MANAGER. and start measurement according to tlte "Message List" table described in a vertical position, at ear level (a camera tripod... is useful for data lost due to the incorrect operatioll of the IMPRINT SOUND MANAGER screen. 3 Activate IMPRINT SOUND MANAGER installed on the IMPRINT SOUND MANAGER screen. We recommend you to back-up your important dma regularly. 4 Set the Measurement Microphone in...

Owners Manual
Page 6
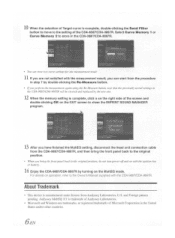
... all doors, windows and sunroof. Select the Target Curve Select button on the screen. 7 When microphone placement is output from the speakers and sound characteristics are available; If noise enters from outside the vehicle. • As measurement error may cause. Repeat the procedure in the car should..., "Error" will take approx. 40 minutes until "Complete" is displayed on the screen and set it will be displayed on the IMPRINT SOUND MANAGER screen. but can be sure to perform MultEQ measurement with the vehicle collnected to the indications on the screen and signal...
... all doors, windows and sunroof. Select the Target Curve Select button on the screen. 7 When microphone placement is output from the speakers and sound characteristics are available; If noise enters from outside the vehicle. • As measurement error may cause. Repeat the procedure in the car should..., "Error" will take approx. 40 minutes until "Complete" is displayed on the screen and set it will be displayed on the IMPRINT SOUND MANAGER screen. but can be sure to perform MultEQ measurement with the vehicle collnected to the indications on the screen and signal...
Owners Manual
Page 7
..., double-clicking the Send Filter button to move to the setting of the screen and double-clicking OK on the EXIT screen to close the IMPRINT SOUND MANAGER program. 13 After you have finished the MultEQ setting, disconnect the head unit connection cable from the CDA-9887/CDA-9887R, and then bring...
..., double-clicking the Send Filter button to move to the setting of the screen and double-clicking OK on the EXIT screen to close the IMPRINT SOUND MANAGER program. 13 After you have finished the MultEQ setting, disconnect the head unit connection cable from the CDA-9887/CDA-9887R, and then bring...
Owners Manual
Page 11
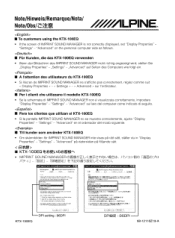
... " Display Properties» - "Settings" - "Advanced" auf Seiten des Computers wie folgt ein. • A I'attention des utilisateurs du KTX-100EQ • Si I 'ordinateur. • Per i clienti che utilizzano iI modello KTX-100EQ e • Se la schermata di IMPRINT SOUND MANAGER non visualizzata correttamente, impostare "Display Properties" - "Advanced" en el ordenador del modo siguiente. • Till kunder som...
... " Display Properties» - "Settings" - "Advanced" auf Seiten des Computers wie folgt ein. • A I'attention des utilisateurs du KTX-100EQ • Si I 'ordinateur. • Per i clienti che utilizzano iI modello KTX-100EQ e • Se la schermata di IMPRINT SOUND MANAGER non visualizzata correttamente, impostare "Display Properties" - "Advanced" en el ordenador del modo siguiente. • Till kunder som...
