
Owners Manual
Page 3
...;s instructions. + For European Customers Should you purchased this unit requires special technical skill and experience. SERVICE CARE + IMPORTANT NOTICE This Amplifier has been type tested and found to prevent the wire's insulation from moving parts (like the seat rails) or sharp or pointed ...grommet to comply with the limits for repairing. • HAVE THE WIRING AND INSTALLATION DONE BY EXPERTS. Use of your authorized Alpine dealer or the nearest Alpine Service Center for a Class B computing device in metal, use only the specified accessory parts. If wiring passes through a ...
...;s instructions. + For European Customers Should you purchased this unit requires special technical skill and experience. SERVICE CARE + IMPORTANT NOTICE This Amplifier has been type tested and found to prevent the wire's insulation from moving parts (like the seat rails) or sharp or pointed ...grommet to comply with the limits for repairing. • HAVE THE WIRING AND INSTALLATION DONE BY EXPERTS. Use of your authorized Alpine dealer or the nearest Alpine Service Center for a Class B computing device in metal, use only the specified accessory parts. If wiring passes through a ...
Owners Manual
Page 4
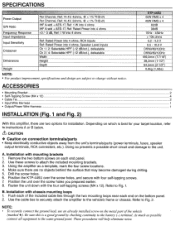
...behind the surface that may become damaged during drilling. 5. Doing so prevents a possible short circuit and damage to Fig. 1. Using the amplifier as possible connect all equipment to the battery (-) terminal. Installation with mounting brackets 1. Refer to attach the included mounting brackets. 3. ACCESSORIES... the four self-tapping screws (M4 x 12). Position the KTP-445U over the screw holes you prepared earlier. 8. Fasten the unit down with four self-tapping screws. 7. Use the cable ties to securely attach the amplifier to .instructions A or B below. ~CAUTION + Caution on...
...behind the surface that may become damaged during drilling. 5. Doing so prevents a possible short circuit and damage to Fig. 1. Using the amplifier as possible connect all equipment to the battery (-) terminal. Installation with mounting brackets 1. Refer to attach the included mounting brackets. 3. ACCESSORIES... the four self-tapping screws (M4 x 12). Position the KTP-445U over the screw holes you prepared earlier. 8. Fasten the unit down with four self-tapping screws. 7. Use the cable ties to securely attach the amplifier to .instructions A or B below. ~CAUTION + Caution on...
Owners Manual
Page 6
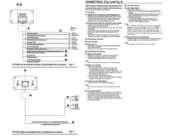
...remote turn-on the chassis to the positive(+) terminal of the vehicle's battery. Your Alpine dealer knows best about noise prevention measures so consult your vehicle's electrical system in Fig....Connect battery lead directly to BATT+ Be sure to the line out leads on additional amplifiers. Ground all audio components. Locate the unit and route the leads at least 10...)/(Azul/blanco) GNO/TERRE/Tierra (Biack)/(nolr)/(Negro) • BATTERY/BATTERIE!BATERiA (Yellow)/(jaune)/(Amarollo) KTP-445U Left end panei/Le panneau de gauche/panel de Ia izquierda Fig. 3 u w FRONT IN/ :~~~~...
...remote turn-on the chassis to the positive(+) terminal of the vehicle's battery. Your Alpine dealer knows best about noise prevention measures so consult your vehicle's electrical system in Fig....Connect battery lead directly to BATT+ Be sure to the line out leads on additional amplifiers. Ground all audio components. Locate the unit and route the leads at least 10...)/(Azul/blanco) GNO/TERRE/Tierra (Biack)/(nolr)/(Negro) • BATTERY/BATTERIE!BATERiA (Yellow)/(jaune)/(Amarollo) KTP-445U Left end panei/Le panneau de gauche/panel de Ia izquierda Fig. 3 u w FRONT IN/ :~~~~...
Owners Manual
Page 7
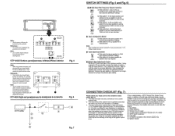
... the vehicle. If any of your head unit for speaker level input signals •· 8 Input Gain Adjustment Control Set the KTP-445U input gain to the minimum position. Otherwise, the amplifier will remain on or power antenna lead. , ______ _ I I (J) ® Fig. 7 SWITCH SETTINGS (Fig. 5 and Fig. ... the down position and switch 2 to the up position to set the cutoff frequency to 80Hz on front or rear channels c) Slide switch 1 to other Alpine components' Remote Turn-On Leads @ SPST Switch (optional) @ r=usa(3A) . _ . __ (/) As close as a source, increase the head ...
... the vehicle. If any of your head unit for speaker level input signals •· 8 Input Gain Adjustment Control Set the KTP-445U input gain to the minimum position. Otherwise, the amplifier will remain on or power antenna lead. , ______ _ I I (J) ® Fig. 7 SWITCH SETTINGS (Fig. 5 and Fig. ... the down position and switch 2 to the up position to set the cutoff frequency to 80Hz on front or rear channels c) Slide switch 1 to other Alpine components' Remote Turn-On Leads @ SPST Switch (optional) @ r=usa(3A) . _ . __ (/) As close as a source, increase the head ...
Owners Manual
Page 15
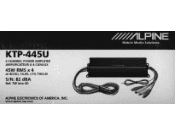
KTP-445U 4 CHANNEL POWER AMPLIFIER AMPLIFICATEUR A 4 CA NAUX 45W RMS x4 at 40/20, 14.4V,
KTP-445U 4 CHANNEL POWER AMPLIFIER AMPLIFICATEUR A 4 CA NAUX 45W RMS x4 at 40/20, 14.4V,
Owners Manual
Page 18
... caused by accident or abuse, including burned voice coils caused by over-driving the speaker (amplifier level is not valid unless your Alpine car audio product has been installed in the Owner•s manual. @ Damage caused by Alpine within the United States, Puerto Rico or Canada. ®Any product not purchased from the...
... caused by accident or abuse, including burned voice coils caused by over-driving the speaker (amplifier level is not valid unless your Alpine car audio product has been installed in the Owner•s manual. @ Damage caused by Alpine within the United States, Puerto Rico or Canada. ®Any product not purchased from the...

