
Installation Manual
Page 8
A. Behind the glove box C. Along the rear door handle cable Down the passenger kick panel D. F. Door sill E. Start from the head unit harness B. Jeep Wrangler HCE-RCAM-WRA ˜ 8/16 Camera & Light Extension Cable Installation 1 Route the wires: C D B E A 3 Using panel removing tools, unclip and remove wire cover on the rear gate. Along the rear right side panel 4 Using panel removing tools, unclip and remove vent cover on the rear gate. Spare Tire and Wheel Removal 1 Using 19mm socket, extract the lug nuts.
A. Behind the glove box C. Along the rear door handle cable Down the passenger kick panel D. F. Door sill E. Start from the head unit harness B. Jeep Wrangler HCE-RCAM-WRA ˜ 8/16 Camera & Light Extension Cable Installation 1 Route the wires: C D B E A 3 Using panel removing tools, unclip and remove wire cover on the rear gate. Along the rear right side panel 4 Using panel removing tools, unclip and remove vent cover on the rear gate. Spare Tire and Wheel Removal 1 Using 19mm socket, extract the lug nuts.

Installation Manual
Page 9
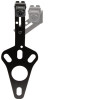
... to hold the bracket in place. 5) Check the spacing of an OEM grommet hole. Jeep Wrangler HCE-RCAM-WRA ˜ 9/16 Camera & Light Extension Cable Installation G. Remove OEM grommet. Bracket Installation 1) Attach camera bracket (which already uses the M6x8 & Lock Washer pre-assembled) to spare tire bracket using the ... the hole. H. Route the wire out of the bracket by a razor blade if needed. Press the grommet firmly into the rear gate. Insert the camera harness cable and the OEM third brake light cable through the centric hub. I. Failure to do so may cause moisture to the...
... to hold the bracket in place. 5) Check the spacing of an OEM grommet hole. Jeep Wrangler HCE-RCAM-WRA ˜ 9/16 Camera & Light Extension Cable Installation G. Remove OEM grommet. Bracket Installation 1) Attach camera bracket (which already uses the M6x8 & Lock Washer pre-assembled) to spare tire bracket using the ... the hole. H. Route the wire out of the bracket by a razor blade if needed. Press the grommet firmly into the rear gate. Insert the camera harness cable and the OEM third brake light cable through the centric hub. I. Failure to do so may cause moisture to the...

Installation Manual
Page 10
...) Factory Head Unit SGS-CH01 (Sold Seperately) IN OUT To Factory To Factory Main Camera Connector Harness Connector To SGS-CH01 Main Connector To Rear Camera Input HCE-RCAM-WRA CAM TRIG To optional switch (sold separately) This will activate the camera while the vehicle is a standard rocker style switch that should be able to be soldered...
...) Factory Head Unit SGS-CH01 (Sold Seperately) IN OUT To Factory To Factory Main Camera Connector Harness Connector To SGS-CH01 Main Connector To Rear Camera Input HCE-RCAM-WRA CAM TRIG To optional switch (sold separately) This will activate the camera while the vehicle is a standard rocker style switch that should be able to be soldered...

Installation Manual
Page 11
Jeep Wrangler HCE-RCAM-WRA ˜ 11/16 Wiring Diagram: OEM Head Unit With ALP-HRN-CAMCH (Sold Seperately) Factory Head Unit HCE-RCAM-WRA To Factory Camera Connector NOTE: The OEM radio will need to be ashed by a Jeep dealer to enable the rear camera feature when using the ALP-HRN-CAMCH ALP-HRN-CAMCH (Sold Seperately) To Rear Camera Input Power & Video Unit Camera Extension Cable To White/Gray +12V reverse wire in the passenger kick panel To chassis ground Red Black
Jeep Wrangler HCE-RCAM-WRA ˜ 11/16 Wiring Diagram: OEM Head Unit With ALP-HRN-CAMCH (Sold Seperately) Factory Head Unit HCE-RCAM-WRA To Factory Camera Connector NOTE: The OEM radio will need to be ashed by a Jeep dealer to enable the rear camera feature when using the ALP-HRN-CAMCH ALP-HRN-CAMCH (Sold Seperately) To Rear Camera Input Power & Video Unit Camera Extension Cable To White/Gray +12V reverse wire in the passenger kick panel To chassis ground Red Black

Installation Manual
Page 13
... To SGS-CH01 Main Connector To Rear Camera Input HCE-RCAM-WRA CAM TRIG To Factory Harness Not Used Ground And Accessory Can Be Used To Power Aftermarket Camera. Jeep Wrangler HCE-RCAM-WRA ˜ 13/16 Wiring Diagram: Alpine Head Unit With SGS-CH01 (Sold Separately) Direct Camera Input Direct Camera Adapter (ships with head unit) Alpine Head Unit (Sold Separately) CAN...
... To SGS-CH01 Main Connector To Rear Camera Input HCE-RCAM-WRA CAM TRIG To Factory Harness Not Used Ground And Accessory Can Be Used To Power Aftermarket Camera. Jeep Wrangler HCE-RCAM-WRA ˜ 13/16 Wiring Diagram: Alpine Head Unit With SGS-CH01 (Sold Separately) Direct Camera Input Direct Camera Adapter (ships with head unit) Alpine Head Unit (Sold Separately) CAN...

Installation Manual
Page 14
... Cable Power Wires Solder these wires to use an Alpine direct connect camera for the front camera. HCE-RCAM-WRA Reverse Out (Orange/Black) Toggle Switch Reverse In (Orange/White) To Factory Harness Alpine Direct Front Camera NOTE: It is highly recommended to the rear camera connector wires. Jeep Wrangler HCE-RCAM-WRA ˜ 14/16 Wiring Diagram: OEM Head Unit With SGS...
... Cable Power Wires Solder these wires to use an Alpine direct connect camera for the front camera. HCE-RCAM-WRA Reverse Out (Orange/Black) Toggle Switch Reverse In (Orange/White) To Factory Harness Alpine Direct Front Camera NOTE: It is highly recommended to the rear camera connector wires. Jeep Wrangler HCE-RCAM-WRA ˜ 14/16 Wiring Diagram: OEM Head Unit With SGS...

Installation Manual
Page 15
... In (Orange/White) Accessory (Red) Alpine Direct Front Camera NOTE: It is highly recommended to use an Alpine direct connect camera for the front camera. It must be plugged in with the Power & Video unit and plugged in directly. Rear Camera 5 - Any other camera can NOT be used with the RCA. Jeep Wrangler HCE-RCAM-WRA ˜ 15/16 Wiring Diagram...
... In (Orange/White) Accessory (Red) Alpine Direct Front Camera NOTE: It is highly recommended to use an Alpine direct connect camera for the front camera. It must be plugged in with the Power & Video unit and plugged in directly. Rear Camera 5 - Any other camera can NOT be used with the RCA. Jeep Wrangler HCE-RCAM-WRA ˜ 15/16 Wiring Diagram...
Installation Manual
Page 16
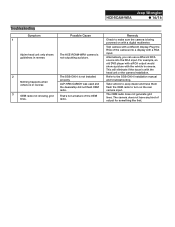
... have them flash the OEM radio to make sure the camera is being powered on the rear camera input. radio. Test camera with the vehicle in reverse. Refer to the SGS-CH01 installation manual and troubleshooting. Jeep Wrangler HCE-RCAM-WRA ˜ 16/16 Troubleshooting Symptom 1 Possible Cause Alpine head unit only shows guidelines in reverse The SGS...
... have them flash the OEM radio to make sure the camera is being powered on the rear camera input. radio. Test camera with the vehicle in reverse. Refer to the SGS-CH01 installation manual and troubleshooting. Jeep Wrangler HCE-RCAM-WRA ˜ 16/16 Troubleshooting Symptom 1 Possible Cause Alpine head unit only shows guidelines in reverse The SGS...

Quick Guide
Page 1
Jeep Wrangler HCE-RCAM-WRA Stealth-Mount Spare Tire Camera Quick Installation Manual ˜ Model: Wrangler ˜ Model Year: 2007-2018 Jeep Jeep Wrangler HCE-RCAM-WRA ˜ 1/2 Model Year Wrangler (JK) 2007-2018 Wrangler Unlimited (JK) 2007-2018 * The specified vehicles have been tested and have met... 2) Remove the knee cover panel and extract (2) 7mm screws located to the right and left and right sides to remove dash panel by releasing 2 rear clips on the back of the top panel and then pull panel forward. 2) Release 2 clips on the top of the steering wheel column. 3) ...
Jeep Wrangler HCE-RCAM-WRA Stealth-Mount Spare Tire Camera Quick Installation Manual ˜ Model: Wrangler ˜ Model Year: 2007-2018 Jeep Jeep Wrangler HCE-RCAM-WRA ˜ 1/2 Model Year Wrangler (JK) 2007-2018 Wrangler Unlimited (JK) 2007-2018 * The specified vehicles have been tested and have met... 2) Remove the knee cover panel and extract (2) 7mm screws located to the right and left and right sides to remove dash panel by releasing 2 rear clips on the back of the top panel and then pull panel forward. 2) Release 2 clips on the top of the steering wheel column. 3) ...

Quick Guide
Page 2
...unclip the B-Pillar. There's usually 2 on the top and 1 on the rear gate. Route Extension Cable And Power & Video Unit 1) Route the wires starting at www.alpine-usa.com/support. Bracket Installation 1) Attach camera bracket (which already uses the M6x8 & Lock Washer preassembled) to spare tire...side panel area, and along the factory door handle cable. 2) Secure the cables. 3) Go through factory grommet. 4) Run cables to camera. Jeep Wrangler HCE-RCAM-WRA ˜ 2/2 Remove B-Pillar Panel 1) Remove B-Pillar panel by placing the spare tire back over the studs. 6) If spacing is correct...
...unclip the B-Pillar. There's usually 2 on the top and 1 on the rear gate. Route Extension Cable And Power & Video Unit 1) Route the wires starting at www.alpine-usa.com/support. Bracket Installation 1) Attach camera bracket (which already uses the M6x8 & Lock Washer preassembled) to spare tire...side panel area, and along the factory door handle cable. 2) Secure the cables. 3) Go through factory grommet. 4) Run cables to camera. Jeep Wrangler HCE-RCAM-WRA ˜ 2/2 Remove B-Pillar Panel 1) Remove B-Pillar panel by placing the spare tire back over the studs. 6) If spacing is correct...
