

Operation Manual
Page 6
Table of contents Chapter 1 : Introduction The user interface Front Panel Rear Panel Connecting MPC1000 to External Audio/MIDI device Terminologies in MPC1000 Chapter 2 : Basic Operation Setting names Entering numbers with NUMERIC key Chapter 3 : Sequencer feature Recording the performance Playing back a sequence ...: Song mode Structure of a song Creating a song Playing a song Other features in the SONG mode Chapter 7 : Functions of a pad Playing with pads Setting the track mute with pads Selecting a sequence to play with pads 1 1 3 3 4 5 7 8 9 10 10 11 12 15 20 22 25 25 27 29 30 30 30 31 33 ...
Table of contents Chapter 1 : Introduction The user interface Front Panel Rear Panel Connecting MPC1000 to External Audio/MIDI device Terminologies in MPC1000 Chapter 2 : Basic Operation Setting names Entering numbers with NUMERIC key Chapter 3 : Sequencer feature Recording the performance Playing back a sequence ...: Song mode Structure of a song Creating a song Playing a song Other features in the SONG mode Chapter 7 : Functions of a pad Playing with pads Setting the track mute with pads Selecting a sequence to play with pads 1 1 3 3 4 5 7 8 9 10 10 11 12 15 20 22 25 25 27 29 30 30 30 31 33 ...

Operation Manual
Page 7
... : Editing a sample 52 Setting the start/end points for a pad 61 The functions in a sequence 44 AFTER key 44 Chapter 9 : Using the MPC1000 with external devices 45 Sync with the MPC1000 as the master 45 Sync with the MPC1000 as a new sample (EXTRACT) 54 Sample window features 54 Other ...editing functions 55 Setting the loop 56 Linking the loop point to the start point 57 Chapter 12 : Program 58 Creating a program 58 Assigning/Reassigning samples to the pads 58 Playing the ...
... : Editing a sample 52 Setting the start/end points for a pad 61 The functions in a sequence 44 AFTER key 44 Chapter 9 : Using the MPC1000 with external devices 45 Sync with the MPC1000 as the master 45 Sync with the MPC1000 as a new sample (EXTRACT) 54 Sample window features 54 Other ...editing functions 55 Setting the loop 56 Linking the loop point to the start point 57 Chapter 12 : Program 58 Creating a program 58 Assigning/Reassigning samples to the pads 58 Playing the ...

Operation Manual
Page 8
Chapter 13 : Mixer 67 Setting the level and pan of the pad 67 Setting the output for the sample 67 Selecting the pad to apply the effect 68 Chapter 14 : Effect 69 Applying effects to a specific pad sound 69 Applying effects of the FX2 to the effect sound of the FX1...Formatting the memory card 84 Saving the data to the internal flash memory 84 Chapter 16 : Connecting the MPC1000 to your computer 85 Connecting the MPC1000 to a Windows-based PC 85 Connecting the MPC1000 to a Macintosh 86 Chapter 17 : Other settings 87 Foot switch 87 Adjusting the master level 88 ...
Chapter 13 : Mixer 67 Setting the level and pan of the pad 67 Setting the output for the sample 67 Selecting the pad to apply the effect 68 Chapter 14 : Effect 69 Applying effects to a specific pad sound 69 Applying effects of the FX2 to the effect sound of the FX1...Formatting the memory card 84 Saving the data to the internal flash memory 84 Chapter 16 : Connecting the MPC1000 to your computer 85 Connecting the MPC1000 to a Windows-based PC 85 Connecting the MPC1000 to a Macintosh 86 Chapter 17 : Other settings 87 Foot switch 87 Adjusting the master level 88 ...
Operation Manual
Page 9
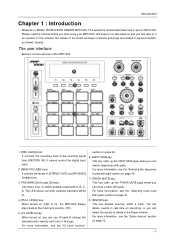
...manual before you start using your MPC1000, and keep it in a safe place so that you can mute a track with pads. For more information, see the "Selecting the sequence to delete in 16 steps. PAD BANK [A] through [D] keys: Use these keys to MUSIC PRODUCTION CENTER MPC1000. section on , you can ...select the events to play with pad" section on page 42. 7. [TRACK MUTE] key: This key calls up the NEXT SEQ ...
...manual before you start using your MPC1000, and keep it in a safe place so that you can mute a track with pads. For more information, see the "Selecting the sequence to delete in 16 steps. PAD BANK [A] through [D] keys: Use these keys to MUSIC PRODUCTION CENTER MPC1000. section on , you can ...select the events to play with pad" section on page 42. 7. [TRACK MUTE] key: This key calls up the NEXT SEQ ...

Operation Manual
Page 10
... the LED of the timing correct setting. 19. [PLAY START] key: Plays a sequence from its status before recording, and LED will be replaced with a pad. The pressure/strength you use various features with a combination of another key. 18. [BAR] key: You can move the highlighted cursor up and down on...can select a sequence with new events. For more information, see the "Q-Link slider" section on the track will blink and you can enter numbers using pads. 12. [MODE] key: When you press this key 3 times quickly, you press this key starts recording to select a field. You can punch ...
... the LED of the timing correct setting. 19. [PLAY START] key: Plays a sequence from its status before recording, and LED will be replaced with a pad. The pressure/strength you use various features with a combination of another key. 18. [BAR] key: You can move the highlighted cursor up and down on...can select a sequence with new events. For more information, see the "Q-Link slider" section on the track will blink and you can enter numbers using pads. 12. [MODE] key: When you press this key 3 times quickly, you press this key starts recording to select a field. You can punch ...

Operation Manual
Page 11
...computer" section on page 87. COLD HOT 2. [STEREO OUT L/R] plug: This is the coaxial digital output. For more information, see the "Connecting the MPC1000 to your PC and transfer data. You can be merged (mixed). 6. [USB] plug (slave): You use to connect a set of foot switches: normal...it automatically detects the type of the unit. -3- If a foot switch has been connected to the MPC1000, when you can use a foot switch to the MPC1000, it is a stereo phone plug to output each pad sound separately. With a stereo phone plug, it GND can use either type of foot switch. ...
...computer" section on page 87. COLD HOT 2. [STEREO OUT L/R] plug: This is the coaxial digital output. For more information, see the "Connecting the MPC1000 to your PC and transfer data. You can be merged (mixed). 6. [USB] plug (slave): You use to connect a set of foot switches: normal...it automatically detects the type of the unit. -3- If a foot switch has been connected to the MPC1000, when you can use a foot switch to the MPC1000, it is a stereo phone plug to output each pad sound separately. With a stereo phone plug, it GND can use either type of foot switch. ...

Operation Manual
Page 13
... separately on a track as a MIDI event. A sample is assigned to pads in PROGRAM mode. You can hold performance data. Drum Pad The MPC1000 has 16 pads. The performance of the pad can set from the MIDI keyboard or pads will be recorded on each of which can change the start/end point of...most basic unit that is useful when you wish to 64 pads. The MPC1000 has 4 pad banks that you can use the PROGRAM mode. Terminologies in MPC1000 These are the basic terminologies you need to assign samples to a pad by hitting the pad. For example you record two Piano solos on Track 1 and...
... separately on a track as a MIDI event. A sample is assigned to pads in PROGRAM mode. You can hold performance data. Drum Pad The MPC1000 has 16 pads. The performance of the pad can set from the MIDI keyboard or pads will be recorded on each of which can change the start/end point of...most basic unit that is useful when you wish to 64 pads. The MPC1000 has 4 pad banks that you can use the PROGRAM mode. Terminologies in MPC1000 These are the basic terminologies you need to assign samples to a pad by hitting the pad. For example you record two Piano solos on Track 1 and...

Operation Manual
Page 14
... on a memory card, or transfer the data to PC through USB. A set of 64 pads, each pad. The MB is a space where you can record up to 136 seconds (monaural recording). By saving the recordings in the MPC1000's RAM on the Memory card, you can save on the flash memory like RAM, but... MPC1000 uses "compact flash" memory cards. -6- Introduction Program Once you assign samples to the pads in the PROGRAM mode, you can play back. RAM RAM (Random Access Memory) is a unit that represents the size of RAM that the...
... on a memory card, or transfer the data to PC through USB. A set of 64 pads, each pad. The MB is a space where you can record up to 136 seconds (monaural recording). By saving the recordings in the MPC1000's RAM on the Memory card, you can save on the flash memory like RAM, but... MPC1000 uses "compact flash" memory cards. -6- Introduction Program Once you assign samples to the pads in the PROGRAM mode, you can play back. RAM RAM (Random Access Memory) is a unit that represents the size of RAM that the...
Operation Manual
Page 16
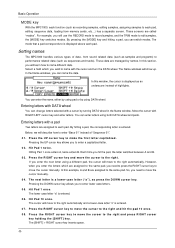
... For example, you can enter the name, either by using pad or by using both DATA wheel and pads. By pressing the [MODE] key and hitting a pad, you will move the cursor manually. 04. Basic Operation MODE key With the MPC1000, each function (such as recording samples, editing samples, assigning... samples to each pad, editing sequence data, loading from sound related data (such as samples and programs) to performance related data (such as an ...
... For example, you can enter the name, either by using pad or by using both DATA wheel and pads. By pressing the [MODE] key and hitting a pad, you will move the cursor manually. 04. Basic Operation MODE key With the MPC1000, each function (such as recording samples, editing samples, assigning... samples to each pad, editing sequence data, loading from sound related data (such as samples and programs) to performance related data (such as an ...

Operation Manual
Page 17
... name" field will blink and allows you can enter the correct number. 03. When you set +/-, you to another data. by hitting the corresponding pads. To enter numeric values, numerically, use the DATA wheel. 1 0 . When you can copy the letters in the Name window , those copied ...letters can enter numbers directly by hitting Pad 11. Pad 1 through 9 corresponds number 1 to 9 and Pad 10 corresponds to confirm the entry and close the window. Press the [NUMERIC] key on the upper right corner of "Sequence ...
... name" field will blink and allows you can enter the correct number. 03. When you set +/-, you to another data. by hitting the corresponding pads. To enter numeric values, numerically, use the DATA wheel. 1 0 . When you can copy the letters in the Name window , those copied ...letters can enter numbers directly by hitting Pad 11. Pad 1 through 9 corresponds number 1 to 9 and Pad 10 corresponds to confirm the entry and close the window. Press the [NUMERIC] key on the upper right corner of "Sequence ...
Operation Manual
Page 18
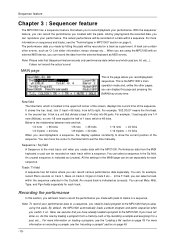
... this now by playing back the recorded data, you record/playback sequences. You can select a sequence in MPC1000" section on page 48. -10- Here, we assume that you made with the pads. For more information on loading a program, see the "Loading a file" section on track 3 etc......memory card, or by hitting the pads will learn how to record the performance you created with pads to show the current position of 1 beat, which is a unit that divides a beat (1/4 note) into 96 parts. Sequence feature Chapter 3 : Sequencer feature The MPC1000 has a sequencer feature that allows you...
... this now by playing back the recorded data, you record/playback sequences. You can select a sequence in MPC1000" section on page 48. -10- Here, we assume that you made with the pads. For more information on loading a program, see the "Loading a file" section on track 3 etc......memory card, or by hitting the pads will learn how to record the performance you created with pads to show the current position of 1 beat, which is a unit that divides a beat (1/4 note) into 96 parts. Sequence feature Chapter 3 : Sequencer feature The MPC1000 has a sequencer feature that allows you...

Operation Manual
Page 19
... sequence is set to load a demo sequence automatically when you wish to play the pads when the track loops. You can select a program in a series by pressing the [REC]+ [PLAY START] keys. The MPC1000 automatically switches to "over dub" recording and adds to start playing back the recorded ... the already recorded performance, press the [PLAY START] key while holding the [REC] key. If you press the [PLAY] key again, the MPC1000 will start from where the previous play , during playing back a sequence, so that the sequence is set to play your performance. Playing back a...
... sequence is set to load a demo sequence automatically when you wish to play the pads when the track loops. You can select a program in a series by pressing the [REC]+ [PLAY START] keys. The MPC1000 automatically switches to "over dub" recording and adds to start playing back the recorded ... the already recorded performance, press the [PLAY START] key while holding the [REC] key. If you press the [PLAY] key again, the MPC1000 will start from where the previous play , during playing back a sequence, so that the sequence is set to play your performance. Playing back a...

Operation Manual
Page 20
...: In the SONG mode, you can delete a certain pad performance by turning the DATA wheel to the end, the MPC1000 will start playing back the sequence you wish to start and... START] key while holding the [OVER DUB] key to delete while holding the [ERASE] key. Hold the pad you select in the Time field. Press the [ERASE] key. You will be recorded in the ERASE window ... features for the last recording. By repeating this feature: by deleting real-time during overdub, and by selecting a pad and part to stop the overdub and press the [UNDO SEQ] key. Tips: With the [NEXT SEQ] key...
...: In the SONG mode, you can delete a certain pad performance by turning the DATA wheel to the end, the MPC1000 will start playing back the sequence you wish to start and... START] key while holding the [OVER DUB] key to delete while holding the [ERASE] key. Hold the pad you select in the Time field. Press the [ERASE] key. You will be recorded in the ERASE window ... features for the last recording. By repeating this feature: by deleting real-time during overdub, and by selecting a pad and part to stop the overdub and press the [UNDO SEQ] key. Tips: With the [NEXT SEQ] key...

Operation Manual
Page 21
... (DO IT) key, the MPC1000 will open up . 05. Note: If you can create the shuffle groove. 03. It makes it is stop, press [F1] (T.C.) key in the Swing% field. When you set the value for timing correction. Timing correct feature When recording a pad performance, it easier to ALL... EVENT, the MPC1000 will delete other than the pad events in the area. 04. The Timing Correct window will be included in the selected area. Press [F4] ...
... (DO IT) key, the MPC1000 will open up . 05. Note: If you can create the shuffle groove. 03. It makes it is stop, press [F1] (T.C.) key in the Swing% field. When you set the value for timing correction. Timing correct feature When recording a pad performance, it easier to ALL... EVENT, the MPC1000 will delete other than the pad events in the area. 04. The Timing Correct window will be included in the selected area. Press [F4] ...

Operation Manual
Page 22
...16 note triplets, 1/32 = 1/32 note, 1/32(3) = 1/32 note triplets, OFF = NO timing correction. To correct the timing of only events on a specific pad, hit the pad. The value in the Note field will learn about various settings for the metronome (click sound). 01. Click/Metronome feature In this section, you... [PLAY] or the [PLAY START] key is pressed without a count. Click/Metronome window will open up . If you hit a different pad by hitting the pad again. Sequence feature Correcting the timing of recorded events You can set the Note values as ALL. When a sequence is in stop , press...
...16 note triplets, 1/32 = 1/32 note, 1/32(3) = 1/32 note triplets, OFF = NO timing correction. To correct the timing of only events on a specific pad, hit the pad. The value in the Note field will learn about various settings for the metronome (click sound). 01. Click/Metronome feature In this section, you... [PLAY] or the [PLAY START] key is pressed without a count. Click/Metronome window will open up . If you hit a different pad by hitting the pad again. Sequence feature Correcting the timing of recorded events You can set the Note values as ALL. When a sequence is in stop , press...

Operation Manual
Page 23
...recording/overdubbing and resume the playback. You can start the recording. If you set this if you release the pad. Press the [NOTE REPEAT] key during recording/overdub. The MPC1000 will be played repeatedly according to play repeatedly. Note repeat feature If you press the [OVER DUB] key and... the [PLAY] key instead, the MPC1000 will be played repeatedly according to press the pad. You can also control its velocity by changing the strength to 999 bars. 01. The pad's sound will be deleted. 04. You can also control its velocity by...
...recording/overdubbing and resume the playback. You can start the recording. If you set this if you release the pad. Press the [NOTE REPEAT] key during recording/overdub. The MPC1000 will be played repeatedly according to play repeatedly. Note repeat feature If you press the [OVER DUB] key and... the [PLAY] key instead, the MPC1000 will be played repeatedly according to press the pad. You can also control its velocity by changing the strength to 999 bars. 01. The pad's sound will be deleted. 04. You can also control its velocity by...

Operation Manual
Page 27
... [F5] (DO IT) key. That deletes all the sequence data in the memory at the end of the sequence even if you hit the pad. The MPC1000 cuts the note at one time. 01. Deleting all sequences You can delete all the sequences and changes their names to handle the duration between...] key. The Delete Sequence window will open . 03. Press the [MODE] key and then the [PAD 10] (OTHER) key. TO SEQUENCE LENGTH TO SEQUENCE END AS PLAYED The MPC1000 records as it reaches the end of the MPC1000. 01. You cannot record beyond the loop. Press [F2] (MISC.) key. Press the [WINDOW] key...
... [F5] (DO IT) key. That deletes all the sequence data in the memory at the end of the sequence even if you hit the pad. The MPC1000 cuts the note at one time. 01. Deleting all sequences You can delete all the sequences and changes their names to handle the duration between...] key. The Delete Sequence window will open . 03. Press the [MODE] key and then the [PAD 10] (OTHER) key. TO SEQUENCE LENGTH TO SEQUENCE END AS PLAYED The MPC1000 records as it reaches the end of the MPC1000. 01. You cannot record beyond the loop. Press [F2] (MISC.) key. Press the [WINDOW] key...

Operation Manual
Page 28
... 02. You can set the track type in the Type field in the MAIN page. The MPC1000 has two MIDI outputs. In the Track name field, enter the new name. Below are two...MPC1000's internal sampler by turning the DATA wheel in the Pgm field in the MAIN page. If you are called DRUM track and MIDI track respectively. Press the [WINDOW] key. The MIDI track data is managed per pad...key. By setting either track to set this track type when you wish to use the MPC1000 to OFF, the MPC1000 does not play internal programs. When you play an external MIDI sound module. The Track ...
... 02. You can set the track type in the Type field in the MAIN page. The MPC1000 has two MIDI outputs. In the Track name field, enter the new name. Below are two...MPC1000's internal sampler by turning the DATA wheel in the Pgm field in the MAIN page. If you are called DRUM track and MIDI track respectively. Press the [WINDOW] key. The MIDI track data is managed per pad...key. By setting either track to set this track type when you wish to use the MPC1000 to OFF, the MPC1000 does not play internal programs. When you play an external MIDI sound module. The Track ...

Operation Manual
Page 30
...select a track in the Tr field in the MAIN page. MIDI sequencer features When you are playing the internal sound module with the pads, you can start recording/playback of each channel separately. About MIDI... Thus, you can record the keyboard performance to it is a ...(TR +) keys. Devices are working on several channels. When you are MIDI channels. The [F6] (SOLO) key will be highlighted and the MPC1000 plays back only the selected track and mutes all tracks. By using a special cable called MIDI cable. For example, when you connect an external ...
...select a track in the Tr field in the MAIN page. MIDI sequencer features When you are playing the internal sound module with the pads, you can start recording/playback of each channel separately. About MIDI... Thus, you can record the keyboard performance to it is a ...(TR +) keys. Devices are working on several channels. When you are MIDI channels. The [F6] (SOLO) key will be highlighted and the MPC1000 plays back only the selected track and mutes all tracks. By using a special cable called MIDI cable. For example, when you connect an external ...

Operation Manual
Page 31
... here, set this section, you don't have the correct settings for 2 bars, the MPC1000 will learn how to record the performance data from the external MIDI keyboard to the MPC1000 and play sounds from pads. By default, sequence is set to receive all MIDI channels, so you will start the...module. You can add the new performance by hitting pads. It cancels the currently recorded performance data and starts the new recording. 11. In the Pgm field, select OFF. In the Midi field, select a MIDI channel. Tips: By default the MPC1000's input MIDI channel is called "over dub by...
... here, set this section, you don't have the correct settings for 2 bars, the MPC1000 will learn how to record the performance data from the external MIDI keyboard to the MPC1000 and play sounds from pads. By default, sequence is set to receive all MIDI channels, so you will start the...module. You can add the new performance by hitting pads. It cancels the currently recorded performance data and starts the new recording. 11. In the Pgm field, select OFF. In the Midi field, select a MIDI channel. Tips: By default the MPC1000's input MIDI channel is called "over dub by...
