
Operation Manual
Page 2
... OF ELECTRIC SHOCK DO NOT OPEN CAUTION: TO REDUCE THE RISK OF ELECTRIC SHOCK DO NOT REMOVE COVER (OR BACK). AKAI professional M.I . Corp. WARNING!! Pull out the power cord when not using the appliance for future releases subject to constitute a risk of such data. Corp., and may be of sufficient magnitude to...
... OF ELECTRIC SHOCK DO NOT OPEN CAUTION: TO REDUCE THE RISK OF ELECTRIC SHOCK DO NOT REMOVE COVER (OR BACK). AKAI professional M.I . Corp. WARNING!! Pull out the power cord when not using the appliance for future releases subject to constitute a risk of such data. Corp., and may be of sufficient magnitude to...
Operation Manual
Page 3
...ensure that produce heat. 9. Do not install near water. 6. Refer all servicing to area. Install in doubt, consult a qualified electrician or AKAI professional dealer. 120 VAC 220~240 VAC 240 VAC @ 60 Hz for USA and Canada @ 50 Hz for Europe @ 50 Hz for...unused for electrical equipment vary from area to qualified service personnel. WARNING: WHEN USING ELECTRIC PRODUCTS, BASIC PRECAUTIONS SHOULD ALWAYS BE FOLLOWED, INCLUDING THE FOLLOWING: WARNING The MPC1000 is designed to be used , use caution when moving the cart/apparatus combination to avoid injury from tip-over. 13...
...ensure that produce heat. 9. Do not install near water. 6. Refer all servicing to area. Install in doubt, consult a qualified electrician or AKAI professional dealer. 120 VAC 220~240 VAC 240 VAC @ 60 Hz for USA and Canada @ 50 Hz for Europe @ 50 Hz for...unused for electrical equipment vary from area to qualified service personnel. WARNING: WHEN USING ELECTRIC PRODUCTS, BASIC PRECAUTIONS SHOULD ALWAYS BE FOLLOWED, INCLUDING THE FOLLOWING: WARNING The MPC1000 is designed to be used , use caution when moving the cart/apparatus combination to avoid injury from tip-over. 13...

Operation Manual
Page 4
... BE INSERTED INTO A 13 AMP SOCKET ELSEWHERE. This should NOT BE GREATER than 5 Amp. Before replacing the plug cover, make certain the cord grip is used, the fuse at 5 Amps.
... BE INSERTED INTO A 13 AMP SOCKET ELSEWHERE. This should NOT BE GREATER than 5 Amp. Before replacing the plug cover, make certain the cord grip is used, the fuse at 5 Amps.
Operation Manual
Page 5
... all related documentation, including this Operator's Manual, contain proprietary information which can radiate radio frequency energy and, if not installed and used in a narrow space, or by copyright laws. If this equipment does cause harmful interference to provide reasonable protection against harmful interference in... THE MANUFACTURER FOR COMPLIANCE COULD VOID THE USER'S AUTHORITY TO OPERATE THE EQUIPMENT. 32-En COPYRIGHT NOTICE The AKAI professional MPC1000 is connected. • Consult the dealer or an experienced radio/TV technician for help. 21B-En AVIS POUR LES ACHETEURS...
... all related documentation, including this Operator's Manual, contain proprietary information which can radiate radio frequency energy and, if not installed and used in a narrow space, or by copyright laws. If this equipment does cause harmful interference to provide reasonable protection against harmful interference in... THE MANUFACTURER FOR COMPLIANCE COULD VOID THE USER'S AUTHORITY TO OPERATE THE EQUIPMENT. 32-En COPYRIGHT NOTICE The AKAI professional MPC1000 is connected. • Consult the dealer or an experienced radio/TV technician for help. 21B-En AVIS POUR LES ACHETEURS...

Operation Manual
Page 6
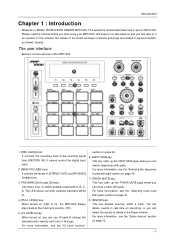
... contents Chapter 1 : Introduction The user interface Front Panel Rear Panel Connecting MPC1000 to External Audio/MIDI device Terminologies in MPC1000 Chapter 2 : Basic Operation Setting names Entering numbers with NUMERIC key Chapter 3 : Sequencer feature Recording the performance Playing back a sequence Other useful features for recording sequences Detailed information on sequence feature Track features MIDI...
... contents Chapter 1 : Introduction The user interface Front Panel Rear Panel Connecting MPC1000 to External Audio/MIDI device Terminologies in MPC1000 Chapter 2 : Basic Operation Setting names Entering numbers with NUMERIC key Chapter 3 : Sequencer feature Recording the performance Playing back a sequence Other useful features for recording sequences Detailed information on sequence feature Track features MIDI...

Operation Manual
Page 7
... 60 Setting the envelope for a pad 61 The functions in a sequence 44 AFTER key 44 Chapter 9 : Using the MPC1000 with external devices 45 Sync with the MPC1000 as the master 45 Sync with the sound module 46 Setting the MIDI input 47 Chapter 10 : Recording a sample 48 Recording the sample - detailed information ... samples at the same time (PURGE) 64 Setting a MIDI note number to the pads 65 Assigning MIDI note numbers to the MIDI keyboard with the MPC1000 as the slave 45 Connecting the MPC1000 to the pads (changeing the default setting) 66 II
... 60 Setting the envelope for a pad 61 The functions in a sequence 44 AFTER key 44 Chapter 9 : Using the MPC1000 with external devices 45 Sync with the MPC1000 as the master 45 Sync with the sound module 46 Setting the MIDI input 47 Chapter 10 : Recording a sample 48 Recording the sample - detailed information ... samples at the same time (PURGE) 64 Setting a MIDI note number to the pads 65 Assigning MIDI note numbers to the MIDI keyboard with the MPC1000 as the slave 45 Connecting the MPC1000 to the pads (changeing the default setting) 66 II

Operation Manual
Page 8
... Effect 69 Applying effects to a specific pad sound 69 Applying effects of the FX2 to the effect sound of the FX1 70 Editing effects 70 Using the master effect 73 Editing the effect set 74 Chapter 15 : Save / Load 75 Saving the data 75 Loading a file 79 Renaming a ...Formatting the memory card 84 Saving the data to the internal flash memory 84 Chapter 16 : Connecting the MPC1000 to your computer 85 Connecting the MPC1000 to a Windows-based PC 85 Connecting the MPC1000 to a Macintosh 86 Chapter 17 : Other settings 87 Foot switch 87 Adjusting the master level 88 ...
... Effect 69 Applying effects to a specific pad sound 69 Applying effects of the FX2 to the effect sound of the FX1 70 Editing effects 70 Using the master effect 73 Editing the effect set 74 Chapter 15 : Save / Load 75 Saving the data 75 Loading a file 79 Renaming a ...Formatting the memory card 84 Saving the data to the internal flash memory 84 Chapter 16 : Connecting the MPC1000 to your computer 85 Connecting the MPC1000 to a Windows-based PC 85 Connecting the MPC1000 to a Macintosh 86 Chapter 17 : Other settings 87 Foot switch 87 Adjusting the master level 88 ...
Operation Manual
Page 9
... plays back at the maximum velocity (127). 5. [16 LEVELS] key: When turned on recording, or you can use an MPC1000. You can delete events in real time on , you can refer to MUSIC PRODUCTION CENTER MPC1000. In this manual before you can switch sequences with pads" section on page 41. 4. [FULL LEVEL] key... the NEXT SEQ page, where you can mute a track with pad" section on panels and plugs are located in a safe place so that you start using your MPC1000, and keep it as follows: [name] . For more information, see the "Selecting the sequence to play with pads.
... plays back at the maximum velocity (127). 5. [16 LEVELS] key: When turned on recording, or you can use an MPC1000. You can delete events in real time on , you can refer to MUSIC PRODUCTION CENTER MPC1000. In this manual before you can switch sequences with pads" section on page 41. 4. [FULL LEVEL] key... the NEXT SEQ page, where you can mute a track with pad" section on panels and plugs are located in a safe place so that you start using your MPC1000, and keep it as follows: [name] . For more information, see the "Selecting the sequence to play with pads.

Operation Manual
Page 10
...keys while playing back a sequence, and punch out by bar. Pressing the [SHIFT] + [PLAY] keys moves to play the internal sampler. The pressure/strength you use these pads to select modes or to enter letters. 27. [AFTER] key: When you can select a sequence with backlight. 25. [F1] through [F6] ...press keys holding a pad while pressing this key will blink), you record a sequence, the LED of this key, you can step through [PAD16]: These are used to call up . Introduction 9. [TAP TEMPO/NOTE REPEAT] key: You can set a tempo by pressing the [REC] key during recording. In the value ...
...keys while playing back a sequence, and punch out by bar. Pressing the [SHIFT] + [PLAY] keys moves to play the internal sampler. The pressure/strength you use these pads to select modes or to enter letters. 27. [AFTER] key: When you can select a sequence with backlight. 25. [F1] through [F6] ...press keys holding a pad while pressing this key will blink), you record a sequence, the LED of this key, you can step through [PAD16]: These are used to call up . Introduction 9. [TAP TEMPO/NOTE REPEAT] key: You can set a tempo by pressing the [REC] key during recording. In the value ...

Operation Manual
Page 11
... is the MIDI output. You can be merged (mixed). 6. [USB] plug (slave): You use either type of foot switch. 3. [PHONES] plug: This is the MIDI input. Use this plug to connect the MPC1000 to output each pad sound separately. It sends out the same signal with the [STEREO OUT]... IN L/R] plug: This is an analog input for the compact flash memory card. 2. [FOOTSWITCH 1/2] plug: This is closed when it GND can use this input to the MPC1000, it automatically detects the type of foot switch connected. COLD HOT 2. [STEREO OUT L/R] plug: This is the main output 3. [ASSIGNABLE MIX OUT...
... is the MIDI output. You can be merged (mixed). 6. [USB] plug (slave): You use either type of foot switch. 3. [PHONES] plug: This is the MIDI input. Use this plug to connect the MPC1000 to output each pad sound separately. It sends out the same signal with the [STEREO OUT]... IN L/R] plug: This is an analog input for the compact flash memory card. 2. [FOOTSWITCH 1/2] plug: This is closed when it GND can use this input to the MPC1000, it automatically detects the type of foot switch connected. COLD HOT 2. [STEREO OUT L/R] plug: This is the main output 3. [ASSIGNABLE MIX OUT...

Operation Manual
Page 13
... in a row, or when you are 2 kinds of samples: Stereo sample (2-channel sample with the MPC 1000. Sample With the MPC1000, sound data that is loaded into a song, assign them using the [PAD BANK] key, so you can create up to 64 pads. You can play back the contents of the pad... start/end point of a sample or set the order and number of a sequence can be recorded on a track as a MIDI event. The MPC1000 has 4 pad banks that you use when you create data with left and right channels), and Mono sample (1-channel sample). You can play back sequences in a certain order. The...
... in a row, or when you are 2 kinds of samples: Stereo sample (2-channel sample with the MPC 1000. Sample With the MPC1000, sound data that is loaded into a song, assign them using the [PAD BANK] key, so you can create up to 64 pads. You can play back the contents of the pad... start/end point of a sample or set the order and number of a sequence can be recorded on a track as a MIDI event. The MPC1000 has 4 pad banks that you use when you create data with left and right channels), and Mono sample (1-channel sample). You can play back sequences in a certain order. The...

Operation Manual
Page 14
... with the pads. There are several kinds of RAM that can save the data on the flash memory like RAM, but MPC1000 uses "compact flash" memory cards. -6- You can play back. Compact Flash is a memory that allow you turn off the unit. The program also has features that ... card, you can load sounds or data temporarily. A set of the memory. The data loaded in the RAM will remain after you turn off the MPC1000. RAM RAM (Random Access Memory) is called "Flash Memory" .You can record up to 136 seconds (monaural recording). With the optional EXM128, you can save...
... with the pads. There are several kinds of RAM that can save the data on the flash memory like RAM, but MPC1000 uses "compact flash" memory cards. -6- You can play back. Compact Flash is a memory that allow you turn off the unit. The program also has features that ... card, you can load sounds or data temporarily. A set of the memory. The data loaded in the RAM will remain after you turn off the MPC1000. RAM RAM (Random Access Memory) is called "Flash Memory" .You can record up to 136 seconds (monaural recording). With the optional EXM128, you can save...
Operation Manual
Page 15
... is the main screen of the selected field. This is the most frequently used functions. You cannot use F1 and F2 for switching pages, and F6 for all fields. for the detailed setting of the MPC1000, where you can move to a specific locations such as right to F4....] (TRIM) key"- Pressing each of the six functions that they move the cursor on the screen using function keys F1 to colon ( : ) . This opens a window for example, when you get lost while operating MPC1000 and want to this , you record and play back sequences. Sequence01] on Main screen is lit....
... is the main screen of the selected field. This is the most frequently used functions. You cannot use F1 and F2 for switching pages, and F6 for all fields. for the detailed setting of the MPC1000, where you can move to a specific locations such as right to F4....] (TRIM) key"- Pressing each of the six functions that they move the cursor on the screen using function keys F1 to colon ( : ) . This opens a window for example, when you get lost while operating MPC1000 and want to this , you record and play back sequences. Sequence01] on Main screen is lit....
Operation Manual
Page 16
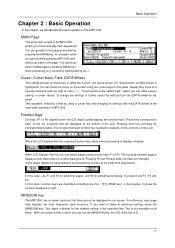
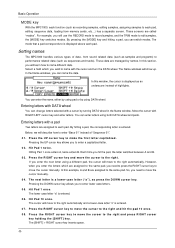
...letter is displayed as an underscore instead of highlights. Press the RIGHT cursor key to move the cursor to each pad. Setting names The MPC1000 handles various types of "Sequence 01". 01. In this section, you will move the cursor manually. 04. You can enter the name, ...you can change letters selected with RIGHT/LEFT cursor key and enter letters. Basic Operation MODE key With the MPC1000, each function (such as sequences and tracks). These screens are managed by using pad or by names. The mode that a pad corresponds to name different data. These data are called ...
...letter is displayed as an underscore instead of highlights. Press the RIGHT cursor key to move the cursor to each pad. Setting names The MPC1000 handles various types of "Sequence 01". 01. In this section, you will move the cursor manually. 04. You can enter the name, ...you can change letters selected with RIGHT/LEFT cursor key and enter letters. Basic Operation MODE key With the MPC1000, each function (such as sequences and tracks). These screens are managed by using pad or by names. The mode that a pad corresponds to name different data. These data are called ...

Operation Manual
Page 17
... can enter numbers directly by turning the DATA wheel. When you to the "New name" field. The key's LED will be pasted to enter numbers using the [NUMERIC] key. 01. Pressing [F4] (CANCEL) cancels the entry and closes the window. That confirms your entry. Press the right cursor k ... + and - Press [F5] (ENTER) to number 0. The number indicated on an available field. by hitting the corresponding pads. To enter numeric values, numerically, use the DATA wheel. 1 0 . The number is canceled and you can enter the correct number. 03. Hit Pad 12. Press the right cursor k e y ...
... can enter numbers directly by turning the DATA wheel. When you to the "New name" field. The key's LED will be pasted to enter numbers using the [NUMERIC] key. 01. Pressing [F4] (CANCEL) cancels the entry and closes the window. That confirms your entry. Press the right cursor k ... + and - Press [F5] (ENTER) to number 0. The number indicated on an available field. by hitting the corresponding pads. To enter numeric values, numerically, use the DATA wheel. 1 0 . The number is canceled and you can enter the correct number. 03. Hit Pad 12. Press the right cursor k e y ...
Operation Manual
Page 18
...16 note = 24 ticks 1/4 triplets = 64 ticks 1/8 triplets = 32 ticks 1/16 triplets = 16 ticks When you need to load a program to the MPC1000. For example, 1 beat equals one 1/4 note (96ticks), so one 1/8 note equals the half of the sequence. Note: To record your performance. MAIN page... sequence. The actual performance will be recorded on track 3 etc... Now field The Now field, which pad you play using the MPC1000 with the MPC1000. An unused sequence is located in the upper left to set separately for each sequence. And by hitting the pads will...
...16 note = 24 ticks 1/4 triplets = 64 ticks 1/8 triplets = 32 ticks 1/16 triplets = 16 ticks When you need to load a program to the MPC1000. For example, 1 beat equals one 1/4 note (96ticks), so one 1/8 note equals the half of the sequence. Note: To record your performance. MAIN page... sequence. The actual performance will be recorded on track 3 etc... Now field The Now field, which pad you play using the MPC1000 with the MPC1000. An unused sequence is located in the upper left to set separately for each sequence. And by hitting the pads will...

Operation Manual
Page 19
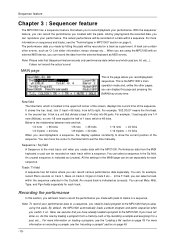
... [PLAY] key to 2 bars. This cancels the currently recorded performance data and starts a new recording. 11. Tips: By default, the MPC1000 is not used. 03. Select the Sq field during playing back a sequence, so that the sequence is set to play . The [MAIN] key displays ... your performance. After recording for recording a performance; You can start from where the previous play back several sequences in the sequence. The MPC1000 automatically switches to "over dub" recording and adds to the already recorded performance, press the [PLAY START] key while holding the [REC...
... [PLAY] key to 2 bars. This cancels the currently recorded performance data and starts a new recording. 11. Tips: By default, the MPC1000 is not used. 03. Select the Sq field during playing back a sequence, so that the sequence is set to play . The [MAIN] key displays ... your performance. After recording for recording a performance; You can start from where the previous play back several sequences in the sequence. The MPC1000 automatically switches to "over dub" recording and adds to the already recorded performance, press the [PLAY START] key while holding the [REC...

Operation Manual
Page 20
...] key. In the Time field, specify the area to light the LED. Sequence feature After playing back the currently selected sequence to the end, the MPC1000 will start playing back the sequence you select in the ERASE window when overdub is stopped. The LED of the area in the first bar... next sequence with pads" section on page 36. Deleting in a track as an event. Press the [PLAY START] key while holding the [ERASE] key. Other useful features for the last recording. To restore the recording, press the [UNDO SEQ] key again to delete events. Erase feature You can cancel the last...
...] key. In the Time field, specify the area to light the LED. Sequence feature After playing back the currently selected sequence to the end, the MPC1000 will start playing back the sequence you select in the ERASE window when overdub is stopped. The LED of the area in the first bar... next sequence with pads" section on page 36. Deleting in a track as an event. Press the [PLAY START] key while holding the [ERASE] key. Other useful features for the last recording. To restore the recording, press the [UNDO SEQ] key again to delete events. Erase feature You can cancel the last...

Operation Manual
Page 21
... to use the Note value field of this , the area right before the end point will be off the rhythm according to change the value for timing correction. Tips: When you wish to ALL EVENT, the MPC1000 will ....93 001.04.94 001.04.95 002.01.01 If you press [F5] (DO IT) key, the MPC1000 will correct the timing of the recorded data. To delete only events on a specific pad, hit the pad to... the left. The value in the Note field will be moved to EXCEPT Note, the MPC1000 will delete the other events other events in the MAIN page. The operation starts and the events of the ...
... to use the Note value field of this , the area right before the end point will be off the rhythm according to change the value for timing correction. Tips: When you wish to ALL EVENT, the MPC1000 will ....93 001.04.94 001.04.95 002.01.01 If you press [F5] (DO IT) key, the MPC1000 will correct the timing of the recorded data. To delete only events on a specific pad, hit the pad to... the left. The value in the Note field will be moved to EXCEPT Note, the MPC1000 will delete the other events other events in the MAIN page. The operation starts and the events of the ...

Operation Manual
Page 23
...[REC], or the [OVER DUB] key during the playback ("Punch In"). Note repeat feature If you want the metronome sound during recording/overdub. The MPC1000 will be played repeatedly according to play repeatedly. Turn the DATA wheel, or press [WINDOW] key. If you set this if you press a pad...can set a larger number than the current value, empty bars will stop the recording in the middle of a sequence By default, a sequence is useful when you can also control its velocity by changing the strength to a 2-bar length, but you release the pad. The Bar field displays the ...
...[REC], or the [OVER DUB] key during the playback ("Punch In"). Note repeat feature If you want the metronome sound during recording/overdub. The MPC1000 will be played repeatedly according to play repeatedly. Turn the DATA wheel, or press [WINDOW] key. If you set this if you press a pad...can set a larger number than the current value, empty bars will stop the recording in the middle of a sequence By default, a sequence is useful when you can also control its velocity by changing the strength to a 2-bar length, but you release the pad. The Bar field displays the ...
