User Manual
Page 4
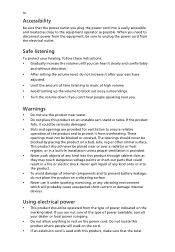
... allow anything to block out noisy surroundings. • Turn the volume down if you can hear it clearly and comfortably and without distortion. • After setting the volume level, do not place the product on a vibrating surface. • Never use this product near you. Safe listening To protect your ears have...
... allow anything to block out noisy surroundings. • Turn the volume down if you can hear it clearly and comfortably and without distortion. • After setting the volume level, do not place the product on a vibrating surface. • Never use this product near you. Safe listening To protect your ears have...

User Manual
Page 5
... personnel when: • the power cord or plug is not properly grounded may result in a grounded power outlet. If you to replace the power cord set . If power strips are used, the load should not exceed 80% of the power strip's input rating. • This product's power cord is equipped with... the supplied power supply cord set , make sure that is damaged, cut or frayed • liquid was spilled into the wall outlet does not exceed the fuse rating. • Do not...
... personnel when: • the power cord or plug is not properly grounded may result in a grounded power outlet. If you to replace the power cord set . If power strips are used, the load should not exceed 80% of the power strip's input rating. • This product's power cord is equipped with... the supplied power supply cord set , make sure that is damaged, cut or frayed • liquid was spilled into the wall outlet does not exceed the fuse rating. • Do not...
User Manual
Page 10
.... Year to establishing a framework for the setting of EMC Directive 2004/108/EC, Low Voltage Directive 2006/95/EC, and RoHS Directive 2011/65/EU and Directive 2009/125/EC with the essential requirements and other standardizing documents: EN 55022:2006/A1:2007 Class B; Acer Incorporated 8F, 88, Sec. 1, Xintai 5th...
.... Year to establishing a framework for the setting of EMC Directive 2004/108/EC, Low Voltage Directive 2006/95/EC, and RoHS Directive 2011/65/EU and Directive 2009/125/EC with the essential requirements and other standardizing documents: EN 55022:2006/A1:2007 Class B; Acer Incorporated 8F, 88, Sec. 1, Xintai 5th...
User Manual
Page 12
... Screen position adjustment Connecting the power cord Power saving Display Data Channel (DDC) Connector pin assignment Standard timing table Installation User controls How to adjust a setting Acer eColor Management User Troubleshooting VGA mode DVI mode DP mode 1 iii iii iii iii iii iv iv iv iv v vi vi vii vii viii xi...
... Screen position adjustment Connecting the power cord Power saving Display Data Channel (DDC) Connector pin assignment Standard timing table Installation User controls How to adjust a setting Acer eColor Management User Troubleshooting VGA mode DVI mode DP mode 1 iii iii iii iii iii iv iv iv iv v vi vi vii vii viii xi...
User Manual
Page 17
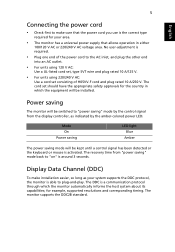
... the DDC protocol, the monitor is activated. The DDC is required. • Plug one end of the power cord to plug-and-play. The cord set consisting of H05VV-F cord and plug rated 10 A/250 V. No user-adjustment is a communication protocol through which the equipment will be kept until a control signal... is able to the AC inlet, and plug the other end into an AC outlet. • For units using 120 V AC: Use a UL-listed cord set, type SVT wire and plug rated 10 A/125 V. • For units using 220/240 V AC: Use a cord...
... the DDC protocol, the monitor is activated. The DDC is required. • Plug one end of the power cord to plug-and-play. The cord set consisting of H05VV-F cord and plug rated 10 A/250 V. No user-adjustment is a communication protocol through which the equipment will be kept until a control signal... is able to the AC inlet, and plug the other end into an AC outlet. • For units using 120 V AC: Use a UL-listed cord set, type SVT wire and plug rated 10 A/125 V. • For units using 220/240 V AC: Use a cord...
User Manual
Page 23
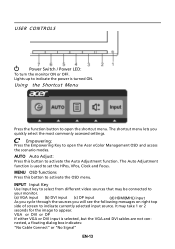
...side of screen to indicate the power is selected ,but the VGA and DVI cables are not con- It may be connected to open the Acer eColor Management OSD and access the scenario modes. nected, a floating dialog box indicates: "No Cable Connect" or "No Signal" EN-13 Using.... (a) VGA input (b) DVI input (c) DP input (d) HDMI(MHL) input As you cycle through the sources you quickly select the most commonly accessed settings. Empowering: Press the Empowering Key to activate the Auto Adjustment function. MENU OSD functions Press this button to open the shortcut menu. AUTO Auto Adjust...
...side of screen to indicate the power is selected ,but the VGA and DVI cables are not con- It may be connected to open the Acer eColor Management OSD and access the scenario modes. nected, a floating dialog box indicates: "No Cable Connect" or "No Signal" EN-13 Using.... (a) VGA input (b) DVI input (c) DP input (d) HDMI(MHL) input As you cycle through the sources you quickly select the most commonly accessed settings. Empowering: Press the Empowering Key to activate the Auto Adjustment function. MENU OSD functions Press this button to open the shortcut menu. AUTO Auto Adjust...
User Manual
Page 24
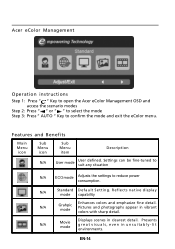
N/A Movie mode Displays scenes in vibrant colors with sharp detail. Acer eColor Management Operation instructions Step 1: Press " " Key to open the Acer eColor Management OSD and access the scenario modes Step 2: Press " " or " " to select the mode Step 3: Press " AUTO " Key to reduce power consumption. Pictures and ... fine detail. Features and Benefits Main Menu icon Sub Menu icon Sub Menu item Description N/A User mode User defined. N/A Standard D efau lt Settin g . EN-14 Settings can be fine-tuned to suit any situation N/A ECO mode Adjusts the...
N/A Movie mode Displays scenes in vibrant colors with sharp detail. Acer eColor Management Operation instructions Step 1: Press " " Key to open the Acer eColor Management OSD and access the scenario modes Step 2: Press " " or " " to select the mode Step 3: Press " AUTO " Key to reduce power consumption. Pictures and ... fine detail. Features and Benefits Main Menu icon Sub Menu icon Sub Menu item Description N/A User mode User defined. N/A Standard D efau lt Settin g . EN-14 Settings can be fine-tuned to suit any situation N/A ECO mode Adjusts the...
User Manual
Page 25
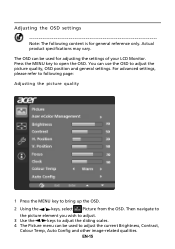
... refer to following content is for adjusting the settings of your LCD Monitor. EN-15 Then navigate to the picture element you wish to adjust. 3 Use the / keys to adjust the sliding scales. 4 The ... to open the OSD. Press the MENU key to adjust the picture quality, OSD position and general settings. You can be used for general reference only. Actual product specifications may vary. Adjusting the OSD settings Note: The following page: Adjusting the picture quality 1 Press the MENU key to adjust the current Brightness...
... refer to following content is for adjusting the settings of your LCD Monitor. EN-15 Then navigate to the picture element you wish to adjust. 3 Use the / keys to adjust the sliding scales. 4 The ... to open the OSD. Press the MENU key to adjust the picture quality, OSD position and general settings. You can be used for general reference only. Actual product specifications may vary. Adjusting the OSD settings Note: The following page: Adjusting the picture quality 1 Press the MENU key to adjust the current Brightness...

User Manual
Page 27
Then navigate to the feature you wish to adjust. 3 The Setting menu can be used to adjust the screen Menu Language and other important settings. 4 Select Power-off USB charge function. EN-17 Adjusting the setting 1 Press the MENU key to enable/disable Power-off USB charge ON/OFF to bring up the OSD. 2 Using the / keys, select Setting from the OSD.
Then navigate to the feature you wish to adjust. 3 The Setting menu can be used to adjust the screen Menu Language and other important settings. 4 Select Power-off USB charge function. EN-17 Adjusting the setting 1 Press the MENU key to enable/disable Power-off USB charge ON/OFF to bring up the OSD. 2 Using the / keys, select Setting from the OSD.
User Manual
Page 29
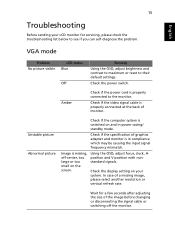
...to maximum or reset to see if you can self-diagnose the problem. Wait for servicing, please check the troubleshooting list below to their default settings. In case of the image before changing or disconnecting the signal cable or switching off -center, too large or too small on and in compliance... which may be causing the input signal frequency mismatch. Amber Check if the power cord is in power saving/ standby mode. Check the display setting on your LCD monitor for a few seconds after adjusting the size of a missing image, please select another resolution or vertical refresh rate.
...to maximum or reset to see if you can self-diagnose the problem. Wait for servicing, please check the troubleshooting list below to their default settings. In case of the image before changing or disconnecting the signal cable or switching off -center, too large or too small on and in compliance... which may be causing the input signal frequency mismatch. Amber Check if the power cord is in power saving/ standby mode. Check the display setting on your LCD monitor for a few seconds after adjusting the size of a missing image, please select another resolution or vertical refresh rate.
User Manual
Page 30
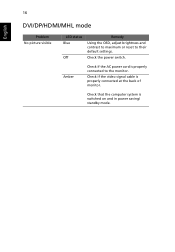
Check that the computer system is properly connected at the back of monitor. Check if the video signal cable is switched on and in power saving/ standby mode. Amber Check if the AC power cord is properly connected to their default settings. 16 English DVI/DP/HDMI/MHL mode Problem No picture visible LED status Blue Off Remedy Using the OSD, adjust brightness and contrast to maximum or reset to the monitor. Check the power switch.
Check that the computer system is properly connected at the back of monitor. Check if the video signal cable is switched on and in power saving/ standby mode. Amber Check if the AC power cord is properly connected to their default settings. 16 English DVI/DP/HDMI/MHL mode Problem No picture visible LED status Blue Off Remedy Using the OSD, adjust brightness and contrast to maximum or reset to the monitor. Check the power switch.


