
X243W User's Guide EN
Page 1
TABLE OF CONTENTS Special notes on LCD monitors 1 Information for your safety and comfort 2 Unpacking 5 Screen position adjustment 6 Connecting the power cord 7 Safety precaution 7 Cleaning your monitor 7 Power saving 8 DDC 8 Connector Pin Assignment 9 Standard Timing Table 11 Installation 12 User controls 13 How to adjust a setting 14 Troubleshooting 19
TABLE OF CONTENTS Special notes on LCD monitors 1 Information for your safety and comfort 2 Unpacking 5 Screen position adjustment 6 Connecting the power cord 7 Safety precaution 7 Cleaning your monitor 7 Power saving 8 DDC 8 Connector Pin Assignment 9 Standard Timing Table 11 Installation 12 User controls 13 How to adjust a setting 14 Troubleshooting 19
X243W User's Guide EN
Page 3
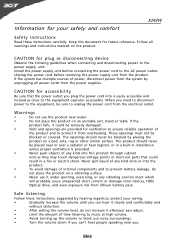
... may touch dangerous voltage points or short-out parts that the power outlet you can hear it clearly and comfortably and without distortion. • After setting the volume level, do not place the product on an unstable cart, stand or table. The openings should never be seriously damaged. • Slots and...
... may touch dangerous voltage points or short-out parts that the power outlet you can hear it clearly and comfortably and without distortion. • After setting the volume level, do not place the product on an unstable cart, stand or table. The openings should never be seriously damaged. • Slots and...
X243W User's Guide EN
Page 8
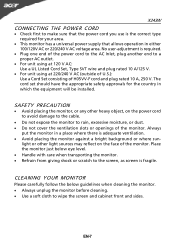
...; Do not cover the ventilation slots or openings of H05VV-F cord and plug rated 10 A, 250 V. The cord set should have the appropriate safety approvals for your area. · This monitor has a universal power supply that allows operation... AC outlet. · For unit using at 120 V AC: Use a UL Listed Cord Set, Type SVT wire and plug rated 10 A/125 V. · For unit using at 220/240 V AC (outside of U.S.): Use... a Cord Set consisting of the monitor. light or other heavy object, on the face of the monitor. Place the ...
...; Do not cover the ventilation slots or openings of H05VV-F cord and plug rated 10 A, 250 V. The cord set should have the appropriate safety approvals for your area. · This monitor has a universal power supply that allows operation... AC outlet. · For unit using at 120 V AC: Use a UL Listed Cord Set, Type SVT wire and plug rated 10 A/125 V. · For unit using at 220/240 V AC (outside of U.S.): Use... a Cord Set consisting of the monitor. light or other heavy object, on the face of the monitor. Place the ...
X243W User's Guide EN
Page 12
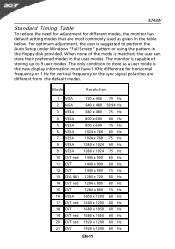
... optimum adjustment, the user is the new display information must have 1 KHz difference for horizontal frequency or 1 Hz for different modes, the monitor has default setting modes that are different from the default modes. X243W Standard Timing Table To reduce the need for adjustment for vertical frequency or the sync signal...
... optimum adjustment, the user is the new display information must have 1 KHz difference for horizontal frequency or 1 Hz for different modes, the monitor has default setting modes that are different from the default modes. X243W Standard Timing Table To reduce the need for adjustment for vertical frequency or the sync signal...
X243W User's Guide EN
Page 14
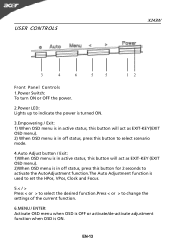
... menu). 2)When OSD menu is in off status, press this button for 2 seconds to activate the AutoAdjustment function.The Auto Adjustment function is used to set the HPos, VPos, Clock and Focus. 5.< / > Press < or > to select the desired function.Press < or > to change the...
... menu). 2)When OSD menu is in off status, press this button for 2 seconds to activate the AutoAdjustment function.The Auto Adjustment function is used to set the HPos, VPos, Clock and Focus. 5.< / > Press < or > to select the desired function.Press < or > to change the...
X243W User's Guide EN
Page 15
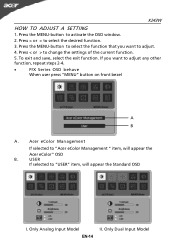
...button to select the function that you want to activate the OSD window. 2. X243W HOW TO ADJUST A SETTING 1. Only Dual Input Model EN-14 Press the MENU-button to adjust. 4. Acer eColor Management If selected to "Acer eColor Management " item, will appear the Standard OSD I. If you want to "USER" item, will ...appear the Acer eColor" OSD B. To exit and save, select the exit function. Only Analog Input Model II. USER If selected to adjust any other function, repeat steps 2-4....
...button to select the function that you want to activate the OSD window. 2. X243W HOW TO ADJUST A SETTING 1. Only Dual Input Model EN-14 Press the MENU-button to adjust. 4. Acer eColor Management If selected to "Acer eColor Management " item, will appear the Standard OSD I. If you want to "USER" item, will ...appear the Acer eColor" OSD B. To exit and save, select the exit function. Only Analog Input Model II. USER If selected to adjust any other function, repeat steps 2-4....
X243W User's Guide EN
Page 16
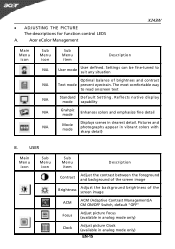
... between the foreground and background of the screen image Brightness Adjust the background brightness of brightness and contrast Text mode prevent eyestrain. Acer eColor Management X243W Main Menu icon Sub Menu icon N/A N/A N/A N/A N/A Sub Menu item Description User mode User defined. ...· ADJUSTING THE PICTURE The descriptions for function control LEDS A. Settings can be fine-tuned to read onscreen text Standard D efau lt Settin g . R eflects n a tive d isp lay mode capability Grahpic mode...
... between the foreground and background of the screen image Brightness Adjust the background brightness of brightness and contrast Text mode prevent eyestrain. Acer eColor Management X243W Main Menu icon Sub Menu icon N/A N/A N/A N/A N/A Sub Menu item Description User mode User defined. ...· ADJUSTING THE PICTURE The descriptions for function control LEDS A. Settings can be fine-tuned to read onscreen text Standard D efau lt Settin g . R eflects n a tive d isp lay mode capability Grahpic mode...
X243W User's Guide EN
Page 17
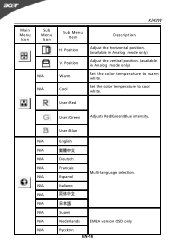
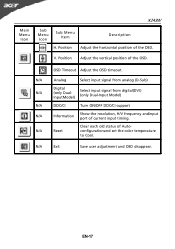
Set the color temperature to warm white. N/A Italiano N/A N/A N/A Suomi N/A Nederlands EMEA version OSD only N/A Pyccknn EN-16 User /Blue N/A English N/A N/A Deutsch N/A Francais N/A Espanol Multi-language selection. User /Red User /Green Adjusts Red/Green/Blue intensity. Position Warm Cool X243W Description Adjust the horizontal position. (available in Analog mode only) Adjust the vertical position. (available in Analog mode only) Set the color temperature to cool white. Main Menu Icon Sub Menu Icon N/A N/A Sub Menu Item H. Position V.
Set the color temperature to warm white. N/A Italiano N/A N/A N/A Suomi N/A Nederlands EMEA version OSD only N/A Pyccknn EN-16 User /Blue N/A English N/A N/A Deutsch N/A Francais N/A Espanol Multi-language selection. User /Red User /Green Adjusts Red/Green/Blue intensity. Position Warm Cool X243W Description Adjust the horizontal position. (available in Analog mode only) Adjust the vertical position. (available in Analog mode only) Set the color temperature to cool white. Main Menu Icon Sub Menu Icon N/A N/A Sub Menu Item H. Position V.
X243W User's Guide EN
Page 18
... signal from digital(DVI) (only Dual-Input Model) N/A DDC/CI Turn ON/OFF DDC/CI support N/A Information Show the resolution, H/V frequency andinput port of Autoconfigurationand set the color temperature to Cool. N/A Reset Clear each old status of current input timing. N/A Exit Save user adjustment and OSD disappear. Main Menu Icon X243W...
... signal from digital(DVI) (only Dual-Input Model) N/A DDC/CI Turn ON/OFF DDC/CI support N/A Information Show the resolution, H/V frequency andinput port of Autoconfigurationand set the color temperature to Cool. N/A Reset Clear each old status of current input timing. N/A Exit Save user adjustment and OSD disappear. Main Menu Icon X243W...
X243W User's Guide EN
Page 20
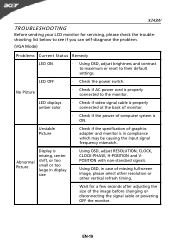
... CLOCK-PHASE, H-POSITION and V- Display is ON. Unstable Picture · Check if the specification of graphics adapter and monitor is properly connected to their default settings. Using OSD, in case of missing full-screen size image, please select other resolution or other vertical refresh timing. · Wait for servicing, please check...
... CLOCK-PHASE, H-POSITION and V- Display is ON. Unstable Picture · Check if the specification of graphics adapter and monitor is properly connected to their default settings. Using OSD, in case of missing full-screen size image, please select other resolution or other vertical refresh timing. · Wait for servicing, please check...
X243W User's Guide EN
Page 21
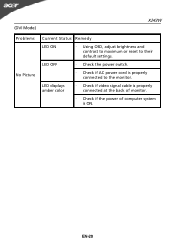
EN-20 LED OFF · Check the power switch. · Check if AC power cord is ON. LED displays amber color · Check if video signal cable is properly connected at the back of monitor. · Check if the power of computer system is properly connected to their default settings. (DVI Mode) X243W Problems No Picture Current Status Remedy LED ON · Using OSD, adjust brightness and contrast to maximum or reset to the monitor.
EN-20 LED OFF · Check the power switch. · Check if AC power cord is ON. LED displays amber color · Check if video signal cable is properly connected at the back of monitor. · Check if the power of computer system is properly connected to their default settings. (DVI Mode) X243W Problems No Picture Current Status Remedy LED ON · Using OSD, adjust brightness and contrast to maximum or reset to the monitor.


