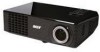
X1160 User's Guide EN
Page 2
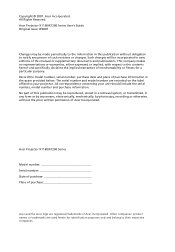
.... Such changes will be reproduced, stored in a retrieval system, or transmitted, in new editions of Acer Incorporated. All correspondence concerning your projector. Acer Incorporated. No part of this manual or supplementary documents and publications. Other companies' product names or trademarks... are used herein for a particular purpose. Copyright © 2007. Acer Projector X1160/X1260 Series Model number Serial number Date of purchase Place of purchase Acer and the Acer logo are registered trademarks of merchantability or fitness for identification purposes only and...
.... Such changes will be reproduced, stored in a retrieval system, or transmitted, in new editions of Acer Incorporated. All correspondence concerning your projector. Acer Incorporated. No part of this manual or supplementary documents and publications. Other companies' product names or trademarks... are used herein for a particular purpose. Copyright © 2007. Acer Projector X1160/X1260 Series Model number Serial number Date of purchase Place of purchase Acer and the Acer logo are registered trademarks of merchantability or fitness for identification purposes only and...

X1160 User's Guide EN
Page 3
... sure that could be placed near water. • Do not place this product from the wall outlet before removing the power supply unit from the projector. • If the system has multiple sources of the product and to the equipment, be blocked or covered. Use a damp cloth for your safety and...
... sure that could be placed near water. • Do not place this product from the wall outlet before removing the power supply unit from the projector. • If the system has multiple sources of the product and to the equipment, be blocked or covered. Use a damp cloth for your safety and...

X1160 User's Guide EN
Page 4
Do not locate this product where people will probably cause unexpected short current or damage rotor devices, lamp. The overall system load must not exceed 80% of power available, consult your electrician for details. Do not insert the plug into the extension cord does not exceed the extension cord ampere rating. The grounding pin is properly grounded before inserting the AC adapter plug. Note: The grounding pin also provides good protection from the type of power indicated on the marking label. If you need to replace the power cord set . Using electrical power • This ...
Do not locate this product where people will probably cause unexpected short current or damage rotor devices, lamp. The overall system load must not exceed 80% of power available, consult your electrician for details. Do not insert the plug into the extension cord does not exceed the extension cord ampere rating. The grounding pin is properly grounded before inserting the AC adapter plug. Note: The grounding pin also provides good protection from the type of power indicated on the marking label. If you need to replace the power cord set . Using electrical power • This ...

X1160 User's Guide EN
Page 5
... or other controls may result in following the operating instructions Note: Adjust only those controls that is poorly ventilated or confined. Consult your projector. Do not operate if smoke, strange noise or odor comes out of a car with your reseller for service • the product... operate normally after following environments: • Space that are higher than 10000 feet. • Unplug immediately if there is on the projector first and then signal sources • Do not place the product in damage and will often require extensive work by the operating instructions,...
... or other controls may result in following the operating instructions Note: Adjust only those controls that is poorly ventilated or confined. Consult your projector. Do not operate if smoke, strange noise or odor comes out of a car with your reseller for service • the product... operate normally after following environments: • Space that are higher than 10000 feet. • Unplug immediately if there is on the projector first and then signal sources • Do not place the product in damage and will often require extensive work by the operating instructions,...
X1160 User's Guide EN
Page 6
... fan to the sun. The temperature inside which has its cooling cycle before turning main power off the main power abruptly or unplug the projector during operation. There are dangerous high voltages inside may hurt you. vi might cause fire or electric shock. Refer servicing only to lamp ...breakage, fire, electric shock or other trouble. Only use acer ceiling mount kit for replacement. • Do not operate lamps beyond the rated lamp life. In this product to removing the lamp assembly for...
... fan to the sun. The temperature inside which has its cooling cycle before turning main power off the main power abruptly or unplug the projector during operation. There are dangerous high voltages inside may hurt you. vi might cause fire or electric shock. Refer servicing only to lamp ...breakage, fire, electric shock or other trouble. Only use acer ceiling mount kit for replacement. • Do not operate lamps beyond the rated lamp life. In this product to removing the lamp assembly for...
X1160 User's Guide EN
Page 7
These devices may be erased. Remember to avoid potential interference with the functionality of Wireless Technology Research. In some cases, transmission of 15.3 centimeters (6 inches) be maintained between wireless devices and a pacemaker to follow any special regulations in force in any area, and always switch off your device, and move it. Pacemakers. If you should not hold the device to the device, and persons with hearing aids should position the device the abovestated distance from the pacemaker. • Not carry the device near the device, because information stored ...
These devices may be erased. Remember to avoid potential interference with the functionality of Wireless Technology Research. In some cases, transmission of 15.3 centimeters (6 inches) be maintained between wireless devices and a pacemaker to follow any special regulations in force in any area, and always switch off your device, and move it. Pacemakers. If you should not hold the device to the device, and persons with hearing aids should position the device the abovestated distance from the pacemaker. • Not carry the device near the device, because information stored ...

X1160 User's Guide EN
Page 8
viii Hearing aids. Using your vehicle is mounted and operating properly. Potentially explosive atmospheres include areas where you can hear clearly and comfortably. • Do not increase the volume level after your ears have adjusted. • Do not listen to music at high volumes for Listening To protect your service provider. or where blasting operations are often, but not always, clearly marked. They include below deck on the use of wireless teledevices in fuel depots, storage, and distribution areas; Faulty installation or service may be illegal. ...
viii Hearing aids. Using your vehicle is mounted and operating properly. Potentially explosive atmospheres include areas where you can hear clearly and comfortably. • Do not increase the volume level after your ears have adjusted. • Do not listen to music at high volumes for Listening To protect your service provider. or where blasting operations are often, but not always, clearly marked. They include below deck on the use of wireless teledevices in fuel depots, storage, and distribution areas; Faulty installation or service may be illegal. ...

X1160 User's Guide EN
Page 9
... information, check www.lamprecycle.org For more information on the Waste from Electrical and Electronics Equipment (WEEE) regulations, visit http://global.acer.com/about/ sustainability.htm Mercury advisory For projectors or electronic products containing an LCD/CRT monitor or display: Lamp(s) inside this electronic device into the trash when discarding. ix Disposal...
... information, check www.lamprecycle.org For more information on the Waste from Electrical and Electronics Equipment (WEEE) regulations, visit http://global.acer.com/about/ sustainability.htm Mercury advisory For projectors or electronic products containing an LCD/CRT monitor or display: Lamp(s) inside this electronic device into the trash when discarding. ix Disposal...
X1160 User's Guide EN
Page 10
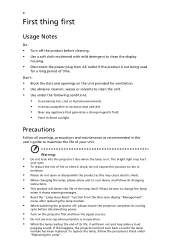
...; Place In direct sunlight. If this may hurt your unit. x First thing first Usage Notes Do: • Turn off , please ensure the projector completes its life, it shows warning messages. • Reset the "Lamp Hour Reset" function from AC outlet if the product is not being used ... Use abrasive cleaners, waxes or solvents to clean the unit. • Use under "Replacing the Lamp". Warning: • Do not look into the projector's lens when the lamp is in this user's guide to clean the display housing. • Disconnect the power plug from the Onscreen display "Management" ...
...; Place In direct sunlight. If this may hurt your unit. x First thing first Usage Notes Do: • Turn off , please ensure the projector completes its life, it shows warning messages. • Reset the "Lamp Hour Reset" function from AC outlet if the product is not being used ... Use abrasive cleaners, waxes or solvents to clean the unit. • Use under "Replacing the Lamp". Warning: • Do not look into the projector's lens when the lamp is in this user's guide to clean the display housing. • Disconnect the power plug from the Onscreen display "Management" ...
X1160 User's Guide EN
Page 11
... Started 6 Connecting the Projector 6 Turning the Projector On/Off 7 Turning on the Projector 7 Turning off the Projector 8 Adjusting the Projected Image 9 Adjusting the Height of Projected Image 9 How to optimize image size and distance 10 How to get a preferred image size by adjusting distance and zoom 12 User Controls 14 Acer Empowering Technology 14 Onscreen...
... Started 6 Connecting the Projector 6 Turning the Projector On/Off 7 Turning on the Projector 7 Turning off the Projector 8 Adjusting the Projected Image 9 Adjusting the Height of Projected Image 9 How to optimize image size and distance 10 How to get a preferred image size by adjusting distance and zoom 12 User Controls 14 Acer Empowering Technology 14 Onscreen...

X1160 User's Guide EN
Page 12
Ceiling Mount Installation 29 Specifications 32 Compatibility modes 34 Regulations and safety notices 36
Ceiling Mount Installation 29 Specifications 32 Compatibility modes 34 Regulations and safety notices 36
X1160 User's Guide EN
Page 13
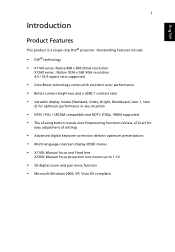
English 1 Introduction Product Features This product is a single-chip DLP® projector. Outstanding features include: • DLP® technology • X1160 series: Native 800 x 600 SVGA resolution X1260 series : Native 1024 x 768 XGA resolution 4:3 / 16:9 aspect ratio supported • ColorBoost ...in any situation • NTSC / PAL / SECAM compatible and HDTV (720p, 1080i) supported • The eCaring button reveals Acer Empowering functions (eView, eTimer) for easy adjustment of settings • Advanced digital keystone correction delivers optimum presentations • Multi-...
English 1 Introduction Product Features This product is a single-chip DLP® projector. Outstanding features include: • DLP® technology • X1160 series: Native 800 x 600 SVGA resolution X1260 series : Native 1024 x 768 XGA resolution 4:3 / 16:9 aspect ratio supported • ColorBoost ...in any situation • NTSC / PAL / SECAM compatible and HDTV (720p, 1080i) supported • The eCaring button reveals Acer Empowering functions (eView, eTimer) for easy adjustment of settings • Advanced digital keystone correction delivers optimum presentations • Multi-...

X1160 User's Guide EN
Page 14
Projector with all the items shown below. Check to make sure your dealer immediately if any thing is complete. English 2 Package Overview This projector comes with lens cap Power cord CR2025 3V Composite video cable Battery User's guide Remote control VGA cable Security card Acer Projector Quick Start Guide Quick start guide Contact your unit is missing.
Projector with all the items shown below. Check to make sure your dealer immediately if any thing is complete. English 2 Package Overview This projector comes with lens cap Power cord CR2025 3V Composite video cable Battery User's guide Remote control VGA cable Security card Acer Projector Quick Start Guide Quick start guide Contact your unit is missing.

X1160 User's Guide EN
Page 15
English 3 Projector Overview Projector Outlook Front / upper side 1 2 3 4 # Description 1 Zoom ring (X1260 series) 2 Focus ring 3 Zoom lens 4 Lens cap Rear side 5 6 7 # Description 5 Power button and Power Indicator LED 6 Remote ...
English 3 Projector Overview Projector Outlook Front / upper side 1 2 3 4 # Description 1 Zoom ring (X1260 series) 2 Focus ring 3 Zoom lens 4 Lens cap Rear side 5 6 7 # Description 5 Power button and Power Indicator LED 6 Remote ...
X1160 User's Guide EN
Page 16
...5 Four directional Use up, down, left, right buttons to select items or make select keys adjustments to your selection. 6 ZOOM Zooms the projector display in or out. 7 ASPECT RATIO To choose the desired aspect ratio (Auto/4:3/16:9). 8 KeyPad 0~9 Press "0~9" to input a password... in the "Security settings". 9 KEYSTONE Adjusts the image to compensate for distortion caused by tilting the projector (± 40 degrees). 10 RESYNC 11 SOURCE Automatically synchronizes the projector to choose RGB, Component, S-Video, Composite and HDTV sources. Power button and Power Indicator LED. ...
...5 Four directional Use up, down, left, right buttons to select items or make select keys adjustments to your selection. 6 ZOOM Zooms the projector display in or out. 7 ASPECT RATIO To choose the desired aspect ratio (Auto/4:3/16:9). 8 KeyPad 0~9 Press "0~9" to input a password... in the "Security settings". 9 KEYSTONE Adjusts the image to compensate for distortion caused by tilting the projector (± 40 degrees). 10 RESYNC 11 SOURCE Automatically synchronizes the projector to choose RGB, Component, S-Video, Composite and HDTV sources. Power button and Power Indicator LED. ...
X1160 User's Guide EN
Page 17
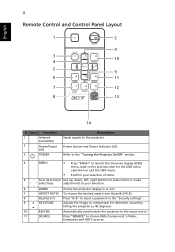
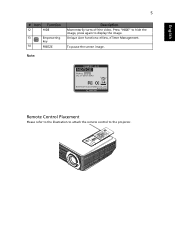
Note: Remote Control Placement Please refer to the illustration to attach the remote control to display the image. Press "HIDE" to hide the image, press again to the projector. To pause the screen image. Unique Acer functions: eView, eTimer Management. English 5 # Icon Function 12 HIDE 13 Empowering key 14 FREEZE Description Momentarily turns off the video.
Note: Remote Control Placement Please refer to the illustration to attach the remote control to display the image. Press "HIDE" to hide the image, press again to the projector. To pause the screen image. Unique Acer functions: eView, eTimer Management. English 5 # Icon Function 12 HIDE 13 Empowering key 14 FREEZE Description Momentarily turns off the video.
X1160 User's Guide EN
Page 18
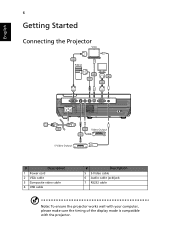
English RW USB 6 Getting Started Connecting the Projector VGA 2 RS232 RS232 4 7 D-Sub 6 2 D-Sub D-Sub USB Y D-Sub Y 1 3 Video Output 5 S-Video Output # Description 1 Power cord 2 VGA cable 3 Composite video cable 4 USB cable # Description 5 S-Video cable 6 Audio cable jack/jack 7 RS232 cable Note: To ensure the projector works well with your computer, please make sure the timing of the display mode is compatible with the projector.
English RW USB 6 Getting Started Connecting the Projector VGA 2 RS232 RS232 4 7 D-Sub 6 2 D-Sub D-Sub USB Y D-Sub Y 1 3 Video Output 5 S-Video Output # Description 1 Power cord 2 VGA cable 3 Composite video cable 4 USB cable # Description 5 S-Video cable 6 Audio cable jack/jack 7 RS232 cable Note: To ensure the projector works well with your computer, please make sure the timing of the display mode is compatible with the projector.
X1160 User's Guide EN
Page 19
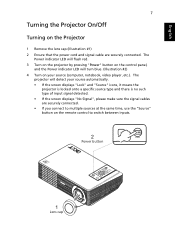
...same time, use the "Source" button on your source automatically. • If the screen displays "Lock" and "Source" icons, it means the projector is locked onto a specific source type and there is no such type of input signal detected. • If the screen displays "No Signal", ...please make sure the signal cables are securely connected. English 7 Turning the Projector On/Off Turning on the Projector 1 Remove the lens cap.(Illustration #1) 2 Ensure that the power cord and signal cable are securely connected. • If you connect...
...same time, use the "Source" button on your source automatically. • If the screen displays "Lock" and "Source" icons, it means the projector is locked onto a specific source type and there is no such type of input signal detected. • If the screen displays "No Signal", ...please make sure the signal cables are securely connected. English 7 Turning the Projector On/Off Turning on the Projector 1 Remove the lens cap.(Illustration #1) 2 Ensure that the power cord and signal cable are securely connected. • If you connect...

X1160 User's Guide EN
Page 20
...flashing RED and steady BLUE by returns, this is displayed onscreen, please contact your local reseller or service center. • If the projector automatically shuts down and the Power indicator quick flashing RED and steady BLUE by returns and the message below is about 120 seconds. Warning...BLUE by returns, please contact your local dealer or service center: "Fan fail. Lamp will continue to operate for about to restart the projector. The message below will display onscreen if this indicates that the system cools correctly. 3 Once the system has finished cooling, the Power ...
...flashing RED and steady BLUE by returns, this is displayed onscreen, please contact your local reseller or service center. • If the projector automatically shuts down and the Power indicator quick flashing RED and steady BLUE by returns and the message below is about 120 seconds. Warning...BLUE by returns, please contact your local dealer or service center: "Fan fail. Lamp will continue to operate for about to restart the projector. The message below will display onscreen if this indicates that the system cools correctly. 3 Once the system has finished cooling, the Power ...

X1160 User's Guide EN
Page 21
English 9 Adjusting the Projected Image Adjusting the Height of Projected Image The projector is equipped with elevator feet for adjusting the height of image. To raise/lower the image: 1 Use Tilt adjusting wheel (Illustration #1) to fine-tune the display angle. 1 Tilt adjusting wheel
English 9 Adjusting the Projected Image Adjusting the Height of Projected Image The projector is equipped with elevator feet for adjusting the height of image. To raise/lower the image: 1 Use Tilt adjusting wheel (Illustration #1) to fine-tune the display angle. 1 Tilt adjusting wheel