
User Manual
Page 3
... openings should never be blocked by unplugging all warnings and instructions marked on a bed, sofa, rug or other similar surface. Warnings! • Do not use liquid cleaners or aerosol cleaners. Keep this product through cabinet slots as disconnecting device Observe the following guidelines when connecting and disconnecting power to the external power supply unit: • Install the power supply unit before connecting the power cord to...
... openings should never be blocked by unplugging all warnings and instructions marked on a bed, sofa, rug or other similar surface. Warnings! • Do not use liquid cleaners or aerosol cleaners. Keep this product through cabinet slots as disconnecting device Observe the following guidelines when connecting and disconnecting power to the external power supply unit: • Install the power supply unit before connecting the power cord to...
User Manual
Page 5
Warning! For safety reasons, do not use non-compliant parts when adding or changing components. Consult your projector. The bright may hurt your eyes. • Turn on the projector first and then signal sources • Do not place the product in following the operating instructions Note: Adjust only those controls that is on. Unplug this product yourself, as inside of a car with all servicing to...
Warning! For safety reasons, do not use non-compliant parts when adding or changing components. Consult your projector. The bright may hurt your eyes. • Turn on the projector first and then signal sources • Do not place the product in following the operating instructions Note: Adjust only those controls that is on. Unplug this product yourself, as inside of a car with all servicing to...
User Manual
Page 6
... projector is securely installed. There are dangerous high voltages inside may hurt your eyes. • Always open the lens shutter or remove the lens cap when the projector is on end vertically. Only use acer ceiling mount kit for ceiling mount installation. The temperature inside which becomes hot. • Clean the air filter frequently if have. Please be sure to break on the remote control. • The lamp becomes extremely hot during operation...
... projector is securely installed. There are dangerous high voltages inside may hurt your eyes. • Always open the lens shutter or remove the lens cap when the projector is on end vertically. Only use acer ceiling mount kit for ceiling mount installation. The temperature inside which becomes hot. • Clean the air filter frequently if have. Please be sure to break on the remote control. • The lamp becomes extremely hot during operation...

User Manual
Page 7
... only in its antenna are not limited to: wireless LAN (WLAN), Bluetooth and/or 3G. Switch off your device in these areas instruct you suspect interference, switch off all wireless or radio transmitting devices when using wireless function (Optional) Warning! Remember to external RF transmissions. Pacemaker manufacturers recommend that could be sensitive to follow any special regulations in force...
... only in its antenna are not limited to: wireless LAN (WLAN), Bluetooth and/or 3G. Switch off your device in these areas instruct you suspect interference, switch off all wireless or radio transmitting devices when using wireless function (Optional) Warning! Remember to external RF transmissions. Pacemaker manufacturers recommend that could be sensitive to follow any special regulations in force...

User Manual
Page 10
...; Disconnect the power plug from the Onscreen display "Management" menu after replacing the lamp module. • When switching the projector off the product before disconnecting power. • Turn on the projector first and then the signal sources. • Do not use lens cap when projector is on. If this user's guide to change the lamp when it will burn out and may make a loud popping sound. Precautions Follow all changing instructions. •...
...; Disconnect the power plug from the Onscreen display "Management" menu after replacing the lamp module. • When switching the projector off the product before disconnecting power. • Turn on the projector first and then the signal sources. • Do not use lens cap when projector is on. If this user's guide to change the lamp when it will burn out and may make a loud popping sound. Precautions Follow all changing instructions. •...
User Manual
Page 11
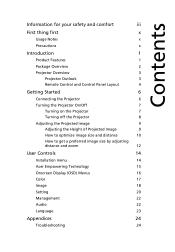
... 2 Projector Overview 3 Projector Outlook 3 Remote Control and Control Panel Layout 4 Getting Started 6 Connecting the Projector 6 Turning the Projector On/Off 7 Turning on the Projector 7 Turning off the Projector 8 Adjusting the Projected Image 9 Adjusting the Height of Projected Image 9 How to optimize image size and distance 10 How to get a preferred image size by adjusting distance and zoom 12 User Controls 14 Installation menu 14 Acer Empowering Technology 15 Onscreen Display (OSD) Menus 16 Color 17 Image 18 Setting 20 Management 22 Audio 22...
... 2 Projector Overview 3 Projector Outlook 3 Remote Control and Control Panel Layout 4 Getting Started 6 Connecting the Projector 6 Turning the Projector On/Off 7 Turning on the Projector 7 Turning off the Projector 8 Adjusting the Projected Image 9 Adjusting the Height of Projected Image 9 How to optimize image size and distance 10 How to get a preferred image size by adjusting distance and zoom 12 User Controls 14 Installation menu 14 Acer Empowering Technology 15 Onscreen Display (OSD) Menus 16 Color 17 Image 18 Setting 20 Management 22 Audio 22...
User Manual
Page 13
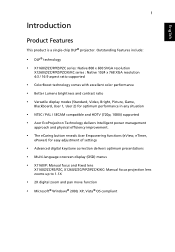
..., 1080i) supported • Acer EcoProjeciton Technology delivers Intelligent power management approach and physical efficiency improvement. • The eCaring button reveals Acer Empowering functions (eView, eTimer, ePower) for easy adjustment of settings • Advanced digital keystone correction delivers optimum presentations • Multi-language onscreen display (OSD) menus • X1160/P: Manual focus and Fixed lens X1160Z/ZC/PZ/PZC, X1260/Z/ZC/P/PZ/PZC/K/KC: Manual focus projection lens zooms up to...
..., 1080i) supported • Acer EcoProjeciton Technology delivers Intelligent power management approach and physical efficiency improvement. • The eCaring button reveals Acer Empowering functions (eView, eTimer, ePower) for easy adjustment of settings • Advanced digital keystone correction delivers optimum presentations • Multi-language onscreen display (OSD) menus • X1160/P: Manual focus and Fixed lens X1160Z/ZC/PZ/PZC, X1260/Z/ZC/P/PZ/PZC/K/KC: Manual focus projection lens zooms up to...

User Manual
Page 16
... (Auto/4:3/16:9). 8 KeyPad 0~9 Press "0~9" to input a password in the "Sécurité". 9 KEYSTONE Adjusts the image to compensate for distortion caused by tilting the projector (± 40 degrees). 10 RESYNC 11 SOURCE Automatically synchronizes the projector to choose RGB, Component, S-Video, Composite and HDTV sources. Power button and Power Indicator LED. Press "SOURCE" to the input source. English 4 Remote Control and Control Panel Layout 1 2 9 3 10 4 5 9 6 11 7 12 8 13 14 # Icon Function 1 Infrared transmitter 2 Power/Power LED 3 POWER...
... (Auto/4:3/16:9). 8 KeyPad 0~9 Press "0~9" to input a password in the "Sécurité". 9 KEYSTONE Adjusts the image to compensate for distortion caused by tilting the projector (± 40 degrees). 10 RESYNC 11 SOURCE Automatically synchronizes the projector to choose RGB, Component, S-Video, Composite and HDTV sources. Power button and Power Indicator LED. Press "SOURCE" to the input source. English 4 Remote Control and Control Panel Layout 1 2 9 3 10 4 5 9 6 11 7 12 8 13 14 # Icon Function 1 Infrared transmitter 2 Power/Power LED 3 POWER...
User Manual
Page 19
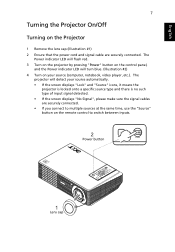
... projector will turn blue. (Illustration #2) 4 Turn on the remote control to multiple sources at the same time, use the "Source" button on your source automatically. • If the screen displays "Lock" and "Source" icons, it means the projector is locked onto a specific source type and there is no such type of input signal detected. • If the screen displays "No Signal", please make sure the signal cables are securely connected. The Power indicator LED will flash red. 3 Turn on the projector by pressing "Power" button on the control panel...
... projector will turn blue. (Illustration #2) 4 Turn on the remote control to multiple sources at the same time, use the "Source" button on your source automatically. • If the screen displays "Lock" and "Source" icons, it means the projector is locked onto a specific source type and there is no such type of input signal detected. • If the screen displays "No Signal", please make sure the signal cables are securely connected. The Power indicator LED will flash red. 3 Turn on the projector by pressing "Power" button on the control panel...

User Manual
Page 20
... the projector has overheated. The message below will display onscreen for about to unplug the power cord. Note: If you wish to turn the projector back on the projector immediately after powering off the projector, press the "Power" button twice. "Please press power button again to complete the shutdown process." 2 Immediately after powering off soon." English 8 Turning off the Projector 1 To turn off , the Power indicator LED will flash RED rapidly and the fan(s) will...
... the projector has overheated. The message below will display onscreen for about to unplug the power cord. Note: If you wish to turn the projector back on the projector immediately after powering off the projector, press the "Power" button twice. "Please press power button again to complete the shutdown process." 2 Immediately after powering off soon." English 8 Turning off the Projector 1 To turn off , the Power indicator LED will flash RED rapidly and the fan(s) will...
User Manual
Page 22
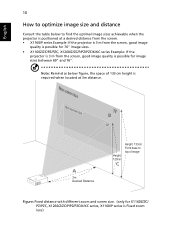
..., X1160/P series is required when located at 3m distance. English 10 How to optimize image size and distance Consult the table below figure, the space of image Figure: Fixed distance with different zoom and screen size. (only for image sizes between 69" and 76". Max screen size Min screen size 76" B 69" A 3m Desired Distance Height: 120cm C Height: 133cm Form base to top of 133 cm height is Fixed zoom lens)
..., X1160/P series is required when located at 3m distance. English 10 How to optimize image size and distance Consult the table below figure, the space of image Figure: Fixed distance with different zoom and screen size. (only for image sizes between 69" and 76". Max screen size Min screen size 76" B 69" A 3m Desired Distance Height: 120cm C Height: 133cm Form base to top of 133 cm height is Fixed zoom lens)
User Manual
Page 26
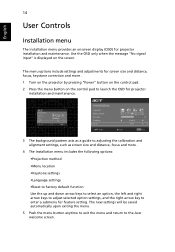
... the menu and return to adjusting the calibration and alignment settings, such as screen size and distance, focus and more . 1 Turn on the projector by pressing "Power" button on the control pad. 2 Press the menu button on the screen. Use the OSD only when the message "No signal input" is displayed on the control pad to launch the OSD for projector installation and maintenance. English 14 User Controls Installation menu The installation menu provides an onscreen display (OSD) for projector installation and...
... the menu and return to adjusting the calibration and alignment settings, such as screen size and distance, focus and more . 1 Turn on the projector by pressing "Power" button on the control pad. 2 Press the menu button on the screen. Use the OSD only when the message "No signal input" is displayed on the control pad to launch the OSD for projector installation and maintenance. English 14 User Controls Installation menu The installation menu provides an onscreen display (OSD) for projector installation and...
User Manual
Page 30
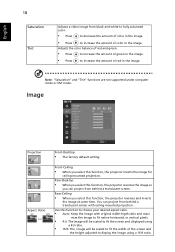
... fit the screen and displayed using a 16:9 ratio. You can project from behind a translucent screen. Adjusts the color balance of red and green. • Press to increase the amount of green in the image. • Press to fit the width of color in the image. Note: "Saturation" and "Tint" functions are not supported under computer mode or DVI mode. Image Projection Aspect Ratio Front-Desktop • The factory default setting. Rear...
... fit the screen and displayed using a 16:9 ratio. You can project from behind a translucent screen. Adjusts the color balance of red and green. • Press to increase the amount of green in the image. • Press to fit the width of color in the image. Note: "Saturation" and "Tint" functions are not supported under computer mode or DVI mode. Image Projection Aspect Ratio Front-Desktop • The factory default setting. Rear...

User Manual
Page 32
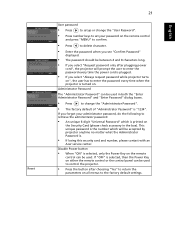
... minutes. • When the time is up, the projector will request user to enable the security function. 20 Setting English Menu Location Source Lock Security Choose the menu location on the projector . When source lock is enabled, your must enter the "Administrator Password" first before changing the security settings. • Select "On" to enter password when switch on the display screen. The user has to enter a password to manage usage of "Timeout...
... minutes. • When the time is up, the projector will request user to enable the security function. 20 Setting English Menu Location Source Lock Security Choose the menu location on the projector . When source lock is enabled, your must enter the "Administrator Password" first before changing the security settings. • Select "On" to enter password when switch on the display screen. The user has to enter a password to manage usage of "Timeout...
User Manual
Page 33
... 6-digit "Universal Password" which is selected, only the Power Key on the remote control can be used in the box). English If you select "Always request password while projector turns on", the user has to enter the password every time when the projector is "1234". Administrator Password The "Administrator Password" can be used . Reset 21 User password • Press to setup or change the "Administrator Password". • The factory default of "Administrator Password" is turned on...
... 6-digit "Universal Password" which is selected, only the Power Key on the remote control can be used in the box). English If you select "Always request password while projector turns on", the user has to enter the password every time when the projector is "1234". Administrator Password The "Administrator Password" can be used . Reset 21 User password • Press to setup or change the "Administrator Password". • The factory default of "Administrator Password" is turned on...

User Manual
Page 34
... change the lamp 30 hours before its expected end-of the projector. Activate this function to display a reminder to allow for X1260/Z/ZC/P/PZ/PZC/K/KC series. Note: Audio menu is no signal input after choosing "Yes" to turn on High Altitude mode. The projector will automatically shutdown when there is for proper high altitude cooling of -life. English 22 Management High Altitutde Auto Shutdown Lamp Hour Elapse Lamp Reminding Lamp Hour Reset...
... change the lamp 30 hours before its expected end-of the projector. Activate this function to display a reminder to allow for X1260/Z/ZC/P/PZ/PZC/K/KC series. Note: Audio menu is no signal input after choosing "Yes" to turn on High Altitude mode. The projector will automatically shutdown when there is for proper high altitude cooling of -life. English 22 Management High Altitutde Auto Shutdown Lamp Hour Elapse Lamp Reminding Lamp Hour Reset...
User Manual
Page 36
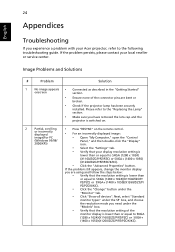
.... • Check if the projector lamp has been securely installed. Next, select "Standard monitor types" under the SP box, and choose the resolution mode you have removed the lens cap and the projector is switched on. 2 Partial, scrolling or incorrectly displayed image(For PC • Press "RESYNC" on the remote control. • For an incorrectly displayed image: • Open "My Computer," open the "Control (Windows 95/98/ 2000/XP)) Panel," and...
.... • Check if the projector lamp has been securely installed. Next, select "Standard monitor types" under the SP box, and choose the resolution mode you have removed the lens cap and the projector is switched on. 2 Partial, scrolling or incorrectly displayed image(For PC • Press "RESYNC" on the remote control. • For an incorrectly displayed image: • Open "My Computer," open the "Control (Windows 95/98/ 2000/XP)) Panel," and...
User Manual
Page 37
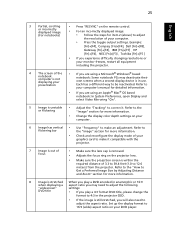
... also need to adjust the following "widescreen" settings: DVD title • If you are using an Apple® Mac® OS based notebook: In System Preferences, open Display and select Video Mirroring "On". 5 Image is unstable • Adjust the "Tracking" to correct it compatible with the projector. 7 Image is out of focus • Make sure the lens cap is removed. • Adjusts the focus ring on...
... also need to adjust the following "widescreen" settings: DVD title • If you are using an Apple® Mac® OS based notebook: In System Preferences, open Display and select Video Mirroring "On". 5 Image is unstable • Adjust the "Tracking" to correct it compatible with the projector. 7 Image is out of focus • Make sure the lens cap is removed. • Adjusts the focus ring on...
User Manual
Page 38
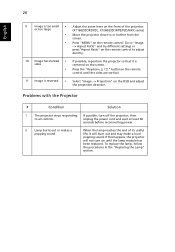
... popping sound. Problems with the Projector # Condition Solution 1 The projector stops responding If possible, turn on the front of its useful life, it is reversed • Select "Image --> Projection" on the remote control. 26 English 9 Image is too small • Adjust the zoom lever on until the sides are vertical. 11 Image is sides centered on the screen. • Press the "Keystone / " buttonon the remote control until the lamp module...
... popping sound. Problems with the Projector # Condition Solution 1 The projector stops responding If possible, turn on the front of its useful life, it is reversed • Select "Image --> Projection" on the remote control. 26 English 9 Image is too small • Adjust the zoom lever on until the sides are vertical. 11 Image is sides centered on the screen. • Press the "Keystone / " buttonon the remote control until the lamp module...
User Manual
Page 45
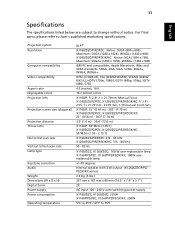
For final specs, please refer to 95ºF Projection system Resolution Computer compatibility Video compatibility Aspect ratio Displayable colors Projection lens Projection screen size (diagonal) Projection distance Throw ratio Horizontal scan rate Vertical refresh scan rate Lamp type Keystone correction Audio Weight Dimensions (W x D x H) Digital Zoom Power supply Power consumption Operating temperature DLP® X1160/Z/ZC/P/PZ/PZC: Native: SVGA (800 x 600) , Maximum: SXGA (1280 x 1024), WXGA+ (1440 x 900) X1260/Z/ZC/P/PZ/PZC/K/KC: Native: XGA (1024...
For final specs, please refer to 95ºF Projection system Resolution Computer compatibility Video compatibility Aspect ratio Displayable colors Projection lens Projection screen size (diagonal) Projection distance Throw ratio Horizontal scan rate Vertical refresh scan rate Lamp type Keystone correction Audio Weight Dimensions (W x D x H) Digital Zoom Power supply Power consumption Operating temperature DLP® X1160/Z/ZC/P/PZ/PZC: Native: SVGA (800 x 600) , Maximum: SXGA (1280 x 1024), WXGA+ (1440 x 900) X1260/Z/ZC/P/PZ/PZC/K/KC: Native: XGA (1024...


