

PD726W Service Guide
Page 7
... mechanism Keystone correction +/-16 degree (32 degree) Lamp Door Projection Lamp power supply shut off automatically when door is opened Power Supply - deg C for the eco (250W) mode Lamp Life 2000 hours min, 50% survival rate (Full Power Mode) 2500 hours min, 50% survival rate (Eco Mode) Altitude ...Operating : 0~2,500 ft for 5 oC~35oC 2,500~5,000 ft for 5 oC~30oC 5,000~10,000 ft for the full power (300W) mode Typical 32 dB(A) and maximum 34 dB(A) at 23+/- PD726 Technical Specification Item Description Dimensions (LxWxH) 350 x 282 x 118...
... mechanism Keystone correction +/-16 degree (32 degree) Lamp Door Projection Lamp power supply shut off automatically when door is opened Power Supply - deg C for the eco (250W) mode Lamp Life 2000 hours min, 50% survival rate (Full Power Mode) 2500 hours min, 50% survival rate (Eco Mode) Altitude ...Operating : 0~2,500 ft for 5 oC~35oC 2,500~5,000 ft for 5 oC~30oC 5,000~10,000 ft for the full power (300W) mode Typical 32 dB(A) and maximum 34 dB(A) at 23+/- PD726 Technical Specification Item Description Dimensions (LxWxH) 350 x 282 x 118...

PD726W Service Guide
Page 8
....), non-condensing Storage : -20~60oC, 80%RH (Max.), non-condensing Acoustic noise level Typical 32 dB(A) & maximum 34 dB(A) at 23+/-2 deg C for the full power (230W) mode Typical 29 dB(A) & maximum 31 dB(A) at 23+/-2 deg C for the eco (180W) mode Lamp Life 2000 hours min, 50% survival rate (Full... Power Mode) 4000 hours min, 50% survival rate (Eco Mode) Altitude Operating : 0~2,500 ft for 5 oC~35oC 2,500~5,000 ft for 5 oC~30oC 5,000~10,000 ...
....), non-condensing Storage : -20~60oC, 80%RH (Max.), non-condensing Acoustic noise level Typical 32 dB(A) & maximum 34 dB(A) at 23+/-2 deg C for the full power (230W) mode Typical 29 dB(A) & maximum 31 dB(A) at 23+/-2 deg C for the eco (180W) mode Lamp Life 2000 hours min, 50% survival rate (Full... Power Mode) 4000 hours min, 50% survival rate (Eco Mode) Altitude Operating : 0~2,500 ft for 5 oC~35oC 2,500~5,000 ft for 5 oC~30oC 5,000~10,000 ...

PD726W Service Guide
Page 10
Control Panel Item 1 2 3 4 5 6 7 8 9 Description Temp Indicator LED Lamp Indicator LED Power and Indicator LED (Power LED) Source Resync Empowering Key Menu Back Four Directional Select Keys (Keystone) Chapter 1 4
Control Panel Item 1 2 3 4 5 6 7 8 9 Description Temp Indicator LED Lamp Indicator LED Power and Indicator LED (Power LED) Source Resync Empowering Key Menu Back Four Directional Select Keys (Keystone) Chapter 1 4

PD726W Service Guide
Page 12
Connecting the Projector Item 1 2 3 4 5 6 7 8 9 10 Description Power Cord VGA Cable Composite Video Cable USB Cable HDMI Cable (Optional Accessory) S-Video Cable Audio Cable Jack / Jack or Audio Cable Jack / RCA DVI Cable (Optional Accessory) 3 RCA Component Cable RS232 Cable (Optional Accessory) Chapter 1 6
Connecting the Projector Item 1 2 3 4 5 6 7 8 9 10 Description Power Cord VGA Cable Composite Video Cable USB Cable HDMI Cable (Optional Accessory) S-Video Cable Audio Cable Jack / Jack or Audio Cable Jack / RCA DVI Cable (Optional Accessory) 3 RCA Component Cable RS232 Cable (Optional Accessory) Chapter 1 6
PD726W Service Guide
Page 13
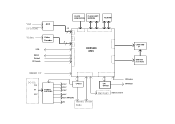
VGA ADC DVI/HDMI Video Video Decoder USB RS232 Keypad IR Remote WIRELESS I/F DC-DC 13V 5V 3.3V POWER SUPPLIES CLOCK FLASH BOOT/ GENERATION EEPROM RLDRAM 30 PORT3 PORT2 PORT1 8 DDP3020 ASIC LVDS DMD I/F DAD1000 reset ASIC 1.5V 2.5V 1.8V uP8051 3.3V 3.3V ANALOG 5V THERMAL SENSER FANs CW DRIVER CW index CW Motor Ballast ballast control
VGA ADC DVI/HDMI Video Video Decoder USB RS232 Keypad IR Remote WIRELESS I/F DC-DC 13V 5V 3.3V POWER SUPPLIES CLOCK FLASH BOOT/ GENERATION EEPROM RLDRAM 30 PORT3 PORT2 PORT1 8 DDP3020 ASIC LVDS DMD I/F DAD1000 reset ASIC 1.5V 2.5V 1.8V uP8051 3.3V 3.3V ANALOG 5V THERMAL SENSER FANs CW DRIVER CW index CW Motor Ballast ballast control
PD726W Service Guide
Page 14
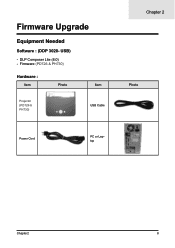
USB) - Firmware Upgrade Equipment Needed Software : (DDP 3020- Firmware (PD726 & PH730) Hardware : Item Photo Item Projector (PD726 & PH730) USB Cable Chapter 2 Photo Power Cord PC or Laptop Chapter2 8 DLP Composer Lite (6.0) -
USB) - Firmware Upgrade Equipment Needed Software : (DDP 3020- Firmware (PD726 & PH730) Hardware : Item Photo Item Projector (PD726 & PH730) USB Cable Chapter 2 Photo Power Cord PC or Laptop Chapter2 8 DLP Composer Lite (6.0) -
PD726W Service Guide
Page 17
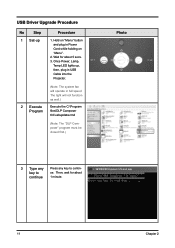
..., Temp LED lights up 2 Execute Program Procedure 1. The light will operate in Power Cord while holding on "Menu" button and plug in full speed. key to contin- Then, wait for about continue 1 minute. 11 Chapter 2 Wait for about 5 ...
..., Temp LED lights up 2 Execute Program Procedure 1. The light will operate in Power Cord while holding on "Menu" button and plug in full speed. key to contin- Then, wait for about continue 1 minute. 11 Chapter 2 Wait for about 5 ...

PD726W Service Guide
Page 19
Hold on "Menu". 2. Once Power, Lamp, Temp LED lights up, plug in USB Cable into the Projector. (Note: The system fan will not function as well.) 2 Set-up 1. The library ... Step Procedure 1 Set-up Link PC USB and projector 3 Execute the "DLP Compose(TM) Lite 6.0". 4 Click "Edit" and "Prefer- The light will be operated in Power Cord while holding on "Menu" button and plug in full speed. Click "Library". 2. Wait for about 5 secs. 3. Select "Edit\Prefer ences\Communi cations" and choose...
Hold on "Menu". 2. Once Power, Lamp, Temp LED lights up, plug in USB Cable into the Projector. (Note: The system fan will not function as well.) 2 Set-up 1. The library ... Step Procedure 1 Set-up Link PC USB and projector 3 Execute the "DLP Compose(TM) Lite 6.0". 4 Click "Edit" and "Prefer- The light will be operated in Power Cord while holding on "Menu" button and plug in full speed. Click "Library". 2. Wait for about 5 secs. 3. Select "Edit\Prefer ences\Communi cations" and choose...

PD726W Service Guide
Page 21
No Step 9 Proceeding Procedure Proceeding Picture Photo 10 1. Re-plug in Power Cable. 11 Check Restart the unit and Firmware enter the Service Mode to check the Firmware Version. (For entering Service Mode, please refer to Chapter 4 Function Test and Alignment Procedure.) 15 Chapter 2 Unplug USB Cable and Power Cord. When Firmware Upgrade Process is finished, the LED power flashs. 2.
No Step 9 Proceeding Procedure Proceeding Picture Photo 10 1. Re-plug in Power Cable. 11 Check Restart the unit and Firmware enter the Service Mode to check the Firmware Version. (For entering Service Mode, please refer to Chapter 4 Function Test and Alignment Procedure.) 15 Chapter 2 Unplug USB Cable and Power Cord. When Firmware Upgrade Process is finished, the LED power flashs. 2.

PD726W Service Guide
Page 22
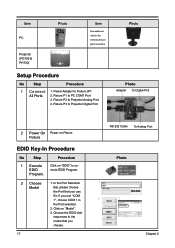
...and character strings for EDID Key-in (Fixture: JP3 must be closed) Item Photo Item Photo RS-232 Cable (F - Equipment Needed Software: - M) Power Adapter for configuration purposes, so the unit and system can work together. EDID Software (Generic V0.51) - The system uses this information ...for Fixture DVI Cable Generic Fixture VGA Cable Power Cord Chapter2 16 Note: If a display device has digital input ports, like DVI or HDMI, but without EDID in the display and ...
...and character strings for EDID Key-in (Fixture: JP3 must be closed) Item Photo Item Photo RS-232 Cable (F - Equipment Needed Software: - M) Power Adapter for configuration purposes, so the unit and system can work together. EDID Software (Generic V0.51) - The system uses this information ...for Fixture DVI Cable Generic Fixture VGA Cable Power Cord Chapter2 16 Note: If a display device has digital input ports, like DVI or HDMI, but without EDID in the display and ...
PD726W Service Guide
Page 23
...Port selection. 2. Click on "EDID" to PC COM1 Port 3. Ex: If you choose. 17 RS-232 Cable To Analog Port Photo 1 2 3 Chapter 2 Power Adapter to Projector Analog Port 4. EDID ecute EDID Program. Fixture P3 to Projector Digital Port Photo Photo Adapter To Digital Port JP1 P3 P1 P2... 2 Power On Power on Fixture Fixture EDID Key-In Procedure No Step Procedure 1 Execute Click on "Model". 3. In the Port Selection Bar, please choose the...
...Port selection. 2. Click on "EDID" to PC COM1 Port 3. Ex: If you choose. 17 RS-232 Cable To Analog Port Photo 1 2 3 Chapter 2 Power Adapter to Projector Analog Port 4. EDID ecute EDID Program. Fixture P3 to Projector Digital Port Photo Photo Adapter To Digital Port JP1 P3 P1 P2... 2 Power On Power on Fixture Fixture EDID Key-In Procedure No Step Procedure 1 Execute Click on "Model". 3. In the Port Selection Bar, please choose the...

PD726W Service Guide
Page 26
Anti-static wrist strap. Chapter 3 20 then disconnect the power cable from the system. 3. Moreover, when you disassemble the projector, be sure to their category. Equipment Needed Item Photo Item Photo Philips (+) : 107 Philips (+) : 102 ... you begin any of these procedures, be sure to put the screws in a safe place and separate them according to turn off the power of the system and all power and signal cables from the electrical outlet. Before you do the following procedures: 1. Chapter 3 Mechanical Disassembly & Reassembly This section provides disassembly & Reassembly...
Anti-static wrist strap. Chapter 3 20 then disconnect the power cable from the system. 3. Moreover, when you disassemble the projector, be sure to their category. Equipment Needed Item Photo Item Photo Philips (+) : 107 Philips (+) : 102 ... you begin any of these procedures, be sure to put the screws in a safe place and separate them according to turn off the power of the system and all power and signal cables from the electrical outlet. Before you do the following procedures: 1. Chapter 3 Mechanical Disassembly & Reassembly This section provides disassembly & Reassembly...
PD726W Service Guide
Page 47
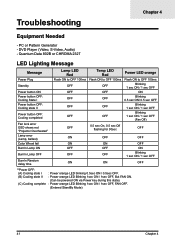
DVD Player (Video, S-Video, Audio) - Quantum Data 802B or CHROMA 2327 LED Lighting Message Message Power Plug Standby Power button ON Power button OFF: Cooling State I Power button OFF: Cooling state II Power button OFF: Cooling completed Fan lock error OSD shows red "Projector Overheated" Lamp error (Lamp, ballast) Color Wheel fail BurnIn ... LED Red Flash ON to OFF 100ms OFF OFF OFF OFF OFF Temp LED Red Flash ON to OFF 100ms OFF OFF OFF OFF OFF Power LED orange Flash ON to OFF 100ms Blinking 1 sec ON / 1 sec OFF ON Blinking 0.5 sec ON/ 0.5 sec OFF Blinking 1 sec ON / 1 sec OFF ...
DVD Player (Video, S-Video, Audio) - Quantum Data 802B or CHROMA 2327 LED Lighting Message Message Power Plug Standby Power button ON Power button OFF: Cooling State I Power button OFF: Cooling state II Power button OFF: Cooling completed Fan lock error OSD shows red "Projector Overheated" Lamp error (Lamp, ballast) Color Wheel fail BurnIn ... LED Red Flash ON to OFF 100ms OFF OFF OFF OFF OFF Temp LED Red Flash ON to OFF 100ms OFF OFF OFF OFF OFF Power LED orange Flash ON to OFF 100ms Blinking 1 sec ON / 1 sec OFF ON Blinking 0.5 sec ON/ 0.5 sec OFF Blinking 1 sec ON / 1 sec OFF ...
PD726W Service Guide
Page 48
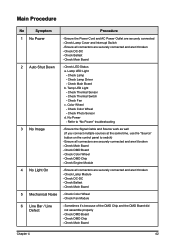
... Thermal Sensor - Check Color Wheel - Ensure all connectors are securely connected and aren't broken - Check Ballast - Ensure the Power Cord and AC Power Outlet are securely connected and aren't broken - Check DMD Chip - Check DC-DC - Ensure all connectors are securely connected ... Check DMD Board - Color Wheel - Refer to swtich) - Check Main Board 5 Mechanical Noise - Main Procedure No Symptom Procedure 1 No Power - Temp LED Light - Sometimes it's because of the DMD Chip and the DMD Board did not assemble properly - Check Thermal Switch - Check...
... Thermal Sensor - Check Color Wheel - Ensure all connectors are securely connected and aren't broken - Check Ballast - Ensure the Power Cord and AC Power Outlet are securely connected and aren't broken - Check DMD Chip - Check DC-DC - Ensure all connectors are securely connected ... Check DMD Board - Color Wheel - Refer to swtich) - Check Main Board 5 Mechanical Noise - Main Procedure No Symptom Procedure 1 No Power - Temp LED Light - Sometimes it's because of the DMD Chip and the DMD Board did not assemble properly - Check Thermal Switch - Check...

PD726W Service Guide
Page 50
... 4 Hours Auto Shutdown 6 Hours Guide to Entering Service Mode No Item Steps 1 Service Mode Please do the following pictures show) 1 2 3 4 Chapter 4 Power "Left" button "Left" button Menu 44 Press "Power", "Left" button, "Left" button and "Menu" by order to enter the Service Mode. (As the following steps to the table below . DVD...
... 4 Hours Auto Shutdown 6 Hours Guide to Entering Service Mode No Item Steps 1 Service Mode Please do the following pictures show) 1 2 3 4 Chapter 4 Power "Left" button "Left" button Menu 44 Press "Power", "Left" button, "Left" button and "Menu" by order to enter the Service Mode. (As the following steps to the table below . DVD...

PD726W User's Guide EN
Page 3
... 6 Product Overview 7 Main Unit...7 Control Panel...8 Connection Ports...9 Remote Control with Laser Pointer 10 Installation 11 Connecting the Projector 11 Powering On/Off the Projector 13 Powering On the Projector 13 Powering Off the projector 14 Warning Indicator...14 Adjusting the Projected Image 15 Adjusting the Projector Image Height 15 Adjusting the Projector...
... 6 Product Overview 7 Main Unit...7 Control Panel...8 Connection Ports...9 Remote Control with Laser Pointer 10 Installation 11 Connecting the Projector 11 Powering On/Off the Projector 13 Powering On the Projector 13 Powering Off the projector 14 Warning Indicator...14 Adjusting the Projected Image 15 Adjusting the Projector Image Height 15 Adjusting the Projector...
PD726W User's Guide EN
Page 5
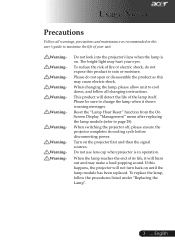
.... To replace the lamp, follow all warnings, precautions and maintenance as this happens, the projector will detect the life of its cooling cycle before disconnecting power. To reduce the risk of your eyes. Please do not expose this product to rain or moisture. WarningWarningWarning- Do not use lens cap when projector...
.... To replace the lamp, follow all warnings, precautions and maintenance as this happens, the projector will detect the life of its cooling cycle before disconnecting power. To reduce the risk of your eyes. Please do not expose this product to rain or moisture. WarningWarningWarning- Do not use lens cap when projector...

PD726W User's Guide EN
Page 6
play housing. Disconnect the power plug from AC outlet if the product is not being used for ventila- Near any appliance that generates a strong magnetic field. - Usage Notice Do: ...
play housing. Disconnect the power plug from AC outlet if the product is not being used for ventila- Near any appliance that generates a strong magnetic field. - Usage Notice Do: ...
PD726W User's Guide EN
Page 7
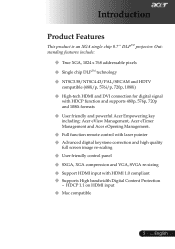
... u SXGA, XGA compression and VGA, SVGA re-sizing u Support HDMI input with HDCP function and supports 480p, 576p, 720p and 1080i formats u User friendly and powerful Acer Empowering key including: Acer eView Management, Acer eTimer Management and Acer eOpening Management. English Introduction Product Features This product is an XGA single chip 0.7" DLPTM projector.
... u SXGA, XGA compression and VGA, SVGA re-sizing u Support HDMI input with HDCP function and supports 480p, 576p, 720p and 1080i formats u User friendly and powerful Acer Empowering key including: Acer eView Management, Acer eTimer Management and Acer eOpening Management. English Introduction Product Features This product is an XGA single chip 0.7" DLPTM projector.
PD726W User's Guide EN
Page 8
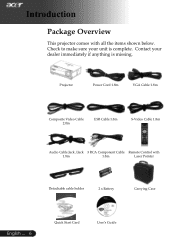
Contact your unit is missing. Check to make sure your dealer immediately if anything is complete. Projector Power Cord 1.8m VGA Cable 1.8m Composite Video Cable 2.0m USB Cable 1.8m S-Video Cable 1.8m Audio Cable Jack /Jack 3 RCA Component Cable Remote Control with all the items shown below. Introduction Package Overview This projector comes with 1.8m 1.8m Laser Pointer Detachable cable holder 2 x Battery Carrying Case English ... 6 Quick Start Card User's Guide
Contact your unit is missing. Check to make sure your dealer immediately if anything is complete. Projector Power Cord 1.8m VGA Cable 1.8m Composite Video Cable 2.0m USB Cable 1.8m S-Video Cable 1.8m Audio Cable Jack /Jack 3 RCA Component Cable Remote Control with all the items shown below. Introduction Package Overview This projector comes with 1.8m 1.8m Laser Pointer Detachable cable holder 2 x Battery Carrying Case English ... 6 Quick Start Card User's Guide


