

User Manual
Page 10
LED & Alarm Definition Listing 26 Specifications 27 Compatibility modes 28 Regulations and safety notices 32
LED & Alarm Definition Listing 26 Specifications 27 Compatibility modes 28 Regulations and safety notices 32

User Manual
Page 11
...home entertainment. • Acer EcoProjeciton Technology delivers Intelligent power management approach and physical efficiency improvement • Empowering Key reveals Acer Empowering Technology utilities (Acer eView, eTimer, ePower ...Management) for easy adjustment of settings • Equipped with HDMITM connection supporting HDCP • Advanced digital keystone correction delivers optimum presentations • Multi-language on screen display (OSD) menus • 2x digital zoom and pan move function • Environmental light source and longer life by LED...
...home entertainment. • Acer EcoProjeciton Technology delivers Intelligent power management approach and physical efficiency improvement • Empowering Key reveals Acer Empowering Technology utilities (Acer eView, eTimer, ePower ...Management) for easy adjustment of settings • Equipped with HDMITM connection supporting HDCP • Advanced digital keystone correction delivers optimum presentations • Multi-language on screen display (OSD) menus • 2x digital zoom and pan move function • Environmental light source and longer life by LED...

User Manual
Page 14
See the contents in "Turning the Projector On/ Off" section. English 4 Control Panel 4 3 1 # Function 1 POWER 2 SOURCE 3 MENU 4 Four directional select keys 2 Description Power button and Power Indicator LED. Press "SOURCE" to choose RGB, Component, SVideo, Composite, HDTV and HDMI™ sources. • Press "MENU" to launch the Onscreen display (OSD) menu, back to the previous step for the OSD menu operation or exit the OSD menu. • Confirm your selection of items. Use to select items or make adjustments to your selection.
See the contents in "Turning the Projector On/ Off" section. English 4 Control Panel 4 3 1 # Function 1 POWER 2 SOURCE 3 MENU 4 Four directional select keys 2 Description Power button and Power Indicator LED. Press "SOURCE" to choose RGB, Component, SVideo, Composite, HDTV and HDMI™ sources. • Press "MENU" to launch the Onscreen display (OSD) menu, back to the previous step for the OSD menu operation or exit the OSD menu. • Confirm your selection of items. Use to select items or make adjustments to your selection.
User Manual
Page 18
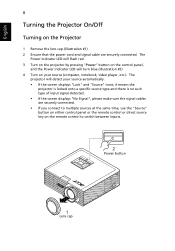
... direct source key on the Projector 1 Remove the lens cap.(Illustration #1) 2 Ensure that the power cord and signal cable are securely connected. The Power indicator LED will flash red. 3 Turn on the projector by pressing "Power" button on the control panel, and the Power indicator...
... direct source key on the Projector 1 Remove the lens cap.(Illustration #1) 2 Ensure that the power cord and signal cable are securely connected. The Power indicator LED will flash red. 3 Turn on the projector by pressing "Power" button on the control panel, and the Power indicator...

User Manual
Page 19
... off , and the fan(s) will continue to operate for about 2 minutes to ensure that the system cools properly. 3 Once the system has finished cooling, the LED power indicator will stop blinking and turn solid red to indicate standby mode. 4 It is now safe to complete the shutdown process." Press the power...
... off , and the fan(s) will continue to operate for about 2 minutes to ensure that the system cools properly. 3 Once the system has finished cooling, the LED power indicator will stop blinking and turn solid red to indicate standby mode. 4 It is now safe to complete the shutdown process." Press the power...

User Manual
Page 29
... a composite video or S-Video input signal is selected and its system format is "16:9" or "Auto" . Management High Altitutde Auto Shutdown LED Calibration Choose "On" to the factory default settings. Select "Off" to finish the white color fine tune process. When source lock is turned...). It helps to 4:3. When source lock is no signal input after the allocated time. (in your screen aspect ratio to adjust LED color performance. The projector will automatically shutdown when there is turned "on High Altitude mode. This function is not available when the aspect...
... a composite video or S-Video input signal is selected and its system format is "16:9" or "Auto" . Management High Altitutde Auto Shutdown LED Calibration Choose "On" to the factory default settings. Select "Off" to finish the white color fine tune process. When source lock is turned...). It helps to 4:3. When source lock is no signal input after the allocated time. (in your screen aspect ratio to adjust LED color performance. The projector will automatically shutdown when there is turned "on High Altitude mode. This function is not available when the aspect...

User Manual
Page 36
... and Steady RED by returns Power button OFF: V -- Cooling completed; Power button ON -- Quick Flashing Power off (Cooling state) Quick Flashing -- V Lamp retry -- 26 English LED & Alarm Definition Listing LED Messages Message Power LED Red Blue Input Power Plug Flash ON to OFF 100ms --
... and Steady RED by returns Power button OFF: V -- Cooling completed; Power button ON -- Quick Flashing Power off (Cooling state) Quick Flashing -- V Lamp retry -- 26 English LED & Alarm Definition Listing LED Messages Message Power LED Red Blue Input Power Plug Flash ON to OFF 100ms --


