
Quick Start Guide
Page 2
...it is encouraged to try to correct the interference by Users in Private Household in interference to establishing a framework for the setting of eco designrequirements for energy-related product. Disposal of Waste Equipment by one or more information about where you purchased the product...are designed to provide reasonable protection against harmful interference in compliance with the essential requirements and otherrelevant provisions of Conformity Hereby, Acer Inc., declares that this device must be determined by turning the device off your waste equipment at the time of ...
...it is encouraged to try to correct the interference by Users in Private Household in interference to establishing a framework for the setting of eco designrequirements for energy-related product. Disposal of Waste Equipment by one or more information about where you purchased the product...are designed to provide reasonable protection against harmful interference in compliance with the essential requirements and otherrelevant provisions of Conformity Hereby, Acer Inc., declares that this device must be determined by turning the device off your waste equipment at the time of ...
User Manual
Page 3
... battery pack. EN-2 Information for your earing. • Gradually increase the volume until you can hear it clearly and comfortably and without distortion. • After setting the volume level, do not place the product on a bed, sofa, rug or other similar surface. Keep this product on the product. When you plug...
... battery pack. EN-2 Information for your earing. • Gradually increase the volume until you can hear it clearly and comfortably and without distortion. • After setting the volume level, do not place the product on a bed, sofa, rug or other similar surface. Keep this product on the product. When you plug...
User Manual
Page 8
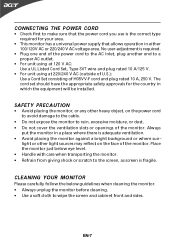
... or other heavy object, on the face of H05VV-F cord and plug rated 10 A, 250 V. EN-7 The cord set should have the appropriate safety approvals for your area. • This monitor has a universal power supply that the power ...to a proper AC outlet. • For unit using at 120 V AC: Use a UL Listed Cord Set, Type SVT wire and plug rated 10 A/125 V. • For unit using at 220/240 V AC (outside of U.S.): Use ...a Cord Set consisting of the monitor. Always put the monitor in either 100/120V AC or 220/240 V AC voltage...
... or other heavy object, on the face of H05VV-F cord and plug rated 10 A, 250 V. EN-7 The cord set should have the appropriate safety approvals for your area. • This monitor has a universal power supply that the power ...to a proper AC outlet. • For unit using at 120 V AC: Use a UL Listed Cord Set, Type SVT wire and plug rated 10 A/125 V. • For unit using at 220/240 V AC (outside of U.S.): Use ...a Cord Set consisting of the monitor. Always put the monitor in either 100/120V AC or 220/240 V AC voltage...
User Manual
Page 14
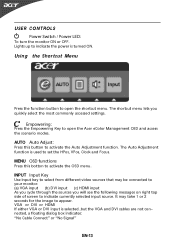
...Empowering Key to your monitor. (a) VGA input (b) DVI input (c) HDMI input As you cycle through the sources you quickly select the most commonly accessed settings. INPUT Input Key Use Input key to select from different video sources that may take 1 or 2 seconds for the image to activate the OSD menu.... AUTO Auto Adjust: Press this botton to appear. MENU OSD functions Press this button to open the Acer eColor Management OSD and access the scenario modes. USER CONTROLS Power Switch / Power LED: To turn the monitor ON or OFF. Using the ...
...Empowering Key to your monitor. (a) VGA input (b) DVI input (c) HDMI input As you cycle through the sources you quickly select the most commonly accessed settings. INPUT Input Key Use Input key to select from different video sources that may take 1 or 2 seconds for the image to activate the OSD menu.... AUTO Auto Adjust: Press this botton to appear. MENU OSD functions Press this button to open the Acer eColor Management OSD and access the scenario modes. USER CONTROLS Power Switch / Power LED: To turn the monitor ON or OFF. Using the ...

User Manual
Page 15
... be fine-tuned to suit any situ a tio n N /A ECO mode Adjusts the settings to confirm the mode and run Auto Adjust. Presents great visuals, even in clearest detail. Features and Benefits Ma in vibrant colors with sharp ... it e m D escrip tio n N /A User mode User defined. Reflects native display capability N /A G rahpic mode Enhances colors and emphasize fine detail. Acer eColor Management Operation instructions Step 1: Press " " Key to open the Acer eColor Management OSD and access the scenario modes Step 2: Press " " or " " to select the mode Step 3: Press " Adjust/Exit " Key...
... be fine-tuned to suit any situ a tio n N /A ECO mode Adjusts the settings to confirm the mode and run Auto Adjust. Presents great visuals, even in clearest detail. Features and Benefits Ma in vibrant colors with sharp ... it e m D escrip tio n N /A User mode User defined. Reflects native display capability N /A G rahpic mode Enhances colors and emphasize fine detail. Acer eColor Management Operation instructions Step 1: Press " " Key to open the Acer eColor Management OSD and access the scenario modes Step 2: Press " " or " " to select the mode Step 3: Press " Adjust/Exit " Key...
User Manual
Page 16
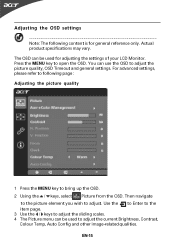
... and other image-related qualities. Then navigate to the picture element you wish to open the OSD. For advanced settings, please refer to following content is for adjusting the settings of your LCD Monitor. The OSD can be used for general reference only. Use the to Enter to the ...to adjust the sliding scales. 4 The Picture menu can use the OSD to adjust the picture quality, OSD Timeout and general settings. Press the MENU key to adjust. Adjusting the OSD settings Note: The following page: Adjusting the picture quality 1 Press the MENU key to bring up the OSD. 2 Using the...
... and other image-related qualities. Then navigate to the picture element you wish to open the OSD. For advanced settings, please refer to following content is for adjusting the settings of your LCD Monitor. The OSD can be used for general reference only. Use the to Enter to the ...to adjust the sliding scales. 4 The Picture menu can use the OSD to adjust the picture quality, OSD Timeout and general settings. Press the MENU key to adjust. Adjusting the OSD settings Note: The following page: Adjusting the picture quality 1 Press the MENU key to bring up the OSD. 2 Using the...

User Manual
Page 18
Use the to Enter to the item page. 3 The Setting menu can be used to bring up the OSD. 2 Using the / keys, select Setting from the OSD. EN-17 Adjusting the setting Setting wide Mode DDC/CI ACM Input La ng u a ge IR Mode Reset Full On O FF VGA English Norma l 1 Press the MENU key to adjust the screen Menu Language and other important settings. Then navigate to the feature you wish to adjust.
Use the to Enter to the item page. 3 The Setting menu can be used to bring up the OSD. 2 Using the / keys, select Setting from the OSD. EN-17 Adjusting the setting Setting wide Mode DDC/CI ACM Input La ng u a ge IR Mode Reset Full On O FF VGA English Norma l 1 Press the MENU key to adjust the screen Menu Language and other important settings. Then navigate to the feature you wish to adjust.
User Manual
Page 20
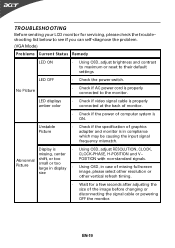
... if the specification of the image before changing or disconnecting the signal cable or powering OFF the monitor. Display is properly connected to their default settings. EN-19 Abnormal Picture shift, or too small or too large in case of missing full-screen size image, please select other resolution or other...
... if the specification of the image before changing or disconnecting the signal cable or powering OFF the monitor. Display is properly connected to their default settings. EN-19 Abnormal Picture shift, or too small or too large in case of missing full-screen size image, please select other resolution or other...
User Manual
Page 21
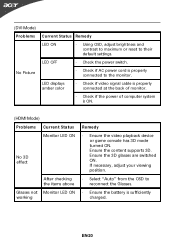
... necessary, adjust your viewing position. · Select "Auto" from the OSD to reconnect the Glasses. · Ensure the battery is properly connected to their default settings. (DVI Mode) P ro b le ms No Picture Current Status Remedy LED ON · Using OSD, adjust brightness and contrast to maximum or reset to the...
... necessary, adjust your viewing position. · Select "Auto" from the OSD to reconnect the Glasses. · Ensure the battery is properly connected to their default settings. (DVI Mode) P ro b le ms No Picture Current Status Remedy LED ON · Using OSD, adjust brightness and contrast to maximum or reset to the...

User Manual
Page 22
... Lepetit, 40, 20020 Lainate (MI) Italy Tel: +39-02-939-921 ,Fax: +39-02 9399-2913 www.acer.i t Hereby declare that: P roduct : T rade Name: M odel Number: SKU Nu mb er: LCD Monitor Acer HN 2 74H HN274H xxxxxx; ("x" = 0~9, a ~ z, A ~ Z , or blank) Is compliant with the essential requirements and other ... .1% M erc u ry 0.1% Polybrominated Diphenyl Ethers (PBDE's ) 0.1% Hexavalent Chromium 0.1% Cadmium 0 .01% Directive 2009/125/EC with the requirements. Year to establishing a framework for the setting of certain Hazardous Sub stances in Electrical and E lectronic Equipment: -.
... Lepetit, 40, 20020 Lainate (MI) Italy Tel: +39-02-939-921 ,Fax: +39-02 9399-2913 www.acer.i t Hereby declare that: P roduct : T rade Name: M odel Number: SKU Nu mb er: LCD Monitor Acer HN 2 74H HN274H xxxxxx; ("x" = 0~9, a ~ z, A ~ Z , or blank) Is compliant with the essential requirements and other ... .1% M erc u ry 0.1% Polybrominated Diphenyl Ethers (PBDE's ) 0.1% Hexavalent Chromium 0.1% Cadmium 0 .01% Directive 2009/125/EC with the requirements. Year to establishing a framework for the setting of certain Hazardous Sub stances in Electrical and E lectronic Equipment: -.

User Manual
Page 30
Contents Information for your safety and comfort iii Safety requirements iii Warning about Epilepsy iii Warning about seizures iv Tips and information for comfortable use v Introducing 3D technology 1 Wireless glasses 1 Charging the glasses 1 Using the glasses 2 Changing the nose piece 2 Hardware Installation 3 Setting up 3D Vision (Dual DVI to PC) 3 Connecting the display 3 Setting up HDMI 3D 5 Frequently asked questions 6 3D Vision is not working 6 Excessive flickering 6 Eyestrain/headache 7 3D content isn't shown correctly on the display 7
Contents Information for your safety and comfort iii Safety requirements iii Warning about Epilepsy iii Warning about seizures iv Tips and information for comfortable use v Introducing 3D technology 1 Wireless glasses 1 Charging the glasses 1 Using the glasses 2 Changing the nose piece 2 Hardware Installation 3 Setting up 3D Vision (Dual DVI to PC) 3 Connecting the display 3 Setting up HDMI 3D 5 Frequently asked questions 6 3D Vision is not working 6 Excessive flickering 6 Eyestrain/headache 7 3D content isn't shown correctly on the display 7

User Manual
Page 33
English 3 Hardware Installation Setting up 3D Vision (Dual DVI to PC) Connecting the display Connect your NVIDIA graphics card. Use the dual-link DVI-to your 3D Vision Ready ...
English 3 Hardware Installation Setting up 3D Vision (Dual DVI to PC) Connecting the display Connect your NVIDIA graphics card. Use the dual-link DVI-to your 3D Vision Ready ...

User Manual
Page 35
English 5 Setting up HDMI 3D Connect your Acer 3D monitor to your HDMI compatible PC or Blu-ray player. Note: Compatible graphic cards include: NVIDIA GT300 Series, NVIDIA GTX400 Series, For more information, please visit: http://www.nvidia.com/object/3d-vision-requirements.html 3D LCD PC HDMI HDMI HDMI cable
English 5 Setting up HDMI 3D Connect your Acer 3D monitor to your HDMI compatible PC or Blu-ray player. Note: Compatible graphic cards include: NVIDIA GT300 Series, NVIDIA GTX400 Series, For more information, please visit: http://www.nvidia.com/object/3d-vision-requirements.html 3D LCD PC HDMI HDMI HDMI cable
User Manual
Page 37
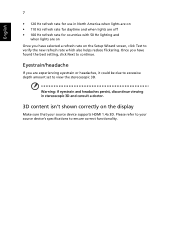
Once you are experiencing eyestrain or headaches, it could be due to excessive depth amount set to view the stereoscopic 3D. Please refer to your source device supports HDMI 1.4a 3D. Eyestrain/headache If you have selected a refresh rate on the ... correct functionality. English 7 • 120 Hz refresh rate for countries with 50 Hz lighting and when lights are on Once you have found the best setting, click Next to continue.
Once you are experiencing eyestrain or headaches, it could be due to excessive depth amount set to view the stereoscopic 3D. Please refer to your source device supports HDMI 1.4a 3D. Eyestrain/headache If you have selected a refresh rate on the ... correct functionality. English 7 • 120 Hz refresh rate for countries with 50 Hz lighting and when lights are on Once you have found the best setting, click Next to continue.


