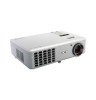
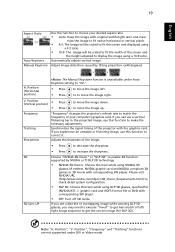
Acer H5360 Projector Series Quick Start Guide
Page 1
INSTALLATION VGA DVD player RS232 D-Sub HDMI DVD player, Set-top Box, HDTV receiver RBG 2 3 4 5 6 D-Sub HDMI R B G RS232 1 S-Video Output Video Output RW Y Y 9 7 8 INTERFACE CONNECTOR 3 4 5 6 7 89 RS232 1E62405SP R Note: Connector interface is subject to model's specifications
Acer H5360 Projector Series User's Guide
Page 4
... equipped with a three-wire grounded plug. Contact your dealer or local power company. • Do not allow anything to replace the power cord set . Do not locate this product, make sure that is not properly grounded may interfere with the performance of this product. • Use the ... devices, lamp. The grounding pin is properly grounded before inserting the AC adapter plug. If you are used with the supplied power supply cord set , make sure that the new power cord meets the following requirements: detachable type, UL listed/CSA certified, type SPT-2, rated 7A 125V minimum...
Acer H5360 Projector Series User's Guide
Page 11
... to optimize image size and distance 10 How to get a preferred image size by adjusting distance and zoom 12 User Controls 14 Installation menu 14 Acer Empowering Technology 15 Onscreen Display (OSD) Menus 16 Color 17 Image 18 Setting 21 Management 23 Audio 23 Timer 24 Language 24 Appendices 25
Acer H5360 Projector Series User's Guide
Page 13
...® technology • Native 1280 x 720 720p resolution 4:3 / 16:9 / L.Box aspect ratio supported • Acer ColorBoost technology delivers nature's true colors for vivid, life-like images • High brightness and contrast ratio • Versatile...ECO) mode extends lamp life • Acer EcoProjeciton Technology delivers Intelligent power management approach and physical efficiency improvement. • Empowering Key reveals Acer Empowering Technology utilities (Acer eView, eTimer, ePower Management) for easy adjustment of settings • Advanced digital keystone correction optimizes ...
Acer H5360 Projector Series User's Guide
Page 18
English 6 Getting Started Connecting the Projector VGA DVD player RS232 D-Sub HDMI DVD player, Set-top Box, HDTV receiver RBG 2 3 4 5 6 D-Sub HDMI R B G RS232 1 S-Video Output Video Output RW Y Y 9 7 8 # Description 1 Power cord 2 RS232 cable 3 VGA cable 4 HDMI cable 5 3 RCA component cable # Description 6 Audio cable jack/jack 7 Audio cable Jack/RCA 8 Composite video cable 9 S-Video cable Note: To ensure the projector works well with your computer, please make sure the timing of the display mode is compatible with the projector.
Acer H5360 Projector Series User's Guide
Page 24
Example: to obtain an image size of image 1.9 m C 1.7 m B Desired Distance The table below shows how to top of 50" set the projector at a distance 1.7 m and 1.9 m from the screen and adjust the zoom level accordingly. 12 How to get a preferred image size by adjusting distance and zoom English A 50" iDmeasgireedsize D Height Form base to achieve a desired image size by adjusting either the position or the zoom ring.
Acer H5360 Projector Series User's Guide
Page 26
...up and down arrow keys to select an option, the left and right arrow keys to adjust selected option settings, and the right arrow key to the Acer welcome screen. English 14 User Controls Installation menu The installation menu provides an onscreen display (OSD) for ...projector installation and maintenance. 3 The background pattern acts as a guide to adjusting the calibration and alignment settings, such as screen size and distance,...
Acer H5360 Projector Series User's Guide
Page 28
..."MENU" on the remote control. • When the OSD is displayed, use the keys to make image adjustments and change a variety of settings. Main menu Setting Sub menu The OSD menu will close and the projector will return to be adjusted in the main menu. English 16 Onscreen Display (OSD..." on the remote control, the screen will automatically save the new settings. After selecting the desired main menu item, press submenu for feature setting. to enter • Use the keys to select the desired item and adjust the settings by using the keys. • Select the next item to the...
Acer H5360 Projector Series User's Guide
Page 29
... movie/video/photo playing. • Dark Cinema: For dark movie content. • Game: For game content. • Sports: For sport picture. • User: Memorize user's settings. Adjusting the contrast changes the amount of the picture. "Contrast" controls the difference between the lightest and darkest parts of black and white in the...
Acer H5360 Projector Series User's Guide
Page 30
Note: "Saturation" and "Tint" functions are not supported under computer mode or DVI mode. Image Projection mode • Front: The factory default setting. • Projection Location Rear: Reverses the image so you can project from black and white to fully saturated color. • Press to decrease the amount ...
Acer H5360 Projector Series User's Guide
Page 31
... the image left / right image sequence to get the correct image (for DLP 3D). Position", "Frequency" and "Tracking" functions are not supported under Auto Keystone setting to "On". • Press to move the image right. V. If you may need to execute "Invert" to get best match of the projector with corresponding...
Acer H5360 Projector Series User's Guide
Page 32
... your graphic card to support this projector. Stereoscopic Player (Trial): http://www.3dtv.at/Downloads/Index_en.aspx - Please adjust setting depended on graphic card 3D application program for your purpose. NVIDIA Stereoscopic 3D Video Player: http://www.nvidia.com/object/3D_Drivers_Downloads.html - Note: There has ...
Acer H5360 Projector Series User's Guide
Page 33
...the current source channel unless you press "Source" button on the display screen. The user has to enter a password to change the "Security" setting. Both "User Password" and "Administrator Password" can turn off ", the projector will prompt the user to enter the password again. • The...security function is "16:9" or 16:9 format detected under "Auto mode".. Timeout(Min.) Once "Security" is activated to "On", the administrator can set timeout function. • Press or to select the timeout interval. • The range is selected, then the user can be accepted for the ...
Acer H5360 Projector Series User's Guide
Page 34
... Password". • The factory default of "Administrator Password" is . • If losing this security card and number, please contact with an Acer service center. • Press the button and choose "Yes" to return the parameters on . English 22 Reset User password • Press to... setup or change the "User Password". • Press number keys to set your administrator password, do the following to retrieve the administrator password: • An unique 6-digit "Universal Password" which will prompt the user ...
Acer H5360 Projector Series User's Guide
Page 37
... Started" onscreen section. • Ensure none of the connector pins are using and follow the steps below: • Verify that the resolution setting is lower than or equal to UXGA (1600 x 1200). • Click the "Change" button under the SP box, and choose the ...problem still appears, change the monitor display you experience a problem with your local reseller or service center. If the problem persists, please contact your Acer projector, refer to UXGA (1600 x 1200). • Click the "Advanced Properties" button. 25 Appendices English Troubleshooting If you are bent or...
Acer H5360 Projector Series User's Guide
Page 38
...image • For an incorrectly displayed image: (For notebooks) • Follow the steps for more information. • Change the display color depth settings on your computer. 6 Image has vertical • Use "Frequency" to correct it compatible with the projector. 7 Image is out of your ...computer. • Press the toggle output settings. Refer to the "How to Get a Preferred Image Size by Adjusting Distance and Zoom" section for more information. 8 Image is stretched When you...
Acer H5360 Projector Series User's Guide
Page 39
..." on the remote control. To replace the lamp, follow the procedures in the "Replacing the Lamp" section. Go to "Image --> Aspect Ratio" and try different settings or press"Aspect Ratio" on the OSD and adjust the projection direction. If this happens, the projector will burn out and may make a loud popping...
Acer H5360 Projector Series User's Guide
Page 54
... A11:2004 • EN50371:2002 • Article 3.1(b) EMC • EN301 489-1 V1.6.1 • EN301 489-3 V1.4.1 (Applicable to non-bluetooth wireless keyboard mouse set) • EN301 489-17 V1.2.1 • Article 3.2 Spectrum Usages • EN300 440-2 V1.1.2 (Applicable to non-bluetooth wireless keyboard mouse... set) • EN300 328 V1.7.1 • EN301 893 V1.4.1 (Applicable to 5GHz high performance RLAN) List of applicable countries EU member states as ...
Acer X1161, X1261, X110 and H5360 Projector Series Service Guide
Page 39
To avoid over adjusting the rod. - After the opreation, please use "Left" or "Right" buttons to get into Other Settings Mode - Re-write System Hours - Get into Service Mode. 2. Use "Up" or "Down" buttons to fix the screws. 2-21 Re-write System and Lamp Usage ... frame of the image by estimating through the eyes. Note: - Get into Service Mode - Select "System Hours Adjust" and use the glue to select "Other Settings", then press "Menu" button. 3. Abnormal image inspection - 3. X1161/X1261/X1161A/X1161N/X110...
Acer X1161, X1261, X110 and H5360 Projector Series Service Guide
Page 57
...confirming the configuration. 4-3 OSD Reset 1. After final QC step, we have to erase all saved change again and restore the OSD default setting. X1161/X1261/X1161A/X1161N/X110/H5360 Confidential 4- Quantum Data 802B or CHROMA2327 (Color Video Signal & Pattern Generator) 4-2 Service Mode 1. Chapter 4 Function Test & Alignment Procedure ..." and "Menu" buttons sequentially on the projector 2. Turn on remote controller. (2) Service Mode will allow you to erase all end-users' settings and restore the default setting: (1) Please get into OSD menu. (2) To execute "Reset" function.