
User Manual
Page 3
... the volume to block out noisy surroundings. • Turn the volume down if you can hear it clearly and comfortably and without distortion. • After setting the volume level, do not place the product on a bed, sofa, rug or other similar surface. Keep this product through cabinet slots as possible. CAUTION...
... the volume to block out noisy surroundings. • Turn the volume down if you can hear it clearly and comfortably and without distortion. • After setting the volume level, do not place the product on a bed, sofa, rug or other similar surface. Keep this product through cabinet slots as possible. CAUTION...
User Manual
Page 8
The cord set should have the appropriate safety approvals for your area. · This monitor has a universal power supply that allows operation in either 100/120V AC or ... transporting the monitor. · Refrain from giving shock or scratch to a proper AC outlet. · For unit using at 120 V AC: Use a UL Listed Cord Set, Type SVT wire and plug rated 10 A/125 V. · For unit using at 220/240 V AC (outside of U.S.): Use a Cord...
The cord set should have the appropriate safety approvals for your area. · This monitor has a universal power supply that allows operation in either 100/120V AC or ... transporting the monitor. · Refrain from giving shock or scratch to a proper AC outlet. · For unit using at 120 V AC: Use a UL Listed Cord Set, Type SVT wire and plug rated 10 A/125 V. · For unit using at 220/240 V AC (outside of U.S.): Use a Cord...
User Manual
Page 16
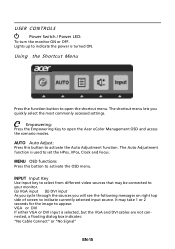
... monitor. (a) VGA input (b) DVI input As you cycle through the sources you quickly select the most commonly accessed settings. The Auto Adjustment function is turned ON. It may be connected to open the Acer eColor Management OSD and access the scenario modes. AUTO Auto Adjust: Press this botton to appear. INPUT Input... VGA and DVI cables are not connected, a floating dialog box indicates: "No Cable Connect" or "No Signal" EN-15 Empowering: Press the Empowering Key to set the HPos, VPos, Clock and Focus. USER CONTROLS Power Switch / Power LED: To turn the monitor ON or OFF.
... monitor. (a) VGA input (b) DVI input As you cycle through the sources you quickly select the most commonly accessed settings. The Auto Adjustment function is turned ON. It may be connected to open the Acer eColor Management OSD and access the scenario modes. AUTO Auto Adjust: Press this botton to appear. INPUT Input... VGA and DVI cables are not connected, a floating dialog box indicates: "No Cable Connect" or "No Signal" EN-15 Empowering: Press the Empowering Key to set the HPos, VPos, Clock and Focus. USER CONTROLS Power Switch / Power LED: To turn the monitor ON or OFF.
User Manual
Page 17
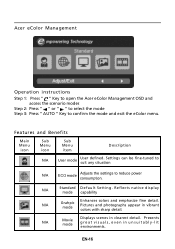
...mode Enhances colors and emphasize fine detail. EN-16 Pictures and photographs appear in unsuitably-lit environments. Settings can be fine-tuned to suit any situation N/A ECO mode Adjusts the settings to confirm the mode and exit the eColor menu. N/A Standard D efau lt Settin g . ...Presents great visuals, even in vibrant colors with sharp detail. Acer eColor Management Operation instructions Step 1: Press " " Key to open the Acer eColor Management OSD and ...
...mode Enhances colors and emphasize fine detail. EN-16 Pictures and photographs appear in unsuitably-lit environments. Settings can be fine-tuned to suit any situation N/A ECO mode Adjusts the settings to confirm the mode and exit the eColor menu. N/A Standard D efau lt Settin g . ...Presents great visuals, even in vibrant colors with sharp detail. Acer eColor Management Operation instructions Step 1: Press " " Key to open the Acer eColor Management OSD and ...
User Manual
Page 18
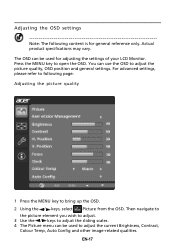
... following page: Adjusting the picture quality 1 Press the MENU key to adjust the picture quality, OSD position and general settings. For advanced settings, please refer to following content is for adjusting the settings of your LCD Monitor. Actual product specifications may vary. EN-17 The OSD can be used to open the OSD...
... following page: Adjusting the picture quality 1 Press the MENU key to adjust the picture quality, OSD position and general settings. For advanced settings, please refer to following content is for adjusting the settings of your LCD Monitor. Actual product specifications may vary. EN-17 The OSD can be used to open the OSD...

User Manual
Page 20
Then navigate to the feature you wish to adjust. 3 The Setting menu can be used to bring up the OSD. 2 Using the / keys, select Setting from the OSD. Adjusting the setting 1 Press the MENU key to adjust the screen Menu Language and other important settings. EN-19
Then navigate to the feature you wish to adjust. 3 The Setting menu can be used to bring up the OSD. 2 Using the / keys, select Setting from the OSD. Adjusting the setting 1 Press the MENU key to adjust the screen Menu Language and other important settings. EN-19
User Manual
Page 22
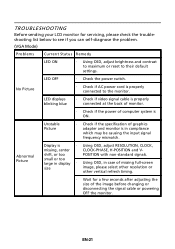
..., CLOCK, missing, center CLOCK-PHASE, H-POSITION and V- Unstable Picture · Check if the specification of graphics adapter and monitor is properly connected to their default settings. small or too large in display · Using OSD, in compliance which may be causing the input signal frequency mismatch. EN-21 TROUBLESHOOTING Before sending...
..., CLOCK, missing, center CLOCK-PHASE, H-POSITION and V- Unstable Picture · Check if the specification of graphics adapter and monitor is properly connected to their default settings. small or too large in display · Using OSD, in compliance which may be causing the input signal frequency mismatch. EN-21 TROUBLESHOOTING Before sending...

User Manual
Page 23
LED displays blinking blue · Check if video signal cable is properly connected at the back of monitor. · Check if the power of computer system is properly connected to their default settings. LED OFF · Check the power switch. · Check if AC power cord is ON. EN-22 (DVI mode) Problems No Picture Current Status Remedy LED ON · Using OSD, adjust brightness and contrast to maximum or reset to the monitor.
LED displays blinking blue · Check if video signal cable is properly connected at the back of monitor. · Check if the power of computer system is properly connected to their default settings. LED OFF · Check the power switch. · Check if AC power cord is ON. EN-22 (DVI mode) Problems No Picture Current Status Remedy LED ON · Using OSD, adjust brightness and contrast to maximum or reset to the monitor.
User Manual
Page 24
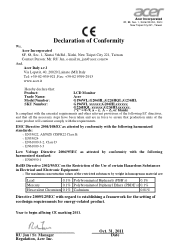
... Substances in force to begin affixing CE marking 2011. Year to assure that : Product: LCD Monitor Trade Name: Acer Model Number: G196WL;G206HL;G226HQL;G236HL SKU Number: G196WL xxxxxx;G206HLxxxxxx; EN61000-3-3 Low Voltage Directive 2006/95/EC as attested by conformity with the following harmonized...: +39-02-939-921 ,Fax: +39-02 9399-2913 www.acer.it Hereby declare that production units of the same product will continue comply with regard to establishing a framework for the setting of ecodesign requirements for energy-related product. EMC Directive 2004/108/EC as...
... Substances in force to begin affixing CE marking 2011. Year to assure that : Product: LCD Monitor Trade Name: Acer Model Number: G196WL;G206HL;G226HQL;G236HL SKU Number: G196WL xxxxxx;G206HLxxxxxx; EN61000-3-3 Low Voltage Directive 2006/95/EC as attested by conformity with the following harmonized...: +39-02-939-921 ,Fax: +39-02 9399-2913 www.acer.it Hereby declare that production units of the same product will continue comply with regard to establishing a framework for the setting of ecodesign requirements for energy-related product. EMC Directive 2004/108/EC as...


