User Manual
Page 2
... written permission of merchantability or fitness for identification purposes only and belong to your unit should include the serial number, model number and purchase information. Acer LCD Monitor User Guide Original Issue: 1/2012 Changes may be reproduced, stored in a retrieval system, or transmitted, ...or implied, with respect to notify any means, electronically, mechanically, by any person of such revisions or changes. Acer LCD Monitor User Guide Model number Serial number Date of purchase Place of purchase information in any form or by photocopy, recording or otherwise, ...
... written permission of merchantability or fitness for identification purposes only and belong to your unit should include the serial number, model number and purchase information. Acer LCD Monitor User Guide Original Issue: 1/2012 Changes may be reproduced, stored in a retrieval system, or transmitted, ...or implied, with respect to notify any means, electronically, mechanically, by any person of such revisions or changes. Acer LCD Monitor User Guide Model number Serial number Date of purchase Place of purchase information in any form or by photocopy, recording or otherwise, ...
User Manual
Page 4
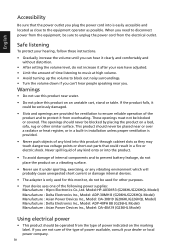
.... This product should be blocked or covered. Model:HP-A0301R3 (G206HL/G226HQL Model) Manufacture : Delta Electronics Inc., Model: ADP-30MH B (G206HL/G226HQL Model) Manufacture : Asian Power Devices Inc., Model: DA-30B19 (G206HL/G226HQL Model) Manufacture : Delta Electronics Inc., Model: ADP-40PH BB (G236HL Model) Manufacture : Asian Power Devices Inc., Model: DA-40A19 (G236HL Model) Using electrical power • This product...
.... This product should be blocked or covered. Model:HP-A0301R3 (G206HL/G226HQL Model) Manufacture : Delta Electronics Inc., Model: ADP-30MH B (G206HL/G226HQL Model) Manufacture : Asian Power Devices Inc., Model: DA-30B19 (G206HL/G226HQL Model) Manufacture : Delta Electronics Inc., Model: ADP-40PH BB (G236HL Model) Manufacture : Asian Power Devices Inc., Model: DA-40A19 (G236HL Model) Using electrical power • This product...

User Manual
Page 9
...: Directive 2009/125/EC with regard to begin affixing CE marking 2012. Acer Incorporated 8F, 88, Sec. 1, Xintai 5th Rd., Xizhi New Taipei City 221, Taiwan Declaration of Conformity Acer Incorporated Acer Italy s.r.l Product: Trade Name: Model Number: SKU Number: LCD Monitor Acer G196HQL G196HQL xxxxxx ("x" = 0~9, a ~ z, A ~ Z, or blank) EMC Directive 2004/108/EC as attested by weight...
...: Directive 2009/125/EC with regard to begin affixing CE marking 2012. Acer Incorporated 8F, 88, Sec. 1, Xintai 5th Rd., Xizhi New Taipei City 221, Taiwan Declaration of Conformity Acer Incorporated Acer Italy s.r.l Product: Trade Name: Model Number: SKU Number: LCD Monitor Acer G196HQL G196HQL xxxxxx ("x" = 0~9, a ~ z, A ~ Z, or blank) EMC Directive 2004/108/EC as attested by weight...
User Manual
Page 11
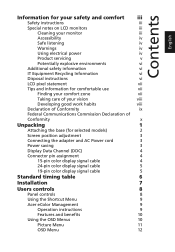
...viii Developing good work habits viii Declaration of Conformity ix Federal Communications Commission Declaration of Conformity x Unpacking 1 Attaching the base (for selected models) 2 Screen position adjustment 3 Connecting the adapter and AC Power cord 3 Power saving 3 Display Data Channel (DDC) 4 Connector ...display signal cable 5 Standard timing table 6 Installation 7 Users controls 8 Panel controls 8 Using the Shortcut Menu 9 Acer eColor Management 9 Operation instructions 9 Features and benefits 10 Using the OSD Menus 10 Picture Menu 11 OSD Menu 12
...viii Developing good work habits viii Declaration of Conformity ix Federal Communications Commission Declaration of Conformity x Unpacking 1 Attaching the base (for selected models) 2 Screen position adjustment 3 Connecting the adapter and AC Power cord 3 Power saving 3 Display Data Channel (DDC) 4 Connector ...display signal cable 5 Standard timing table 6 Installation 7 Users controls 8 Panel controls 8 Using the Shortcut Menu 9 Acer eColor Management 9 Operation instructions 9 Features and benefits 10 Using the OSD Menus 10 Picture Menu 11 OSD Menu 12

User Manual
Page 14
Carefully place the monitor face-down on a stable surface -- use a cloth to avoid scratching the screen. 1 Attach the monitor stand arm to the base. 2 Ensure that the base is locked onto the monitor stand arm. • Secure the base to the monitor stand arm by turning the white screw using the integrated tab or a suitable coin. (for selected models) Note: Remove the monitor and monitor base from its packaging. English Attaching the base (for selected models) Note: Take care when performing the installation to avoid injuring yourself. 2
Carefully place the monitor face-down on a stable surface -- use a cloth to avoid scratching the screen. 1 Attach the monitor stand arm to the base. 2 Ensure that the base is locked onto the monitor stand arm. • Secure the base to the monitor stand arm by turning the white screw using the integrated tab or a suitable coin. (for selected models) Note: Remove the monitor and monitor base from its packaging. English Attaching the base (for selected models) Note: Take care when performing the installation to avoid injuring yourself. 2
User Manual
Page 20
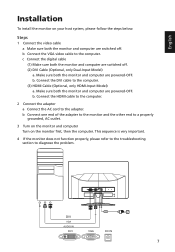
... sure both the monitor and computer are powered-OFF. Make sure both the monitor and computer are switched off . (2) DVI Cable (Optional, only Dual-Input Model) a. b. This sequence is very important. 4 If the monitor does not function properly, please refer to the troubleshooting section to the computer. DVI VGA AUDIO IN..., then the computer. b Connect the VGA video cable to diagnose the problem. Connect the DVI cable to the computer. (3) HDMI Cable (Optional, only HDMI-Input Model) a.
... sure both the monitor and computer are powered-OFF. Make sure both the monitor and computer are switched off . (2) DVI Cable (Optional, only Dual-Input Model) a. b. This sequence is very important. 4 If the monitor does not function properly, please refer to the troubleshooting section to the computer. DVI VGA AUDIO IN..., then the computer. b Connect the VGA video cable to diagnose the problem. Connect the DVI cable to the computer. (3) HDMI Cable (Optional, only HDMI-Input Model) a.

User Manual
Page 22
... the Menu button to confirm the selection and exit Acer eColor Management. 9 Using the Shortcut Menu English AUTO Input Press any of your monitor. (Optional, only Dual-Input Model or HDMI-Input Model) Acer eColor Management Operation instructions 1 Press the Empowering Key to open the Acer eColor Management OSD menu and access the scenario modes...
... the Menu button to confirm the selection and exit Acer eColor Management. 9 Using the Shortcut Menu English AUTO Input Press any of your monitor. (Optional, only Dual-Input Model or HDMI-Input Model) Acer eColor Management Operation instructions 1 Press the Empowering Key to open the Acer eColor Management OSD menu and access the scenario modes...


