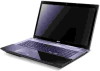
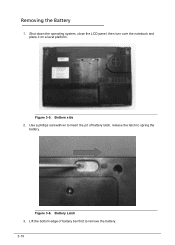
Acer Aspire V3-771G Notebook Service Guide
Page 5
... Specifications Features 1-5 Operating System 1-5 Platform 1-5 System Memory 1-5 Display 1-5 Graphics 1-5 Storage Subsystem 1-6 Audio Subsystem 1-6 Optical Media Drive 1-7 Communication 1-7 Privacy Control 1-7 Dimensions and Weight 1-8 Power Adapter and Battery 1-8 Special Keys and Controls 1-8 I/O Ports 1-8 Software 1-9 Environment 1-10 Notebook Tour 1-11 Top Cover View 1-11 Keyboard View 1-12 Closed Front View 1-13 Left View 1-14...
Acer Aspire V3-771G Notebook Service Guide
Page 6
... and Replacement 3-5 Recommended Equipment 3-5 Replacement Requirements 3-5 Pre-disassembly Instructions 3-6 Disassembly Process 3-7 External Module Disassembly Process 3-8 External Modules Disassembly Flowchart 3-8 Removing the Memory Card 3-9 Removing the Battery 3-10 Removing the Main Door 3-12 Removing the Memory Module 3-14 Removing the HDD Module 3-17 Removing the WLAN Card 3-21 Removing the ODD Module...
Acer Aspire V3-771G Notebook Service Guide
Page 7
... ODD Module 3-116 Replacing the WLAN Card 3-119 Replacing the HDD Module 3-121 Replacing the DIMM Module 3-125 Replacing the Main Door 3-127 Replacing the Battery 3-128 CHAPTER 4 Troubleshooting Introduction 4-3 General Information 4-3 Power On Issues 4-4 No Display Issues 4-5 LCD Failure 4-7 Keyboard Failure 4-8 vii
Acer Aspire V3-771G Notebook Service Guide
Page 12
Features 1-5 Operating System 1-5 Platform 1-5 System Memory 1-5 Display 1-5 Graphics 1-5 Storage Subsystem 1-6 Audio Subsystem 1-6 Optical Media Drive 1-7 Communication 1-7 Privacy Control 1-7 Dimensions and Weight 1-8 Power Adapter and Battery 1-8 Special Keys and Controls 1-8 I/O Ports 1-8 Software 1-9 Environment 1-10 Notebook Tour 1-11 Top Cover View 1-11 Keyboard View 1-12 Closed Front View 1-13 Left View 1-14 ...
Acer Aspire V3-771G Notebook Service Guide
Page 18
...Weight 0 Dimensions 0 414.8 (L) x 275 (W) x 34~34.65 (H) mm Weight 0 3.215 kg with 6 cell battery Power Adapter and Battery 0 ACPI 3.0 CPU power management standard: supports Standby and Hibernation power-saving modes Power adapter 0 3-pin 65 W AC adapter: ...;126.5(W) x 50.0 (D) x 30.6 (H) mm 400g maximum Battery 0 4400 mAh 6-cell Li-ion standard battery pack 9000 mAh 9-cell Li-ion standard battery pack Special Keys and Controls 0 Keyboard 0 103-US/104-UK/107...
Acer Aspire V3-771G Notebook Service Guide
Page 23
... computer's wireless connectivity device status. 2 Multi-in AC mode. Only one card can operate at any given time. Closed Front View 0 Figure 1-3. Battery indicator HDD indicator Indicates the computer's battery status. 1. Indicates when the hard disk drive is charging. 2. Note: Push to remove/install the card. Fully charged: The light shows blue...
Acer Aspire V3-771G Notebook Service Guide
Page 26
Memory compartment Houses the computer's main memory. 3 Battery bay Houses the computer's battery pack. 1-16 Hardware Specifications and Configurations Base View 0 Figure 1-6. Base View No Icon Item 1 Battery release latch Description Releases the battery for removal. Insert a suitable tool into the latch and slide to release. 2 Hard disk bay Houses the computer's hard disk (secured with screws). Base View Table 1-6.
Acer Aspire V3-771G Notebook Service Guide
Page 27
... 1-7. Indicates when the hard disk drive is charging. 2. Indicators 0 The computer has five easy-to-read status indicators. Charging: The light shows amber when the battery is active Communication Indicator Indicates the computer's wireless connectivity device status. Optical disk access indicator Lights up when the optical drive is closed. Hardware Specifications...
Acer Aspire V3-771G Notebook Service Guide
Page 35
... Length 414.8 mm 16.3 in Width 275.0 mm 10.8 in Height 34.6 mm 1.4 in Weight (equipped with optical 3.2 kg with HDD drive, flash drive, and battery) 7.0 lbs with HDD Input power Operating voltage 19V at 3.42A Max for 90W Operating current 3.42A(Max) Temperature Operating 5°C to 35°C 41°...
Acer Aspire V3-771G Notebook Service Guide
Page 50
... Audio Interface Item Audio Controller Audio onboard or optional Mono or Stereo Resolution Compatibility Sampling rate Internal microphone Internal speaker/quantity Battery Item Vendor & Model name Battery Type Pack capacity Number of battery cell Package configuration VRAM Item Chipset Memory size Interface Specification Embedded 4 step gain control 2-W/Ch Output Power into...
Acer Aspire V3-771G Notebook Service Guide
Page 52
... PS/2 Keyboard System CMOS/real time clock ELAN PS/2 Port Smart-Pad 1-42 Hardware Specifications and Configurations Battery charging with AC Blue color solid on - Battery in critical low state Amber color off Amber color blinking: S3 state Charging ...; Amber solid on - Battery in low power state or battery abnormal Discharging Amber blinking - Discharging state. Card Reader Item Chipset Package Maximum supported size Features Specification REALTEK ...
Acer Aspire V3-771G Notebook Service Guide
Page 70
... has auto execution function. 2-14 System Utilities NOTE: NOTE: Create a Crisis Recovery Disc, if one is not available, before the Flash utility is used . If battery pack does not contain power to update the system BIOS Flash ROM.
Acer Aspire V3-771G Notebook Service Guide
Page 90
... and Replacement 3-5 Recommended Equipment 3-5 Replacement Requirements 3-5 Pre-disassembly Instructions 3-6 Disassembly Process 3-7 External Module Disassembly Process 3-8 External Modules Disassembly Flowchart 3-8 Removing the Memory Card 3-9 Removing the Battery 3-10 Removing the Main Door 3-12 Removing the Memory Module 3-14 Removing the HDD Module 3-17 Removing the WLAN Card 3-21 Removing the ODD Module...
Acer Aspire V3-771G Notebook Service Guide
Page 91
Replacing the Thermal Module 3-92 Replacing the Motherboard 3-95 Replacing the IO Board 3-98 Replacing the Keyboard 3-100 Replacing the Power Switch Board 3-103 Replacing the Speaker Module 3-105 Replacing the Top Case 3-108 Replacing the Top Case Palmrest 3-111 Replacing the ODD Module 3-116 Replacing the WLAN Card 3-119 Replacing the HDD Module 3-121 Replacing the DIMM Module 3-125 Replacing the Main Door 3-127 Replacing the Battery 3-128 3-3
Acer Aspire V3-771G Notebook Service Guide
Page 98
Battery Latch 3. Figure 3-5. Use a phillips screwdriver to insert the pit of battery bar first to spring the battery. Shut down the operating system, close the LCD panel, then turn over the notebook and place it on a level platform. Lift the bottom edge of battery latch, release the latch to remove the battery. 3-10 Figure 3-6. Bottom side 2. Removing the Battery 0 1.
Acer Aspire V3-771G Notebook Service Guide
Page 216
Battery Figure 3-199. Battery 3-128 Figure 3-198. Replacing the Battery 0 1. Place the top edge of the battery to its housing, press down the bottom edge to lock the spring latch.
Acer Aspire V3-771G Notebook Service Guide
Page 220
... cables between the computer and the electrical outlet. Remove all surge protectors between the computer and the outlet. 3. Remove all power (AC adapter and Battery), then re-insert to the computer that are free of obstructions. 5. after removing all external and non-essential hardware connected to try power on Check... Daughter BD & FFC OK NG Swap AC/Battery OK Swap NG Daughter BD & Re-plug PWR FFC Swap MB Figure 4-1. Power On Issue Please wait for 3 min.
Acer Aspire V3-771G Notebook Service Guide
Page 221
Replace LCD Panel/LCD Cable Power On? Switching between internal and external by removing the power cable and battery. Connect the power and reboot the computer. Do not replace a non-defective FRU: START NG LCD Moduel OK? NG Replace Ext. Figure 4-2. Make sure that ...
Acer Aspire V3-771G Notebook Service Guide
Page 222
If the POST or video appears on battery alone as this may reduce display brightness. 2. Start the computer. Adjust the brightness to Disassembly Process. 3. Refer to its highest level. If the Issue is ...
Acer Aspire V3-771G Notebook Service Guide
Page 235
... errors. Perform the following procedures to check if current one at the time of the following devices: Non-Acer devices Printer, mouse, and other external devices Battery pack Hard disk drive DIMM CD-ROM/Diskette drive Module PC...