
User Guide
Page 5
... 14 Span Display Mode 14 Reinstalling Drivers 15 Display Properties 17 ATI Displays Tab 17 Dynamic Display Reassignment 19 ATI Color Tab 19 Hotkeys 22 ATI Options Tab 24 ATI Configuration Tab 25 ATI Advanced Settings Tab 27 ATI HDTV Component Video Adapter 31 Installing Your ATI HDTV Component Video Adapter 31 Setting the ATI HDTV Component Video Adapter DIP Switches 32
... 14 Span Display Mode 14 Reinstalling Drivers 15 Display Properties 17 ATI Displays Tab 17 Dynamic Display Reassignment 19 ATI Color Tab 19 Hotkeys 22 ATI Options Tab 24 ATI Configuration Tab 25 ATI Advanced Settings Tab 27 ATI HDTV Component Video Adapter 31 Installing Your ATI HDTV Component Video Adapter 31 Setting the ATI HDTV Component Video Adapter DIP Switches 32

User Guide
Page 8
... support (DVI-I-to-VGA adapter included). • Component Video (YPrPb) output (adapter included). AMD Athlon® 64/K7/XP or compatible. • 512 MB or more for best performance. • Motherboard with available X16 lane PCI Express™ slot and correct chipset driver. • Optical drive for 30-inch Apple® ... • Digital flat-panel displays or digital CRT displays. System Requirements Make sure you meet the following system requirements before installing your FireGL™ card. Hardware Operating System Monitor • Intel® Pentium® 4/Xeon®;
... support (DVI-I-to-VGA adapter included). • Component Video (YPrPb) output (adapter included). AMD Athlon® 64/K7/XP or compatible. • 512 MB or more for best performance. • Motherboard with available X16 lane PCI Express™ slot and correct chipset driver. • Optical drive for 30-inch Apple® ... • Digital flat-panel displays or digital CRT displays. System Requirements Make sure you meet the following system requirements before installing your FireGL™ card. Hardware Operating System Monitor • Intel® Pentium® 4/Xeon®;

User Guide
Page 9
Write these numbers down before removing it from your new FireGL™ card, you begin installing your new ATI product. Before You Begin 3 Before You Begin Before you must uninstall the drivers for registration. Record Your Serial and Part Numbers The serial number and 102 part number on the back of your computer. Serial and...
Write these numbers down before removing it from your new FireGL™ card, you begin installing your new ATI product. Before You Begin 3 Before You Begin Before you must uninstall the drivers for registration. Record Your Serial and Part Numbers The serial number and 102 part number on the back of your computer. Serial and...

User Guide
Page 10
... If the previously installed graphics card has any previously installed card. 4 Install your new FireGL™ card. 5 Reassemble and connect your computer system. 6 Install the FireGL™ drivers and configuration software from the ATI Installation CD-ROM by doing one of your current display drivers. The wizard will help you...8226; Run through the automatic ATISETUP utility; 4 Quick Installation 3 Select your system and remove the old graphics card. To perform a quick installation 1 Uninstall the drivers and software for installing the FireGL™ card in the next two sections.
... If the previously installed graphics card has any previously installed card. 4 Install your new FireGL™ card. 5 Reassemble and connect your computer system. 6 Install the FireGL™ drivers and configuration software from the ATI Installation CD-ROM by doing one of your current display drivers. The wizard will help you...8226; Run through the automatic ATISETUP utility; 4 Quick Installation 3 Select your system and remove the old graphics card. To perform a quick installation 1 Uninstall the drivers and software for installing the FireGL™ card in the next two sections.

User Guide
Page 14
Check driver release notes for limitations on the use of stereographics. 8 Display Configurations Display Connector(s) Configuration Used Comments DFP display + Quad-buffered stereographics device CRT display + Quad-...
Check driver release notes for limitations on the use of stereographics. 8 Display Configurations Display Connector(s) Configuration Used Comments DFP display + Quad-buffered stereographics device CRT display + Quad-...

User Guide
Page 15
... use of stereographics. If you have installed the FireGL™ drivers and software, you can use of stereographics. Once you turn on the System L WARNING - Turn on your monitor before you have properly installed your graphics card, operating system messages will be running in a basic video mode. Higher refresh rates are not available at...
... use of stereographics. If you have installed the FireGL™ drivers and software, you can use of stereographics. Once you turn on the System L WARNING - Turn on your monitor before you have properly installed your graphics card, operating system messages will be running in a basic video mode. Higher refresh rates are not available at...

User Guide
Page 17
...™ multi-monitor and desktop management software will need to install the FireGL™ drivers and software in the following cases: • After you have installed the card in Windows® You will install automatically with your operating system. For... upgraded your FireGL™. L Linux drivers and installation instructions are available from ati.com/support HydraVision™ Multi-monitor Management 11 CHAPTER 3: Installing Software This chapter will guide you through the installation of the drivers and software associated with the Express driver installation of ...
...™ multi-monitor and desktop management software will need to install the FireGL™ drivers and software in the following cases: • After you have installed the card in Windows® You will install automatically with your operating system. For... upgraded your FireGL™. L Linux drivers and installation instructions are available from ati.com/support HydraVision™ Multi-monitor Management 11 CHAPTER 3: Installing Software This chapter will guide you through the installation of the drivers and software associated with the Express driver installation of ...

User Guide
Page 18
... CD-ROM. L The Express installation option is not enabled or the ATISETUP utility does not start automatically: a) Click the Start button in the task bar. Note: The installation dialog will start the Installation Wizard. 6 Follow the wizard's on as a user with the ATI driver, by selecting this option. To install ATI drivers and software 1 Start...
... CD-ROM. L The Express installation option is not enabled or the ATISETUP utility does not start automatically: a) Click the Start button in the task bar. Note: The installation dialog will start the Installation Wizard. 6 Follow the wizard's on as a user with the ATI driver, by selecting this option. To install ATI drivers and software 1 Start...

User Guide
Page 19
... my Windows desktop onto this monitor. 4 Set the Screen Resolution and Color Quality as appropriate for the second monitor. L Warning - Note: ATI software provides many additional configuration features that best suit your requirements and your monitor's performance. 3 Click Advanced and select the Monitor tab. 4 ... up a multi-monitor display 1 From the Start menu click Control Panel, then Display. Consult your monitor. Monitor Configuration Once the drivers and software have been installed, you can be accessed by clicking the Advanced button from the drop-down list. 5 Click OK to...
... my Windows desktop onto this monitor. 4 Set the Screen Resolution and Color Quality as appropriate for the second monitor. L Warning - Note: ATI software provides many additional configuration features that best suit your requirements and your monitor's performance. 3 Click Advanced and select the Monitor tab. 4 ... up a multi-monitor display 1 From the Start menu click Control Panel, then Display. Consult your monitor. Monitor Configuration Once the drivers and software have been installed, you can be accessed by clicking the Advanced button from the drop-down list. 5 Click OK to...

User Guide
Page 21
... vertically. 3 Click OK or Apply to SETUP.EXE on the ATI Installation CD-ROM. Reinstalling Drivers You can install new drivers or reinstall existing drivers if there was a Windows® conflict. To manually reinstall drivers If your optical drive after the operating system has started. Reinstalling Drivers 15 • Click Start > Settings > Control Panel > Display > Advanced...
... vertically. 3 Click OK or Apply to SETUP.EXE on the ATI Installation CD-ROM. Reinstalling Drivers You can install new drivers or reinstall existing drivers if there was a Windows® conflict. To manually reinstall drivers If your optical drive after the operating system has started. Reinstalling Drivers 15 • Click Start > Settings > Control Panel > Display > Advanced...

User Guide
Page 22
16 Reinstalling Drivers
16 Reinstalling Drivers
User Guide
Page 30
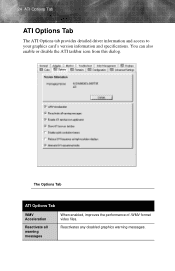
You can also enable or disable the ATI taskbar icon from this dialog. The Options Tab ATI Options Tab WMV Acceleration Reactivate all warning messages When enabled, improves the performance of .WMV format video files. Reactivates any disabled graphics warning messages. 24 ATI Options Tab ATI Options Tab The ATI Options tab provides detailed driver information and access to your graphics card's version information and specifications.
You can also enable or disable the ATI taskbar icon from this dialog. The Options Tab ATI Options Tab WMV Acceleration Reactivate all warning messages When enabled, improves the performance of .WMV format video files. Reactivates any disabled graphics warning messages. 24 ATI Options Tab ATI Options Tab The ATI Options tab provides detailed driver information and access to your graphics card's version information and specifications.

User Guide
Page 44
...® 2000 and Windows® XP, press and hold F8 until you installed your enhanced driver. • Make sure that the auxilary power cable is attached to the graphics card. 38 Troubleshooting General Problems Problem Computer Does Not Boot-Up Properly No Display Possible Solution •...interrupt assignments. • Make sure that the auxilary power cable is attached to the graphics card. • Contact ATI's Customer Care or your local technical support. • Check that the card is seated properly in its expansion slot. • Ensure that you selected the appropriate monitor...
...® 2000 and Windows® XP, press and hold F8 until you installed your enhanced driver. • Make sure that the auxilary power cable is attached to the graphics card. 38 Troubleshooting General Problems Problem Computer Does Not Boot-Up Properly No Display Possible Solution •...interrupt assignments. • Make sure that the auxilary power cable is attached to the graphics card. • Contact ATI's Customer Care or your local technical support. • Check that the card is seated properly in its expansion slot. • Ensure that you selected the appropriate monitor...

User Guide
Page 45
...position the picture on how to your operating system and applications. • Reinstall the ATI drivers for recommended resolutions and refresh rates. • Try adjusting the brightness, sharpness, ...8226; Check the driver installation and make sure that both video card and monitor support resolution and refresh rates you have selected are supported by the graphics card. • ...documentation for your FireGL™ card. but not integrated analog/digital (DVI-I). Off-Center Screen Image, Odd Colors or No Picture Operating System Warns that Video Card Isn't Properly Configured Warning...
...position the picture on how to your operating system and applications. • Reinstall the ATI drivers for recommended resolutions and refresh rates. • Try adjusting the brightness, sharpness, ...8226; Check the driver installation and make sure that both video card and monitor support resolution and refresh rates you have selected are supported by the graphics card. • ...documentation for your FireGL™ card. but not integrated analog/digital (DVI-I). Off-Center Screen Image, Odd Colors or No Picture Operating System Warns that Video Card Isn't Properly Configured Warning...

User Guide
Page 56
... lighting conditions in the work area and gradual shifts in the upper right corner) represents the "full" strength for that the display driver will write to functions on graphics cards, providing the type of the glass screen. Color Curve A color curve represents all possible intensity values (from 0 to produce a colored image. Color...
... lighting conditions in the work area and gradual shifts in the upper right corner) represents the "full" strength for that the display driver will write to functions on graphics cards, providing the type of the glass screen. Color Curve A color curve represents all possible intensity values (from 0 to produce a colored image. Color...

User Guide
Page 68
... 21, 22 color settings 19 Control Panel 3, 13 Control point 50 CPU 55 CRT 50, 51, 57 D Depth Buffer 53 desktop color settings 20 Digital Video Interface 51 Direct 3D 50 Direct 3D ® 28 display corruption DVI 25 high resolution 25 displays Hotkey 18 primary 17 scheme 18 secondary 17...
... 21, 22 color settings 19 Control Panel 3, 13 Control point 50 CPU 55 CRT 50, 51, 57 D Depth Buffer 53 desktop color settings 20 Digital Video Interface 51 Direct 3D 50 Direct 3D ® 28 display corruption DVI 25 high resolution 25 displays Hotkey 18 primary 17 scheme 18 secondary 17...