RAID Installation Guide
Page 1
...; on a HDD under 2TB in RAID mode 18 1 Guide to RAID Configurations 3 2.1 Introduction of RAID 3 2.2 RAID Configuration Precautions 6 2.3 Installing Windows® 8 / 8 64-bit / 7 / 7 64-bit With RAID Functions 7 2.4 Setting the BIOS RAID Items 8 2.5 Configuring a RAID array 8 2.5.1 Configuring a RAID array Using UEFI Setup Utility....... 8 2.5.2 Configuring a RAID ...
...; on a HDD under 2TB in RAID mode 18 1 Guide to RAID Configurations 3 2.1 Introduction of RAID 3 2.2 RAID Configuration Precautions 6 2.3 Installing Windows® 8 / 8 64-bit / 7 / 7 64-bit With RAID Functions 7 2.4 Setting the BIOS RAID Items 8 2.5 Configuring a RAID array 8 2.5.1 Configuring a RAID array Using UEFI Setup Utility....... 8 2.5.2 Configuring a RAID ...
RAID Installation Guide
Page 7
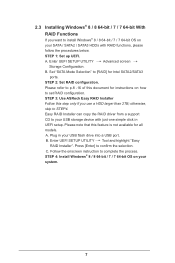
...RAID configuration. otherwise, skip to [RAID] for Intel SATA2/SATA3 ports. B. Please refer to p.8 -16 of this document for all models A. 2.3 Installing Windows® 8 / 8 64-bit / 7 / 7 64-bit With RAID Functions If you use a HDD larger than 2TB; Enter UEFI SETUP UTILITY Tool ...7 64-bit OS on your USB storage device with RAID functions, please follow the procedures below. STEP 3: Use ASRock Easy RAID Installer Follow this feature is not available for instructions on how to install Windows® 8 / 8 64-bit / 7 / 7 64-bit OS on your USB flash drive into a USB...
...RAID configuration. otherwise, skip to [RAID] for Intel SATA2/SATA3 ports. B. Please refer to p.8 -16 of this document for all models A. 2.3 Installing Windows® 8 / 8 64-bit / 7 / 7 64-bit With RAID Functions If you use a HDD larger than 2TB; Enter UEFI SETUP UTILITY Tool ...7 64-bit OS on your USB storage device with RAID functions, please follow the procedures below. STEP 3: Use ASRock Easy RAID Installer Follow this feature is not available for instructions on how to install Windows® 8 / 8 64-bit / 7 / 7 64-bit OS on your USB flash drive into a USB...

RAID Installation Guide
Page 8
... Go to UEFI SETUP UTILITY Boot to disable "CSM". Press key to save your system, and press key to enter BIOS setup utility. For Windows® 7: Go to UEFI SETUP UTILITY Boot CSM to set the option SATA Mode Selection to [RAID]. Boot your change before setting your RAID... configuration. Go to Advanced Storage Configuration and set "Launch Storage OpROM policy" to [UEFI only]. 8 2.4 Setting the BIOS RAID Items After installing the hard disk drives, please set the necessary RAID items in the BIOS before you exit BIOS setup. 2.5 Configuring a RAID array You can configure a...
... Go to UEFI SETUP UTILITY Boot to disable "CSM". Press key to save your system, and press key to enter BIOS setup utility. For Windows® 7: Go to UEFI SETUP UTILITY Boot CSM to set the option SATA Mode Selection to [RAID]. Boot your change before setting your RAID... configuration. Go to Advanced Storage Configuration and set "Launch Storage OpROM policy" to [UEFI only]. 8 2.4 Setting the BIOS RAID Items After installing the hard disk drives, please set the necessary RAID items in the BIOS before you exit BIOS setup. 2.5 Configuring a RAID array You can configure a...

RAID Installation Guide
Page 16
If you want to configure RAID functions after you want to create an extra RAID partition, please use the RAID utility under BIOS RAID environment. If you install OS. Please note that you are only allowed to complete the setup of RAID. Press to create one RAID partition at a time under Windows environment to delete a RAID volume, please select the option Delete RAID Volume, press , and then follow the instructions on the screen. 16 After the completion, you will see the detailed information about the RAID that you set up.
If you want to configure RAID functions after you want to create an extra RAID partition, please use the RAID utility under BIOS RAID environment. If you install OS. Please note that you are only allowed to complete the setup of RAID. Press to create one RAID partition at a time under Windows environment to delete a RAID volume, please select the option Delete RAID Volume, press , and then follow the instructions on the screen. 16 After the completion, you will see the detailed information about the RAID that you set up.
RAID Installation Guide
Page 17
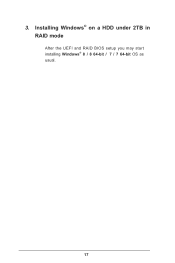
Installing Windows® on a HDD under 2TB in RAID mode After the UEFI and RAID BIOS setup you may start installing Windows® 8 / 8 64-bit / 7 / 7 64-bit OS as usual. 17 3.
Installing Windows® on a HDD under 2TB in RAID mode After the UEFI and RAID BIOS setup you may start installing Windows® 8 / 8 64-bit / 7 / 7 64-bit OS as usual. 17 3.
RAID Installation Guide
Page 18
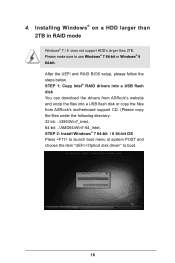
... into a USB flash disk or copy the files from ASRock's motherboard support CD. (Please copy the files under the following directory: 32 bit: ..\i386\Win7_Intel.. 64-bit: ..\AMD64\Win7-64_Intel.. After the UEFI and RAID BIOS setup, please follow the steps below. STEP 2: Install Windows® 7 64-bit / 8 64-bit OS Press to...
... into a USB flash disk or copy the files from ASRock's motherboard support CD. (Please copy the files under the following directory: 32 bit: ..\i386\Win7_Intel.. 64-bit: ..\AMD64\Win7-64_Intel.. After the UEFI and RAID BIOS setup, please follow the steps below. STEP 2: Install Windows® 7 64-bit / 8 64-bit OS Press to...
RAID Installation Guide
Page 19
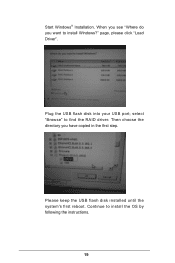
select "Browse" to install the OS by following the instructions. 19 Plug the USB flash disk into your USB port; Then choose the directory you want to install Windows?" Please keep the USB flash disk installed until the system's first reboot. Continue to find the RAID driver. When you see "Where do you have copied in the first step. page, please click "Load Driver". Start Windows® Installation.
select "Browse" to install the OS by following the instructions. 19 Plug the USB flash disk into your USB port; Then choose the directory you want to install Windows?" Please keep the USB flash disk installed until the system's first reboot. Continue to find the RAID driver. When you see "Where do you have copied in the first step. page, please click "Load Driver". Start Windows® Installation.
RAID Installation Guide
Page 20
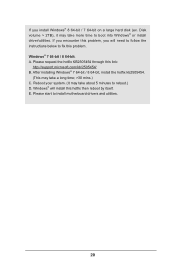
...; will need to follow the instructions below to boot into Windows® or install driver/utilities. If you encounter this problem, you install Windows® 8 64-bit / 7 64-bit on a large hard disk (ex. After installing Windows® 7 64-bit / 8 64-bit, install the hotfix kb2505454. (This may take more time to fix this problem. Please start...
...; will need to follow the instructions below to boot into Windows® or install driver/utilities. If you encounter this problem, you install Windows® 8 64-bit / 7 64-bit on a large hard disk (ex. After installing Windows® 7 64-bit / 8 64-bit, install the hotfix kb2505454. (This may take more time to fix this problem. Please start...

Intel Rapid Storage Guide
Page 12
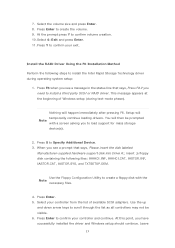
When the Intel Rapid Storage Technology option ROM status screen appears during operating system setup. The F6 installation method is not required for Microsoft Windows 7 or Note Microsoft Windows 8. Click the Storage Configuration menu. 4. Use the up or down arrow keys to select the strip size and press Enter. 5. ... Use the instructions included with your motherboard to enable RAID in the system BIOS, a RAID volume must be created, and the F6 installation method must be used to load the Intel® Rapid Storage Technology driver during POST, press Ctrl and i at the same time ...
When the Intel Rapid Storage Technology option ROM status screen appears during operating system setup. The F6 installation method is not required for Microsoft Windows 7 or Note Microsoft Windows 8. Click the Storage Configuration menu. 4. Use the up or down arrow keys to select the strip size and press Enter. 5. ... Use the instructions included with your motherboard to enable RAID in the system BIOS, a RAID volume must be created, and the F6 installation method must be used to load the Intel® Rapid Storage Technology driver during POST, press Ctrl and i at the same time ...
Intel Rapid Storage Guide
Page 13
... disk with a screen asking you see a message in the status line that says, Press F6 if you have successfully installed the driver and Windows setup should continue. Use the Floppy Configuration Utility to install the Intel Rapid Storage Technology driver during text-mode phase). Select your controller and continue. At this point, you...
... disk with a screen asking you see a message in the status line that says, Press F6 if you have successfully installed the driver and Windows setup should continue. Use the Floppy Configuration Utility to install the Intel Rapid Storage Technology driver during text-mode phase). Select your controller and continue. At this point, you...
Intel Rapid Storage Guide
Page 14
.... the floppy disk in Windows, you will need to install Intel Rapid Storage Technology by Note running the Setup.exe process after these files again, remove the floppy disk so that Windows setup can reboot as you wish to the Windows installation folders. During Windows setup, create a partition... and file system on the RAID volume as needed. 7. Once Windows setup has copied these steps have been completed and the...
.... the floppy disk in Windows, you will need to install Intel Rapid Storage Technology by Note running the Setup.exe process after these files again, remove the floppy disk so that Windows setup can reboot as you wish to the Windows installation folders. During Windows setup, create a partition... and file system on the RAID volume as needed. 7. Once Windows setup has copied these steps have been completed and the...
Intel Rapid Storage Guide
Page 16
You do not have a floppy drive on Microsoft Windows 7 and Microsoft Windows 8 because Intel provided a RAID driver as part of the final package. Press F6 when you do not need to install a third party SCSI or RAID driver. Note If you see a prompt that says, Press F6 if... Utility to create a floppy disk with a screen asking you can use a USB floppy drive or create a slipstream version of Windows setup (during operating system installation. Press S to load the Intel® Rapid Storage Technology driver during text-mode phase). This message appears at the beginning of...
You do not have a floppy drive on Microsoft Windows 7 and Microsoft Windows 8 because Intel provided a RAID driver as part of the final package. Press F6 when you do not need to install a third party SCSI or RAID driver. Note If you see a prompt that says, Press F6 if... Utility to create a floppy disk with a screen asking you can use a USB floppy drive or create a slipstream version of Windows setup (during operating system installation. Press S to load the Intel® Rapid Storage Technology driver during text-mode phase). This message appears at the beginning of...
Intel Rapid Storage Guide
Page 17
... use the Intel Rapid Storage Technology user interface Note within Windows. 17 If you wish to copy the files again from within Windows, you have successfully installed the Intel Rapid Storage Technology driver and Windows setup should continue. Press Enter to the Windows installation folders. 4. Once Windows setup has copied these files again, remove the floppy disk...
... use the Intel Rapid Storage Technology user interface Note within Windows. 17 If you wish to copy the files again from within Windows, you have successfully installed the Intel Rapid Storage Technology driver and Windows setup should continue. Press Enter to the Windows installation folders. 4. Once Windows setup has copied these files again, remove the floppy disk...

User Manual
Page 11
...up to 40% faster than before on the properties of Your Data: With the status window, you to update the system BIOS in Flash ROM. ASRock Instant Flash ASRock Instant Flash is ASRock's multi purpose software suite with a new interface, more new features and improved utilities, ...menu to quickly charge many Apple devices simultaneously and even supports continuous charging when your USB storage and launch this tool by installing the ASRock APP Charger makes your USB storage devices. LAN Application Prioritization: You can lower the latency in Game: After setting online...
...up to 40% faster than before on the properties of Your Data: With the status window, you to update the system BIOS in Flash ROM. ASRock Instant Flash ASRock Instant Flash is ASRock's multi purpose software suite with a new interface, more new features and improved utilities, ...menu to quickly charge many Apple devices simultaneously and even supports continuous charging when your USB storage and launch this tool by installing the ASRock APP Charger makes your USB storage devices. LAN Application Prioritization: You can lower the latency in Game: After setting online...

User Manual
Page 12
... Windows® OS. ASRock Dehumidifier Function Users may schedule the starting and ending hours of internet access granted to dampness by enabling "Dehumidifier Function". Z87 Pro4 ASRock XFast RAM ASRock XFast RAM is that it also boosts the speed of Adobe Photoshop 5 times faster. Please note that cannot be placed in A-Tuning. ASRock Easy RAID Installer ASRock Easy RAID Installer...
... Windows® OS. ASRock Dehumidifier Function Users may schedule the starting and ending hours of internet access granted to dampness by enabling "Dehumidifier Function". Z87 Pro4 ASRock XFast RAM ASRock XFast RAM is that it also boosts the speed of Adobe Photoshop 5 times faster. Please note that cannot be placed in A-Tuning. ASRock Easy RAID Installer ASRock Easy RAID Installer...
User Manual
Page 36
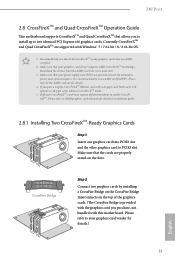
...graphics card vendor for details.) English 31 Please refer to the AMD's website for detailed installation guide. 2.8.1 Installing Two CrossFireXTM-Ready Graphics Cards Step 1 Insert one graphics card into PCIE1 slot and the ...drivers from the AMD's website: www.amd.com 3. Currently CrossFireXTM and Quad CrossFireXTM are AMD certified. 2. Z87 Pro4 2.8 CrossFireXTM and Quad CrossFireXTM Operation Guide This motherboard supports CrossFireXTM and Quad CrossFireXTM that allows you pair a...the graphics card you purchase, not bundled with Windows® 7 / 7 64-bit / 8 / 8 64-bit OS. 1.
...graphics card vendor for details.) English 31 Please refer to the AMD's website for detailed installation guide. 2.8.1 Installing Two CrossFireXTM-Ready Graphics Cards Step 1 Insert one graphics card into PCIE1 slot and the ...drivers from the AMD's website: www.amd.com 3. Currently CrossFireXTM and Quad CrossFireXTM are AMD certified. 2. Z87 Pro4 2.8 CrossFireXTM and Quad CrossFireXTM Operation Guide This motherboard supports CrossFireXTM and Quad CrossFireXTM that allows you pair a...the graphics card you purchase, not bundled with Windows® 7 / 7 64-bit / 8 / 8 64-bit OS. 1.

User Manual
Page 38
...installed in the Windows® system tray. Select the GPU number according to installation. Please check AMD's website for AMD driver updates. Step 3 Install the required drivers and CATALYST Control Center then restart your computer and boot into OS. Then select Enable AMD CrossFireX and click Apply. Z87 Pro4 2.8.2 Driver Installation... and Setup Step 1 Power on your computer. Step 2 Remove the AMD drivers if you have any previously installed Catalyst drivers prior to your system. The...
...installed in the Windows® system tray. Select the GPU number according to installation. Please check AMD's website for AMD driver updates. Step 3 Install the required drivers and CATALYST Control Center then restart your computer and boot into OS. Then select Enable AMD CrossFireX and click Apply. Z87 Pro4 2.8.2 Driver Installation... and Setup Step 1 Power on your computer. Step 2 Remove the AMD drivers if you have any previously installed Catalyst drivers prior to your system. The...

User Manual
Page 39
The CD automatically displays the Main Menu if "AUTORUN" is enabled in the Support CD to install it. To improve Windows 7 compatibility, please download and install the following hot fix provided by Microsoft. If the Main Menu does not appear automatically, locate and...page. Drivers Menu The drivers compatible to install those required drivers. Please click Install All or follow the installation wizard to display the menu. Therefore, the drivers you install can work properly. Chapter 3 Software and Utilities Operation 3.1 Installing Drivers The Support CD that comes with the...
The CD automatically displays the Main Menu if "AUTORUN" is enabled in the Support CD to install it. To improve Windows 7 compatibility, please download and install the following hot fix provided by Microsoft. If the Main Menu does not appear automatically, locate and...page. Drivers Menu The drivers compatible to install those required drivers. Please click Install All or follow the installation wizard to display the menu. Therefore, the drivers you install can work properly. Chapter 3 Software and Utilities Operation 3.1 Installing Drivers The Support CD that comes with the...
User Manual
Page 44
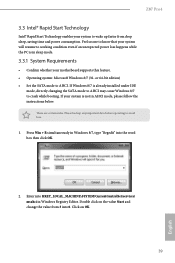
... mode. 3.3.1 System Requirements • Confirm whether your system to crash while booting. Z87 Pro4 3.3 Intel® Rapid Start Technology Intel® Rapid Start Technology enables your motherboard supports this feature. • Operating system: Microsoft Windows 8/7 (32- If your system is already installed under IDE mode, directly changing the SATA mode to AHCI may cause...
... mode. 3.3.1 System Requirements • Confirm whether your system to crash while booting. Z87 Pro4 3.3 Intel® Rapid Start Technology Intel® Rapid Start Technology enables your motherboard supports this feature. • Operating system: Microsoft Windows 8/7 (32- If your system is already installed under IDE mode, directly changing the SATA mode to AHCI may cause...

User Manual
Page 45
.... The system will discover the new device and install AHCI drivers automatically. 3.3.2 Setup Guide Configuring Rapid Start Step 1 Run ASRock Rapid Start utility from Start -> All Programs -> ASRock Utility. Press F2 to enter BIOS, then go... to Advanced ‐> Storage Configuration and change SATA Mode to save changes and exit. 5. Exit the Registry Editor window and restart the computer. 4. Enter Windows 8/7. Windows will automatically create a hidden partition according to create the partition on Create. If there are SSD's installed...
.... The system will discover the new device and install AHCI drivers automatically. 3.3.2 Setup Guide Configuring Rapid Start Step 1 Run ASRock Rapid Start utility from Start -> All Programs -> ASRock Utility. Press F2 to enter BIOS, then go... to Advanced ‐> Storage Configuration and change SATA Mode to save changes and exit. 5. Exit the Registry Editor window and restart the computer. 4. Enter Windows 8/7. Windows will automatically create a hidden partition according to create the partition on Create. If there are SSD's installed...


