
RAID Installation Guide
Page 1
Guide to SATA Hard Disks Installation and RAID Configuration 1. Guide to SATA Hard Disks Installation 2 1.1 Serial ATA (SATA) Hard Disks Installation 2 2. Guide to RAID Configurations 3 2.1 Introduction of RAID 3 2.2 RAID Configuration Precautions 5 2.3 Installing Windows® XP / XP 64-bit / VistaTM / VistaTM 64-bit With RAID Functions 6 2.4 Setting the BIOS RAID Items 11 2.5 Configuring the Intel RAID BIOS 11 2.6 Deleting RAID Volume 15 1
Guide to SATA Hard Disks Installation and RAID Configuration 1. Guide to SATA Hard Disks Installation 2 1.1 Serial ATA (SATA) Hard Disks Installation 2 2. Guide to RAID Configurations 3 2.1 Introduction of RAID 3 2.2 RAID Configuration Precautions 5 2.3 Installing Windows® XP / XP 64-bit / VistaTM / VistaTM 64-bit With RAID Functions 6 2.4 Setting the BIOS RAID Items 11 2.5 Configuring the Intel RAID BIOS 11 2.6 Deleting RAID Volume 15 1
RAID Installation Guide
Page 6
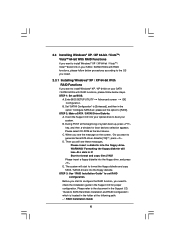
... you will start to configure the RAID function, you need to check the installation guide in the folder at the beginning of system boot-up BIOS. E. STEP 3: Use "RAID Installation Guide" to set the option to [RAID]. STEP 2: Make a SATA / SATAII Driver Diskette. WARNING! B. During POST at...Installing Windows® XP / XP 64-bit With RAID Functions If you want to generate Serial ATA driver diskette [YN]?", press . Enter BIOS SETUP UTILITY Advanced screen IDE Configuration. Insert the Support CD into the floppy drive, and press . Formatting the floppy diskette will lose ALL...
... you will start to configure the RAID function, you need to check the installation guide in the folder at the beginning of system boot-up BIOS. E. STEP 3: Use "RAID Installation Guide" to set the option to [RAID]. STEP 2: Make a SATA / SATAII Driver Diskette. WARNING! B. During POST at...Installing Windows® XP / XP 64-bit With RAID Functions If you want to generate Serial ATA driver diskette [YN]?", press . Enter BIOS SETUP UTILITY Advanced screen IDE Configuration. Insert the Support CD into the floppy drive, and press . Formatting the floppy diskette will lose ALL...
RAID Installation Guide
Page 7
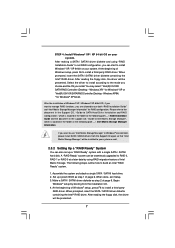
... Support CD again so that "Intel Matrix Storage Manager" will be presented. 7 Begin Windows® setup by using "RAID Installation Guide" to set up system BIOS as well. 2.3.2 Setting Up a "RAID Ready" System You can also set RAID configuration, you are allowed to use "Intel Matrix Storage Manager" in Windows®...
... Support CD again so that "Intel Matrix Storage Manager" will be presented. 7 Begin Windows® setup by using "RAID Installation Guide" to set up system BIOS as well. 2.3.2 Setting Up a "RAID Ready" System You can also set RAID configuration, you are allowed to use "Intel Matrix Storage Manager" in Windows®...
RAID Installation Guide
Page 9
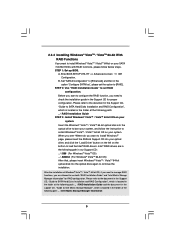
... with RAID functions, please follow the instruction to load the Intel® RAID drivers. STEP 1: Set up BIOS. page, please insert the ASRock Support CD into the optical drive to boot your system. Enter BIOS SETUP UTILITY Advanced screen IDE Configuration. When you see "Where do you need to Intel Matrix Storage Manager...
... with RAID functions, please follow the instruction to load the Intel® RAID drivers. STEP 1: Set up BIOS. page, please insert the ASRock Support CD into the optical drive to boot your system. Enter BIOS SETUP UTILITY Advanced screen IDE Configuration. When you see "Where do you need to Intel Matrix Storage Manager...
RAID Installation Guide
Page 11
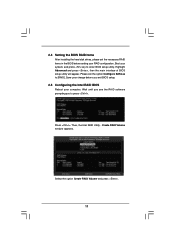
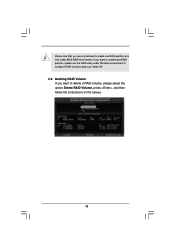
...Advanced and press , then the main interface of BIOS setup utility will appear. Press . Select the option Create RAID Volume and press . 11 Wait until you see the RAID software prompting you exit BIOS setup. 2.5 Configuring the Intel RAID BIOS Reboot your change before setting your system, and... press key to enter BIOS setup utility. 2.4 Setting the BIOS RAID Items After installing the hard disk drives, please set the option...
...Advanced and press , then the main interface of BIOS setup utility will appear. Press . Select the option Create RAID Volume and press . 11 Wait until you see the RAID software prompting you exit BIOS setup. 2.5 Configuring the Intel RAID BIOS Reboot your change before setting your system, and... press key to enter BIOS setup utility. 2.4 Setting the BIOS RAID Items After installing the hard disk drives, please set the option...
RAID Installation Guide
Page 15
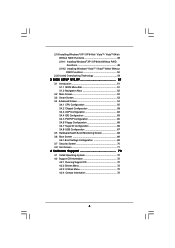
If you want to delete a RAID volume, please select the option Delete RAID Volume, press , and then follow the instructions on the screen. 15 Please note that you are only allowed to create one RAID partition at a time under Windows environment to configure RAID functions after you install OS. 2.6 Deleting RAID Volume If you want to create extra RAID partition, please use the RAID utility under BIOS RAID environment.
If you want to delete a RAID volume, please select the option Delete RAID Volume, press , and then follow the instructions on the screen. 15 Please note that you are only allowed to create one RAID partition at a time under Windows environment to configure RAID functions after you install OS. 2.6 Deleting RAID Volume If you want to create extra RAID partition, please use the RAID utility under BIOS RAID environment.
User Manual
Page 4
... 64-bit Without RAID Functions 49 2.19.2 Installing Windows® VistaTM / VistaTM 64-bit Without RAID Functions 50 2.20 Untied Overclocking Technology 50 3 BIOS SETUP UTILITY 51 3.1 Introduction 51 3.1.1 BIOS Menu Bar 51 3.1.2 Navigation Keys 52 3.2 Main Screen 52 3.3 Smart Screen 53 3.4 Advanced Screen 54 3.4.1 CPU Configuration 55 3.4.2 Chipset Configuration 58 3.4.3 ACPI...
... 64-bit Without RAID Functions 49 2.19.2 Installing Windows® VistaTM / VistaTM 64-bit Without RAID Functions 50 2.20 Untied Overclocking Technology 50 3 BIOS SETUP UTILITY 51 3.1 Introduction 51 3.1.1 BIOS Menu Bar 51 3.1.2 Navigation Keys 52 3.2 Main Screen 52 3.3 Smart Screen 53 3.4 Advanced Screen 54 3.4.1 CPU Configuration 55 3.4.2 Chipset Configuration 58 3.4.3 ACPI...

User Manual
Page 5
... the latest VGA cards and CPU support lists on ASRock website without notice. Chapter 1: Introduction Thank you are using. Because the motherboard specifications and the BIOS software might be subject to the hardware installation. In...) 1 x I/O Panel Shield 2 x ASRock XFire_Bridge_3S Cards 1 x ASRock SLI_Bridge_3S Card 1 x ASRock 3-Way SLI Bridge Card 5 www.asrock.com/support/index.asp 1.1 Package Contents ASRock X58 Deluxe Motherboard (ATX Form Factor: 12.0-in x 9.6-in, 30.5 cm x 24.4 cm) ASRock X58 Deluxe Quick Installation Guide ASRock X58 Deluxe Support CD 1 x 80-conductor Ultra ATA...
... the latest VGA cards and CPU support lists on ASRock website without notice. Chapter 1: Introduction Thank you are using. Because the motherboard specifications and the BIOS software might be subject to the hardware installation. In...) 1 x I/O Panel Shield 2 x ASRock XFire_Bridge_3S Cards 1 x ASRock SLI_Bridge_3S Card 1 x ASRock 3-Way SLI Bridge Card 5 www.asrock.com/support/index.asp 1.1 Package Contents ASRock X58 Deluxe Motherboard (ATX Form Factor: 12.0-in x 9.6-in, 30.5 cm x 24.4 cm) ASRock X58 Deluxe Quick Installation Guide ASRock X58 Deluxe Support CD 1 x 80-conductor Ultra ATA...
User Manual
Page 7
... RAID 1, RAID 10, RAID 5 and Intel Matrix Storage), NCQ, AHCI and "Hot Plug" functions (see CAUTION 8) - Supports Smart BIOS - CPU Quiet Fan - ASRock U-COP (see CAUTION 9) - Supports "Plug and Play" - CPU, DRAM, NB, SB, VTT Voltage Multi-adjustment - Intelligent Energy Saver...Feature Hardware Monitor - 1 x IEEE 1394 Port - AMI Legal BIOS - Drivers, Utilities, AntiVirus Software (Trial Version) - Supports jumperfree - CPU/Chassis/NB/Power FAN connector - 24 pin ATX power connector - 8 pin 12V power connector - ASRock OC Tuner (see CAUTION 6) * 2 SATAII 3.0 Gb/s ...
... RAID 1, RAID 10, RAID 5 and Intel Matrix Storage), NCQ, AHCI and "Hot Plug" functions (see CAUTION 8) - Supports Smart BIOS - CPU Quiet Fan - ASRock U-COP (see CAUTION 9) - Supports "Plug and Play" - CPU, DRAM, NB, SB, VTT Voltage Multi-adjustment - Intelligent Energy Saver...Feature Hardware Monitor - 1 x IEEE 1394 Port - AMI Legal BIOS - Drivers, Utilities, AntiVirus Software (Trial Version) - Supports jumperfree - CPU/Chassis/NB/Power FAN connector - 24 pin ATX power connector - 8 pin 12V power connector - ASRock OC Tuner (see CAUTION 6) * 2 SATAII 3.0 Gb/s ...

User Manual
Page 8
... Technology. For Windows® XP 64-bit and Windows® VistaTM 64-bit with overclocking, including adjusting the setting in the BIOS, applying Untied Overclocking Technology, or using the thirdparty overclocking tools. For audio output, this motherboard supports both stereo and mono modes.... installation. 4. Overclocking may be done at your SATAII hard disk drive to adjust your own risk and expense. About the setting of ASRock OC Tuner. Please read the installation guide of your system by overclocking. FCC, CE, WHQL * For detailed product information, please visit...
... Technology. For Windows® XP 64-bit and Windows® VistaTM 64-bit with overclocking, including adjusting the setting in the BIOS, applying Untied Overclocking Technology, or using the thirdparty overclocking tools. For audio output, this motherboard supports both stereo and mono modes.... installation. 4. Overclocking may be done at your SATAII hard disk drive to adjust your own risk and expense. About the setting of ASRock OC Tuner. Please read the installation guide of your system by overclocking. FCC, CE, WHQL * For detailed product information, please visit...

User Manual
Page 12
... Bottom: CTR BASS Top: LINE IN Center: FRONT Bottom: MIC IN LAN PHY AUDIO CODEC CD1 Intel X58 CPU_FAN1 Chipset PWR_FAN1 PCIE1 PCI1 3-WaySLI CHA_FAN2 NB_FAN1 CHA_FAN1 RoHS Super I/O PCIE2 PCI2 X58 Deluxe PCI Express 2.0 1394a 8Mb BIOS PCIE3 PCI3 CMOS Battery FLOPPY1 HDMI_SPDIF1 1 PCIE4 1 COM1 1 IR1 CLRCMOS1 1 VIA VT6330 IDE1 Intel ICH10R RAID...
... Bottom: CTR BASS Top: LINE IN Center: FRONT Bottom: MIC IN LAN PHY AUDIO CODEC CD1 Intel X58 CPU_FAN1 Chipset PWR_FAN1 PCIE1 PCI1 3-WaySLI CHA_FAN2 NB_FAN1 CHA_FAN1 RoHS Super I/O PCIE2 PCI2 X58 Deluxe PCI Express 2.0 1394a 8Mb BIOS PCIE3 PCI3 CMOS Battery FLOPPY1 HDMI_SPDIF1 1 PCIE4 1 COM1 1 IR1 CLRCMOS1 1 VIA VT6330 IDE1 Intel ICH10R RAID...
User Manual
Page 33
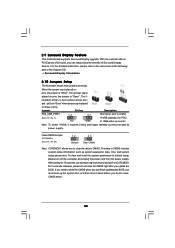
... system password, date, time, and system setup parameters. For the detailed instruction, please refer to clear the CMOS when you just finish updating the BIOS, you must boot up events. However, please do the clearCMOS action. 33 The il- lustration shows a 3-pin jumper whose pin1 and pin2 are...Display Information 2.10 Jumpers Setup The illustration shows how jumpers are "Short" when jumper cap is placed on PCI Express VGA cards, you update the BIOS. Clear CMOS Jumper (CLRCMOS1) (see p.12, No. 1) 2_3 Short pin2, pin3 to default setup, please turn off the computer and unplug ...
... system password, date, time, and system setup parameters. For the detailed instruction, please refer to clear the CMOS when you just finish updating the BIOS, you must boot up events. However, please do the clearCMOS action. 33 The il- lustration shows a 3-pin jumper whose pin1 and pin2 are...Display Information 2.10 Jumpers Setup The illustration shows how jumpers are "Short" when jumper cap is placed on PCI Express VGA cards, you update the BIOS. Clear CMOS Jumper (CLRCMOS1) (see p.12, No. 1) 2_3 Short pin2, pin3 to default setup, please turn off the computer and unplug ...

User Manual
Page 36
... 64-bit OS: Click "Audio I/O", select "Connector Settings" , choose "Disable front panel jack detection", and save the change by clicking "OK". D. Enter Windows system. Enter BIOS Setup Utility. Enter Advanced Settings, and then select Chipset Configuration. For Windows® VistaTM / VistaTM 64-bit OS: Click the right-top "Folder" icon , choose...
... 64-bit OS: Click "Audio I/O", select "Connector Settings" , choose "Disable front panel jack detection", and save the change by clicking "OK". D. Enter Windows system. Enter BIOS Setup Utility. Enter Advanced Settings, and then select Chipset Configuration. For Windows® VistaTM / VistaTM 64-bit OS: Click the right-top "Folder" icon , choose...

User Manual
Page 45
Please follow the order from up BIOS. STEP 2: Make a SATA / SATAII Driver Diskette. A. C. WARNING! Formatting the floppy diskette will see the message on your optical drive first. The system will start to ... of system boot-up, press key, and then a window for proper configuration. Before you see these messages, Please insert a diskette into the floppy diskette. B. Enter BIOS SETUP UTILITY Advanced screen IDE Configuration. B. When you start to format the floppy diskette and copy SATA / SATAII drivers into the floppy drive. D. Then, the...
Please follow the order from up BIOS. STEP 2: Make a SATA / SATAII Driver Diskette. A. C. WARNING! Formatting the floppy diskette will see the message on your optical drive first. The system will start to ... of system boot-up, press key, and then a window for proper configuration. Before you see these messages, Please insert a diskette into the floppy diskette. B. Enter BIOS SETUP UTILITY Advanced screen IDE Configuration. B. When you start to format the floppy diskette and copy SATA / SATAII drivers into the floppy drive. D. Then, the...

User Manual
Page 46
...", which is located in the folder at the following path: .. \ RAID Installation Guide and the document in the support CD, "Guide to set up system BIOS as step 2 of page 45. Make a SATA / SATAII driver diskette as step 1 of page 45. Windows XP64)" for Windows® XP 64-bit. When prompted...
...", which is located in the folder at the following path: .. \ RAID Installation Guide and the document in the support CD, "Guide to set up system BIOS as step 2 of page 45. Make a SATA / SATAII driver diskette as step 1 of page 45. Windows XP64)" for Windows® XP 64-bit. When prompted...

User Manual
Page 48
...for RAID configuration. A. B. Before you start to configure the RAID function, you want to install Windows?" Enter BIOS SETUP UTILITY Advanced screen IDE Configuration. STEP 1: Set up BIOS. STEP 2: Use "RAID Installation Guide" to your system as ", please set RAID configuration. Please refer to ...insert Windows® VistaTM / VistaTM 64-bit optical disk into the optical drive again to continue the installation. page, please insert the ASRock Support CD into the optical drive to boot your system, and follow below steps. Set "SATAII Configuration" to [Enhanced], and then ...
...for RAID configuration. A. B. Before you start to configure the RAID function, you want to install Windows?" Enter BIOS SETUP UTILITY Advanced screen IDE Configuration. STEP 1: Set up BIOS. STEP 2: Use "RAID Installation Guide" to your system as ", please set RAID configuration. Please refer to ...insert Windows® VistaTM / VistaTM 64-bit optical disk into the optical drive again to continue the installation. page, please insert the ASRock Support CD into the optical drive to boot your system, and follow below steps. Set "SATAII Configuration" to [Enhanced], and then ...

User Manual
Page 49
...® XP / XP 64-bit / VistaTM / VistaTM 64-bit OS on your SATA / SATAII HDDs without RAID functions, please follow below steps. Enter BIOS SETUP UTILITY Advanced screen IDE Configuration. STEP 2: Make a SATA / SATAII driver diskette. STEP 2: Install Windows® XP / XP 64-bit OS on your.... Please make a SATA / SATAII driver diskette by following section 2.18.1 step 2 on your SATA / SATAII HDDs without NCQ function STEP 1: Set up BIOS. After making a SATA / SATAII driver diskette, you can start to install Windows® XP / XP 64-bit on your system. 49 2.19 Installing ...
...® XP / XP 64-bit / VistaTM / VistaTM 64-bit OS on your SATA / SATAII HDDs without RAID functions, please follow below steps. Enter BIOS SETUP UTILITY Advanced screen IDE Configuration. STEP 2: Make a SATA / SATAII driver diskette. STEP 2: Install Windows® XP / XP 64-bit OS on your.... Please make a SATA / SATAII driver diskette by following section 2.18.1 step 2 on your SATA / SATAII HDDs without NCQ function STEP 1: Set up BIOS. After making a SATA / SATAII driver diskette, you can start to install Windows® XP / XP 64-bit on your system. 49 2.19 Installing ...

User Manual
Page 50
... screen IDE Configuration. When you see "Where do you want to [IDE]. Please refer to install Windows?" page, please insert the ASRock Support CD into the optical drive again to load the Intel® AHCI drivers. Therefore, CPU FSB is untied during overclocking, FSB enjoys...your optical drive, and click the "Load Driver" button on the left on your SATA / SATAII HDDs without NCQ function STEP 1: Set up BIOS. Enter BIOS SETUP UTILITY Advanced screen IDE Configuration. A. 2.19.2 Installing Windows® VistaTM / VistaTM 64-bit Without RAID Functions If you want to the ...
... screen IDE Configuration. When you see "Where do you want to [IDE]. Please refer to install Windows?" page, please insert the ASRock Support CD into the optical drive again to load the Intel® AHCI drivers. Therefore, CPU FSB is untied during overclocking, FSB enjoys...your optical drive, and click the "Load Driver" button on the left on your SATA / SATAII HDDs without NCQ function STEP 1: Set up BIOS. Enter BIOS SETUP UTILITY Advanced screen IDE Configuration. A. 2.19.2 Installing Windows® VistaTM / VistaTM 64-bit Without RAID Functions If you want to the ...
User Manual
Page 51
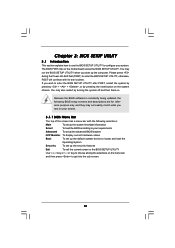
... screens and descriptions are for reference purpose only, and they may not exactly match what you see on your screen. 3.1.1 BIOS Menu Bar The top of the screen has a menu bar with the following selections: Main To set up the computer. You may also restart by ...pressing the reset button on the system chassis. If you start up the security features Exit To exit the current screen or the BIOS SETUP UTILITY Use < > key or < > key to choose among the selections on the menu bar, and then press to enter the...
... screens and descriptions are for reference purpose only, and they may not exactly match what you see on your screen. 3.1.1 BIOS Menu Bar The top of the screen has a menu bar with the following selections: Main To set up the computer. You may also restart by ...pressing the reset button on the system chassis. If you start up the security features Exit To exit the current screen or the BIOS SETUP UTILITY Use < > key or < > key to choose among the selections on the menu bar, and then press to enter the...
User Manual
Page 52
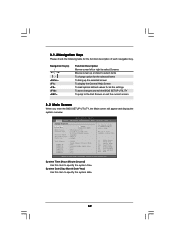
... key. Use [+] or [-] to select a field. 3.1.2Navigation Keys Please check the following table for all the settings To save changes and exit the BIOS SETUP UTILITY To jump to the Exit Screen or exit the current screen 3.2 Main Screen When you enter the... UTILITY Main Smart Advanced H/W Monitor Boot Security Exit System Overview System Time System Date [14:00:09] [Wed 01/14/2009] BIOS Version : X58 Deluxe P1.00 Processor Type : Intel (R) Xeon (TM) CPU W 570 @ 3.20GHz (64bit) Processor Speed : 3200MHz Microcode Update : 106A4/A Cache Size : 8192KB Total Memory DDR3_A2 DDR3_A1...
... key. Use [+] or [-] to select a field. 3.1.2Navigation Keys Please check the following table for all the settings To save changes and exit the BIOS SETUP UTILITY To jump to the Exit Screen or exit the current screen 3.2 Main Screen When you enter the... UTILITY Main Smart Advanced H/W Monitor Boot Security Exit System Overview System Time System Date [14:00:09] [Wed 01/14/2009] BIOS Version : X58 Deluxe P1.00 Processor Type : Intel (R) Xeon (TM) CPU W 570 @ 3.20GHz (64bit) Processor Speed : 3200MHz Microcode Update : 106A4/A Cache Size : 8192KB Total Memory DDR3_A2 DDR3_A1...


