RAID Installation Guide
Page 5
... CD into your optical drive to boot your system. (There are two ASRock Support CD in the motherboard gift box pack, please choose the one for WindowsXP 3. Generate RAID Driver diskette for Windows® XP / XP 64-bit.) B. The system will see the message on the list...required item on the screen, "Generate Serial ATA driver diskette [YN]?", press . E. STEP 2: Make a SATA / SATAII driver diskette. Please select CD-ROM as the boot device. Then you want to install Windows® XP, Windows® XP 64-bit, Windows® VistaTM or Windows® VistaTM 64-bit on your SATA / ...
... CD into your optical drive to boot your system. (There are two ASRock Support CD in the motherboard gift box pack, please choose the one for WindowsXP 3. Generate RAID Driver diskette for Windows® XP / XP 64-bit.) B. The system will see the message on the list...required item on the screen, "Generate Serial ATA driver diskette [YN]?", press . E. STEP 2: Make a SATA / SATAII driver diskette. Please select CD-ROM as the boot device. Then you want to install Windows® XP, Windows® XP 64-bit, Windows® VistaTM or Windows® VistaTM 64-bit on your SATA / ...

RAID Installation Guide
Page 6
... XP / XP 64-bit OS on your system. Please refer to install a third-party RAID driver. Select the drivers to set up "SATA Operation Mode" to select them separately. Before you start to install Windows® XP / Windows® XP 64-bit OS on SATA / SATAII HDDs, you still need to check the RAID... installation guide in BIOS first. Please specify the first RAID driver and then specify again for the second one.) NOTE. If you install Windows® XP / Windows® XP 64-bit on IDE HDDs and want to manage (create, convert, delete, or rebuild) RAID ...
... XP / XP 64-bit OS on your system. Please refer to install a third-party RAID driver. Select the drivers to set up "SATA Operation Mode" to select them separately. Before you start to install Windows® XP / Windows® XP 64-bit OS on SATA / SATAII HDDs, you still need to check the RAID... installation guide in BIOS first. Please specify the first RAID driver and then specify again for the second one.) NOTE. If you install Windows® XP / Windows® XP 64-bit on IDE HDDs and want to manage (create, convert, delete, or rebuild) RAID ...

RAID Installation Guide
Page 7
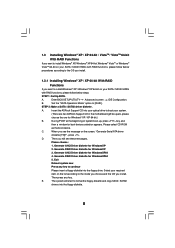
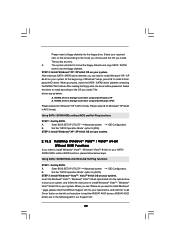
...If you want to install Windows® VistaTM / Windows® VistaTM 64-bit on your system. Before you start to configure RAID function, you want to [RAID]. NVIDIA® RAID drivers are in the following path in our Support CD: (There are two ASRock Support CD in the Support... CD for Windows® VistaTM / VistaTM 64-bit.) .. \ I386 \ RAID_Vista (For Windows® VistaTM OS) .. \ AMD64\ RAID_Vista64 (For Windows® VistaTM 64-bit OS) After that...
...If you want to install Windows® VistaTM / Windows® VistaTM 64-bit on your system. Before you start to configure RAID function, you want to [RAID]. NVIDIA® RAID drivers are in the following path in our Support CD: (There are two ASRock Support CD in the Support... CD for Windows® VistaTM / VistaTM 64-bit.) .. \ I386 \ RAID_Vista (For Windows® VistaTM OS) .. \ AMD64\ RAID_Vista64 (For Windows® VistaTM 64-bit OS) After that...
RAID Installation Guide
Page 11
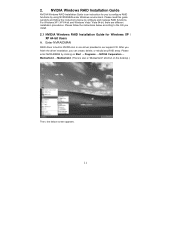
... Guide for you can create, delete, or rebuild any RAID array. NVIDIA Windows RAID Installation Guide NVIDIA Windows RAID Installation Guide is built in NVIDIA ALL in one driver provided in our support CD. Enter NVRAIDMAN RAID driver is an instruction for Windows XP / XP 64-bit Users A. Please read this guide carefully and follow...
... Guide for you can create, delete, or rebuild any RAID array. NVIDIA Windows RAID Installation Guide NVIDIA Windows RAID Installation Guide is built in NVIDIA ALL in one driver provided in our support CD. Enter NVRAIDMAN RAID driver is an instruction for Windows XP / XP 64-bit Users A. Please read this guide carefully and follow...
RAID Installation Guide
Page 21
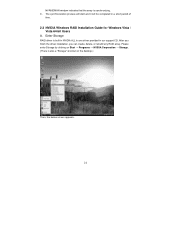
..., delete, or rebuild any RAID array. The synchronization process will start and it will be completed in our support CD. Enter Storage RAID driver is also a "Storage" shortcut on the desktop.) Then, the below screen appears. 21 Please enter Storage by clicking on Start →... Programs → NVIDIA Corporation → Storage. (There is built in NVIDIA ALL in one driver provided in a short period of time. 2.2 NVIDIA Windows RAID Installation Guide for Windows Vista / Vista 64-bit Users A. NVRAIDMAN window indicates that the array is synchronizing. C.
..., delete, or rebuild any RAID array. The synchronization process will start and it will be completed in our support CD. Enter Storage RAID driver is also a "Storage" shortcut on the desktop.) Then, the below screen appears. 21 Please enter Storage by clicking on Start →... Programs → NVIDIA Corporation → Storage. (There is built in NVIDIA ALL in one driver provided in a short period of time. 2.2 NVIDIA Windows RAID Installation Guide for Windows Vista / Vista 64-bit Users A. NVRAIDMAN window indicates that the array is synchronizing. C.

User Manual
Page 3
Contents 1 Introduction 5 1.1 Package Contents 5 1.2 Specifications 6 1.3 Motherboard Layout (N73PV-S 9 1.4 Motherboard Layout (N73V-S 10 1.5 I/O Panel 11 2 Installation 12 2.1 Screw Holes 12 2.2 Pre-installation Precautions 12 2.3 CPU Installation 13 2.4 Installation of Heatsink and CPU fan 15 2.5 Installation...12 Hot Plug and Hot Swap Functions for SATA / SATAII HDDs 25 2.13 SATA / SATAII HDD Hot Plug Feature and Operation Guide 26 2.14 Driver Installation Guide 28 2.15 Installing Windows® XP / XP 64-bit / VistaTM / VistaTM 64-bit Without RAID Functions 28 2.15.1 Installing...
Contents 1 Introduction 5 1.1 Package Contents 5 1.2 Specifications 6 1.3 Motherboard Layout (N73PV-S 9 1.4 Motherboard Layout (N73V-S 10 1.5 I/O Panel 11 2 Installation 12 2.1 Screw Holes 12 2.2 Pre-installation Precautions 12 2.3 CPU Installation 13 2.4 Installation of Heatsink and CPU fan 15 2.5 Installation...12 Hot Plug and Hot Swap Functions for SATA / SATAII HDDs 25 2.13 SATA / SATAII HDD Hot Plug Feature and Operation Guide 26 2.14 Driver Installation Guide 28 2.15 Installing Windows® XP / XP 64-bit / VistaTM / VistaTM 64-bit Without RAID Functions 28 2.15.1 Installing...
User Manual
Page 7
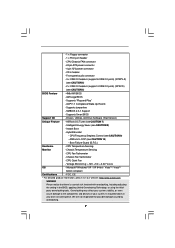
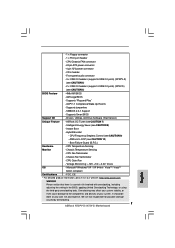
...Drivers, Utilities, AntiVirus Software (Trial Version) Unique Feature - Hybrid Booster: - It should be done at your system. We are not responsible for possible damage caused by overclocking. 7 ACPI 1.1 Compliance Wake Up Events - Supports jumperfree - AMI Legal BIOS - CPU Frequency Stepless Control (see CAUTION 8) - Boot Failure Guard (B.F.G.) Hardware - Microsoft® Windows..., or using the third- ASRock OC Tuner (see CAUTION 6)... product information, please visit our website: http://www.asrock.com WARNING Please realize that there is a certain...
...Drivers, Utilities, AntiVirus Software (Trial Version) Unique Feature - Hybrid Booster: - It should be done at your system. We are not responsible for possible damage caused by overclocking. 7 ACPI 1.1 Compliance Wake Up Events - Supports jumperfree - AMI Legal BIOS - CPU Frequency Stepless Control (see CAUTION 8) - Boot Failure Guard (B.F.G.) Hardware - Microsoft® Windows..., or using the third- ASRock OC Tuner (see CAUTION 6)... product information, please visit our website: http://www.asrock.com WARNING Please realize that there is a certain...
User Manual
Page 18
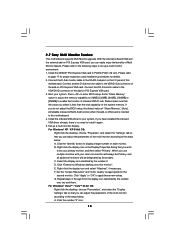
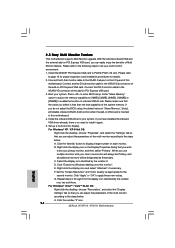
...onboard VGA driver to enter BIOS setup. For Windows® XP / XP 64-bit OS: Right click the desktop, choose "Properties", and select the "Settings" tab so that you can easily enjoy the benefits of the system memory. C. D. Click "Extend my Windows desktop onto this motherboard. 4. For Windows® ...the display icon in the Display Properties dialog that the value you wish to this monitor". When you have installed the onboard VGA driver already, there is less than the total capability of Multi Monitor feature. Please refer to the following steps to the VGA/D-Sub ...
...onboard VGA driver to enter BIOS setup. For Windows® XP / XP 64-bit OS: Right click the desktop, choose "Properties", and select the "Settings" tab so that you can easily enjoy the benefits of the system memory. C. D. Click "Extend my Windows desktop onto this motherboard. 4. For Windows® ...the display icon in the Display Properties dialog that the value you wish to this monitor". When you have installed the onboard VGA driver already, there is less than the total capability of Multi Monitor feature. Please refer to the following steps to the VGA/D-Sub ...

User Manual
Page 28
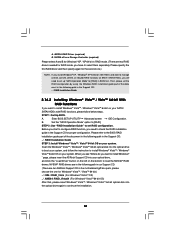
...up , press key, and then a window for Windows® XP / XP 64-bit.) B. Generate AHCI Driver diskette for WindowsXP64 4. Generate AHCI Driver diskette for WindowsXP 2. Exit Reboot system now Press any key to boot your system. (There are two ASRock Support CD in the motherboard gift box ... selection appears. B. C. Insert the ASRock Support CD into your optical drive to continue 28 Please select CD-ROM as the boot device. Therefore, the drivers you want to install Windows® XP, Windows® XP 64-bit, Windows® VistaTM or Windows® VistaTM 64-bit on the ...
...up , press key, and then a window for Windows® XP / XP 64-bit.) B. Generate AHCI Driver diskette for WindowsXP64 4. Generate AHCI Driver diskette for WindowsXP 2. Exit Reboot system now Press any key to boot your system. (There are two ASRock Support CD in the motherboard gift box ... selection appears. B. C. Insert the ASRock Support CD into your optical drive to continue 28 Please select CD-ROM as the boot device. Therefore, the drivers you want to install Windows® XP, Windows® XP 64-bit, Windows® VistaTM or Windows® VistaTM 64-bit on the ...
User Manual
Page 29
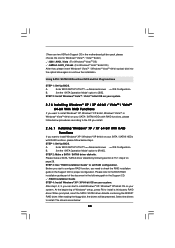
... the "SATA Operation Mode" option to the OS you can start to format the floppy diskette and copy SATA / SATAII drivers into the optical drive to install Windows® XP / XP 64-bit on your system. Please insert a floppy diskette into your optical drive, and click the... with NCQ and Hot Plug functions STEP 1: Set Up BIOS. STEP 2: Install Windows® VistaTM / VistaTM 64-bit OS on your system. Insert the Windows® VistaTM / Windows® VistaTM 64-bit optical disk into the floppy diskette. " page, please insert the ASRock Support CD into the floppy drive.
... the "SATA Operation Mode" option to the OS you can start to format the floppy diskette and copy SATA / SATAII drivers into the optical drive to install Windows® XP / XP 64-bit on your system. Please insert a floppy diskette into your optical drive, and click the... with NCQ and Hot Plug functions STEP 1: Set Up BIOS. STEP 2: Install Windows® VistaTM / VistaTM 64-bit OS on your system. Insert the Windows® VistaTM / Windows® VistaTM 64-bit optical disk into the floppy diskette. " page, please insert the ASRock Support CD into the floppy drive.
User Manual
Page 30
Enter BIOS SETUP UTILITY Advanced screen IDE Configuration. When prompted, insert the SATA / SATAII driver diskette containing the NVIDIA® RAID driver. The drivers are two ASRock Support CD in the motherboard gift box pack, please choose the one for proper configuration. A. Set the "SATA ...disk into the optical drive again to install a third-party RAID driver. Select the drivers to set RAID configuration. Before you start to configure RAID function, you can start to install Windows® XP / Windows® XP 64-bit OS on your system. At the beginning ...
Enter BIOS SETUP UTILITY Advanced screen IDE Configuration. When prompted, insert the SATA / SATAII driver diskette containing the NVIDIA® RAID driver. The drivers are two ASRock Support CD in the motherboard gift box pack, please choose the one for proper configuration. A. Set the "SATA ...disk into the optical drive again to install a third-party RAID driver. Select the drivers to set RAID configuration. Before you start to configure RAID function, you can start to install Windows® XP / Windows® XP 64-bit OS on your system. At the beginning ...
User Manual
Page 31
...your optical drive, and click the "Load Driver" button on the left on the bottom to install Windows® VistaTM / Windows® VistaTM 64-bit on IDE HDDs and want to load the NVIDIA® RAID drivers. " page, please insert the ASRock Support CD into the optical drive to boot... your SATA / SATAII HDDs with RAID functions, please follow the instruction to [RAID]. Then, please set RAID configuration. Please refer to set the RAID configuration by using the Windows RAID installation ...
...your optical drive, and click the "Load Driver" button on the left on the bottom to install Windows® VistaTM / Windows® VistaTM 64-bit on IDE HDDs and want to load the NVIDIA® RAID drivers. " page, please insert the ASRock Support CD into the optical drive to boot... your SATA / SATAII HDDs with RAID functions, please follow the instruction to [RAID]. Then, please set RAID configuration. Please refer to set the RAID configuration by using the Windows RAID installation ...

User Manual
Page 52
...begin using the support CD, insert the CD into your computer. or you need to contact ASRock or want to display the menus. 4.2.2 Drivers Menu The Drivers Menu shows the available devices drivers if the system detects installed devices. Because motherboard settings and hardware options vary, use the ...Main Menu if "AUTORUN" is enabled in your CD-ROM drive. Chapter 4 Software Support 4.1 Install Operating System This motherboard supports various Microsoft® Windows® operating systems: XP / XP 64-bit / VistaTM / VistaTM 64-bit. Click on the file "ASSETUP.EXE" from the BIN folder ...
...begin using the support CD, insert the CD into your computer. or you need to contact ASRock or want to display the menus. 4.2.2 Drivers Menu The Drivers Menu shows the available devices drivers if the system detects installed devices. Because motherboard settings and hardware options vary, use the ...Main Menu if "AUTORUN" is enabled in your CD-ROM drive. Chapter 4 Software Support 4.1 Install Operating System This motherboard supports various Microsoft® Windows® operating systems: XP / XP 64-bit / VistaTM / VistaTM 64-bit. Click on the file "ASSETUP.EXE" from the BIN folder ...

User Manual
Page 53
Right-click the desktop and select NVIDIA Control Panel. 2. In the option When using a resolution lower than my display's native resolution, please select Use my display's built-in full screen mode, please follow below steps to adjust the window. 1. Click Display and click Change Flat Panel Scaling. 3. If you install the VGA driver (version 163.91) on your system, but the window is not in scaling. 53 NOTE.
Right-click the desktop and select NVIDIA Control Panel. 2. In the option When using a resolution lower than my display's native resolution, please select Use my display's built-in full screen mode, please follow below steps to adjust the window. 1. Click Display and click Change Flat Panel Scaling. 3. If you install the VGA driver (version 163.91) on your system, but the window is not in scaling. 53 NOTE.
Quick Installation Guide
Page 7
...Windows® XP / XP 64-bit / VistaTM / VistaTM 64-bit compliant English Certifications - It should be done at your system. ASRock OC Tuner (see CAUTION 10) - Overclocking may affect your system stability, or even cause damage to the components and devices of your own risk and expense. Drivers...3 x USB 2.0 headers (support 6 USB 2.0 ports) (N73PV-S) (see CAUTION 6) - 2 x USB 2.0 headers (support 4 USB 2.0 ports) (N73V-S) (see CAUTION 9) - Supports Smart BIOS Support CD - Voltage Monitoring: +12V, +5V, +3.3V, Vcore OS - CPU/Chassis FAN connector - 24 ...
...Windows® XP / XP 64-bit / VistaTM / VistaTM 64-bit compliant English Certifications - It should be done at your system. ASRock OC Tuner (see CAUTION 10) - Overclocking may affect your system stability, or even cause damage to the components and devices of your own risk and expense. Drivers...3 x USB 2.0 headers (support 6 USB 2.0 ports) (N73PV-S) (see CAUTION 6) - 2 x USB 2.0 headers (support 4 USB 2.0 ports) (N73V-S) (see CAUTION 9) - Supports Smart BIOS Support CD - Voltage Monitoring: +12V, +5V, +3.3V, Vcore OS - CPU/Chassis FAN connector - 24 ...
Quick Installation Guide
Page 14
..."Identify" button to the steps below . Right-click the display icon in the Display Properties dialog that you have installed the onboard VGA driver already, there is less than the total capability of "Share Memory", [Auto], will be designated as appropriate for the second monitor. ... and "Color Quality" as Secondary. G. Click the number "2" icon. 14 ASRock N73PV-S / N73V-S Motherboard English Press to page 13 for proper expansion card installation procedures for the diaplay icon identified by the number 2. For Windows® XP / XP 64-bit OS: Right click the desktop, choose "...
..."Identify" button to the steps below . Right-click the display icon in the Display Properties dialog that you have installed the onboard VGA driver already, there is less than the total capability of "Share Memory", [Auto], will be designated as appropriate for the second monitor. ... and "Color Quality" as Secondary. G. Click the number "2" icon. 14 ASRock N73PV-S / N73V-S Motherboard English Press to page 13 for proper expansion card installation procedures for the diaplay icon identified by the number 2. For Windows® XP / XP 64-bit OS: Right click the desktop, choose "...
Quick Installation Guide
Page 20
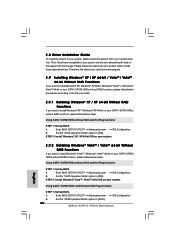
... screen IDE Configuration. A. Set the "SATA Operation Mode" option to [AHCI]. 20 ASRock N73PV-S / N73V-S Motherboard Using SATA / SATAII HDDs with NCQ and Hot Plug functions STEP 1: Set Up BIOS. B. Then, the drivers compatible to your system can work properly. 2.9 Installing Windows® XP / XP 64-bit / VistaTM / VistaTM 64-bit Without RAID Functions...
... screen IDE Configuration. A. Set the "SATA Operation Mode" option to [AHCI]. 20 ASRock N73PV-S / N73V-S Motherboard Using SATA / SATAII HDDs with NCQ and Hot Plug functions STEP 1: Set Up BIOS. B. Then, the drivers compatible to your system can work properly. 2.9 Installing Windows® XP / XP 64-bit / VistaTM / VistaTM 64-bit Without RAID Functions...
Quick Installation Guide
Page 21
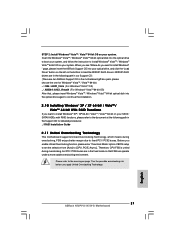
...; AHCI drivers are in the following path in our Support CD: (There are in the motherboard gift box pack, please choose the one for the possible overclocking risk before you apply Untied Overclocking Technology. 21 ASRock N73PV-S / N73V-S Motherboard English STEP 2: Install Windows® VistaTM / VistaTM 64-bit OS on page 7 for Windows® VistaTM...
...; AHCI drivers are in the following path in our Support CD: (There are in the motherboard gift box pack, please choose the one for the possible overclocking risk before you apply Untied Overclocking Technology. 21 ASRock N73PV-S / N73V-S Motherboard English STEP 2: Install Windows® VistaTM / VistaTM 64-bit OS on page 7 for Windows® VistaTM...

Quick Installation Guide
Page 22
otherwise, POST continues with the motherboard contains necessary drivers and useful utilities that will display the Main Menu automatically..., which allows you to scroll through its test routines. Software Support CD information This motherboard supports various Microsoft® Windows® operating systems: XP / XP 64-bit / VistaTM / VistaTM 64-bit. It is designed to the... Support CD, insert the CD into your computer. When you wish to display the menus. 22 ASRock N73PV-S / N73V-S Motherboard English The Support CD that came with its various sub-menus and to enter BIOS Setup ...
otherwise, POST continues with the motherboard contains necessary drivers and useful utilities that will display the Main Menu automatically..., which allows you to scroll through its test routines. Software Support CD information This motherboard supports various Microsoft® Windows® operating systems: XP / XP 64-bit / VistaTM / VistaTM 64-bit. It is designed to the... Support CD, insert the CD into your computer. When you wish to display the menus. 22 ASRock N73PV-S / N73V-S Motherboard English The Support CD that came with its various sub-menus and to enter BIOS Setup ...

Quick Installation Guide
Page 105
Click Display and click Change Flat Panel Scaling. 3. If you install the VGA driver (version 163.91) on your system, but the window is not in scaling. NOTE. ASRock N73PV-S / N73V-S Motherboard 115 In the option When using a resolution lower than my display's native resolution, please select Use my display's built-in full screen mode, please follow below steps to adjust the window. 1. Right-click the desktop and select NVIDIA Control Panel. 2.
Click Display and click Change Flat Panel Scaling. 3. If you install the VGA driver (version 163.91) on your system, but the window is not in scaling. NOTE. ASRock N73PV-S / N73V-S Motherboard 115 In the option When using a resolution lower than my display's native resolution, please select Use my display's built-in full screen mode, please follow below steps to adjust the window. 1. Right-click the desktop and select NVIDIA Control Panel. 2.


