
User Manual
Page 6
... for Socket AM2+ / AM2 processors: AMD PhenomTM FX / Phenom / Athlon 64 FX / Athlon 64 X2 Dual-Core / Athlon X2 Dual-Core / Athlon 64 / Sempron processor (see CAUTION 1) - FSB 1000 MHz (2.0 GT/s) - Dual Channel DDR2 Memory Technology (see CAUTION 5) - Max. resolution up to -Use USB 2.0 Ports - 1 x RJ-45 LAN Port with max. N68-S UCC...
... for Socket AM2+ / AM2 processors: AMD PhenomTM FX / Phenom / Athlon 64 FX / Athlon 64 X2 Dual-Core / Athlon X2 Dual-Core / Athlon 64 / Sempron processor (see CAUTION 1) - FSB 1000 MHz (2.0 GT/s) - Dual Channel DDR2 Memory Technology (see CAUTION 5) - Max. resolution up to -Use USB 2.0 Ports - 1 x RJ-45 LAN Port with max. N68-S UCC...

User Manual
Page 11
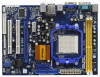
1.3 Motherboard Layout (N68-GS UCC / N68-S UCC) 12 17.8cm (7.0-in) PS2 Mouse PS2 Keyboard COM1 1 PS2_USB_PW1 DDRII_2 (64 bit, 240-pFinSmBod8u0le0) 3 DDRII_1 (64 bit, 240-pin module) AM2+/AM3 Dual Channel DDR2 1066 CPU_FAN1 4 SOCKET AM2 ATXPWR1 24.4cm (9.6-in) VGA1 26 25 USB 2.0 T: USB2 B: USB3 USB 2.0 T: USB0 B: USB1 Top: RJ-45 Top: LINE IN... x16 Slot (PCIE2) 23 PCI Express x1 Slot (PCIE1) 24 ATX 12V Power Connector (ATX12V1) 25 CPU Heatsink Retention Module 26 AM2 940-Pin CPU Socket 11
1.3 Motherboard Layout (N68-GS UCC / N68-S UCC) 12 17.8cm (7.0-in) PS2 Mouse PS2 Keyboard COM1 1 PS2_USB_PW1 DDRII_2 (64 bit, 240-pFinSmBod8u0le0) 3 DDRII_1 (64 bit, 240-pin module) AM2+/AM3 Dual Channel DDR2 1066 CPU_FAN1 4 SOCKET AM2 ATXPWR1 24.4cm (9.6-in) VGA1 26 25 USB 2.0 T: USB2 B: USB3 USB 2.0 T: USB0 B: USB1 Top: RJ-45 Top: LINE IN... x16 Slot (PCIE2) 23 PCI Express x1 Slot (PCIE1) 24 ATX 12V Power Connector (ATX12V1) 25 CPU Heatsink Retention Module 26 AM2 940-Pin CPU Socket 11

User Manual
Page 13
... damage to do not touch the ICs. 4. When placing screws into it on the carpet or the like. 2. Installation This is detached from the wall socket before you install the motherboard, study the configuration of the following precautions before you uninstall any component. 2. Also remember to the chassis, please do not...
... damage to do not touch the ICs. 4. When placing screws into it on the carpet or the like. 2. Installation This is detached from the wall socket before you install the motherboard, study the configuration of the following precautions before you uninstall any component. 2. Also remember to the chassis, please do not...

User Manual
Page 14
...small triangle. Then connect the CPU fan to secure the CPU. Step 2. Unlock the socket by lifting the lever up to improve heat dissipation. 2.1 CPU Installation Step 1. Position the CPU directly above the socket such that it fits in one correct orientation. Step 4. You also need to spray ... and the heatsink to a 90o angle. Step 3. The CPU fits only in place. The lever clicks on the socket while you install the CPU into the socket to dissipate heat. For proper installation, please kindly refer to indicate that the CPU corner with the golden triangle matches...
...small triangle. Then connect the CPU fan to secure the CPU. Step 2. Unlock the socket by lifting the lever up to improve heat dissipation. 2.1 CPU Installation Step 1. Position the CPU directly above the socket such that it fits in one correct orientation. Step 4. You also need to spray ... and the heatsink to a 90o angle. Step 3. The CPU fits only in place. The lever clicks on the socket while you install the CPU into the socket to dissipate heat. For proper installation, please kindly refer to indicate that the CPU corner with the golden triangle matches...

Quick Installation Guide
Page 2
... x16 Slot (PCIE2) 23 PCI Express x1 Slot (PCIE1) 24 ATX 12V Power Connector (ATX12V1) 25 CPU Heatsink Retention Module 26 AM2 940-Pin CPU Socket 2 ASRock N68-GS UCC / N68-S UCC Motherboard Motherboard Layout (N68-GS UCC / N68-S UCC) English 1 PS2_USB_PW1 Jumper 2 CPU Fan Connector (CPU_FAN1) 3 2 x 240-pin DDR2 DIMM Slots (Dual Channel: DDRII_1, DDRII_2;
... x16 Slot (PCIE2) 23 PCI Express x1 Slot (PCIE1) 24 ATX 12V Power Connector (ATX12V1) 25 CPU Heatsink Retention Module 26 AM2 940-Pin CPU Socket 2 ASRock N68-GS UCC / N68-S UCC Motherboard Motherboard Layout (N68-GS UCC / N68-S UCC) English 1 PS2_USB_PW1 Jumper 2 CPU Fan Connector (CPU_FAN1) 3 2 x 240-pin DDR2 DIMM Slots (Dual Channel: DDRII_1, DDRII_2;

Quick Installation Guide
Page 5
Micro ATX Form Factor: 9.6-in x 7.0-in / Front Speaker / Microphone 5 ASRock N68-GS UCC / N68-S UCC Motherboard English FSB 1000 MHz (2.0 GT/s) - Integrated NVIDIA® GeForce 7025 graphics - Supports Wake-On-LAN Rear Panel I/O I/O Panel - 1 x ... Express x1 slot - 2 x PCI slots Graphics - DX9.0 VGA, Pixel Shader 3.0 - N68-GS UCC Realtek Giga PHY RTL8211CL, speed 10/100/1000 Mb/s - Supports AMD's Cool 'n' QuietTM Technology - Max. 1.2 Specifications Platform - Support for Socket AM2+ / AM2 processors: AMD PhenomTM FX / Phenom / Athlon 64 FX / Athlon 64 ...
Micro ATX Form Factor: 9.6-in x 7.0-in / Front Speaker / Microphone 5 ASRock N68-GS UCC / N68-S UCC Motherboard English FSB 1000 MHz (2.0 GT/s) - Integrated NVIDIA® GeForce 7025 graphics - Supports Wake-On-LAN Rear Panel I/O I/O Panel - 1 x ... Express x1 slot - 2 x PCI slots Graphics - DX9.0 VGA, Pixel Shader 3.0 - N68-GS UCC Realtek Giga PHY RTL8211CL, speed 10/100/1000 Mb/s - Supports AMD's Cool 'n' QuietTM Technology - Max. 1.2 Specifications Platform - Support for Socket AM2+ / AM2 processors: AMD PhenomTM FX / Phenom / Athlon 64 FX / Athlon 64 ...

Quick Installation Guide
Page 9
This motherboard supports ASRock AM2 Boost overclocking technology. You may cause severe damage to the motherboard, peripherals, and/or components. 1. Pre-installation Precautions Take note of the following precautions ... keeping the stability of your system is unstable after AM2 Boost function is detached from the wall socket before you install motherboard components or change any component, place it may damage the motherboard. 9 ASRock N68-GS UCC / N68-S UCC Motherboard English Before you adopt. Enabling this function in , 24.4 cm x 17.8 cm) motherboard. Installation This is...
This motherboard supports ASRock AM2 Boost overclocking technology. You may cause severe damage to the motherboard, peripherals, and/or components. 1. Pre-installation Precautions Take note of the following precautions ... keeping the stability of your system is unstable after AM2 Boost function is detached from the wall socket before you install motherboard components or change any component, place it may damage the motherboard. 9 ASRock N68-GS UCC / N68-S UCC Motherboard English Before you adopt. Enabling this function in , 24.4 cm x 17.8 cm) motherboard. Installation This is...

Quick Installation Guide
Page 10
...locked. Then connect the CPU fan to improve heat dissipation. Carefully insert the CPU into the socket to avoid bending of the pins. The lever clicks on the socket while you install the CPU into this motherboard, it firmly on the side tab to secure the...Socket Corner Small Triangle STEP 4: Push Down And Lock The Socket Lever 2.2 Installation of the CPU fan and the heatsink. DO NOT force the CPU into the socket until it is necessary to install a larger heatsink and cooling fan to a 90o angle. 2.1 CPU Installation Step 1. Step 3. English 10 ASRock N68-GS UCC / N68-S UCC...
...locked. Then connect the CPU fan to improve heat dissipation. Carefully insert the CPU into the socket to avoid bending of the pins. The lever clicks on the socket while you install the CPU into this motherboard, it firmly on the side tab to secure the...Socket Corner Small Triangle STEP 4: Push Down And Lock The Socket Lever 2.2 Installation of the CPU fan and the heatsink. DO NOT force the CPU into the socket until it is necessary to install a larger heatsink and cooling fan to a 90o angle. 2.1 CPU Installation Step 1. Step 3. English 10 ASRock N68-GS UCC / N68-S UCC...
