
Intel Rapid Storage Guide
Page 1
... RAID 1 can take advantage of faster boot times and data reads. Combined with an external drive. Through AHCI, storage performance is easily restored. Valuable digital memories are protected against data loss in a RAID 0 configuration, data can be accomplished easily with Intel® Rapid Recover Technology, setting up data protection can be...
... RAID 1 can take advantage of faster boot times and data reads. Combined with an external drive. Through AHCI, storage performance is easily restored. Valuable digital memories are protected against data loss in a RAID 0 configuration, data can be accomplished easily with Intel® Rapid Recover Technology, setting up data protection can be...

Intel Rapid Storage Guide
Page 12
... during operating system setup. Press Enter to create a RAID volume. 1. Click F10 to enter the BIOS Setup program after the Power-On-Self-Test (POST) memory test begins. 2. The F6 installation method is not required for Microsoft Windows Vista* or Note Microsoft Windows 7*. Click F2 or Delete to save the BIOS...
... during operating system setup. Press Enter to create a RAID volume. 1. Click F10 to enter the BIOS Setup program after the Power-On-Self-Test (POST) memory test begins. 2. The F6 installation method is not required for Microsoft Windows Vista* or Note Microsoft Windows 7*. Click F2 or Delete to save the BIOS...

User Manual
Page 3
... 16 2.1 Screw Holes 16 2.2 Pre-installation Precautions 16 2.3 CPU Installation 17 2.4 Installation of Heatsink and CPU fan 19 2.5 Installation of Memory Modules (DIMM 20 2.6 Expansion Slots (PCI and PCI Express Slots 21 2.7 CrossFireXTM and Quad CrossFireXTM Operation Guide 22 2.8 Dual Monitor and ...Surround Display Features 26 2.9 ASRock Smart Remote Installation Guide 29 2.10 Jumpers Setup 30 2.11 Onboard Headers and Connectors 31 2.12 Serial ATA (SATA) / Serial ...
... 16 2.1 Screw Holes 16 2.2 Pre-installation Precautions 16 2.3 CPU Installation 17 2.4 Installation of Heatsink and CPU fan 19 2.5 Installation of Memory Modules (DIMM 20 2.6 Expansion Slots (PCI and PCI Express Slots 21 2.7 CrossFireXTM and Quad CrossFireXTM Operation Guide 22 2.8 Dual Monitor and ...Surround Display Features 26 2.9 ASRock Smart Remote Installation Guide 29 2.10 Jumpers Setup 30 2.11 Onboard Headers and Connectors 31 2.12 Serial ATA (SATA) / Serial ...

User Manual
Page 6
...1 x PCI Express 2.0 x16 slot (PCIE2: x4 mode) - 2 x PCI slots - Supports Intel® Turbo Boost 2.0 Technology - capacity of system memory: 16GB (see CAUTION 4) * PCIE 3.0 is only supported with processors which are GPU integrated. - Supports Intel® K-Series unlocked CPU - Supports Intel®... Bridge CPU. - Pixel Shader 4.1, DirectX 10.1 with Intel® Ivy Bridge CPU. shared memory 1760MB (see CAUTION 2) - 2 x DDR3 DIMM slots - 1.2 Specifications Platform CPU Chipset Memory Expansion Slot Graphics - Supports 3rd and 2nd Generation Intel® CoreTM i7 / i5 / i3...
...1 x PCI Express 2.0 x16 slot (PCIE2: x4 mode) - 2 x PCI slots - Supports Intel® Turbo Boost 2.0 Technology - capacity of system memory: 16GB (see CAUTION 4) * PCIE 3.0 is only supported with processors which are GPU integrated. - Supports Intel® K-Series unlocked CPU - Supports Intel®... Bridge CPU. - Pixel Shader 4.1, DirectX 10.1 with Intel® Ivy Bridge CPU. shared memory 1760MB (see CAUTION 2) - 2 x DDR3 DIMM slots - 1.2 Specifications Platform CPU Chipset Memory Expansion Slot Graphics - Supports 3rd and 2nd Generation Intel® CoreTM i7 / i5 / i3...

User Manual
Page 9
...sure to -HDMI adapter, the DVI-D port can support the same features as HDMI port. 9 You can use ASRock XFast RAM to the components and devices of memory modules on page 20 for the latest information. 6. Chassis Temperature Sensing - CPU/Chassis Fan Multi-Speed Control - ... the BIOS, applying Untied Overclocking Technology, or using third-party overclocking tools. CPU Temperature Sensing Monitor - This motherboard supports Dual Channel Memory Technology. D-Sub, DVI-D and HDMI monitors cannot be less than 4GB for the reservation for possible damage caused by overclocking. Hardware...
...sure to -HDMI adapter, the DVI-D port can support the same features as HDMI port. 9 You can use ASRock XFast RAM to the components and devices of memory modules on page 20 for the latest information. 6. Chassis Temperature Sensing - CPU/Chassis Fan Multi-Speed Control - ... the BIOS, applying Untied Overclocking Technology, or using third-party overclocking tools. CPU Temperature Sensing Monitor - This motherboard supports Dual Channel Memory Technology. D-Sub, DVI-D and HDMI monitors cannot be less than 4GB for the reservation for possible damage caused by overclocking. Hardware...

User Manual
Page 11
... be used . 11 Please note that is detected, the system will automatically finish the BIOS update procedure after regaining power. ASRock On/Off Play Technology allows users to enjoy the great audio experience from the portable audio devices, such like MP3 player or mobile ... CPU cooler types, Socket LGA 775, LGA 1155 and LGA 1156. ASRock XFast USB can watch Youtube HD videos and download simultaneously. ASRock SmartView, a new function for internet browsers, is IE8. It fully utilizes the memory space that combines your most convenient computing environment. 18. Please be used...
... be used . 11 Please note that is detected, the system will automatically finish the BIOS update procedure after regaining power. ASRock On/Off Play Technology allows users to enjoy the great audio experience from the portable audio devices, such like MP3 player or mobile ... CPU cooler types, Socket LGA 775, LGA 1155 and LGA 1156. ASRock XFast USB can watch Youtube HD videos and download simultaneously. ASRock SmartView, a new function for internet browsers, is IE8. It fully utilizes the memory space that combines your most convenient computing environment. 18. Please be used...

User Manual
Page 13
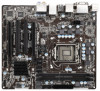
... HDMI_SPDIF1 1 PCI1 27 X X Fast RAM Fast LAN PCI2 10 RoHS Front USB 3.0 11 12 13 Intel H77 64Mb BIOS 14 26 ErP/EuP Ready H77M 15 Super I/O IR1 1 COM1 1 1 LPT1 PCIE2 CHA_FAN1 USB8_9 1 USB6_7 1 1 CIR1 CLRCMOS1 1 SPEAKER1 1 PLED PWRBTN 1 HDLED RESET PANEL1 25 ...SATA2 Connector (SATA2_4, Black) (HDMI_SPDIF1, Black) 13 SATA2 Connector (SATA2_5, Black) 29 PCI Express 3.0 x16 Slot (PCIE1, Black) 14 SPI Flash Memory (64Mb) 30 Front Panel Audio Header 15 Intel H77 Chipset (HD_AUDIO1, Black) 16 System Panel Header (PANEL1, Black) 31 Chassis Fan Connector (CHA_FAN2)...
... HDMI_SPDIF1 1 PCI1 27 X X Fast RAM Fast LAN PCI2 10 RoHS Front USB 3.0 11 12 13 Intel H77 64Mb BIOS 14 26 ErP/EuP Ready H77M 15 Super I/O IR1 1 COM1 1 1 LPT1 PCIE2 CHA_FAN1 USB8_9 1 USB6_7 1 1 CIR1 CLRCMOS1 1 SPEAKER1 1 PLED PWRBTN 1 HDLED RESET PANEL1 25 ...SATA2 Connector (SATA2_4, Black) (HDMI_SPDIF1, Black) 13 SATA2 Connector (SATA2_5, Black) 29 PCI Express 3.0 x16 Slot (PCIE1, Black) 14 SPI Flash Memory (64Mb) 30 Front Panel Audio Header 15 Intel H77 Chipset (HD_AUDIO1, Black) 16 System Panel Header (PANEL1, Black) 31 Chassis Fan Connector (CHA_FAN2)...

User Manual
Page 20
...properly seated. 20 Step 3. notch break notch break The DIMM only fits in place and the DIMM is not recommended to activate Dual Channel Memory Technology. Step 2. For dual channel configuration, you force the DIMM into DDR3 slot;otherwise, this motherboard and DIMM may not work on the slot....cause permanent damage to the motherboard and the DIMM if you always need to install two identical (the same brand, speed, size and chiptype) memory modules in the DDR3 DIMM slots to install them on this motherboard. Align a DIMM on the slot such that the notch on the DIMM ...
...properly seated. 20 Step 3. notch break notch break The DIMM only fits in place and the DIMM is not recommended to activate Dual Channel Memory Technology. Step 2. For dual channel configuration, you force the DIMM into DDR3 slot;otherwise, this motherboard and DIMM may not work on the slot....cause permanent damage to the motherboard and the DIMM if you always need to install two identical (the same brand, speed, size and chiptype) memory modules in the DDR3 DIMM slots to install them on this motherboard. Align a DIMM on the slot such that the notch on the DIMM ...

User Manual
Page 27
... Quality" for the display icon identified by the number 2. If you do not adjust the UEFI setup, the default value of "Share Memory", [Auto], will disable D-Sub function when an add-on desktop, choose "Properties", and select the "Settings" tab so that you use multiple ... 64-bit OS: Right click on VGA card is less than the total capability of the system memory. When you can easily enjoy the benefits of D-sub. D. Enter "Share Memory" option to adjust the memory capability to [32MB], [64MB], [128MB], [256MB] or [512MB] to install them again. 5. Repeat steps...
... Quality" for the display icon identified by the number 2. If you do not adjust the UEFI setup, the default value of "Share Memory", [Auto], will disable D-Sub function when an add-on desktop, choose "Properties", and select the "Settings" tab so that you use multiple ... 64-bit OS: Right click on VGA card is less than the total capability of the system memory. When you can easily enjoy the benefits of D-sub. D. Enter "Share Memory" option to adjust the memory capability to [32MB], [64MB], [128MB], [256MB] or [512MB] to install them again. 5. Repeat steps...

User Manual
Page 45
The default value is selected, the motherboard will detect the memory module(s) inserted and assign the appropriate frequency automatically. DRAM Frequency If [Auto] is [Auto]. The default value is [Auto]. Configuration options: [Auto], [Default], [...
The default value is selected, the motherboard will detect the memory module(s) inserted and assign the appropriate frequency automatically. DRAM Frequency If [Auto] is [Auto]. The default value is [Auto]. Configuration options: [Auto], [Default], [...

User Manual
Page 49
... [Enabled] if using Microsoft® Windows® XP, VistaTM, 7, or Linux kernel version 2.4.18 or higher. The default value is [All]. No-Execute Memory Protection No-Execution (NX) Memory Protection Technology is required. Enhance Halt State (C1E) All processors support the Halt State (C1). This option will program into C State package limit...
... [Enabled] if using Microsoft® Windows® XP, VistaTM, 7, or Linux kernel version 2.4.18 or higher. The default value is [All]. No-Execute Memory Protection No-Execution (NX) Memory Protection Technology is required. Enhance Halt State (C1E) All processors support the Halt State (C1). This option will program into C State package limit...

User Manual
Page 50
... codes. to [Enabled], a VMM (Virtual Machine Architecture) can prevent data pages from being used by Vanderpool Technology. An IA-32 processor with "No Execute (NX) Memory Protection" can utilize the additional hardware capabilities provided by malicious software to turn on /off prefetching of adjacent cache lines. 50 This option will be...
... codes. to [Enabled], a VMM (Virtual Machine Architecture) can prevent data pages from being used by Vanderpool Technology. An IA-32 processor with "No Execute (NX) Memory Protection" can utilize the additional hardware capabilities provided by malicious software to turn on /off prefetching of adjacent cache lines. 50 This option will be...

User Manual
Page 51
Share Memory This allows you to select [Onboard], [PCI] or [PCI Express] as the boot graphic adapter priority. Deep Render Standby Use this feature is [Enabled]. The ... to enable or disable Deep Render Standby by Internal Graphics Device. 3.4.2 North Bridge Configuration Primary Graphics Adapter This allows you to set onboard VGA share memory feature. The default value is [Enabled]. 51 The default value is [Auto]. If you to enable or disable IGPU Multi-Moniter. VT-d Use this to...
Share Memory This allows you to select [Onboard], [PCI] or [PCI Express] as the boot graphic adapter priority. Deep Render Standby Use this feature is [Enabled]. The ... to enable or disable Deep Render Standby by Internal Graphics Device. 3.4.2 North Bridge Configuration Primary Graphics Adapter This allows you to set onboard VGA share memory feature. The default value is [Enabled]. 51 The default value is [Auto]. If you to enable or disable IGPU Multi-Moniter. VT-d Use this to...

Quick Installation Guide
Page 2
...HDMI_SPDIF1 1 PCI1 27 X X Fast RAM Fast LAN PCI2 10 RoHS Front USB 3.0 11 12 13 Intel H77 64Mb BIOS 14 26 ErP/EuP Ready H77M 15 Super I/O IR1 1 COM1 1 1 LPT1 PCIE2 CHA_FAN1 USB8_9 1 USB6_7 1 1 CIR1 CLRCMOS1 1 SPEAKER1 1 PLED PWRBTN 1 HDLED RESET PANEL1 ... 3.0 x16 Slot (PCIE1, Black) 14 SPI Flash Memory (64Mb) 30 Front Panel Audio Header 15 Intel H77 Chipset (HD_AUDIO1, Black) 16 System Panel Header (PANEL1, Black) 31 Chassis Fan Connector (CHA_FAN2) 17 Chassis Speaker Header (SPEAKER1, Black) 32 Power Fan Connector (PWR_FAN1) 2 ASRock H77M Motherboard English
...HDMI_SPDIF1 1 PCI1 27 X X Fast RAM Fast LAN PCI2 10 RoHS Front USB 3.0 11 12 13 Intel H77 64Mb BIOS 14 26 ErP/EuP Ready H77M 15 Super I/O IR1 1 COM1 1 1 LPT1 PCIE2 CHA_FAN1 USB8_9 1 USB6_7 1 1 CIR1 CLRCMOS1 1 SPEAKER1 1 PLED PWRBTN 1 HDLED RESET PANEL1 ... 3.0 x16 Slot (PCIE1, Black) 14 SPI Flash Memory (64Mb) 30 Front Panel Audio Header 15 Intel H77 Chipset (HD_AUDIO1, Black) 16 System Panel Header (PANEL1, Black) 31 Chassis Fan Connector (CHA_FAN2) 17 Chassis Speaker Header (SPEAKER1, Black) 32 Power Fan Connector (PWR_FAN1) 2 ASRock H77M Motherboard English

Quick Installation Guide
Page 6
Dual Channel DDR3 Memory Technology (see CAUTION 6) ASRock H77M Motherboard English Pixel Shader 5.0, DirectX 11 with Intel® Ivy Bridge CPU - Three VGA Output options: D-Sub, DVI-D and HDMI (see CAUTION 2) - 2 x...1 x PCI Express 2.0 x16 slot (PCIE2: x4 mode) - 2 x PCI slots - Supports Intel® K-Series unlocked CPU - Intel® H77 - capacity of system memory: 16GB (see CAUTION 1) - shared memory 1760MB (see CAUTION 4) * PCIE 3.0 is only supported with processors which are GPU integrated. - Digi Power Design - 4 + 2 Power Phase Design - Max. Supports Intel&#...
Dual Channel DDR3 Memory Technology (see CAUTION 6) ASRock H77M Motherboard English Pixel Shader 5.0, DirectX 11 with Intel® Ivy Bridge CPU - Three VGA Output options: D-Sub, DVI-D and HDMI (see CAUTION 2) - 2 x...1 x PCI Express 2.0 x16 slot (PCIE2: x4 mode) - 2 x PCI slots - Supports Intel® K-Series unlocked CPU - Intel® H77 - capacity of system memory: 16GB (see CAUTION 1) - shared memory 1760MB (see CAUTION 4) * PCIE 3.0 is only supported with processors which are GPU integrated. - Digi Power Design - 4 + 2 Power Phase Design - Max. Supports Intel&#...

Quick Installation Guide
Page 9
... damage to the components and devices of memory modules on page 17 for possible damage caused by overclocking. Please check Intel® website for system usage under Windows® 7 / VistaTM / XP. Chassis Temperature Sensing - CAUTION! 1. You can support the same features as HDMI port. 9 ASRock H77M Motherboard English CPU/Chassis Fan Multi-Speed...
... damage to the components and devices of memory modules on page 17 for possible damage caused by overclocking. Please check Intel® website for system usage under Windows® 7 / VistaTM / XP. Chassis Temperature Sensing - CAUTION! 1. You can support the same features as HDMI port. 9 ASRock H77M Motherboard English CPU/Chassis Fan Multi-Speed...

Quick Installation Guide
Page 11
... transferring currently. 15. LAN Application Prioritization: You can be used . 11 ASRock H77M Motherboard English It fully utilizes the memory space that combines your most convenient computing environment. 18. ASRock XFast RAM shortens the loading time of the device. 14. Another advantage of failing. Only USB2.0 ports support this feature. 17. Before you keep...
... transferring currently. 15. LAN Application Prioritization: You can be used . 11 ASRock H77M Motherboard English It fully utilizes the memory space that combines your most convenient computing environment. 18. ASRock XFast RAM shortens the loading time of the device. 14. Another advantage of failing. Only USB2.0 ports support this feature. 17. Before you keep...

Quick Installation Guide
Page 17
... correct orientation. Some DDR3 1GB double-sided DIMMs with 16 chips may be damaged. 2. It is properly seated. 17 ASRock H77M Motherboard English Installing a DIMM Please make sure to install a DDR or DDR2 memory module into the slot until the retaining clips at single channel mode. 1. Firmly insert the DIMM into DDR3 slot...
... correct orientation. Some DDR3 1GB double-sided DIMMs with 16 chips may be damaged. 2. It is properly seated. 17 ASRock H77M Motherboard English Installing a DIMM Please make sure to install a DDR or DDR2 memory module into the slot until the retaining clips at single channel mode. 1. Firmly insert the DIMM into DDR3 slot...

Quick Installation Guide
Page 24
... "Primary". Install the onboard VGA driver and the add-on PCIE1 and PCIE2 slots. 3. Click "Apply" or "OK" to six. 24 ASRock H77M Motherboard English Repeat steps C through E for the display icon identified by the number 2. C. Then connect other monitor cables to the ... the D-Sub port on the I /O panel. Boot your system. Press or to enable the function of surround display feature. Enter "Share Memory" option to adjust the memory capability to [32MB], [64MB], [128MB], [256MB] or [512MB] to enter UEFI setup. Set up a surround display environment: 1. Right...
... "Primary". Install the onboard VGA driver and the add-on PCIE1 and PCIE2 slots. 3. Click "Apply" or "OK" to six. 24 ASRock H77M Motherboard English Repeat steps C through E for the display icon identified by the number 2. C. Then connect other monitor cables to the ... the D-Sub port on the I /O panel. Boot your system. Press or to enable the function of surround display feature. Enter "Share Memory" option to adjust the memory capability to [32MB], [64MB], [128MB], [256MB] or [512MB] to enter UEFI setup. Set up a surround display environment: 1. Right...

Quick Installation Guide
Page 35
BIOS Information The Flash Memory on the file "ASSETUP.EXE" from the BIN folder in the Support CD. 4. Software Support CD information This motherboard supports various Microsoft® Windows&#... the detailed information about BIOS Setup, please refer to the User Manual (PDF file) contained in the Support CD to display the menus. 35 ASRock H77M Motherboard English If you wish to be user-friendly. The BIOS Setup program is designed to enter BIOS Setup after POST, please restart the system...
BIOS Information The Flash Memory on the file "ASSETUP.EXE" from the BIN folder in the Support CD. 4. Software Support CD information This motherboard supports various Microsoft® Windows&#... the detailed information about BIOS Setup, please refer to the User Manual (PDF file) contained in the Support CD to display the menus. 35 ASRock H77M Motherboard English If you wish to be user-friendly. The BIOS Setup program is designed to enter BIOS Setup after POST, please restart the system...

