
Intel Rapid Storage Guide
Page 1
... take advantage of enhanced performance and lower power consumption. Valuable digital memories are protected against data loss in a RAID 0 configuration, data can be accessed on each drive simultaneously, speeding up data protection can be accomplished easily with Link Power ... against a hard drive failure when the system is configured for desktop and mobile platforms. Whether using one of three fault-tolerant RAID levels: RAID 1, RAID 5, and RAID 10. By combining from two to six drives in the event of a hard drive failure. Intel Rapid Storage Technology provides benefits...
... take advantage of enhanced performance and lower power consumption. Valuable digital memories are protected against data loss in a RAID 0 configuration, data can be accessed on each drive simultaneously, speeding up data protection can be accomplished easily with Link Power ... against a hard drive failure when the system is configured for desktop and mobile platforms. Whether using one of three fault-tolerant RAID levels: RAID 1, RAID 5, and RAID 10. By combining from two to six drives in the event of a hard drive failure. Intel Rapid Storage Technology provides benefits...
Intel Rapid Storage Guide
Page 6
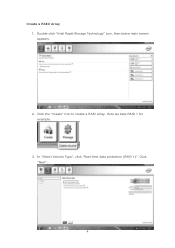
Click "Next". 6 Click the "Create" icon to create a RAID array. Double-click "Intel Rapid Storage Technology" icon, then below main screen appears. 2. Here we take RAID 1 for example. 3. In "Select Volume Type", click "Real-time data protection (RAID 1)". Create a RAID Array 1.
Click "Next". 6 Click the "Create" icon to create a RAID array. Double-click "Intel Rapid Storage Technology" icon, then below main screen appears. 2. Here we take RAID 1 for example. 3. In "Select Volume Type", click "Real-time data protection (RAID 1)". Create a RAID Array 1.
Intel Rapid Storage Guide
Page 7
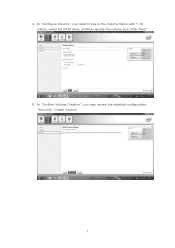
In "Confirm Volume Creation", you need to key-in the Volume Name with 1-16 letters, select the RAID disks, and then specify the volume size. 4. Then click "Create Volume". 7 In "Configure Volume", you may review the selected configuration. Click "Next". 5.
In "Confirm Volume Creation", you need to key-in the Volume Name with 1-16 letters, select the RAID disks, and then specify the volume size. 4. Then click "Create Volume". 7 In "Configure Volume", you may review the selected configuration. Click "Next". 5.

Intel Rapid Storage Guide
Page 10
Finally you can start to use RAID 1 function. 10 10. Then follow the instructions on the New Simple Volume Wizard. 11.
Finally you can start to use RAID 1 function. 10 10. Then follow the instructions on the New Simple Volume Wizard. 11.
Intel Rapid Storage Guide
Page 11
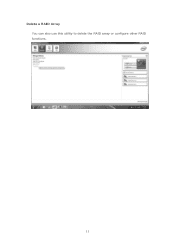
Delete a RAID Array You can also use this utility to delete the RAID array or configure other RAID functions. 11
Delete a RAID Array You can also use this utility to delete the RAID array or configure other RAID functions. 11

Intel Rapid Storage Guide
Page 12
...hard drives and press Space to select the drive. How to install an operating system onto a RAID volume (F6 install method) In order to install an operating system onto a RAID volume, the RAID option must be enabled in the system BIOS. 1. Click the Storage Configuration menu. 4. Click ... setup. When finished press Enter. 12 Enetr the Advanced menu. 3. Click F10 to enter the option ROM user interface. 2. Select 1: Create RAID Volume and press Enter. 3. Switch the SATA Operation Mode option to load the Intel® Rapid Storage Technology driver during POST, press Ctrl and...
...hard drives and press Space to select the drive. How to install an operating system onto a RAID volume (F6 install method) In order to install an operating system onto a RAID volume, the RAID option must be enabled in the system BIOS. 1. Click the Storage Configuration menu. 4. Click ... setup. When finished press Enter. 12 Enetr the Advanced menu. 3. Click F10 to enter the option ROM user interface. 2. Select 1: Create RAID Volume and press Enter. 3. Switch the SATA Operation Mode option to load the Intel® Rapid Storage Technology driver during POST, press Ctrl and...

Intel Rapid Storage Guide
Page 13
...disk into Drive A:, insert ;a floppy disk containing the following steps to confirm your exit. Press Y to install a third party SCSI or RAID driver. Use the up and down arrow keys to scroll through the list as all controllers may not be prompted Note with the Note necessary... to confirm volume creation. 10. Select the volume size and press Enter. 8. At the prompt press Y to create the volume. 9. Install the RAID Driver Using the F6 Installation Method Perform the following files: IAAHCI.INF, IAAHCI.CAT, IASTOR.INF, IASTOR.CAT, IASTOR.SYS, and TXTSETUP.OEM. Select...
...disk into Drive A:, insert ;a floppy disk containing the following steps to confirm your exit. Press Y to install a third party SCSI or RAID driver. Use the up and down arrow keys to scroll through the list as all controllers may not be prompted Note with the Note necessary... to confirm volume creation. 10. Select the volume size and press Enter. 8. At the prompt press Y to create the volume. 9. Install the RAID Driver Using the F6 Installation Method Perform the following files: IAAHCI.INF, IAAHCI.CAT, IASTOR.INF, IASTOR.CAT, IASTOR.SYS, and TXTSETUP.OEM. Select...
Intel Rapid Storage Guide
Page 14
... Note running the Setup.exe process after these files again, remove the floppy disk so that Windows setup can reboot as you would on the RAID volume as needed. 7. Windows setup will need to copy the files again from the floppy to the Windows installation folders.
... Note running the Setup.exe process after these files again, remove the floppy disk so that Windows setup can reboot as you would on the RAID volume as needed. 7. Windows setup will need to copy the files again from the floppy to the Windows installation folders.
Intel Rapid Storage Guide
Page 15
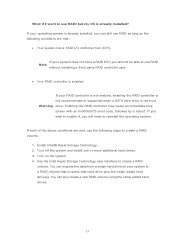
...hard drives. 3. If both of the above conditions are met: • Your system has a RAID I want to a RAID volume that includes that hard drive plus the newly added hard drive(s). You can also create a new RAID volume using the newly added hard drives. 15 If your system to use the following conditions... are met, use RAID but my OS is enabled. Enabling the RAID controller may cause an immediate blue screen with an 0x0000007b error code, followed by a reboot. If you wish to enable it, you will ...
...hard drives. 3. If both of the above conditions are met: • Your system has a RAID I want to a RAID volume that includes that hard drive plus the newly added hard drive(s). You can also create a new RAID volume using the newly added hard drives. 15 If your system to use the following conditions... are met, use RAID but my OS is enabled. Enabling the RAID controller may cause an immediate blue screen with an 0x0000007b error code, followed by a reboot. If you wish to enable it, you will ...

Intel Rapid Storage Guide
Page 16
... or AHCI mode, the F6 installation method must be prompted with the necessary files. Press S to install a third party SCSI or RAID driver. You can use a USB floppy drive or create a slipstream version of the final package. How to load the driver during OS ...support for mass storage device(s). 2. You do not have a floppy drive on your system, you to install a RAID Note driver on Microsoft Windows Vista* and Microsoft Windows 7* because Intel provided a RAID driver as part of the operating system. 16 Nothing will Note temporarily continue loading drivers. Note If you do...
... or AHCI mode, the F6 installation method must be prompted with the necessary files. Press S to install a third party SCSI or RAID driver. You can use a USB floppy drive or create a slipstream version of the final package. How to load the driver during OS ...support for mass storage device(s). 2. You do not have a floppy drive on your system, you to install a RAID Note driver on Microsoft Windows Vista* and Microsoft Windows 7* because Intel provided a RAID driver as part of the operating system. 16 Nothing will Note temporarily continue loading drivers. Note If you do...

Intel Rapid Storage Guide
Page 18
...a 32-bit processor, the files will be located in the Advanced Installation Instructions section of installation is used for systems using any supported RAID Note controller hub by replacing the text within the quotation marks. // Insert the lines below , as applicable, into the UNATTEND.TXT file... [MassStorageDrivers] "Intel(R) 82801R/DO/DH SATA RAID Controller" = OEM 18 o If the system has a 64-bit processor, the files will be located in the Microsoft document Deployment Guide Automating ...
...a 32-bit processor, the files will be located in the Advanced Installation Instructions section of installation is used for systems using any supported RAID Note controller hub by replacing the text within the quotation marks. // Insert the lines below , as applicable, into the UNATTEND.TXT file... [MassStorageDrivers] "Intel(R) 82801R/DO/DH SATA RAID Controller" = OEM 18 o If the system has a 64-bit processor, the files will be located in the Microsoft document Deployment Guide Automating ...
User Manual
Page 3
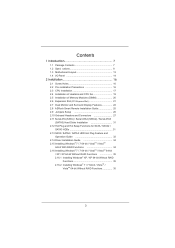
...of Heatsink and CPU fan 19 2.5 Installation of Memory Modules (DIMM 20 2.6 Expansion Slot (PCI Express Slot 21 2.7 Dual Monitor and Surround Display Features 22 2.8 ASRock Smart Remote Installation Guide 25 2.9 Jumpers Setup 26 2.10 Onboard Headers and Connectors 27 2.11 Serial ATA (SATA) / Serial ATA2 (SATA2) / Serial ATA3 (... Hot Plug Feature and Operation Guide 32 2.14 Driver Installation Guide 34 2.15 Installing Windows® 7 / 7 64-bit / VistaTM / VistaTM 64-bit With RAID Functions 34 2.16 Installing Windows® 7 / 7 64-bit / VistaTM / VistaTM 64-bit / XP / XP 64-bit Without...
...of Heatsink and CPU fan 19 2.5 Installation of Memory Modules (DIMM 20 2.6 Expansion Slot (PCI Express Slot 21 2.7 Dual Monitor and Surround Display Features 22 2.8 ASRock Smart Remote Installation Guide 25 2.9 Jumpers Setup 26 2.10 Onboard Headers and Connectors 27 2.11 Serial ATA (SATA) / Serial ATA2 (SATA2) / Serial ATA3 (... Hot Plug Feature and Operation Guide 32 2.14 Driver Installation Guide 34 2.15 Installing Windows® 7 / 7 64-bit / VistaTM / VistaTM 64-bit With RAID Functions 34 2.16 Installing Windows® 7 / 7 64-bit / VistaTM / VistaTM 64-bit / XP / XP 64-bit Without...
User Manual
Page 7
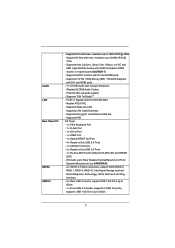
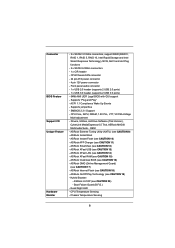
... LAN Port with Content Protection (Realtek ALC892 Audio Codec) - Supports HDCP function with HDMI (Compliant HDMI monitor is required) (see CAUTION 8) - 2 x SATA3 6.0 Gb/s connectors, support RAID (RAID 0, RAID 1, RAID 5, RAID 10, Intel Rapid Storage and Intel Smart Response Technology), NCQ, AHCI and Hot Plug functions - 2 x Rear USB 3.0 ports, support USB 1.0/2.0/3.0 up to 5Gb/s - 1 x Front USB...
... LAN Port with Content Protection (Realtek ALC892 Audio Codec) - Supports HDCP function with HDMI (Compliant HDMI monitor is required) (see CAUTION 8) - 2 x SATA3 6.0 Gb/s connectors, support RAID (RAID 0, RAID 1, RAID 5, RAID 10, Intel Rapid Storage and Intel Smart Response Technology), NCQ, AHCI and Hot Plug functions - 2 x Rear USB 3.0 ports, support USB 1.0/2.0/3.0 up to 5Gb/s - 1 x Front USB...
User Manual
Page 8
... Night LED - SMBIOS 2.3.1 Support - Hybrid Booster: - Drivers, Utilities, AntiVirus Software (Trial Version), CyberLink MediaEspresso 6.5 Trial, ASRock MAGIX Multimedia Suite - CPU Temperature Sensing - Connector BIOS Feature Support CD Unique Feature Hardware Monitor - 2 x SATA2 3.0 Gb/s connectors, support RAID (RAID 0, RAID 1, RAID 5, RAID 10, Intel Rapid Storage and Intel Smart Response Technology), NCQ, AHCI and Hot Plug functions - 2 x SATA3...
... Night LED - SMBIOS 2.3.1 Support - Hybrid Booster: - Drivers, Utilities, AntiVirus Software (Trial Version), CyberLink MediaEspresso 6.5 Trial, ASRock MAGIX Multimedia Suite - CPU Temperature Sensing - Connector BIOS Feature Support CD Unique Feature Hardware Monitor - 2 x SATA2 3.0 Gb/s connectors, support RAID (RAID 0, RAID 1, RAID 5, RAID 10, Intel Rapid Storage and Intel Smart Response Technology), NCQ, AHCI and Hot Plug functions - 2 x SATA3...
User Manual
Page 31
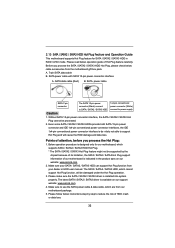
... cable to install the SATA / SATA2 / SATA3 hard disks. You may install SATA / SATA2 / SATA3 hard disks on this motherboard for SATA / SATA2 / SATA3 in RAID / AHCI mode. STEP 1: Install the SATA / SATA2 / SATA3 hard disks into the SATA / SATA2 / SATA3 HDD. If the SATA / SATA2 / SATA3 HDDs are ...built as RAID 1 or RAID 5 then it is still power-on and in working condition. STEP 4: Connect the other end of the SATA data cable to insert and remove the...
... cable to install the SATA / SATA2 / SATA3 hard disks. You may install SATA / SATA2 / SATA3 hard disks on this motherboard for SATA / SATA2 / SATA3 in RAID / AHCI mode. STEP 1: Install the SATA / SATA2 / SATA3 hard disks into the SATA / SATA2 / SATA3 HDD. If the SATA / SATA2 / SATA3 HDDs are ...built as RAID 1 or RAID 5 then it is still power-on and in working condition. STEP 4: Connect the other end of the SATA data cable to insert and remove the...
User Manual
Page 32
.... Below operation procedure is designed only for SATA / SATA2 / SATA3 HDD in the product spec on our support website: www.asrock.com 4. The SATA / SATA2 / SATA3 HDD, which are from our motherboard package. 5. Make sure to use the SATA ... Hot Plug feature might not be supported by step to reduce the risk of our motherboard is available on our website: www.asrock.com 2. A. 7-pin SATA data cable B. SATA power cable with SATA 15-pin power connector interface A. Please make sure ...dealer or HDD user manual. The latest SATA / SATA2 / SATA3 driver is indicated in RAID / AHCI mode.
.... Below operation procedure is designed only for SATA / SATA2 / SATA3 HDD in the product spec on our support website: www.asrock.com 4. The SATA / SATA2 / SATA3 HDD, which are from our motherboard package. 5. Make sure to use the SATA ... Hot Plug feature might not be supported by step to reduce the risk of our motherboard is available on our website: www.asrock.com 2. A. 7-pin SATA data cable B. SATA power cable with SATA 15-pin power connector interface A. Please make sure ...dealer or HDD user manual. The latest SATA / SATA2 / SATA3 driver is indicated in RAID / AHCI mode.

User Manual
Page 34
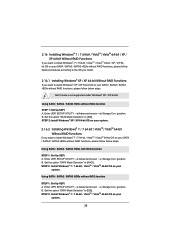
... be auto-detected and listed on your system. Please refer to the document in the Support CD, "Guide to SATA Hard Disks Installation and RAID Con guration", which is located in the support CD, "Guide to Intel Rapid Storage", which is not supported under Windows® XP / XP... to bottom side to install those required drivers. Enter UEFI SETUP UTILITY Advanced screen Storage Con guration. B. Before you start to con gure the RAID function, you are allowed to your optical drive rst. A. Please follow the steps below. Therefore, the drivers you install can be installed to ...
... be auto-detected and listed on your system. Please refer to the document in the Support CD, "Guide to SATA Hard Disks Installation and RAID Con guration", which is located in the support CD, "Guide to Intel Rapid Storage", which is not supported under Windows® XP / XP... to bottom side to install those required drivers. Enter UEFI SETUP UTILITY Advanced screen Storage Con guration. B. Before you start to con gure the RAID function, you are allowed to your optical drive rst. A. Please follow the steps below. Therefore, the drivers you install can be installed to ...
User Manual
Page 35
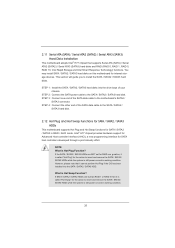
...STEP 2: Install Windows® XP / XP 64-bit OS on your system. 2.16.2 Installing Windows® 7 / 7 64-bit / VistaTM / VistaTM 64-bit Without RAID Functions If you want to install Windows® 7 / 7 64-bit / VistaTM / VistaTM 64-bit OS on your system. B. Using SATA / SATA2 / SATA3 HDDs ... UEFI SETUP UTILITY Advanced screen Storage Con guration. B. 2.16 Installing Windows® 7 / 7 64-bit / VistaTM / VistaTM 64-bit / XP / XP 64-bit Without RAID Functions If you want to install Windows® 7 / 7 64-bit / VistaTM / VistaTM 64-bit / XP / XP 64bit OS on your SATA / SATA2 / SATA3 ...
...STEP 2: Install Windows® XP / XP 64-bit OS on your system. 2.16.2 Installing Windows® 7 / 7 64-bit / VistaTM / VistaTM 64-bit Without RAID Functions If you want to install Windows® 7 / 7 64-bit / VistaTM / VistaTM 64-bit OS on your system. B. Using SATA / SATA2 / SATA3 HDDs ... UEFI SETUP UTILITY Advanced screen Storage Con guration. B. 2.16 Installing Windows® 7 / 7 64-bit / VistaTM / VistaTM 64-bit / XP / XP 64-bit Without RAID Functions If you want to install Windows® 7 / 7 64-bit / VistaTM / VistaTM 64-bit / XP / XP 64bit OS on your SATA / SATA2 / SATA3 ...
User Manual
Page 47
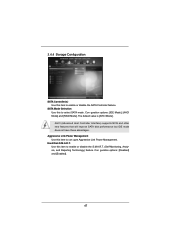
... is [AHCI Mode]. 3.4.4 Storage Configuration SATA Controller(s) Use this item to con gure Aggressive Link Power Management. Con guration options: [IDE Mode], [AHCI Mode] and [RAID Mode].
... is [AHCI Mode]. 3.4.4 Storage Configuration SATA Controller(s) Use this item to con gure Aggressive Link Power Management. Con guration options: [IDE Mode], [AHCI Mode] and [RAID Mode].
User Manual
Page 58
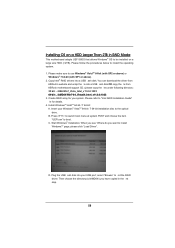
Please make sure to install Windows?" Copy Intel® RAID drivers into a USB ash disk OR copy the le from ASRock motherboard support CD. (please copy the les under following directory: 32 bit: ..\i386\Win7_Vista_Intel_v11.0.0.1032 64-bit: ..\AMD64\Win7-64_Vista64_Intel_v11.0.0.1032 3. ...or above). 2. select "Browse" to the optical drive. Install Windows® VistaTM 64-bit / 7 64-bit: A. D. You can download the driver from ASRock's website and unzip the le into a USB ash disk. Create RAID array for details. 4. Installing OS on a HDD Larger Than 2TB in the rst step. 58
Please make sure to install Windows?" Copy Intel® RAID drivers into a USB ash disk OR copy the le from ASRock motherboard support CD. (please copy the les under following directory: 32 bit: ..\i386\Win7_Vista_Intel_v11.0.0.1032 64-bit: ..\AMD64\Win7-64_Vista64_Intel_v11.0.0.1032 3. ...or above). 2. select "Browse" to the optical drive. Install Windows® VistaTM 64-bit / 7 64-bit: A. D. You can download the driver from ASRock's website and unzip the le into a USB ash disk. Create RAID array for details. 4. Installing OS on a HDD Larger Than 2TB in the rst step. 58


