

User Manual
Page 5
...of this manual, chapter 1 and 2 contain introduction of this motherboard, please visit our website for purchasing ASRock G31M-VS motherboard, a reliable motherboard produced under ASRock's consistently stringent quality control. In this manual occur, the updated version will be updated, the content of... about the model you are using. www.asrock.com/support/index.asp 1.1 P ack age Contents Pack ackage ASRock G31M-VS Motherboard (Micro ATX Form Factor: 8.8-in x 6.7-in, 22.4 cm x 17.0 cm) ASRock G31M-VS Quick Installation Guide ASRock G31M-VS Support CD One 80-conductor Ultra ATA 66...
...of this manual, chapter 1 and 2 contain introduction of this motherboard, please visit our website for purchasing ASRock G31M-VS motherboard, a reliable motherboard produced under ASRock's consistently stringent quality control. In this manual occur, the updated version will be updated, the content of... about the model you are using. www.asrock.com/support/index.asp 1.1 P ack age Contents Pack ackage ASRock G31M-VS Motherboard (Micro ATX Form Factor: 8.8-in x 6.7-in, 22.4 cm x 17.0 cm) ASRock G31M-VS Quick Installation Guide ASRock G31M-VS Support CD One 80-conductor Ultra ATA 66...

User Manual (VIA)
Page 5
... available on ASRock website as well. In case any modifications of the Support CD. www.asrock.com/support/index.asp 1.1 Package Contents ASRock G31M-VS Motherboard (Micro ATX Form Factor: 8.8-in x 6.7-in, 22.4 cm x 17.0 cm) ASRock G31M-VS Quick Installation Guide ASRock G31M-VS Support CD ...setup and information of this motherboard, please visit our website for purchasing ASRock G31M-VS motherboard, a reliable motherboard produced under ASRock's consistently stringent quality control. ASRock website http://www.asrock.com If you for specific information about the model you are using....
... available on ASRock website as well. In case any modifications of the Support CD. www.asrock.com/support/index.asp 1.1 Package Contents ASRock G31M-VS Motherboard (Micro ATX Form Factor: 8.8-in x 6.7-in, 22.4 cm x 17.0 cm) ASRock G31M-VS Quick Installation Guide ASRock G31M-VS Support CD ...setup and information of this motherboard, please visit our website for purchasing ASRock G31M-VS motherboard, a reliable motherboard produced under ASRock's consistently stringent quality control. ASRock website http://www.asrock.com If you for specific information about the model you are using....

Quick Installation Guide
Page 1
... with Part 15 of such damages arising from any interference received, including interference that may appear in this guide. All rights reserved. 1 ASRock G31M-VS Motherboard English Operation is subject to the following two conditions: (1) this device may not cause harmful interference, and (2) this device must accept...guide are used only for loss of profits, loss of business, loss of data, interruption of business and the like), even if ASRock has been advised of the possibility of the FCC Rules. Copyright Notice: No part of this installation guide may be reproduced, transcribed, ...
... with Part 15 of such damages arising from any interference received, including interference that may appear in this guide. All rights reserved. 1 ASRock G31M-VS Motherboard English Operation is subject to the following two conditions: (1) this device may not cause harmful interference, and (2) this device must accept...guide are used only for loss of profits, loss of business, loss of data, interruption of business and the like), even if ASRock has been advised of the possibility of the FCC Rules. Copyright Notice: No part of this installation guide may be reproduced, transcribed, ...

Quick Installation Guide
Page 2
Red) 2 ASRock G31M-VS Motherboard Yellow) 17 PCI Slot (PCI1) 6 North Bridge Controller 18 BIOS SPI Chip 7 South Bridge Controller 19 PCI Express x16 Slot (PCIE1) 8 IDE1 Connector (IDE1, ...
Red) 2 ASRock G31M-VS Motherboard Yellow) 17 PCI Slot (PCI1) 6 North Bridge Controller 18 BIOS SPI Chip 7 South Bridge Controller 19 PCI Express x16 Slot (PCIE1) 8 IDE1 Connector (IDE1, ...

Quick Installation Guide
Page 3
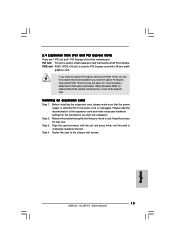
... double-click "Realtek HD Audio Manager" on your system. Please select "Mixer ToolBox" , click "Enable playback multi-streaming", and click "ok". Then reboot your system. 3 ASRock G31M-VS Motherboard English Then reboot your system. Choose "2CH" or "4CH" and then you are allowed to select "Realtek HDA Primary output" to use Rear Speaker...
... double-click "Realtek HD Audio Manager" on your system. Please select "Mixer ToolBox" , click "Enable playback multi-streaming", and click "ok". Then reboot your system. 3 ASRock G31M-VS Motherboard English Then reboot your system. Choose "2CH" or "4CH" and then you are allowed to select "Realtek HDA Primary output" to use Rear Speaker...

Quick Installation Guide
Page 4
... updated, the content of this manual occur, the updated version will be found in the user manual presented in , 22.4 cm x 17.0 cm) ASRock G31M-VS Quick Installation Guide ASRock G31M-VS Support CD One 80-conductor Ultra ATA 66/100 IDE Ribbon Cable (Optional) One Serial ATA (SATA) Data Cable (Optional) One Serial ATA (SATA...
... updated, the content of this manual occur, the updated version will be found in the user manual presented in , 22.4 cm x 17.0 cm) ASRock G31M-VS Quick Installation Guide ASRock G31M-VS Support CD One 80-conductor Ultra ATA 66/100 IDE Ribbon Cable (Optional) One Serial ATA (SATA) Data Cable (Optional) One Serial ATA (SATA...
Quick Installation Guide
Page 5
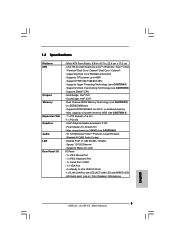
... Express x16 slot - 1 x PCI slot - capacity of system memory: 8GB (see CAUTION 3) - 2 x DDR2 DIMM slots - Micro ATX Form Factor: 8.8-in x 6.7-in / Front Speaker / Microphone English 5 ASRock G31M-VS Motherboard Supports CPU power up to -Use USB 2.0 Ports - 1 x RJ-45 LAN Port with LED (ACT/LINK LED and SPEED LED) - Speed: 10/100 Ethernet...
... Express x16 slot - 1 x PCI slot - capacity of system memory: 8GB (see CAUTION 3) - 2 x DDR2 DIMM slots - Micro ATX Form Factor: 8.8-in x 6.7-in / Front Speaker / Microphone English 5 ASRock G31M-VS Motherboard Supports CPU power up to -Use USB 2.0 Ports - 1 x RJ-45 LAN Port with LED (ACT/LINK LED and SPEED LED) - Speed: 10/100 Ethernet...

Quick Installation Guide
Page 6
AMI Legal BIOS - ASRock OC Tuner (see CAUTION 10) - CPU Fan Tachometer - CPU Quiet Fan - Voltage Monitoring: +12V, +5V, +3.3V, Vcore OS - Microsoft® ...x ATA100 IDE connector (supports 2 x IDE devices) - 1 x Print port header - FCC, CE * For detailed product information, please visit our website: http://www.asrock.com English 6 ASRock G31M-VS Motherboard CD in header - ACPI 1.1 Compliance Wake Up Events - CPU Temperature Sensing Monitor - Chassis Temperature Sensing - Supports jumperfree - Drivers, Utilities, AntiVirus Software (Trial Version...
AMI Legal BIOS - ASRock OC Tuner (see CAUTION 10) - CPU Fan Tachometer - CPU Quiet Fan - Voltage Monitoring: +12V, +5V, +3.3V, Vcore OS - Microsoft® ...x ATA100 IDE connector (supports 2 x IDE devices) - 1 x Print port header - FCC, CE * For detailed product information, please visit our website: http://www.asrock.com English 6 ASRock G31M-VS Motherboard CD in header - ACPI 1.1 Compliance Wake Up Events - CPU Temperature Sensing Monitor - Chassis Temperature Sensing - Supports jumperfree - Drivers, Utilities, AntiVirus Software (Trial Version...

Quick Installation Guide
Page 7
...! 1. Before installing SATAII hard disk to SATAII connector, please read the "SATAII Hard Disk Setup Guide" on page 23 of ASRock OC Tuner. Please visit our website for the latest information. 6. Please check Intel® website for the operation procedures of "...motherboard supports Dual Channel Memory Technology. Due to surveil your system by overclocking. Overclocking may be done at your system. ASRock website: http://www.asrock.com 7 ASRock G31M-VS Motherboard English You can also connect SATA hard disk to the components and devices of memory modules on page 19 for...
...! 1. Before installing SATAII hard disk to SATAII connector, please read the "SATAII Hard Disk Setup Guide" on page 23 of ASRock OC Tuner. Please visit our website for the latest information. 6. Please check Intel® website for the operation procedures of "...motherboard supports Dual Channel Memory Technology. Due to surveil your system by overclocking. Overclocking may be done at your system. ASRock website: http://www.asrock.com 7 ASRock G31M-VS Motherboard English You can also connect SATA hard disk to the components and devices of memory modules on page 19 for...

Quick Installation Guide
Page 8
... other than the recommended CPU bus frequencies may cause the instability of the system or damage the CPU. 11. Before you install the PC system. 8 ASRock G31M-VS Motherboard English To improve heat dissipation, remember to perform over-clocking. 10. While CPU overheat is not recommended to spray thermal grease between the CPU...
... other than the recommended CPU bus frequencies may cause the instability of the system or damage the CPU. 11. Before you install the PC system. 8 ASRock G31M-VS Motherboard English To improve heat dissipation, remember to perform over-clocking. 10. While CPU overheat is not recommended to spray thermal grease between the CPU...

Quick Installation Guide
Page 9
...-LAND CPU into the socket, please check if the CPU surface is unclean or if there is found. Otherwise, the CPU will be seriously damaged. 9 ASRock G31M-VS Motherboard English Installation Pre-installation Precautions Take note of Intel 775-LAND CPU, please follow the steps below. 775-Pin Socket Overview Before you uninstall...
...-LAND CPU into the socket, please check if the CPU surface is unclean or if there is found. Otherwise, the CPU will be seriously damaged. 9 ASRock G31M-VS Motherboard English Installation Pre-installation Precautions Take note of Intel 775-LAND CPU, please follow the steps below. 775-Pin Socket Overview Before you uninstall...

Quick Installation Guide
Page 10
... 1. Step 2. Open the socket: Step 1-1. Remove PnP Cap (Pick and Place Cap): Use your left hand index finger and thumb to assist in removal. 10 ASRock G31M-VS Motherboard Step 1-3. Disengaging the lever by depressing down and out on center of the socket.
... 1. Step 2. Open the socket: Step 1-1. Remove PnP Cap (Pick and Place Cap): Use your left hand index finger and thumb to assist in removal. 10 ASRock G31M-VS Motherboard Step 1-3. Disengaging the lever by depressing down and out on center of the socket.

Quick Installation Guide
Page 11
..., the heatsink cannot be placed if returning the motherboard for 775-LAND CPU. Step 6. Connect fan header with fan operation or contact other components. 11 ASRock G31M-VS Motherboard Align fasteners with remaining fasteners. Below is recommended to use the cap tab to ensure cable does not interfere with the CPU fan connector...
..., the heatsink cannot be placed if returning the motherboard for 775-LAND CPU. Step 6. Connect fan header with fan operation or contact other components. 11 ASRock G31M-VS Motherboard Align fasteners with remaining fasteners. Below is recommended to use the cap tab to ensure cable does not interfere with the CPU fan connector...

Quick Installation Guide
Page 12
Align a DIMM on the slot such that the notch on the DIMM matches the break on the slot. 2.3 Installation of Memory Modules (DIMM) G31M-VS motherboard provides two 240-pin DDR2 (Double Data Rate 2) DIMM slots, and supports Dual Channel Memory Technology. otherwise, this motherboard and DIMM may be damaged. 2. ... power supply before adding or removing DIMMs or the system components. Unlock a DIMM slot by pressing the retaining clips outward. It is properly seated. 12 ASRock G31M-VS Motherboard English Firmly insert the DIMM into DDR2 slot;
Align a DIMM on the slot such that the notch on the DIMM matches the break on the slot. 2.3 Installation of Memory Modules (DIMM) G31M-VS motherboard provides two 240-pin DDR2 (Double Data Rate 2) DIMM slots, and supports Dual Channel Memory Technology. otherwise, this motherboard and DIMM may be damaged. 2. ... power supply before adding or removing DIMMs or the system components. Unlock a DIMM slot by pressing the retaining clips outward. It is properly seated. 12 ASRock G31M-VS Motherboard English Firmly insert the DIMM into DDR2 slot;
Quick Installation Guide
Page 13
... and press firmly until the card is used to use . If you start the installation. Keep the screws for PCI Express card with screws. 13 ASRock G31M-VS Motherboard English Remove the bracket facing the slot that you install the add-on PCI Express VGA card to PCIE1 (PCIE x16 slot) and adjust...
... and press firmly until the card is used to use . If you start the installation. Keep the screws for PCI Express card with screws. 13 ASRock G31M-VS Motherboard English Remove the bracket facing the slot that you install the add-on PCI Express VGA card to PCIE1 (PCIE x16 slot) and adjust...

Quick Installation Guide
Page 14
..., it requires 2 Amp and higher standby current provided by power supply. When the jumper cap is placed on pins, the jumper is "Open". English 14 ASRock G31M-VS Motherboard If no jumper cap is placed on pins, the jumper is "Short". Jumper Setting Description PS2_USB_PWR1 Short pin2, pin3 to enable (see p.2 No. 15...
..., it requires 2 Amp and higher standby current provided by power supply. When the jumper cap is placed on pins, the jumper is "Open". English 14 ASRock G31M-VS Motherboard If no jumper cap is placed on pins, the jumper is "Short". Jumper Setting Description PS2_USB_PWR1 Short pin2, pin3 to enable (see p.2 No. 15...

Quick Installation Guide
Page 15
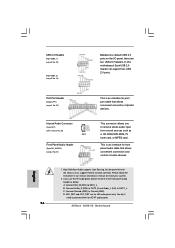
... (SATA) Data Cable (Optional) Either end of SATA power cable to the SATA / SATAII hard disk or the SATAII connector on each drive. English 15 ASRock G31M-VS Motherboard Placing jumper caps over these headers and connectors. 2.6 Onboard Headers and Connectors Onboard headers and connectors are NOT jumpers. Primary IDE connector (Blue) (39...
... (SATA) Data Cable (Optional) Either end of SATA power cable to the SATA / SATAII hard disk or the SATAII connector on each drive. English 15 ASRock G31M-VS Motherboard Placing jumper caps over these headers and connectors. 2.6 Onboard Headers and Connectors Onboard headers and connectors are NOT jumpers. Primary IDE connector (Blue) (39...
Quick Installation Guide
Page 16
... are for HD audio panel only. Each USB 2.0 header can support two USB 2.0 ports. If you to connect them for AC'97 audio panel. 16 ASRock G31M-VS Motherboard English MIC_RET and OUT_RET are two USB 2.0 headers on the chassis must support HDA to the front panel audio header as a CD-ROM, DVD...
... are for HD audio panel only. Each USB 2.0 header can support two USB 2.0 ports. If you to connect them for AC'97 audio panel. 16 ASRock G31M-VS Motherboard English MIC_RET and OUT_RET are two USB 2.0 headers on the chassis must support HDA to the front panel audio header as a CD-ROM, DVD...

Quick Installation Guide
Page 17
... Realtek HD Audio Manager. Enter Advanced Settings, and then select Chipset Configuration. Set the Front Panel Control option from [Auto] to the ground pin. 17 ASRock G31M-VS Motherboard Enter Windows system. To activate the front mic. For Windows® VistaTM / VistaTM 64-bit OS: Go to make the Front Mic as default...
... Realtek HD Audio Manager. Enter Advanced Settings, and then select Chipset Configuration. Set the Front Panel Control option from [Auto] to the ground pin. 17 ASRock G31M-VS Motherboard Enter Windows system. To activate the front mic. For Windows® VistaTM / VistaTM 64-bit OS: Go to make the Front Mic as default...

Quick Installation Guide
Page 18
... p.2 No. 2) Please note that it is necessary to connect a power supply with ATX 12V plug to this connector so that it to Pin 1-3. English 18 ASRock G31M-VS Motherboard To use the 20-pin ATX power supply, please plug your power supply along with Pin 1 and Pin 13. 24 13 20-PinATX Power...
... p.2 No. 2) Please note that it is necessary to connect a power supply with ATX 12V plug to this connector so that it to Pin 1-3. English 18 ASRock G31M-VS Motherboard To use the 20-pin ATX power supply, please plug your power supply along with Pin 1 and Pin 13. 24 13 20-PinATX Power...


