

User Manual
Page 3
... ATA (SATA) / Serial ATAII (SATAII) Hard Disks Installation ...24 2.11 Driver Installation Guide ...24 2.12 Untied Overclocking Technology ...24 3 BIOS S ETUP UTILITY ...25 SETUP 3.1 Introduction ...3.1.1 BIOS Menu Bar ...3.1.2 Navigation Keys ...3.2 Main Screen ...3.3 Smart Screen ...3.4 Advanced Screen ...3.4.1 CPU Configuration ...3.4.2 Chipset Configuration ...3.4.3 ACPI Configuration ...3.4.4 IDE Configuration ...3.4.5 PCIPnP Configuration ...3.4.6 Super IO Configuration ...3.4.7 USB Configuration ...3.5 Hardware Health Event Monitoring...
... ATA (SATA) / Serial ATAII (SATAII) Hard Disks Installation ...24 2.11 Driver Installation Guide ...24 2.12 Untied Overclocking Technology ...24 3 BIOS S ETUP UTILITY ...25 SETUP 3.1 Introduction ...3.1.1 BIOS Menu Bar ...3.1.2 Navigation Keys ...3.2 Main Screen ...3.3 Smart Screen ...3.4 Advanced Screen ...3.4.1 CPU Configuration ...3.4.2 Chipset Configuration ...3.4.3 ACPI Configuration ...3.4.4 IDE Configuration ...3.4.5 PCIPnP Configuration ...3.4.6 Super IO Configuration ...3.4.7 USB Configuration ...3.5 Hardware Health Event Monitoring...

User Manual
Page 17
... for the card before you install the add-on PCI Express VGA card to PCIE1 (PCIE x16 slot) and adjust the "Internal Graphics Mode Select" BIOS option to use . Step 4. 17 PCIE slot: PCIE1 (PCIE x16 slot) is completely seated on this motherboard. If you intend to [Enabled, 1MB] ...or [Enabled, 8MB], the onboard VGA will be enabled, and the primary screen will be onboard VGA. Installing an expansion card Step 1. 2.6 Expansion Slots (PCI and PCI Express Slots) There are 1 PCI slot and 1 PCI Express slot...
... for the card before you install the add-on PCI Express VGA card to PCIE1 (PCIE x16 slot) and adjust the "Internal Graphics Mode Select" BIOS option to use . Step 4. 17 PCIE slot: PCIE1 (PCIE x16 slot) is completely seated on this motherboard. If you intend to [Enabled, 1MB] ...or [Enabled, 8MB], the onboard VGA will be enabled, and the primary screen will be onboard VGA. Installing an expansion card Step 1. 2.6 Expansion Slots (PCI and PCI Express Slots) There are 1 PCI slot and 1 PCI Express slot...

User Manual
Page 25
... , or by turning the system off and then back on your system. Because the BIOS software is constantly being updated, the following BIOS setup screens and descriptions are for reference purpose only, and they may run the BIOS SETUP UTILITY when you see on . The SPI Memory on the menu bar, and ...then press to configure your screen. 3 . 1 . 1 BIOS Menu Bar The top of the screen has a menu bar with its test routines. You may not exactly match what you start up the security features Exit To exit the current screen or the BIOS SETUP UTILITY Use < > key or < > key...
... , or by turning the system off and then back on your system. Because the BIOS software is constantly being updated, the following BIOS setup screens and descriptions are for reference purpose only, and they may run the BIOS SETUP UTILITY when you see on . The SPI Memory on the menu bar, and ...then press to configure your screen. 3 . 1 . 1 BIOS Menu Bar The top of the screen has a menu bar with its test routines. You may not exactly match what you start up the security features Exit To exit the current screen or the BIOS SETUP UTILITY Use < > key or < > key...

User Manual
Page 26
... Screen When you enter the BIOS SETUP UTILITY, the Main screen will appear and display the system overview Smart BIOS SETUP UTILITY Advanced H/W Monitor Boot Security Exit Main System Overview System Time System Date BIOS Version Processor Type [14:00:09] [Fri 03/13/2009] Use [Enter], [TAB] or [SHIFT-TAB] to configure system Time. : G31M-VS...
... Screen When you enter the BIOS SETUP UTILITY, the Main screen will appear and display the system overview Smart BIOS SETUP UTILITY Advanced H/W Monitor Boot Security Exit Main System Overview System Time System Date BIOS Version Processor Type [14:00:09] [Fri 03/13/2009] Use [Enter], [TAB] or [SHIFT-TAB] to configure system Time. : G31M-VS...

User Manual
Page 27
...Security Exit Smart Settings Save Changes and Exit Load BIOS Defaults Load Performance Setup Default (IDE/SATA) Load Power Saving Setup Default Exit system setup after loading, please resume optimal default settings. Enter F1 F9 F10 ESC Select Screen Select Item Go to save the changes and ...exit the BIOS SETUP UTILITY. Load BIOS Defaults Load BIOS default values for this operation. If system boot failure occurs after saving the changes. F9 ...
...Security Exit Smart Settings Save Changes and Exit Load BIOS Defaults Load Performance Setup Default (IDE/SATA) Load Power Saving Setup Default Exit system setup after loading, please resume optimal default settings. Enter F1 F9 F10 ESC Select Screen Select Item Go to save the changes and ...exit the BIOS SETUP UTILITY. Load BIOS Defaults Load BIOS default values for this operation. If system boot failure occurs after saving the changes. F9 ...

User Manual
Page 28
... SuperIO Configuration USB Configuration Enter F1 F9 F10 ESC Select Screen Select Item Go to malfunction. CPU Thermal Throttling No-Excute Memory Protection Hyper Threading Technology Intel (R) SpeedStep(tm) tech. BIOS SETUP UTILITY H/W Monitor Boot Main Smart Advanced Security Exit Options...Inc. The default value is [Auto]. Setting wrong values in below sections may cause the system to malfunction. 3.4.1 CPU Configuration BIOS SETUP UTILITY Advanced CPU Configuration Overclock Mode CPU Frequency (MHz) PCIE Frequency (MHz) Boot Failure Guard Spread Spectrum Ratio Status Ratio...
... SuperIO Configuration USB Configuration Enter F1 F9 F10 ESC Select Screen Select Item Go to malfunction. CPU Thermal Throttling No-Excute Memory Protection Hyper Threading Technology Intel (R) SpeedStep(tm) tech. BIOS SETUP UTILITY H/W Monitor Boot Main Smart Advanced Security Exit Options...Inc. The default value is [Auto]. Setting wrong values in below sections may cause the system to malfunction. 3.4.1 CPU Configuration BIOS SETUP UTILITY Advanced CPU Configuration Overclock Mode CPU Frequency (MHz) PCIE Frequency (MHz) Boot Failure Guard Spread Spectrum Ratio Status Ratio...

User Manual
Page 30
...will allow remapping of memory accessing. Intel (R) SpeedStep(tm) tech. The default value is Intel's new power saving technology. Select Screen Select Item Change Option General Help Load Defaults Save and Exit Exit +F1 F9 F10 ESC v02.54 (C) Copyright 1985-2005, ...333MHz (DDRII667)] and [400MHz (DDRII800)]. Flexibility Option The default value of overlapped PCI memory above issue occurs. 3.4.2 Chipset Configuration BIOS SETUP UTILITY Advanced Chipset Settings Memory Remap Feature DRAM Frequency Flexibility Option DRAM tCL DRAM tRCD DRAM tRP DRAM tRAS Primary Graphics ...
...will allow remapping of memory accessing. Intel (R) SpeedStep(tm) tech. The default value is Intel's new power saving technology. Select Screen Select Item Change Option General Help Load Defaults Save and Exit Exit +F1 F9 F10 ESC v02.54 (C) Copyright 1985-2005, ...333MHz (DDRII667)] and [400MHz (DDRII800)]. Flexibility Option The default value of overlapped PCI memory above issue occurs. 3.4.2 Chipset Configuration BIOS SETUP UTILITY Advanced Chipset Settings Memory Remap Feature DRAM Frequency Flexibility Option DRAM tCL DRAM tRCD DRAM tRP DRAM tRAS Primary Graphics ...

User Manual
Page 33
If [Power On] is selected, the AC/Power remains off when the power recovers. 3.4.3 ACPI Configuration BIOS SETUP UTILITY Advanced ACPI Configuration Suspend To RAM Restore on the system from the power-soft-off mode. v02.54 (C) Copyright 1985-2005, American Megatrends, ... On PS / 2 Keyboard Power On RTC Alarm Power On ACPI HPET Table [Disabled] [Power Off] [Disabled] [Disabled] [Disabled] [Disabled] [Disabled] +F1 F9 F10 ESC Select Screen Select Item Change Option General Help Load Defaults Save and Exit Exit Select auto-detect or disable the STR feature. Suspend to RAM This field...
If [Power On] is selected, the AC/Power remains off when the power recovers. 3.4.3 ACPI Configuration BIOS SETUP UTILITY Advanced ACPI Configuration Suspend To RAM Restore on the system from the power-soft-off mode. v02.54 (C) Copyright 1985-2005, American Megatrends, ... On PS / 2 Keyboard Power On RTC Alarm Power On ACPI HPET Table [Disabled] [Power Off] [Disabled] [Disabled] [Disabled] [Disabled] [Disabled] +F1 F9 F10 ESC Select Screen Select Item Change Option General Help Load Defaults Save and Exit Exit Select auto-detect or disable the STR feature. Suspend to RAM This field...

User Manual
Page 34
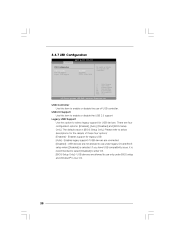
... 2], then SATAII_1 will use the "Primary IDE Master" as the example in the following instruction. 34 We will not work . 3.4.4 IDE Configuration BIOS SETUP UTILITY Advanced IDE Configuration ATA/IDE Configuration SATAII_1 SATAII_2 IDE1 Master IDE1 Slave [Enhanced] [Hard Disk] [Not Detected] [Not Detected] [Not ...Detected] Set [Compatible] when Legacy OS (MS-DOS, Win NT) device is used . +F1 F9 F10 ESC Select Screen Select Item Change Option General Help Load Defaults Save and Exit Exit v02.54 (C) Copyright 1985-2005, American Megatrends, Inc. If native OS (Windows&#...
... 2], then SATAII_1 will use the "Primary IDE Master" as the example in the following instruction. 34 We will not work . 3.4.4 IDE Configuration BIOS SETUP UTILITY Advanced IDE Configuration ATA/IDE Configuration SATAII_1 SATAII_2 IDE1 Master IDE1 Slave [Enhanced] [Hard Disk] [Not Detected] [Not Detected] [Not ...Detected] Set [Compatible] when Legacy OS (MS-DOS, Win NT) device is used . +F1 F9 F10 ESC Select Screen Select Item Change Option General Help Load Defaults Save and Exit Exit v02.54 (C) Copyright 1985-2005, American Megatrends, Inc. If native OS (Windows&#...

User Manual
Page 35
... allows the improved transfer-speed and data-integrity for Netware and UNIX user, select [Disabled] to the system. +F1 F9 F10 ESC Select Screen Select Item Change Option General Help Load Defaults Save and Exit Exit v02.54 (C) Copyright 1985-2005, American Megatrends, Inc. After selecting the ...hard disk information into BIOS, use of the IDE device that you specify. LBA/Large Mode Use this feature is [Auto]. If this item to configure the type of...
... allows the improved transfer-speed and data-integrity for Netware and UNIX user, select [Disabled] to the system. +F1 F9 F10 ESC Select Screen Select Item Change Option General Help Load Defaults Save and Exit Exit v02.54 (C) Copyright 1985-2005, American Megatrends, Inc. After selecting the ...hard disk information into BIOS, use of the IDE device that you specify. LBA/Large Mode Use this feature is [Auto]. If this item to configure the type of...

User Manual
Page 36
... options: [Disabled], [Auto], [Enabled]. 32-Bit Data Transfer Use this item to maximize the IDE hard disk data transfer rate. 3.4.5 PCIPnP Configuration BIOS SETUP UTILITY Advanced Advanced PCI / PnP Settings PCI Latency Timer PCI IDE BusMaster [32] [Enabled] Value in units of PCI clocks for PCI device ...latency timer register. +F1 F9 F10 ESC Select Screen Select Item Change Option General Help Load Defaults Save and Exit Exit v02.54 (C) Copyright 1985-2005, American Megatrends, Inc. PCI Latency Timer The...
... options: [Disabled], [Auto], [Enabled]. 32-Bit Data Transfer Use this item to maximize the IDE hard disk data transfer rate. 3.4.5 PCIPnP Configuration BIOS SETUP UTILITY Advanced Advanced PCI / PnP Settings PCI Latency Timer PCI IDE BusMaster [32] [Enabled] Value in units of PCI clocks for PCI device ...latency timer register. +F1 F9 F10 ESC Select Screen Select Item Change Option General Help Load Defaults Save and Exit Exit v02.54 (C) Copyright 1985-2005, American Megatrends, Inc. PCI Latency Timer The...

User Manual
Page 37
...item to set the EPP version. Parallel Port Mode Use this item to Enable or Disable Floppy Controller. +F1 F9 F10 ESC Select Screen Select Item Change Option General Help Load Defaults Save and Exit Exit v02.54 (C) Copyright 1985-2003, American Megatrends, Inc. Configuration ...options: [Normal], [Bi-Directional], and [ECP+EPP]. 3.4.6 Super IO Configuration BIOS SETUP UTILITY Advanced Configure Super IO Chipset Serial Port Address Parallel Port Address Parallel Port Mode EPP Version ECP Mode DMA Channel Parallel Port ...
...item to set the EPP version. Parallel Port Mode Use this item to Enable or Disable Floppy Controller. +F1 F9 F10 ESC Select Screen Select Item Change Option General Help Load Defaults Save and Exit Exit v02.54 (C) Copyright 1985-2003, American Megatrends, Inc. Configuration ...options: [Normal], [Bi-Directional], and [ECP+EPP]. 3.4.6 Super IO Configuration BIOS SETUP UTILITY Advanced Configure Super IO Chipset Serial Port Address Parallel Port Address Parallel Port Mode EPP Version ECP Mode DMA Channel Parallel Port ...
User Manual
Page 38
Legacy USB Support Use this item to enable or disable the USB 2.0 support. If you have USB compatibility issue, it is [BIOS Setup Only]. There are connected. [Disabled] - Please refer to use of these four options: [Enabled] - The default value is ...for legacy USB. [Auto] - 3.4.7 USB Configuration BIOS SETUP UTILITY Advanced USB Configuration USB Controller USB 2.0 Support Legacy USB Support [Enabled] [Enabled] [BIOS Setup Only] To enable or disable the onboard USB controllers. +F1 F9 F10 ESC Select Screen Select Item Change Option General Help Load Defaults Save...
Legacy USB Support Use this item to enable or disable the USB 2.0 support. If you have USB compatibility issue, it is [BIOS Setup Only]. There are connected. [Disabled] - Please refer to use of these four options: [Enabled] - The default value is ...for legacy USB. [Auto] - 3.4.7 USB Configuration BIOS SETUP UTILITY Advanced USB Configuration USB Controller USB 2.0 Support Legacy USB Support [Enabled] [Enabled] [BIOS Setup Only] To enable or disable the onboard USB controllers. +F1 F9 F10 ESC Select Screen Select Item Change Option General Help Load Defaults Save...

User Manual
Page 39
... is [50 C/122 F]. The default value is [Disabled]. Configuration options: [Fast], [Middle] and [Slow]. 39 F1 F9 F10 ESC Select Screen Select Item General Help Load Defaults Save and Exit Exit v02.54 (C) Copyright 1985-2003, American Megatrends, Inc. If you set this option as ...in full speed. Target Fan Speed Use this option to monitor the status of the hardware on your system, including the parameters of CPU fan. BIOS SETUP UTILITY Advanced H/W Monitor Boot Main Smart Security Exit Hardware Health Event Monitoring CPU Temperature M / B Temperature CPU Fan Speed Chassis Fan Speed...
... is [50 C/122 F]. The default value is [Disabled]. Configuration options: [Fast], [Middle] and [Slow]. 39 F1 F9 F10 ESC Select Screen Select Item General Help Load Defaults Save and Exit Exit v02.54 (C) Copyright 1985-2003, American Megatrends, Inc. If you set this option as ...in full speed. Target Fan Speed Use this option to monitor the status of the hardware on your system, including the parameters of CPU fan. BIOS SETUP UTILITY Advanced H/W Monitor Boot Main Smart Security Exit Hardware Health Event Monitoring CPU Temperature M / B Temperature CPU Fan Speed Chassis Fan Speed...

User Manual
Page 40
... Help Load Defaults Save and Exit Exit v02.54 (C) Copyright 1985-2005, American Megatrends, Inc. 3.6.1 Boot Settings Configuration BIOS SETUP UTILITY Boot Boot Settings Configuration Full Screen Logo AddOn ROM Display Boot From Onboard LAN Bootup Num-Lock [Enabled] [Enabled] [Disabled] [On] Disabled: Displays... Defaults Save and Exit Exit v02.54 (C) Copyright 1985-2003, American Megatrends, Inc. Full Screen Logo Use this option to adjust AddOn ROM Display. Main Smart BIOS SETUP UTILITY Advanced H/W Monitor Boot Security Exit Boot Settings Boot Settings Configuration 1st Boot Device 2nd...
... Help Load Defaults Save and Exit Exit v02.54 (C) Copyright 1985-2005, American Megatrends, Inc. 3.6.1 Boot Settings Configuration BIOS SETUP UTILITY Boot Boot Settings Configuration Full Screen Logo AddOn ROM Display Boot From Onboard LAN Bootup Num-Lock [Enabled] [Enabled] [Disabled] [On] Disabled: Displays... Defaults Save and Exit Exit v02.54 (C) Copyright 1985-2003, American Megatrends, Inc. Full Screen Logo Use this option to adjust AddOn ROM Display. Main Smart BIOS SETUP UTILITY Advanced H/W Monitor Boot Security Exit Boot Settings Boot Settings Configuration 1st Boot Device 2nd...

User Manual
Page 41
... it will automatically activate the Numeric Lock function after boot-up. 3.7 Security Screen In this item to [On], it . Boot From Onboard LAN Use this section, you may set to enable or disable the Boot From Onboard LAN feature. BIOS SETUP UTILITY Advanced H/W Monitor Boot Main Smart Security Exit Security Settings Supervisor...
... it will automatically activate the Numeric Lock function after boot-up. 3.7 Security Screen In this item to [On], it . Boot From Onboard LAN Use this section, you may set to enable or disable the Boot From Onboard LAN feature. BIOS SETUP UTILITY Advanced H/W Monitor Boot Main Smart Security Exit Security Settings Supervisor...

User Manual
Page 42
3.8 Exit Screen Main Smart BIOS SETUP UTILITY Advanced H/W Monitor Boot Security Exit Exit Options Save Changes and ...[OK] to save three user defaults according to save current setting user defaults ? Select [OK] to exit the BIOS SETUP UTILITY without saving any changes. Save Changes and Exit When you like to your own requirements. 42 Discard Changes... (C) Copyright 1985-2005, American Megatrends, Inc. Enter F1 F9 F10 ESC Select Screen Select Item Go to load and save the changes and exit the BIOS SETUP UTILITY. In this option, you select this operation. F10 key can be ...
3.8 Exit Screen Main Smart BIOS SETUP UTILITY Advanced H/W Monitor Boot Security Exit Exit Options Save Changes and ...[OK] to save three user defaults according to save current setting user defaults ? Select [OK] to exit the BIOS SETUP UTILITY without saving any changes. Save Changes and Exit When you like to your own requirements. 42 Discard Changes... (C) Copyright 1985-2005, American Megatrends, Inc. Enter F1 F9 F10 ESC Select Screen Select Item Go to load and save the changes and exit the BIOS SETUP UTILITY. In this option, you select this operation. F10 key can be ...

User Manual (VIA)
Page 3
...) / Serial ATAII (SATAII) Hard Disks Installation 24 2.11 Driver Installation Guide 24 2.12 Untied Overclocking Technology 24 3 BIOS SETUP UTILITY 25 3.1 Introduction 25 3.1.1 BIOS Menu Bar 25 3.1.2 Navigation Keys 26 3.2 Main Screen 26 3.3 Smart Screen 27 3.4 Advanced Screen 28 3.4.1 CPU Configuration 28 3.4.2 Chipset Configuration 30 3.4.3 ACPI Configuration 33 3.4.4 IDE Configuration 34 3.4.5 PCIPnP Configuration 36 3.4.6 Super...
...) / Serial ATAII (SATAII) Hard Disks Installation 24 2.11 Driver Installation Guide 24 2.12 Untied Overclocking Technology 24 3 BIOS SETUP UTILITY 25 3.1 Introduction 25 3.1.1 BIOS Menu Bar 25 3.1.2 Navigation Keys 26 3.2 Main Screen 26 3.3 Smart Screen 27 3.4 Advanced Screen 28 3.4.1 CPU Configuration 28 3.4.2 Chipset Configuration 30 3.4.3 ACPI Configuration 33 3.4.4 IDE Configuration 34 3.4.5 PCIPnP Configuration 36 3.4.6 Super...

User Manual (VIA)
Page 17
... on PCI Express VGA card to PCIE1 (PCIE x16 slot) and adjust the "Internal Graphics Mode Select" BIOS option to [Enabled, 1MB] or [Enabled, 8MB], the onboard VGA will be enabled, and the primary screen will be onboard VGA. If you start the installation. Step 3. Align the card connector with screws. 17...
... on PCI Express VGA card to PCIE1 (PCIE x16 slot) and adjust the "Internal Graphics Mode Select" BIOS option to [Enabled, 1MB] or [Enabled, 8MB], the onboard VGA will be enabled, and the primary screen will be onboard VGA. If you start the installation. Step 3. Align the card connector with screws. 17...

User Manual (VIA)
Page 25
...system. erating System Security To set up the computer. Please press during the Power-On-Self-Test (POST) to get into the sub screen. 25 Because the BIOS software is constantly being updated, the following selections: Main To set up the security features Exit To exit the current... < > key or < > key to choose among the selections on the menu bar, and then press to enter the BIOS SETUP UTILITY, otherwise, POST will continue with the following BIOS setup screens and descriptions are for reference purpose only, and they may not exactly match what you start up the system time...
...system. erating System Security To set up the computer. Please press during the Power-On-Self-Test (POST) to get into the sub screen. 25 Because the BIOS software is constantly being updated, the following selections: Main To set up the security features Exit To exit the current... < > key or < > key to choose among the selections on the menu bar, and then press to enter the BIOS SETUP UTILITY, otherwise, POST will continue with the following BIOS setup screens and descriptions are for reference purpose only, and they may not exactly match what you start up the system time...


