User Manual
Page 5
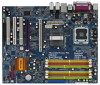
... ASRock 4Core1600Twins-P35 Motherboard (ATX Form Factor: 12.0-in x 9.6-in, 30.5 cm x 24.4 cm) ASRock 4Core1600Twins-P35 Quick Installation Guide ASRock 4Core1600Twins-P35 Support CD One 80-conductor Ultra ATA 66/100/133 IDE Ribbon Cable One Ribbon Cable for purchasing ASRock 4Core1600Twins-P35 motherboard, a reliable motherboard produced under ASRock's consistently stringent quality control. Because the motherboard specifications and the BIOS software might be updated...
... ASRock 4Core1600Twins-P35 Motherboard (ATX Form Factor: 12.0-in x 9.6-in, 30.5 cm x 24.4 cm) ASRock 4Core1600Twins-P35 Quick Installation Guide ASRock 4Core1600Twins-P35 Support CD One 80-conductor Ultra ATA 66/100/133 IDE Ribbon Cable One Ribbon Cable for purchasing ASRock 4Core1600Twins-P35 motherboard, a reliable motherboard produced under ASRock's consistently stringent quality control. Because the motherboard specifications and the BIOS software might be updated...

User Manual
Page 25
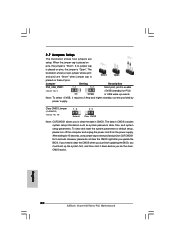
...date, time, and system setup parameters. Jumper Setting Description PS2_USB_PWR1 (see p.11, No. 10) 1_2 2_3 Default Clear CMOS Note: CLRCMOS1 allows you update the BIOS. The data in CMOS. However, please do the clearCMOS action. 25 lustration shows a 3-pin jumper whose pin1 and pin2 are setup. Note: ... and higher standby current provided by power supply. To clear and reset the system parameters to clear the CMOS when you just finish updating the BIOS, you need to default setup, please turn off the computer and unplug the power cord from the power supply. If you must...
...date, time, and system setup parameters. Jumper Setting Description PS2_USB_PWR1 (see p.11, No. 10) 1_2 2_3 Default Clear CMOS Note: CLRCMOS1 allows you update the BIOS. The data in CMOS. However, please do the clearCMOS action. 25 lustration shows a 3-pin jumper whose pin1 and pin2 are setup. Note: ... and higher standby current provided by power supply. To clear and reset the system parameters to clear the CMOS when you just finish updating the BIOS, you need to default setup, please turn off the computer and unplug the power cord from the power supply. If you must...

User Manual
Page 43
... the system time/date information Advanced To set up the advanced BIOS features H/W Monitor To display current hardware status Boot To set up the computer. Because the BIOS software is constantly being updated, the following BIOS setup screens and descriptions are for reference purpose only, and they... may run the BIOS SETUP UTILITY when you start up the security features Exit To exit...
... the system time/date information Advanced To set up the advanced BIOS features H/W Monitor To display current hardware status Boot To set up the computer. Because the BIOS software is constantly being updated, the following BIOS setup screens and descriptions are for reference purpose only, and they... may run the BIOS SETUP UTILITY when you start up the security features Exit To exit...

User Manual
Page 44
... the system date. 44 3.1.2Navigation Keys Please check the following table for all the settings To save changes and exit the BIOS SETUP UTILITY To jump to configure system Time. +Tab F1 F9 F10 ESC Select Screen Select Item Change Field Select Field... H/W Monitor Boot System Overview System Time System Date [14:00:09] [Thu 12/13/2007] BIOS Version : 4Core1600Twins-P35 P1.00 Processor Type : Intel (R) Core(TM)2 Extreme CPU X9770 @ 3.20GHz (64bit) Processor Speed : 3200MHz Microcode Update : 10676/606 Cache Size : 12288KB Total Memory DDRII 1 DDRII 2 DDRII 3 DDRII 4 DDR3_1 DDR3_2...
... the system date. 44 3.1.2Navigation Keys Please check the following table for all the settings To save changes and exit the BIOS SETUP UTILITY To jump to configure system Time. +Tab F1 F9 F10 ESC Select Screen Select Item Change Field Select Field... H/W Monitor Boot System Overview System Time System Date [14:00:09] [Thu 12/13/2007] BIOS Version : 4Core1600Twins-P35 P1.00 Processor Type : Intel (R) Core(TM)2 Extreme CPU X9770 @ 3.20GHz (64bit) Processor Speed : 3200MHz Microcode Update : 10676/606 Cache Size : 12288KB Total Memory DDRII 1 DDRII 2 DDRII 3 DDRII 4 DDR3_1 DDR3_2...
Quick Installation Guide
Page 4
... and the BIOS software might be updated, the content of this motherboard, please visit our website for specific information about the model you for a 3.5-in Floppy Drive Two Serial ATA (SATA) Data Cables (Optional) One Serial ATA (SATA) HDD Power Cable (Optional) One HDMI_SPDIF Cable (Optional) One "ASRock 8CH_eSATAII I/O Plus" I/O Panel Shield 4 ASRock 4Core1600Twins-P35 Motherboard...
... and the BIOS software might be updated, the content of this motherboard, please visit our website for specific information about the model you for a 3.5-in Floppy Drive Two Serial ATA (SATA) Data Cables (Optional) One Serial ATA (SATA) HDD Power Cable (Optional) One HDMI_SPDIF Cable (Optional) One "ASRock 8CH_eSATAII I/O Plus" I/O Panel Shield 4 ASRock 4Core1600Twins-P35 Motherboard...
Quick Installation Guide
Page 20
... (see p.2 No. 10) Default Clear CMOS Note: CLRCMOS1 allows you must boot up events. English 20 ASRock 4Core1600Twins-P35 Motherboard The data in CMOS. If you need to clear the CMOS when you just finish updating the BIOS, you to default setup, please turn off the computer and unplug the power cord from the power...
... (see p.2 No. 10) Default Clear CMOS Note: CLRCMOS1 allows you must boot up events. English 20 ASRock 4Core1600Twins-P35 Motherboard The data in CMOS. If you need to clear the CMOS when you just finish updating the BIOS, you to default setup, please turn off the computer and unplug the power cord from the power...


