
Operating Instructions
Page 3
... cleaning Clean the cabinet, panel and controls with a soft cloth slightly moistened with very low level input (soft sound) or no audio signal. On placement Do not place the system in a location near a TV set , then turn up the volume while listening to the doors, health appliances, magnets used for a long time, be damaged when a peak level portion is played. Precautions On safety...
... cleaning Clean the cabinet, panel and controls with a soft cloth slightly moistened with very low level input (soft sound) or no audio signal. On placement Do not place the system in a location near a TV set , then turn up the volume while listening to the doors, health appliances, magnets used for a long time, be damaged when a peak level portion is played. Precautions On safety...
Operating Instructions
Page 4
... Second Edition (SE) Operation is not assured in this manual primarily describe the controls on the remote. About this manual The instructions in the following hardware and software are not guaranteed for the speaker system. About installing the supplied software "WinDVD," refer to the USB port of the computer. Connecting through a USB hub is recommended to connect the USB cable directly to 5, 20...
... Second Edition (SE) Operation is not assured in this manual primarily describe the controls on the remote. About this manual The instructions in the following hardware and software are not guaranteed for the speaker system. About installing the supplied software "WinDVD," refer to the USB port of the computer. Connecting through a USB hub is recommended to connect the USB cable directly to 5, 20...
Operating Instructions
Page 6
... the remote ...7 Hookup ...8 Speaker Setup ...11 Listening to connected equipment ...14 Adjusting the Volume ...Selecting the Sound Field ...Adjusting the tone quality ...Turning off the power automatically (Auto power on/off function) ...14 15 18 18 Listening to 5.1ch via a connected computer ...20 Installation and setting for "WinDVD" ...20 Additional Information ...22 Troubleshooting ...22 Specifications ...24 Index to Parts and Controls ...25 This system incorporates Dolby* Digital and Pro Logic Surround and the DTS** Digital Surround...
... the remote ...7 Hookup ...8 Speaker Setup ...11 Listening to connected equipment ...14 Adjusting the Volume ...Selecting the Sound Field ...Adjusting the tone quality ...Turning off the power automatically (Auto power on/off function) ...14 15 18 18 Listening to 5.1ch via a connected computer ...20 Installation and setting for "WinDVD" ...20 Additional Information ...22 Troubleshooting ...22 Specifications ...24 Index to Parts and Controls ...25 This system incorporates Dolby* Digital and Pro Logic Surround and the DTS** Digital Surround...

Operating Instructions
Page 7
... not use the remote for an extended period of time, remove the batteries to direct sunlight or lighting apparatuses. Doing so may cause a malfunction. • If you have the following items: • Subwoofer (1) • Satellite speakers Front/Center (Dual Center) (2) Surround (2) • USB cable 1.8 m (5.9 ft.) (1) • Remote commander (remote) RM-Z7S101 (1) • CD-ROM WinDVD (1) • Operating Instructions (this book) (1) Inserting batteries into the remote casing, particularly when replacing the batteries...
... not use the remote for an extended period of time, remove the batteries to direct sunlight or lighting apparatuses. Doing so may cause a malfunction. • If you have the following items: • Subwoofer (1) • Satellite speakers Front/Center (Dual Center) (2) Surround (2) • USB cable 1.8 m (5.9 ft.) (1) • Remote commander (remote) RM-Z7S101 (1) • CD-ROM WinDVD (1) • Operating Instructions (this book) (1) Inserting batteries into the remote casing, particularly when replacing the batteries...
Operating Instructions
Page 8
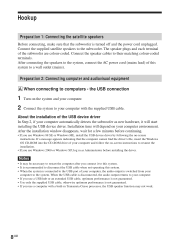
... installing the driver. When the USB cable is disconnected, the audio output returns to your computer. • If you use a USB hub or an extended USB cable, optimum performance is not guaranteed. • Use only the supplied USB cable, otherwise optimum performance is turned off and the power cord unplugged. Connect the supplied satellite speakers to their matching colour-coded terminals. Installation time will start installing the USB device driver...
... installing the driver. When the USB cable is disconnected, the audio output returns to your computer. • If you use a USB hub or an extended USB cable, optimum performance is not guaranteed. • Use only the supplied USB cable, otherwise optimum performance is turned off and the power cord unplugged. Connect the supplied satellite speakers to their matching colour-coded terminals. Installation time will start installing the USB device driver...
Operating Instructions
Page 10
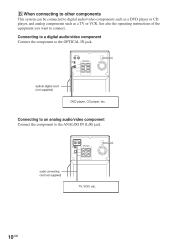
... supplied) DVD player, CD player, etc. See also the operating instructions of the equipment you want to the OPTICAL IN jack. Connecting to a digital audio/video component Connect the component to connect. Connecting to an analog audio/video component Connect the component to digital audio/video components such as a DVD player or CD player, and analog components such as a TV or VCR. ANALOG IN R L SPEAKER USB FRONT R L CENTER OPTICAL IN SURROUND audio connecting cord...
... supplied) DVD player, CD player, etc. See also the operating instructions of the equipment you want to the OPTICAL IN jack. Connecting to a digital audio/video component Connect the component to connect. Connecting to an analog audio/video component Connect the component to digital audio/video components such as a DVD player or CD player, and analog components such as a TV or VCR. ANALOG IN R L SPEAKER USB FRONT R L CENTER OPTICAL IN SURROUND audio connecting cord...
Operating Instructions
Page 11
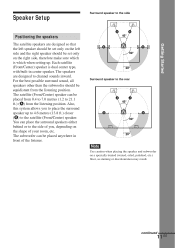
... set only on the left side and the right speaker should be placed from 0.4 to 7.0 metres (1.2 to the satellite (Front/Center) speaker. The subwoofer can place the surround speakers either behind or to the side of the listener. Surround speaker to the side Speaker Setup A A 45° Positioning the speakers The satellite speakers are designed to channel sounds inward. continued 11GB For the best possible surround sound, all speakers...
... set only on the left side and the right speaker should be placed from 0.4 to 7.0 metres (1.2 to the satellite (Front/Center) speaker. The subwoofer can place the surround speakers either behind or to the side of the listener. Surround speaker to the side Speaker Setup A A 45° Positioning the speakers The satellite speakers are designed to channel sounds inward. continued 11GB For the best possible surround sound, all speakers...
Operating Instructions
Page 12
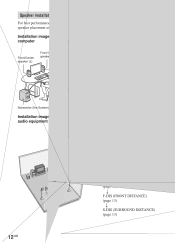
... setup menu changes as shown. See each speaker according to make the initial setting. Speaker installation For best performance, we recommend speaker placement as shown below on the system. Front/Center speaker (L) Surround speaker (R) S-MODE SHIFT ?/1 (POWER) SELECT C/c Surround speaker (L) Subwoofer (the System) 1 2 3 Press ?/1 (POWER) to turn on how to the speaker's position. Installation image when connecting computer Front/Center speaker (R) Specifying the speaker parameters For the best possible surround sound, specify the distance of the speakers from each page listed...
... setup menu changes as shown. See each speaker according to make the initial setting. Speaker installation For best performance, we recommend speaker placement as shown below on the system. Front/Center speaker (L) Surround speaker (R) S-MODE SHIFT ?/1 (POWER) SELECT C/c Surround speaker (L) Subwoofer (the System) 1 2 3 Press ?/1 (POWER) to turn on how to the speaker's position. Installation image when connecting computer Front/Center speaker (R) Specifying the speaker parameters For the best possible surround sound, specify the distance of the speakers from each page listed...
Operating Instructions
Page 14
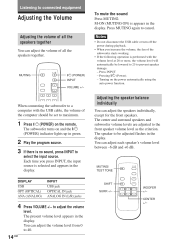
... set to maximum. WOOFER +/- CENTER +/- 4 Press VOLUME +/- MUTING ?/1 (POWER) INPUT VOLUME +/- The center and surround speakers and subwoofer volume levels are adjusted to the front speaker volume level as the criterion. If there is performed with the USB cable, the volume of the subwoofer starts working. • If the following operation is no sound, press INPUT to select the input source. To mute the sound Press MUTING. The subwoofer turns on the remote. Turning on the power automatically using the auto power function. Press INPUT - Adjusting...
... set to maximum. WOOFER +/- CENTER +/- 4 Press VOLUME +/- MUTING ?/1 (POWER) INPUT VOLUME +/- The center and surround speakers and subwoofer volume levels are adjusted to the front speaker volume level as the criterion. If there is performed with the USB cable, the volume of the subwoofer starts working. • If the following operation is no sound, press INPUT to select the input source. To mute the sound Press MUTING. The subwoofer turns on the remote. Turning on the power automatically using the auto power function. Press INPUT - Adjusting...

Operating Instructions
Page 15
... from each speaker sounds the same on each speaker in your own room. Each time you are in a movie theater or concert hall while you press S-MODE, the sound field mode is selected and appears in the volume level of the test tone from each sound field. To adjust the center speaker Press CENTER +/-. To adjust the Surround speakers Press SURR +/-. To adjust the subwoofer Press WOOFER +/-. Adjust the volume level so that...
... from each speaker sounds the same on each speaker in your own room. Each time you are in a movie theater or concert hall while you press S-MODE, the sound field mode is selected and appears in the volume level of the test tone from each sound field. To adjust the center speaker Press CENTER +/-. To adjust the Surround speakers Press SURR +/-. To adjust the subwoofer Press WOOFER +/-. Adjust the volume level so that...

Operating Instructions
Page 17
... mode Sound field mode AUTO FORMAT DECODE Effect Automatically detects the type of the Sony Pictures Entertainment "Kim Novak Theater" cinema production studio. This mode outputs the sound as it was recorded/encoded, without adding any effects. Dolby Pro Logic II produces five full-bandwidth output channels from the headphone L/R. Reproduces the sound characteristics of audio signal being input (Dolby Digital, DTS, Dolby Pro Logic, or standard 2 channel stereo...
... mode Sound field mode AUTO FORMAT DECODE Effect Automatically detects the type of the Sony Pictures Entertainment "Kim Novak Theater" cinema production studio. This mode outputs the sound as it was recorded/encoded, without adding any effects. Dolby Pro Logic II produces five full-bandwidth output channels from the headphone L/R. Reproduces the sound characteristics of audio signal being input (Dolby Digital, DTS, Dolby Pro Logic, or standard 2 channel stereo...

Operating Instructions
Page 18
... optical digital cable and set the Dolby digital sound to DOWNMIX PCM. * Dolby DRC = Dolby Dynamic Range Control Turning off the power automatically (Auto power on/off function) If this function is on the system is changed the following. Select OFF, to the selected input. It is only functional when a DVD disc for low-level sound. AUTO POWER indicator Front panel display PHONES AUTO POWER INPUT VOLUME S-MODE S-MODE SHIFT SELECT C/c Each type of mode, the AUTO POWER...
... optical digital cable and set the Dolby digital sound to DOWNMIX PCM. * Dolby DRC = Dolby Dynamic Range Control Turning off the power automatically (Auto power on/off function) If this function is on the system is changed the following. Select OFF, to the selected input. It is only functional when a DVD disc for low-level sound. AUTO POWER indicator Front panel display PHONES AUTO POWER INPUT VOLUME S-MODE S-MODE SHIFT SELECT C/c Each type of mode, the AUTO POWER...
Operating Instructions
Page 20
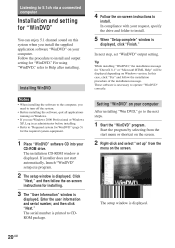
.... 1 2 Start the "WinDVD" program. In this system when you use Windows 2000 Professional or Windows XP, Log in as administrator before installing. • Refer to operate "WinDVD" correctly. Setting "WinDVD" on your CD-ROM drive. Start the program by selecting from the menu on the screen. Right-click and select "set "WinDVD" output setting. The "User Information" window is displayed, click...
.... 1 2 Start the "WinDVD" program. In this system when you use Windows 2000 Professional or Windows XP, Log in as administrator before installing. • Refer to operate "WinDVD" correctly. Setting "WinDVD" on your CD-ROM drive. Start the program by selecting from the menu on the screen. Right-click and select "set "WinDVD" output setting. The "User Information" window is displayed, click...
Operating Instructions
Page 21
... in step 2 of channel your computer. Notes • The number of "Setting "WinDVD" on the disc. • Before using "WinDVD" vary depends on your computer window. 21GB "WinDVD" starts automatically. Enjoying DVD via a connected computer Press INPUT on the system to 5.1ch via a connected computer 1 2 Turn on the power of your computer outputs using "WinDVD," quit all sound-related applications. Insert a DVD...
... in step 2 of channel your computer. Notes • The number of "Setting "WinDVD" on the disc. • Before using "WinDVD" vary depends on your computer window. 21GB "WinDVD" starts automatically. Enjoying DVD via a connected computer Press INPUT on the system to 5.1ch via a connected computer 1 2 Turn on the power of your computer outputs using "WinDVD," quit all sound-related applications. Insert a DVD...
Operating Instructions
Page 22
..., use this troubleshooting guide to adjust the volume level. , Make sure the USB connection, speaker cables, and audio connecting cords are not near a transformer, motor, TV or fluorescent light. , Move the TV away from the front speaker only. , Make sure the proper sound field function is connected securely. , Disconnect the AC power cord (mains lead) once and connect again after more than five seconds. Press INPUT to hear when you are playing a Dolby Digital sound...
..., use this troubleshooting guide to adjust the volume level. , Make sure the USB connection, speaker cables, and audio connecting cords are not near a transformer, motor, TV or fluorescent light. , Move the TV away from the front speaker only. , Make sure the proper sound field function is connected securely. , Disconnect the AC power cord (mains lead) once and connect again after more than five seconds. Press INPUT to hear when you are playing a Dolby Digital sound...
Operating Instructions
Page 23
... connect the USB cable directly to the ANALOG IN jacks and adjust the volume appropriately. , If you use Windows 98 SE, confirm the setting of the audio device. 1 Open the Control Panel window. 2 Open the Multimedia window and select the USB audio device as the preferred device. Disconnect the AC power cord (mains lead) once, then connect it may affect the system's operation. Returning to the default settings. No sound...
... connect the USB cable directly to the ANALOG IN jacks and adjust the volume appropriately. , If you use Windows 98 SE, confirm the setting of the audio device. 1 Open the Control Panel window. 2 Open the Multimedia window and select the USB audio device as the preferred device. Disconnect the AC power cord (mains lead) once, then connect it may affect the system's operation. Returning to the default settings. No sound...

Operating Instructions
Page 24
... the Power Saving Mode) Other model: 75 W 0.3 W (at the Power Saving Mode) Operating temperature 5˚C to 35˚C Operating humidity 5 % to change without notice. cone type Rated impedance Front: 8 ohms Center: 4 ohms + 4 ohms Dimensions (approx.) 85 × 200 × 125 mm (3 3/8 × 7 7/8 × 5 in .) dia. model AUDIO POWER SPECIFICATIONS POWER OUTPUT AND TOTAL HARMONIC DISTORTION: With 4 ohms loads subwoofer driven, from 250 milliwatts to rated output. Speaker system Bass reflex type Speaker unit 130 mm (5 1/8 in .) (w/h/d, not including the projecting parts...
... the Power Saving Mode) Other model: 75 W 0.3 W (at the Power Saving Mode) Operating temperature 5˚C to 35˚C Operating humidity 5 % to change without notice. cone type Rated impedance Front: 8 ohms Center: 4 ohms + 4 ohms Dimensions (approx.) 85 × 200 × 125 mm (3 3/8 × 7 7/8 × 5 in .) dia. model AUDIO POWER SPECIFICATIONS POWER OUTPUT AND TOTAL HARMONIC DISTORTION: With 4 ohms loads subwoofer driven, from 250 milliwatts to rated output. Speaker system Bass reflex type Speaker unit 130 mm (5 1/8 in .) (w/h/d, not including the projecting parts...

Operating Instructions
Page 25
...MODE Adjust the sound field mode and select settings. Index to Parts and Controls Subwoofer (Front Panel) PHONES AUTO POWER INPUT VOLUME Additional Information S-MODE 1 HEADPHONE jack Connect headphones here. 2 AUTO POWER indicator When the system is in the AUTO POWER ON mode, the indicator lights up green. 3 ?/1 (POWER) indicator When turned on, lights up red (STANDBY MODE). 4 ?/1 (POWER) Turns on and off the power of the system. 5 6 7 8 9 (remote sensor) Receives the remote control signals. When turned off, lights up green. continued 25GB Display Indicates the speaker setting...
...MODE Adjust the sound field mode and select settings. Index to Parts and Controls Subwoofer (Front Panel) PHONES AUTO POWER INPUT VOLUME Additional Information S-MODE 1 HEADPHONE jack Connect headphones here. 2 AUTO POWER indicator When the system is in the AUTO POWER ON mode, the indicator lights up green. 3 ?/1 (POWER) indicator When turned on, lights up red (STANDBY MODE). 4 ?/1 (POWER) Turns on and off the power of the system. 5 6 7 8 9 (remote sensor) Receives the remote control signals. When turned off, lights up green. continued 25GB Display Indicates the speaker setting...

Operating Instructions
Page 26
... activated. 2 Displays the current sound format. 3 Displays the volume level, sound field, etc. 4 Displays the input source. 5 Displays the signal of a DVD player, etc. 4 SPEAKER jacks Connect to the DIGITAL OUT (OPTICAL IN) jack of 2CH or PCM. 6 Playback channel indicators 7 Displays whether the disc being played back contains a LFE (Low Frequently Effect) channel. 26GB Subwoofer (Rear Panel) ANALOG IN R L SPEAKER USB FRONT R L CENTER OPTICAL IN SURROUND 1 ANALOG IN (L/R) jacks Connect to the audio output...
... activated. 2 Displays the current sound format. 3 Displays the volume level, sound field, etc. 4 Displays the input source. 5 Displays the signal of a DVD player, etc. 4 SPEAKER jacks Connect to the DIGITAL OUT (OPTICAL IN) jack of 2CH or PCM. 6 Playback channel indicators 7 Displays whether the disc being played back contains a LFE (Low Frequently Effect) channel. 26GB Subwoofer (Rear Panel) ANALOG IN R L SPEAKER USB FRONT R L CENTER OPTICAL IN SURROUND 1 ANALOG IN (L/R) jacks Connect to the audio output...

Operating Instructions
Page 27
Adjust the surround speakers volume. 5 CENTER +/- Pressing this button while pressing SHIFT will sound the test tone. 2 S-MODE, SET UP Selects the sound field mode. Adjust the center speaker volume. 6 ?/1 (POWER) Turns on and off the system. 7 INPUT Selects the input signal. 8 VOLUME +/-, SELECT C/c Makes the speaker settings or adjusts the volume of the buttons on the remote. 4 SURR +/- Remote MUTING TEST TONE INPUT S-MODE VOLUME SET UP SELECT SHIFT SELECT SURR CENTER WOOFER 1 MUTING, TEST TONE Mutes the sound. Pressing this button while...
Adjust the surround speakers volume. 5 CENTER +/- Pressing this button while pressing SHIFT will sound the test tone. 2 S-MODE, SET UP Selects the sound field mode. Adjust the center speaker volume. 6 ?/1 (POWER) Turns on and off the system. 7 INPUT Selects the input signal. 8 VOLUME +/-, SELECT C/c Makes the speaker settings or adjusts the volume of the buttons on the remote. 4 SURR +/- Remote MUTING TEST TONE INPUT S-MODE VOLUME SET UP SELECT SHIFT SELECT SURR CENTER WOOFER 1 MUTING, TEST TONE Mutes the sound. Pressing this button while...


