Operating Instructions
Page 2
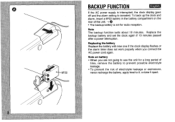
...Do not place the unit on the unit should not be situated with care. When placed or mounted on a flat, even surface. 4 Ventilation - Quick stops, excessive force, and uneven surfaces may be strictly followed, as well as near a bathtub, washbowl...mounting - NO USER-SERVICEABLE PARTS INSIDE. Place the unit on a stand or cart, the unit should not be of sufficient magnitude to keep the Operating Instructions for future reference. Allow 10 cm (4 in temperatures less than 5°C (41 'F) or greater than 35°C (95°F). 3 Mounting surface - Do not use...
...Do not place the unit on the unit should not be situated with care. When placed or mounted on a flat, even surface. 4 Ventilation - Quick stops, excessive force, and uneven surfaces may be strictly followed, as well as near a bathtub, washbowl...mounting - NO USER-SERVICEABLE PARTS INSIDE. Place the unit on a stand or cart, the unit should not be of sufficient magnitude to keep the Operating Instructions for future reference. Allow 10 cm (4 in temperatures less than 5°C (41 'F) or greater than 35°C (95°F). 3 Mounting surface - Do not use...
Operating Instructions
Page 4
... plug, do not use - If it out by the AC power plug, Do not pull the cord itself. -Never handle the AC power plug with polarized AC power plugs which can be completely inserted to power sou rces specified in the Operating Instructions, and as this could result in fire or shock. 4 Extension cord - When the cord is plugged in use a polarized AC power plug with an extension cord...
... plug, do not use - If it out by the AC power plug, Do not pull the cord itself. -Never handle the AC power plug with polarized AC power plugs which can be completely inserted to power sou rces specified in the Operating Instructions, and as this could result in fire or shock. 4 Extension cord - When the cord is plugged in use a polarized AC power plug with an extension cord...
Operating Instructions
Page 6
PRECAUTIONS Maintenance Clean the unit only as recommended Instructions. in performance -The unit has been dropped, or the cabinet has been damaged DO NOT ATTEMPT TO SERVICE THE UNIT YOURSELF. Foreign objects or liquid have gotten inside the unit -The unit has been exposed to rain or water -The unit does not seem to operate normally -The unit exhibits a marked change in the Operating Damage Requiring Service Have the units serviced by a qualified service technician if: -The AC power cord or plug has been damaged -
PRECAUTIONS Maintenance Clean the unit only as recommended Instructions. in performance -The unit has been dropped, or the cabinet has been damaged DO NOT ATTEMPT TO SERVICE THE UNIT YOURSELF. Foreign objects or liquid have gotten inside the unit -The unit has been exposed to rain or water -The unit does not seem to operate normally -The unit exhibits a marked change in the Operating Damage Requiring Service Have the units serviced by a qualified service technician if: -The AC power cord or plug has been damaged -
Operating Instructions
Page 8
... connect the AC power cord again. Note The backup function lasts about 10 minutes. Replace the backup battery and set the clock again if 10 minutes passed after a power interruption. Note on the rear of the unit. + o q The backup battery is canceled. Replacing the battery Replace the battery with new one if the clock display flashes or the alarm timer does not work properly when you are not going to use the unit for radio reception. BACKUP FUNCTION...
... connect the AC power cord again. Note The backup function lasts about 10 minutes. Replace the backup battery and set the clock again if 10 minutes passed after a power interruption. Note on the rear of the unit. + o q The backup battery is canceled. Replacing the battery Replace the battery with new one if the clock display flashes or the alarm timer does not work properly when you are not going to use the unit for radio reception. BACKUP FUNCTION...
Operating Instructions
Page 10
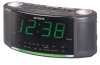
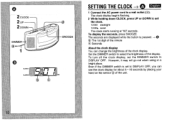
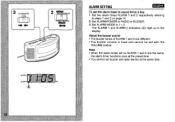
... displayed while the button is set to DISPLAY OFF. To display the seconds, press SNOOZE. However, it may not go out when using in a bright place. noon The clock starts running at "00" seconds. The clock display begins flashing. 2 While holding down CLOCK, press UP or DOWN to set the DIMMER switch to DISPLAY OFF, you can change the brightness of the clock display. DIMMER SETTING THE CLOCK + @ - 1 Connect the AC power cord to select the brightness...
... displayed while the button is set to DISPLAY OFF. To display the seconds, press SNOOZE. However, it may not go out when using in a bright place. noon The clock starts running at "00" seconds. The clock display begins flashing. 2 While holding down CLOCK, press UP or DOWN to set the DIMMER switch to DISPLAY OFF, you can change the brightness of the clock display. DIMMER SETTING THE CLOCK + @ - 1 Connect the AC power cord to select the brightness...
Operating Instructions
Page 12
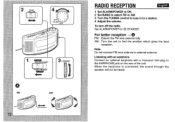
BUZZER amm [1] 3 TUNNING RAD1O RECEPTION mm 1 Set ALARM/POWER to ON. 2 Set BAND to select FM or AM. 3 Turn the TUNING control to tune in to through the e3 FM Arvl mm 1 =TANDBY ml RADIO.. For better reception + @ FM: Extend the FM wire antenna fully. mini-plug to a station. 4 Adjust the volume. When the earphone is connected, the sound speaker will not be heard. To turn off the radio Set ALARM/POWER to external antenna. AM...
BUZZER amm [1] 3 TUNNING RAD1O RECEPTION mm 1 Set ALARM/POWER to ON. 2 Set BAND to select FM or AM. 3 Turn the TUNING control to tune in to through the e3 FM Arvl mm 1 =TANDBY ml RADIO.. For better reception + @ FM: Extend the FM wire antenna fully. mini-plug to a station. 4 Adjust the volume. When the earphone is connected, the sound speaker will not be heard. To turn off the radio Set ALARM/POWER to external antenna. AM...
Operating Instructions
Page 14
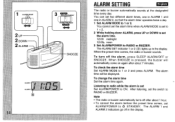
... that the alarm timer operates twice a day. 1 Set ALARM MODE to ON. ALARM SETTING mm The radio or buzzer automatically sounds at the designated time every day. q To cancel the alarm before the preset time comes, set ALARM/POWER to set the switch to RADIO or BUZZER. The ALARM SET indicator 1 or 2 (~) lights up in the display. To turn off after about 1 hour. noon 3 Set ALARMIPOWER to RADIO or BUZZER. Note q The radio or buzzer automatically turns off the alarm, press SLEEP ALARM/OFF or SNOOZE. After listening, set the alarm time. 12:00...
... that the alarm timer operates twice a day. 1 Set ALARM MODE to ON. ALARM SETTING mm The radio or buzzer automatically sounds at the designated time every day. q To cancel the alarm before the preset time comes, set ALARM/POWER to set the switch to RADIO or BUZZER. The ALARM SET indicator 1 or 2 (~) lights up in the display. To turn off after about 1 hour. noon 3 Set ALARMIPOWER to RADIO or BUZZER. Note q The radio or buzzer automatically turns off the alarm, press SLEEP ALARM/OFF or SNOOZE. After listening, set the alarm time. 12:00...
Operating Instructions
Page 16
..., the alarm timer functions once at the same time. q You cannot set with the VOLUME control. Note q When the alarm times set the alarm timer to sound twice a day 1 Set two alarm times ALARM 1 and 2 respectively referring to steps 1 and 2 on ALARM 1 and 2 are different. The ALARM 1 and ALARM 2 indicators (~) light up in the display. ALARM SETTING - q The buzzer volume is fixed and cannot be set buzzer and radio alarms at the preset time. a;[[u]': 3 ALAWl~ODE 1...2 ++ 2 %?%%ANDBY RADIO-BUZZER = To set on page 14. 2 Set ALARM/POWER to RADIO or BUZZER. 3 Set ALARM MODE to...
..., the alarm timer functions once at the same time. q You cannot set with the VOLUME control. Note q When the alarm times set the alarm timer to sound twice a day 1 Set two alarm times ALARM 1 and 2 respectively referring to steps 1 and 2 on ALARM 1 and 2 are different. The ALARM 1 and ALARM 2 indicators (~) light up in the display. ALARM SETTING - q The buzzer volume is fixed and cannot be set buzzer and radio alarms at the preset time. a;[[u]': 3 ALAWl~ODE 1...2 ++ 2 %?%%ANDBY RADIO-BUZZER = To set on page 14. 2 Set ALARM/POWER to RADIO or BUZZER. 3 Set ALARM MODE to...

Operating Instructions
Page 18
... RADIO-BUZZER +7 SLEEP TIMER SETTING - To cancel the sleep tirper, press SLEEP ALARM/OFF. To check the remaining time of sleep timer Press SLEEP to turn off automatically after up to set the sleep timer. q Before setthg, tune in to a station. (See page 12.) 1 Set ALARM/POWER to (!) STANDBY. 2 While holding down SLEEP, press UP or DOWN to 59 minutes. To uae both the sleep kmer and the alsrm You can use the sleep timer to display...
... RADIO-BUZZER +7 SLEEP TIMER SETTING - To cancel the sleep tirper, press SLEEP ALARM/OFF. To check the remaining time of sleep timer Press SLEEP to turn off automatically after up to set the sleep timer. q Before setthg, tune in to a station. (See page 12.) 1 Set ALARM/POWER to (!) STANDBY. 2 While holding down SLEEP, press UP or DOWN to 59 minutes. To uae both the sleep kmer and the alsrm You can use the sleep timer to display...
Operating Instructions
Page 20
... of the unit. Note Keep cassette tapes, magnetic cards and other magnetically recorded materials away from the speaker as alcohol, benzine or thinner. Do not use strong solvents, such as the recorded information may occur. q Specifications, trade mark and model name are subject to change without notice. To clean the cabinet Use a soft cloth lightly moistened with a mild detergent...
... of the unit. Note Keep cassette tapes, magnetic cards and other magnetically recorded materials away from the speaker as alcohol, benzine or thinner. Do not use strong solvents, such as the recorded information may occur. q Specifications, trade mark and model name are subject to change without notice. To clean the cabinet Use a soft cloth lightly moistened with a mild detergent...


